5점 만점의 별점 평가 기능을 구현해보자.
구현하려는 별점 평가 기능은
- 5점 만점
- 0.5점 단위로 평가가 가능하다.
- click을 이용해서 평가가 가능해야한다.
- 드래그 동작을 이용해 평가가 가능해야한다.
별점 드래그 기능 구현하기
별점을 드래그를 이용해 조정을 하기위해 input(type=range)를 이용하였다.
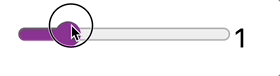
1. 0.5 간격의 input 생성
먼저 0.5 단위로 별점평가를 할 수 있도록 0.5 step의 input을 생성한다.
StarInput.tsx
interface Props{
  id : number;
}

function StarInput({id}:Props) {
  const [rating, setRating] = useState<number | null>(null);

  const onChange = (e: ChangeEvent<HTMLInputElement>) => {
    e.stopPropagation();
    setRating(parseFloat(e.target.value));
  };

  return (
    <div>
      <input
        type="range"
        onChange={onChange}
        value={rating}
        min="0"
        max="5"
        step="0.5"
      />
      <span>{rating}</span>
    </div>
  );
}

export default StarInput;
구현 모습
2. 별모양 컴포넌트 만들기
실제로 값을 바꾸는 부분은 위에서 만든 input이고,
별점으로 보여야 하기 때문에, 보이는 부분만을 담당하는 별점 컴포넌트를 만들어줍니다.
위에 정의해둔 상수를 조정해서 별 모양의 크기를 조정할 수 있습니다.
StarRate.tsx
const STAR_SIZE = 25;
const STAR_COLOR = '#ffcc00';
const EMPTY_STAR_COLOR = '#cacaca';
const START_WIDTH_SIZE = 14;
import { css } from '@emotion/react';
import { useCallback, useEffect, useState } from 'react';
const START_WIDTH_SIZE = 14;
interface Props {
rating: number;
id: number; // 별점 컴포넌트를 구분하는 key 값, 유니트한 값이여야 한다.
}
function StarRate({ id, rating }: Props) {
const STAR_IDX_ARR = ['first', 'second', 'third', 'fourth', 'last'];
const [ratesResArr, setRatesResArr] = useState([0, 0, 0, 0, 0]);
const calcStarRates = useCallback(() => {
const tempStarRatesArr = [0, 0, 0, 0, 0];
let starVerScore = (rating * 20 * 70) / 100;
let idx = 0;
while (starVerScore > START_WIDTH_SIZE) {
tempStarRatesArr[idx] = START_WIDTH_SIZE;
idx += 1;
starVerScore -= START_WIDTH_SIZE;
}
tempStarRatesArr[idx] = starVerScore;
return tempStarRatesArr;
}, [rating]);
useEffect(() => {
setRatesResArr(calcStarRates);
}, [calcStarRates]);
return (
<div css={starRateWrapperCss}>
{STAR_IDX_ARR.map((item, idx) => {
const itemKey = id + item;
return (
<span css={starIconCss} key={`${itemKey}_${idx}`}>
<svg
xmlns="http://www.w3.org/2000/svg"
width={STAR_SIZE}
height={STAR_SIZE}
viewBox={`0 0 ${START_WIDTH_SIZE} 13`}
fill={EMPTY_STAR_COLOR}
>
<clipPath id={`${itemKey}StarClip`}>
<rect width={`${ratesResArr[idx]}`} height="39" />
</clipPath>
<path
id={`${itemKey}Star`}
d="M9,2l2.163,4.279L16,6.969,12.5,10.3l.826,4.7L9,12.779,4.674,15,5.5,10.3,2,6.969l4.837-.69Z"
transform="translate(-2 -2)"
/>
<use
clipPath={`url(#${itemKey}StarClip)`}
href={`#${itemKey}Star`}
fill={STAR_COLOR}
/>
</svg>
</span>
);
})}
</div>
);
}
export default StarRate;
const starRateWrapperCss = css`
display: flex;
align-items: center;
width: fit-content;
`;
const starIconCss = css`
display: inline-flex;
margin-right: 5px;
* {
transition: width 0.1s ease-in;
}
&:last-of-type {
margin-right: 0;
}
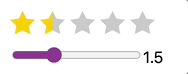
`;별을 svg로 구현해 value가 변경될 때 마다 star rate를 계산하여, (calcStarRates 메소드)
star rate에 따라 색을 칠해줍니다.
구현 모습
3. 별 컴포넌트와 input 컴포넌트를 겹치고, input을 보이지 않게 합니다.
- (2)에서 만든
StarRate컴포넌트를 이용합니다 - input의 position을
absoute로 변경해,StarRate컴포넌트와 겹칩니다. - input의 height를 별의 크기와 같게 맞추어, 드래드 영역을 맞춥니다.
- input의 opacity를 0으로 바꾸어 보이지 않게 합니다.
StarInput.tsx
const STAR_SIZE = 25;

interface Props{
  id : number;
}

function StarInput({id}:Props) {
  const [rating, setRating] = useState<number | null>(null);

  const onChange = (e: ChangeEvent<HTMLInputElement>) => {
    e.stopPropagation();
    setRating(parseFloat(e.target.value));
  };

  return (
    <div css={containerCss}>
      <StarRate rating={rating ?? 0} id={id} />
      <Box m={10} css={inputCss}>
        <input
          type="range"
          onChange={onChange}
          onClick={(e) => e.stopPropagation()}
          value={rating ?? 0}
          min="0"
          max="5"
          step="0.5"
        />
        <span>{rating}</span>
      </Box>
    </div>
  );
}

export default StarRateInput;

const containerCss = css`
  position: relative;
  width: fit-content;
`;

const inputCss = css`
  position: absolute;
  top: 0;
  bottom: 0;
  left: 0;

  width: 100%;
  margin: 0;

  opacity: 0;

  input {
    width: 100%;
    height: ${STAR_SIZE}px;  // 별 크기에 따라 변경
  }
`;
완성!!

전체 코드
StarInput.tsx
const STAR_SIZE = 25;

interface Props{
  id : number;
}

function StarInput({id}:Props) {
  const [rating, setRating] = useState<number | null>(null);

  const onChange = (e: ChangeEvent<HTMLInputElement>) => {
    e.stopPropagation();
    setRating(parseFloat(e.target.value));
  };

  return (
    <div css={containerCss}>
      <StarRate rating={rating ?? 0} id={id} />
      <Box m={10} css={inputCss}>
        <input
          type="range"
          onChange={onChange}
          onClick={(e) => e.stopPropagation()}
          value={rating ?? 0}
          min="0"
          max="5"
          step="0.5"
        />
        <span>{rating}</span>
      </Box>
    </div>
  );
}

export default StarRateInput;

const containerCss = css`
  position: relative;
  width: fit-content;
`;

const inputCss = css`
  position: absolute;
  top: 0;
  bottom: 0;
  left: 0;

  width: 100%;
  margin: 0;

  opacity: 0;

  input {
    width: 100%;
    height: ${STAR_SIZE}px;  // 별 크기에 따라 변경
  }
`;
StarRate.tsx
const STAR_SIZE = 25;
const STAR_COLOR = '#ffcc00';
const EMPTY_STAR_COLOR = '#cacaca';
const START_WIDTH_SIZE = 14;

import { css } from '@emotion/react';
import { useCallback, useEffect, useState } from 'react';

const START_WIDTH_SIZE = 14;

interface Props {
  rating: number;
  id: number; // 별점 컴포넌트를 구분하는 key 값, 유니트한 값이여야 한다.
}

function StarRate({ id, rating }: Props) {
  const STAR_IDX_ARR = ['first', 'second', 'third', 'fourth', 'last'];
  const [ratesResArr, setRatesResArr] = useState([0, 0, 0, 0, 0]);

  const calcStarRates = useCallback(() => {
    const tempStarRatesArr = [0, 0, 0, 0, 0];
    let starVerScore = (rating * 20 * 70) / 100;
    let idx = 0;
    while (starVerScore > START_WIDTH_SIZE) {
      tempStarRatesArr[idx] = START_WIDTH_SIZE;
      idx += 1;
      starVerScore -= START_WIDTH_SIZE;
    }
    tempStarRatesArr[idx] = starVerScore;
    return tempStarRatesArr;
  }, [rating]);

  useEffect(() => {
    setRatesResArr(calcStarRates);
  }, [calcStarRates]);

  return (
    <div css={starRateWrapperCss}>
      {STAR_IDX_ARR.map((item, idx) => {
        const itemKey = id + item;
        return (
          <span css={starIconCss} key={`${itemKey}_${idx}`}>
            <svg
              xmlns="http://www.w3.org/2000/svg"
              width={STAR_SIZE}
              height={STAR_SIZE}
              viewBox={`0 0 ${START_WIDTH_SIZE} 13`}
              fill={EMPTY_STAR_COLOR}
            >
              <clipPath id={`${itemKey}StarClip`}>
                <rect width={`${ratesResArr[idx]}`} height="39" />
              </clipPath>
              <path
                id={`${itemKey}Star`}
                d="M9,2l2.163,4.279L16,6.969,12.5,10.3l.826,4.7L9,12.779,4.674,15,5.5,10.3,2,6.969l4.837-.69Z"
                transform="translate(-2 -2)"
              />
              <use
                clipPath={`url(#${itemKey}StarClip)`}
                href={`#${itemKey}Star`}
                fill={STAR_COLOR}
              />
            </svg>
          </span>
        );
      })}
    </div>
  );
}

export default StarRate;

const starRateWrapperCss = css`
  display: flex;
  align-items: center;
  width: fit-content;
`;

const starIconCss = css`
  display: inline-flex;
  margin-right: 5px;

  * {
    transition: width 0.1s ease-in;
  }

  &:last-of-type {
    margin-right: 0;
  }
`;
안녕하세요 😚 썸네일을 쉽게 만들 수 있는 서비스를 운영중입니다. 많은 관심 부탁드립니다. https://thumbnail.ssumi.space/