서론
서비스의 핵심 기능 중 하나인 작품 검색 기능 페이지를 리팩토링 하기로 결정하였다.
현재 해당 페이지의 문제점은 다음과 같다.
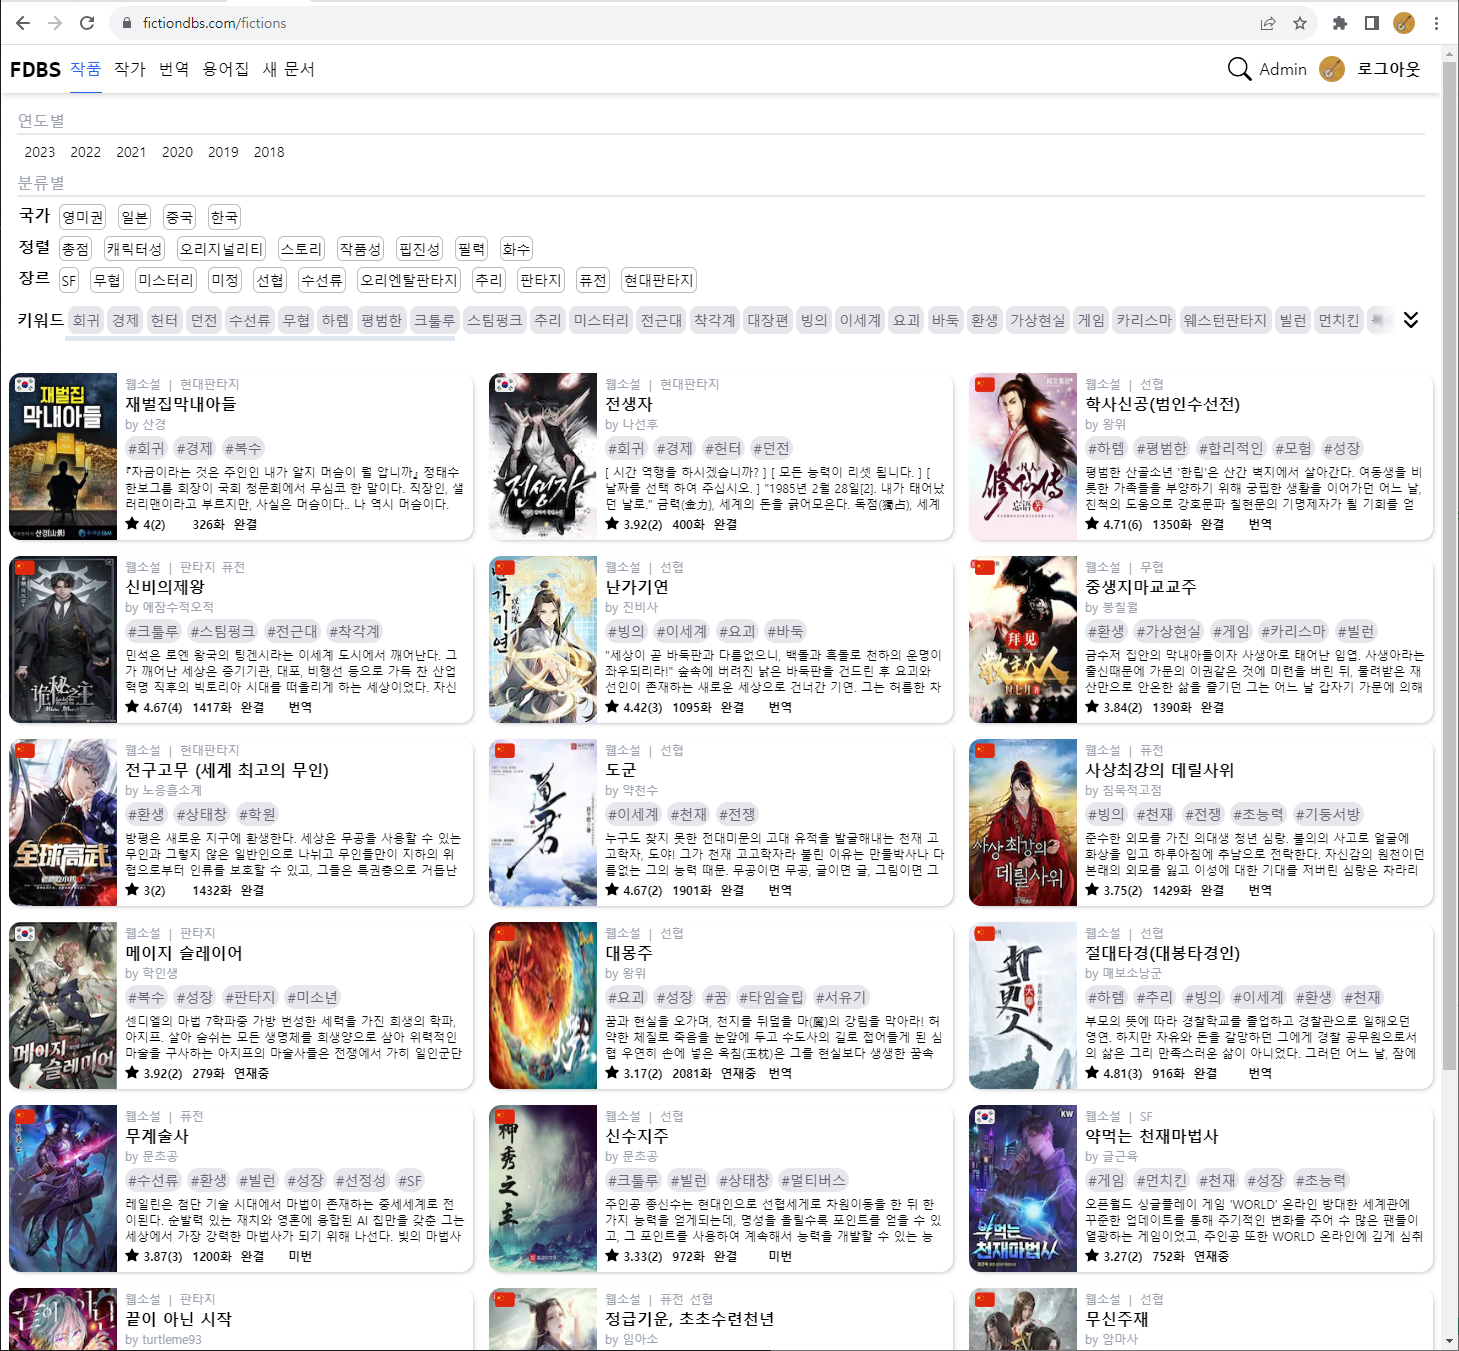
첫 째, 유저가 페이지에 접속하게 될 경우 보게되는 스크린의 상당 부분이 필터링 메뉴가 불필요하게 차지하고 있다는 점.
이 때문에 작품을 필터링 하더라도 유저가 확인할 수 있는 새로운 데이터는 전체 데이터의 일부분에 불과하다.
둘 째, 데스크탑과 모바일환경을 구분하지 않은 일관적인 UI로 이루어져 있는 점.
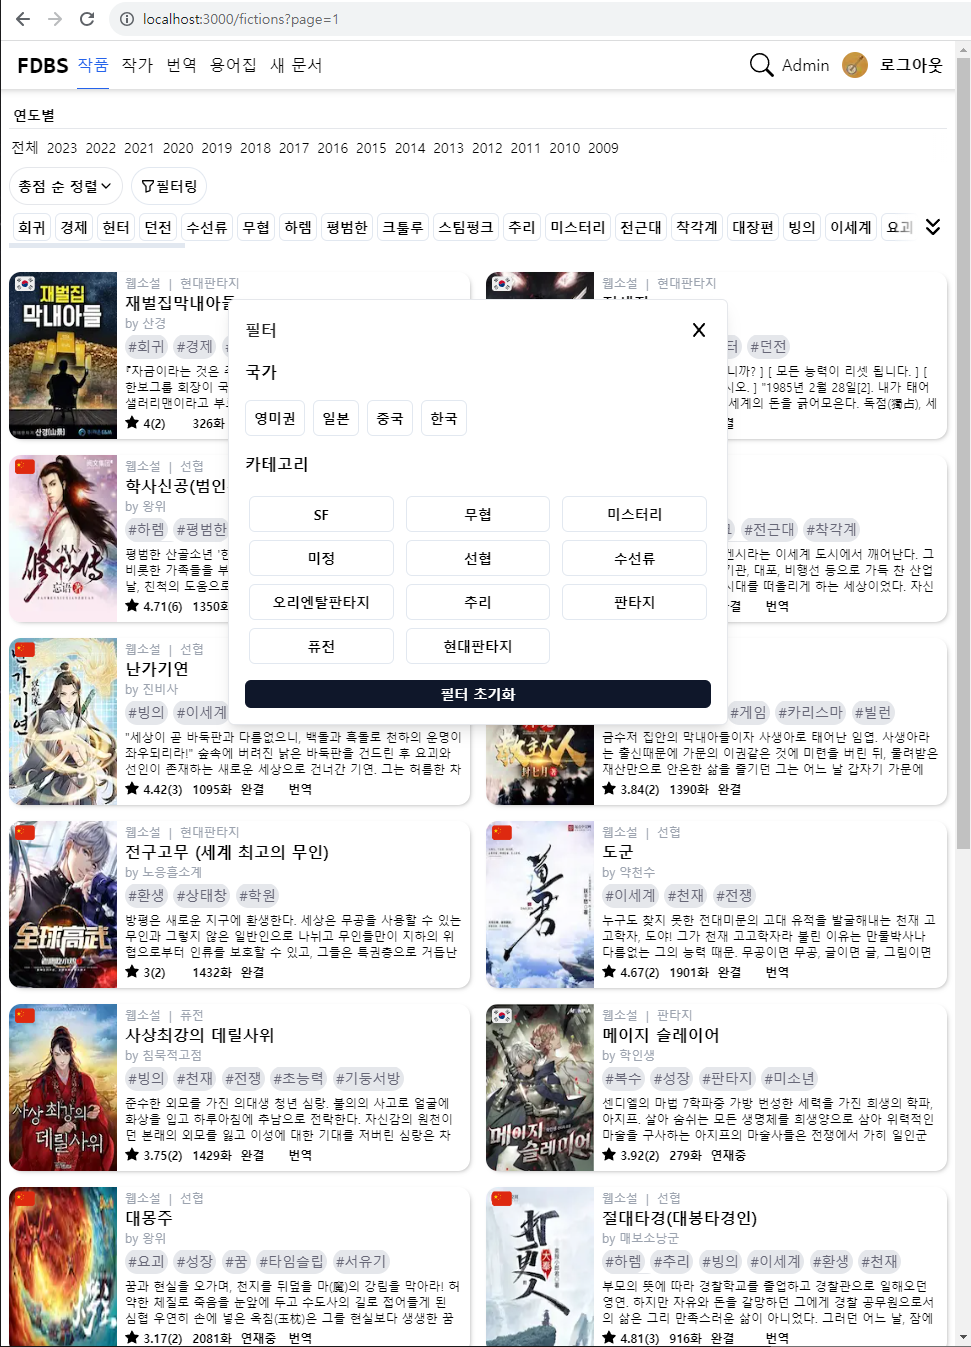
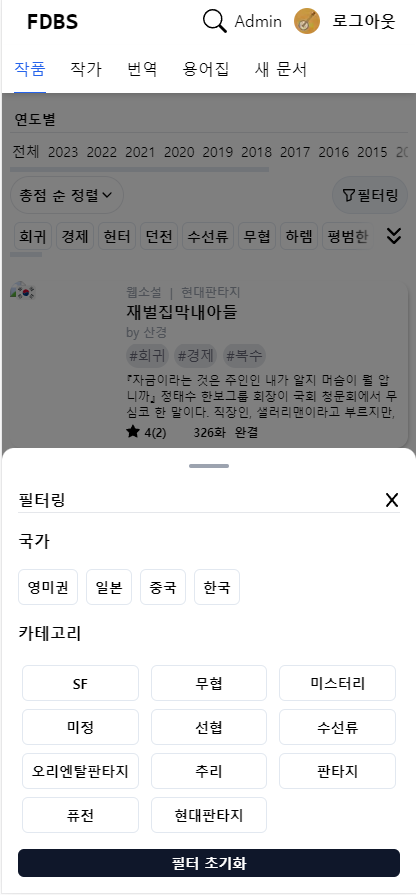
이러한 문제들을 개선하기 위해 모달 및 바텀시트를 도입하기로 결정하였고 리팩토링을 진행하였다.
1. 모달을 구현하는 방법
그렇다면 모달을 구현하는 데에는 어떤 방법들이 있을까?
우선 모달 구현을 크게 2가지 단계로 분류하여야 한다.
첫 번째가, 상태관리이고 두 번째는 모달 렌더링이다.
모달 내부에서 사용될 상태들을 어디에서 어떻게 관리하느냐 그리고, 모달 컴포넌트를 어떤 방법으로 어디에 렌더링 할 것인지에 대한 경우가 나뉘게 되어 이 부분에 대한 정리가 필요하였다.
1.1 상태 관리
우선 모달 내 상태를 관리하는 방법들은 다음과 같다.
1) useState로 구현
가장 간단한 구현방법.
close, isOpen 등의 값을 최상단에서 props로 일일이 넘겨주어야 하는 한계가 있다.
2) context API
props 드릴링을 피하기 위한 가장 간단한 방법은 react context API를 사용하는 것이다.
단, useMemo, useCallback등 불필요한 리렌더링을 피하기 위한 별도의 작업이 필요한 것이 단점이다.
3) 별도의 상태관리 라이브러리 사용
가장 확실한 방법이다.
외부 라이브러리에 의존성이 생긴다는 점이나, 번들 사이즈가 늘어난다는 단점이 있다.
1.2 모달 렌더링
1) 컴포넌트 내부 렌더링
가장 기본적이고 간단한 렌더링 방법이다.
상위 컴포넌트의 context 내에서 렌더링이 실행된다.
가장 큰 단점은 CSS 상속 및 Z-index와 관련한 이슈이다.
특히, 특정 상황에서는 CSS Stacking conext로 인해 Z-index만으로는 해결이 어려운 경우가 발생할 수 있다.
2) React Portal
React의 portal을 사용하면 이러한 문제를 해결할 수 있다.
모달이 렌더링 되는 위치를 임의로 지정하여 portal을 여는 것처럼 렌더링함으로써 z-index와 css 상속문제에서 벗어날 수 있다.
3) Create Root
Create Root를 사용해 별개의 React Root를 생성하는 방식도 존재한다.
이 경우는 어플리케이션 전체가 React로 구성되지 않았을 경우 유용하다.
특정한 상황에서만 react 앱이 실행되고 있는 상황에서, react를 통해서 에러 모달을 띄울려고 할 때, react가 이미 실행되지 않은 경우가 있을 수 있다. 이 때 creatRoot를 사용할 수 있다.
하지만 서버사이드렌더링 환경(특히 Next.js)에서 사용에 제약이 따르고, react에서도 modal 구현의 경우 createPortal을 권장하고 있다.
When you want to render a piece of JSX in a different part of the DOM tree that isn’t a child of your component (for example, a modal or a tooltip), use createPortal instead of createRoot.
...
When you need to display extra content like a modal or a tooltip outside the DOM node, render it with a portal.
(특별히 2번이나 강조하고 있다)
2. useOverlay / toss slash
context API와 기존에 사용하던 recoil 중에 어떤 방법을 사용할 지 고민하던 중, 토스에서 배포한 slash의 useOverlay 라이브러리가 context 기반으로 구현되어 있는 것을 발견하였다.
더 좋은 컴포넌트 설계를 위해 모범적인 코드 practice를 참고할 수 있는 해당 라이브러리와 css 충돌을 방지하기 위해 react portal을 사용하여 모달 및 바텀시트를 구현하기로 결정하였다.
코드 분석
  const overLay = useOverlay({ exitOnUnmount: true });

....

  <Button2
  ref={filterButton}
  variant="outline"
  size="sm"
  onClick={() => {
    overLay.open(({ exit, isOpen, close }) => (
      <FictionFilteringModal
        staticData={staticData}
        close={close}
        isOpen={isOpen}
        exit={exit}
      ></FictionFilteringModal>
    ));
  }}
>
...
사용법은 간단하다. 컴포넌트를 overLay Provider로 감싸주고 useOverlay 훅에서 반환된 overlay객체의 open함수에 렌더링할 컴포넌트를 넣어주기만 하면 된다.
overLay가 어떻게 구현되어있는지 따라가보자.
import { useContext, useEffect, useMemo, useRef, useState } from 'react';
import { OverlayContext } from './OverlayProvider';
/** @tossdocs-ignore */
import { OverlayController, OverlayControlRef } from './OverlayController';
import { CreateOverlayElement } from './types';

let elementId = 1;

interface Options {
  exitOnUnmount?: boolean;
}

export function useOverlay({ exitOnUnmount = true }: Options = {}) {
  const context = useContext(OverlayContext);

  if (context == null) {
    throw new Error('useOverlay is only available within OverlayProvider.');
  }

  const { mount, unmount } = context;
  const [id] = useState(() => String(elementId++));

  const overlayRef = useRef<OverlayControlRef | null>(null);

  useEffect(() => {
    return () => {
      if (exitOnUnmount) {
        unmount(id);
      }
    };
  }, [exitOnUnmount, id, unmount]);

  return useMemo(
    () => ({
      open: (overlayElement: CreateOverlayElement) => {
        mount(
          id,
          <OverlayController
            // NOTE: state should be reset every time we open an overlay
            key={Date.now()}
            ref={overlayRef}
            overlayElement={overlayElement}
            onExit={() => {
              unmount(id);
            }}
          />
        );
      },
      close: () => {
        overlayRef.current?.close();
      },
      exit: () => {
        unmount(id);
      },
    }),
    [id, mount, unmount]
  );
}
open함수가 실행될 경우부터 시작해보자.
elementId를 1부터 설정하고 open함수가 실행 될 때, 해당 id를 통해 context에서 가져온 mount 함수를 실행하고 있다. 이 mount 함수에는 id와 렌더링할 컴포넌트를 주입한 OverlayController를 인수로 넘기고 있다.
우선 mount가 존재하는 context를 가져온 OverlayProvider를 따라가보자
/** @tossdocs-ignore */
import React, { createContext, PropsWithChildren, ReactNode, useCallback, useMemo, useState } from 'react';

export const OverlayContext = createContext<{
  mount(id: string, element: ReactNode): void;
  unmount(id: string): void;
} | null>(null);
if (process.env.NODE_ENV !== 'production') {
  OverlayContext.displayName = 'OverlayContext';
}

export function OverlayProvider({ children }: PropsWithChildren) {
  const [overlayById, setOverlayById] = useState<Map<string, ReactNode>>(new Map());

  const mount = useCallback((id: string, element: ReactNode) => {
    setOverlayById(overlayById => {
      const cloned = new Map(overlayById);
      cloned.set(id, element);
      return cloned;
    });
  }, []);

  const unmount = useCallback((id: string) => {
    setOverlayById(overlayById => {
      const cloned = new Map(overlayById);
      cloned.delete(id);
      return cloned;
    });
  }, []);

  const context = useMemo(() => ({ mount, unmount }), [mount, unmount]);

  return (
    <OverlayContext.Provider value={context}>
      {children}
      {[...overlayById.entries()].map(([id, element]) => (
        <React.Fragment key={id}>{element}</React.Fragment>
      ))}
    </OverlayContext.Provider>
  );
}
mount가 실행되면 map 객체인 overlayId에 id와 렌더링할 컴포넌트(앞전의 OverLayController)를 key, value로 저장한다.
저장한 값(렌더링할 element = overLayController로 감싸진 element)들은 Provider의 children 아래에 렌더링 되게 된다.
마지막으로 렌더링 시킬 OverLayController를 확인해보자.
/** @tossdocs-ignore */
import { forwardRef, Ref, useCallback, useEffect, useImperativeHandle, useState } from 'react';

import { CreateOverlayElement } from './types';

interface Props {
  overlayElement: CreateOverlayElement;
  onExit: () => void;
}

export interface OverlayControlRef {
  close: () => void;
}

export const OverlayController = forwardRef(function OverlayController(
  { overlayElement: OverlayElement, onExit }: Props,
  ref: Ref<OverlayControlRef>
) {
  const [isOpenOverlay, setIsOpenOverlay] = useState(false);

  const handleOverlayClose = useCallback(() => setIsOpenOverlay(false), []);

  useImperativeHandle(
    ref,
    () => {
      return { close: handleOverlayClose };
    },
    [handleOverlayClose]
  );

  useEffect(() => {
    // NOTE: requestAnimationFrame이 없으면 가끔 Open 애니메이션이 실행되지 않는다.
    requestAnimationFrame(() => {
      setIsOpenOverlay(true);
    });
  }, []);

  return <OverlayElement isOpen={isOpenOverlay} close={handleOverlayClose} exit={onExit} />;
});
최종적으로 overLayElement에 isOpen, close, exit를 주입해 반환하고 있다.
state에 기반해 isOpen을 관리하고 있으며, useCallback, useMemo 등을 활용한 렌더링 최적화와 requestAnimationFrame을 활용한 예외상황에 대한 꼼꼼한 핸들링이 눈에 띈다.
3. 구현
Modal.tsx
"use client";

import useIsMobile from "@/hooks/useIsMobile";
import { ReactNode, useEffect, useRef } from "react";
import { createPortal } from "react-dom";
import XIcon from "@public/svg/x.svg";
import { Button2 } from "./Button2";
import {
  motion,
  useAnimation,
  useMotionValue,
  useTransform,
} from "framer-motion";

interface ModalProps {
  isOpen: boolean;
  close: () => void;
  exit?: () => void;
  children: ReactNode;
}

const Modal = ({ isOpen, close, exit, children }: ModalProps) => {
  const isMobile = useIsMobile();
  const backSection = useRef<HTMLDivElement>(null);
  const timeoutRef = useRef<any>(null);

  const modalRoot = document.getElementById("modal")!;
  const controls = useAnimation();

  const onDragEnd = (event: PointerEvent, { point, velocity }: any): void => {
    const shouldClose =
      (velocity.y > -20 &&
        (event.type === "pointerup" || event.target === backSection.current)) ||
      velocity.y > 20 ||
      (velocity.y >= 0 && point.y > 45);

    if (shouldClose) {
      controls.start("hidden").then(() => {
        timeoutRef.current = setTimeout(() => {
          close();
        }, 50);
      });
    } else {
      controls.start("visible");
    }
  };

  useEffect(() => {
    if (isOpen) {
      controls.start("visible");
    } else {
      controls.start("hidden");
    }

    return () => {
      if (timeoutRef.current) {
        clearTimeout(timeoutRef.current);
      }
    };
  }, [isOpen, controls]);

  if (!isOpen) return null;

  return isMobile
    ? // Bottom sheet
      createPortal(
        <motion.div
          ref={backSection}
          initial="hidden"
          animate={controls}
          onClick={(e) => {
            if (e.target === backSection.current) close();
          }}
          className="fixed inset-0 z-20 bg-black/50 transition duration-300 ease-in-out"
        >
          <motion.div
            ref={backSection}
            className=" fixed bottom-0 left-0 w-screen overflow-y-scroll rounded-t-xl bg-white p-4"
            variants={{
              hidden: { y: "100%" },
              visible: { y: 0 },
            }}
            transition={{ type: "spring", stiffness: 400, damping: 30 }}
            onDragEnd={onDragEnd}
            drag="y"
            dragConstraints={{ top: 0, bottom: 0 }}
            dragElastic={0.7}
          >
            <div className="flex flex-col items-center">
              <div className=" flex h-6 w-full justify-center">
                <div
                  id="bottomSheet-header"
                  className=" h-1 w-10 rounded-xl bg-gray-400"
                ></div>
              </div>
              <div className=" mb-4 flex w-full justify-between border-b-[1px]">
                <div className="font-bold">필터링</div>
                <div
                  onClick={close}
                  className="flex items-center justify-center"
                >
                  <XIcon className="h-4 w-4" />
                </div>
              </div>
            </div>
            {children}
          </motion.div>
        </motion.div>,
        modalRoot
      )
    : // Modal Popup
      createPortal(
        <div
          onClick={(e) => {
            if (e.target === backSection.current) close();
          }}
          data-te-modal-init
          data-te-modal-non-invasive="true"
          className="fixed inset-0 z-[1055] h-screen w-full overflow-hidden outline-none"
        >
          <div
            ref={backSection}
            data-te-modal-dialog-ref
            className=" relative flex h-full w-auto translate-y-[-50px] items-center transition-all duration-300 ease-in-out min-[576px]:mx-auto min-[576px]:my-7 min-[576px]:max-w-[500px]"
          >
            <div className="min-[576px]:shadow-[0_0.5rem_1rem_rgba(#000, 0.15)] pointer-events-auto relative bottom-40 flex w-full flex-col rounded-md border-[1px]  bg-white bg-clip-padding text-current shadow-lg dark:bg-neutral-600">
              <div className="flex flex-shrink-0 items-center justify-between rounded-t-md  border-neutral-100 border-opacity-100 px-4 pt-4 dark:border-opacity-50">
                <h5 className="text-md font-bold leading-normal text-neutral-800 dark:text-neutral-200">
                  필터
                </h5>
                <Button2 onClick={close} variant="ghost" size="xs">
                  <XIcon className="h-4 w-4" />
                </Button2>
              </div>
              <div className="relative flex-auto p-4" data-te-modal-body-ref>
                {children}
              </div>
            </div>
          </div>
        </div>,
        modalRoot
      );
};

export default Modal;
FictionFilteringModal.tsx
import Modal from "@components/common/Modal";
import { useQueryObject } from "@/hooks/useQueryObject";
import { Category, Keyword } from "@prisma/client";
import { Button2 } from "@components/common/Button2";

export default function FictionFilteringModal({
  staticData,
  isOpen,
  close,
}: {
  staticData: {
    keywordList: Keyword[];
    nationalityList: string[];
    categoryList: Category[];
  };
  isOpen: boolean;
  close: () => void;
  exit?: () => void;
}) {
  const {
    keywordList: keywords,
    nationalityList: nationalities,
    categoryList: categories,
  } = staticData;
  const { updateQueryObject, queryObject, resetQueryObject } = useQueryObject();

  const checkHandler = ({
    currentTarget,
    value,
    name,
    ariaChecked,
    dataset,
  }: any) => {
    if (currentTarget) updateQueryObject(currentTarget);
    else updateQueryObject({ value, name, dataset });
  };

  return (
    <div>
      <Modal isOpen={isOpen} close={close}>
        <div className=" flex flex-col space-y-4">
          <h4 className=" font-bold">국가</h4>
          <div className=" flex space-x-2">
            {nationalities.map((nationality, i) => (
              <Button2
                variant="outline"
                size="sm"
                key={nationality}
                onClick={(e) => checkHandler(e)}
                className=" font-bold "
                // id="nationality"
                value={nationality}
                name="nationalities"
                data-checked={queryObject.nationalities?.includes(nationality)}
              >
                {nationality}
              </Button2>
            ))}
          </div>
          <h4 className=" font-bold">카테고리</h4>
          <div className=" grid grid-cols-[repeat(3,minmax(83px,500px))] gap-1">
            {categories.map((category: any, i) => (
              <Button2
                key={category.name}
                variant="outline"
                size="sm"
                onClick={(e) => checkHandler(e)}
                className=" mx-1 mt-1 font-bold "
                value={category.name}
                name="categories"
                data-checked={queryObject.categories?.includes(category.name)}
              >
                {category.name}
              </Button2>
            ))}
          </div>
          <div className="flex flex-shrink-0 flex-wrap items-center justify-center rounded-b-md ">
            <Button2
              className=" w-full font-bold "
              onClick={resetQueryObject}
              variant="default"
              size="xs"
              // padding="none"
            >
              필터 초기화
            </Button2>
          </div>
        </div>
      </Modal>
    </div>
  );
}
Modal의 재사용성을 위해 모달을 내부로직을 제외한 Modal과 FictionFilteringModal로 분리하였다.
Modal에서는 useIsMobile 훅을 통해 사용자 디바이스에 따라 모달을 렌더링할 지, 바텀시트를 렌더링할 지 결정하고 fictionFilteringModal 에서 세부내용을 작성한다.
추가적으로 UX 개선을 위해 FramerMotion을 활용해 header를 통한 Scroll 애니메이션 기능을 추가하였다.
Before
After
4. 추가적인 고민
Scrim?
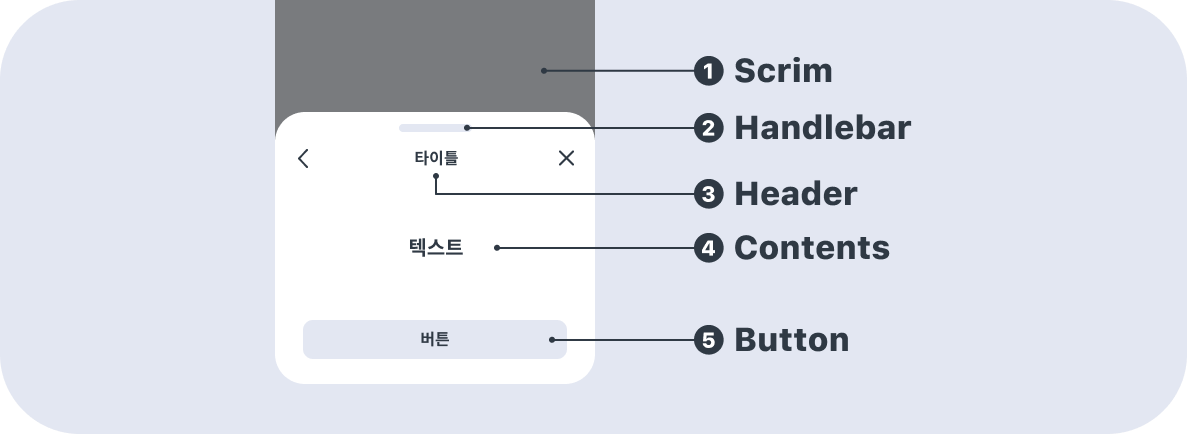
Scrim은 바텀시트의 구성요소 중 하나이다. Scrim의 여부에 따라 Modal과 Non-Modal로 구분된다. Scrim이 있는 경우는 Modal 타입으로 바텀 시트의 태스크를 완료하거나 취소하기 전까지는 기존 화면을 확인하거나 다른 액션을 할 수 없다.
유저 디바이스가 데스크탑인 경우, 모달이 켜진상태에서도 외부 UI와 상호작용을 할수있는 것이 유저입장에서 더 나은 선택지일것 같아 Scrim은 모바일에서만 구현을 하기로 결정하였다.