INTRO
개발을 진행하면서 코드가 꽤 읽기 어려운 경우를 모두 경험해봤을 것이다.
필자의 경우에도 본 프로젝트에서 그런 경험을 가끔 느꼈는데, 그런 경우 대부분 조건문이 하나의 컴포넌트 내에서 많이 적용된 경우라는 것을 알게 되었다.
하나씩 따라가다 보면 물론 이해는 되지만, 어떻게 하면 조금 더 깔끔하게 코드를 작성할 수 있을지 고민했던 경험과 그 결과물을 한번 짤막하게 공유해보려고 한다 👀
1. 언제 코드가 읽기 힘든가?
이전에 말했던 것처럼 필자의 경우에는 조건문 분기가 하나의 컴포넌트 내부에서 많아지는 경우라고 생각한다.
다음 코드를 살펴보자
Sample Code - 1
export default function DashBoardConversionRate() {
  const { data } = useConversionApi();
  const isLowDataExist = data && data.low.length > 0;
  const isHighDataExist = data && data.high.length > 0;

  return (
    <div className="flex flex-col" data-testid="dashboard-conversionRate">
      <DashBoardTitle title="구매전환율" />
      <div className="flex justify-between">
        <div className="relative w-[660px] h-[510px] bg-gray02 rounded-[50px] px-6 flex justify-center">
          <div className="mt-7 flex text-gray09 font-medium text-[28px]">
            하위 상품 TOP 6
          </div>
          <div
            className={`absolute bottom-6 w-[612px] h-[394px] ${isLowDataExist ? "bg-gray01" : ""} rounded-[40px] flex justify-center`}

            {isLowDataExist ? (
              <ConversionRateChart
                data={data.low}
                barColor="#FFDCEA"
                lineColor="#9F9FF8"
                tooltipColorClass={{
                  interested: "text-purple07",
                  purchased: "text-main03",
                  rate: "text-blue07",
                }}
                legendColors={{
                  interested: "#9F9FF8",
                  purchased: "#FFB4D1",
                }}
              />
            ) : (
              <div className="absolute bottom-6 w-[612px] h-[394px]">
                <NoDataCompt />
              </div>
            )}
          </div>
        </div>
        <div className="relative w-[660px] h-[510px] bg-gray02 rounded-[50px] px-6 flex justify-center">
          <div className="mt-7 flex text-gray09 font-medium text-[28px]">
            상위 상품 TOP 6
          </div>
          <div
            className={`absolute bottom-6 w-[612px] h-[394px] ${isHighDataExist ? "bg-gray01" : ""} rounded-[40px] flex justify-center`}

            {isHighDataExist ? (
              <ConversionRateChart
                data={data.high}
                barColor="#C5EFE8"
                lineColor="#78B0FF"
                tooltipColorClass={{
                  interested: "text-blue07",
                  purchased: "text-mint07",
                  rate: "text-main04",
                }}
                legendColors={{
                  interested: "#78B0FF",
                  purchased: "#C5EFE8",
                }}
              />
            ) : (
              <div className="absolute bottom-6 w-[612px] h-[394px]">
                <NoDataCompt />
              </div>
            )}
          </div>
        </div>
      </div>
    </div>
  );
}
위 코드는 우리가 개발했던 대시보드 컴포넌트 중 하나인데, isLowDataExist , isHighDataExist 와 같은 조건을 확인하여 조건부 렌더링을 진행하고 있다.
물론 기능적으로는 문제없지만, 동일한 구조가 두 번 반복되고 있고 조건부 렌더링 로직이 JSX에 직접 포함되어 있어서 코드가 깔끔하지 않다는 느낌이 든다.
다른 예시를 살펴보면 다음과 같다.
Sample Code - 2
export default function EntireItemsScreen() {
  const { hotItems } = useLocalSearchParams<{ hotItems: string }>();
  const { selectedPopUpId } = usePopUpStore();
  const formattedPopularItems = ParseStringToJson(hotItems) as ItemUrlType[];
  const { searchResult, isLoading, hasMore, loadMore } = useSearch();
  const { keyword } = useSearchStore();
  const { allItems, isItemLoading, isItemError, allItemsQuery } = usePopUpDetailAllItemsApi({
    popupId: selectedPopUpId,
  });

  const isSearchMode = keyword.trim().length > 0;

  const renderSearchBar = useCallback(
    () => <SearchBarTextInput flag="ITEM" placeholder="찾으시는 굿즈가 있나요?" />,
    [],
  );

  const handleLoadMore = useCallback(() => {
    if (hasMore && !isLoading) {
      loadMore();
    }
  }, [hasMore, isLoading, loadMore]);

  const renderFooter = useCallback(() => {
    if (!isLoading || !hasMore) return null;
    return (
      <View style={{ padding: 20, alignItems: 'center' }}>
        <ActivityIndicator size="small" color="white" />
      </View>
    );
  }, [isLoading, hasMore]);

  const renderEmptyComponent = useCallback(() => {
    if (isLoading) {
      return (
        <View style={{ padding: 50, alignItems: 'center' }}>
          <ActivityIndicator size="large" color="white" />
        </View>
      );
    }
    return <NoItem title="검색 결과와 일치하는 상품이 없어요" />;
  }, [isLoading]);

  // ... 다른 useCallback 함수들

  const renderSearchContent = useCallback(
    () => (
      <FlatList
        data={searchResult as PostItemSearch[]}
        renderItem={renderSearchItem}
        numColumns={2}
        columnWrapperStyle={{ justifyContent: 'space-between', gap: 12 }}
        contentContainerStyle={{ paddingBottom: 100, paddingHorizontal: 12 }}
        showsVerticalScrollIndicator={false}
        onEndReached={handleLoadMore}
        onEndReachedThreshold={0.3}
        ListFooterComponent={renderFooter}
        ListEmptyComponent={renderEmptyComponent}
        keyExtractor={keyExtractor}
        ItemSeparatorComponent={itemSeperatorComponent}
        ListHeaderComponent={renderSearchHeader}
      />
    ),
    [/* 의존성 배열 */],
  );

  const renderDefaultContent = useCallback(
    () => (
      <FlatList
        data={allItems}
        style={{ flex: 1 }}
        renderItem={renderDefaultItem}
        numColumns={2}
        columnWrapperStyle={{ justifyContent: 'space-between', gap: 10 }}
        contentContainerStyle={{ gap: 20, paddingHorizontal: 12, paddingBottom: 100 }}
        showsVerticalScrollIndicator={false}
        keyExtractor={defaultKeyExtractor}
        ListHeaderComponent={renderDefaultHeader}
        onEndReached={handleDefaultLoadMore}
        onEndReachedThreshold={0.3}
        ListFooterComponent={renderDefaultFooter}
      />
    ),
    [/* 의존성 배열 */],
  );

  if (isItemLoading) {
    return <ActivityIndicator />;
  }

  if (isItemError || allItems?.length === 0) {
    return <Text>조회된 데이터가 없습니다.</Text>;
  }

  return (
    <View style={{ backgroundColor: 'black', flex: 1 }}>
      <View style={{ height: 50, marginBottom: 12 }}>{renderSearchBar()}</View>
      <View style={{ flex: 1 }}>
        {isSearchMode ? renderSearchContent() : renderDefaultContent()}
      </View>
    </View>
  );
}
두 번째 샘플 코드는 React Native 환경에서 작성된 내용으로, 컴포넌트의 모든 요소들을 useCallback으로 감싸 함수 재생성을 방지하기 위해 위처럼 작성되어 있다.
또한, 하나의 페이지에서 상품 리스트와 상품 검색 요소들을 모두 보여줘야 하다 보니, isSearchMode 라는 조건에 따라 renderSearchContent() 와 renderDefaultContent() 를 조건부 렌더링하고 있다.
(두 번째 코드는 당연히 컴포넌트 분리가 필요해 보인다.. 😅)
뿐만 아니라, 두 번째 샘플 코드에서는 React Query를 사용하여 로딩 상태 UI 등을 처리하고 있는데 이러한 부분에서도 조건부 렌더링이 계속해서 사용되는 모습을 볼 수 있다.
결국 이런 상황들이 반복되다 보니 코드를 읽기가 점점 어려워지고, 새로운 기능을 추가하거나 수정할 때도 실수할 가능성이 높아진다고 생각했다.
2. Conditional Component
그래서 ConditionalComponent 를 하나 만들어봤다.
이걸 만들게 된 계기는 React Native에서 제공하는 Flatlist 컴포넌트를 사용해보니 무한스크롤 관련 기능, 컴포넌트를 분리해서 추가하는 방법이 꽤 맘에 들었기 때문이다.
그래서 구현한 코드는 다음과 같다.
Sample Code
/**
 * @Description
 * 조건부 렌더링을 위한 컴포넌트입니다.
 * - `when` 값이 falsy하거나 빈 배열이면 `fallback`을 렌더링합니다.
 * - `children`이 함수일 경우, `when` 값을 인자로 호출해 렌더링합니다.
 * - 그 외에는 `children` 자체를 그대로 렌더링합니다.
 *
 * @Example
 * <ConditionalComponent when={data} fallback={<div>데이터 없음</div>}>
 *   {(validData) => <div>{validData.name}</div>}
 * </ConditionalComponent>
 */

import React from "react";

function ConditionalComponent<T>({
  when,
  fallback,
  children,
}: {
  when: T | undefined | null | false | boolean;
  fallback?: React.ReactNode;
  children: React.ReactNode | ((_data: T) => React.ReactNode);
}) {
  if (
    !when ||
    (Array.isArray(when) && when.length === 0) ||
    Object.keys(when).length === 0
  )
    return <>{fallback}</>;

  if (typeof children === "function" && typeof when !== "boolean") {
    return <>{children(when)}</>;
  }

  return <>{children}</>;
}

export default ConditionalComponent;
공통 컴포넌트를 만들때, 가장 중요한건 유연한 타입 추론 이라고 생각한다.
따라서, 제네릭을 사용하여 타입 추론이 제대로 될 수 있게끔 만들어보는데에 집중해봤다.
로직은 아주 간단한데, when 이라는 조건이 truthy이면 children 을 렌더링하고 when 이라는 조건이 falsy이면 fallback 컴포넌트를 렌더링한다.
한가지 도전적으로 만든 내용을 보면 children 이 ReactNode 뿐만 아니라 함수도 받을 수 있다는 것이다.
함수로 받는 경우, data라는 매개변수의 데이터 타입이 T로 추론되는 모습을 볼 수 있다.
이렇게 개발을 진행한 이유는, when이라는 조건에서 추론된 데이터를 children으로 사용하는 경우가 있기 때문이다.
다음 코드를 통해 사용 예시를 살펴보자
Sample Code - Example
const ItemListPage = () => {
  const popupId = usePopUpReadStore(state => state.popupId);
  const { data } = useItemListApi({ popupId });
  const navigate = useNavigate();
  const [isModalOpen, setIsModalOpen] = useState<boolean>(false);

  return (
    <div className="py-8 flex flex-col min-h-[calc(100vh-200px)]">
      <div className="flex justify-end gap-3 mb-10 px-10">
        <button
          className="cursor-pointer px-4 py-2 bg-gray01 border border-gray10 text-gray10 rounded-full text-[20px] font-semibold hover:bg-gray10 hover:text-gray01 transition-colors duration-300"
          onClick={() => setIsModalOpen(true)}

          전체 상품 등록
        </button>
        <button
          id="item-create-button"
          onClick={() => navigate("/items/create")}
          className="cursor-pointer px-4 py-2 bg-gray01 border border-gray10 text-gray10 rounded-full text-[20px] font-semibold hover:bg-gray10 hover:text-gray01 transition-colors duration-300"

          상품 등록
        </button>
      </div>

      {isModalOpen && (
        <ItemCreateExcelModal closeModal={() => setIsModalOpen(false)} />
      )}

      <ConditionalComponent
        when={data}
        fallback={
          <div className="flex flex-col items-center justify-center flex-grow">
            <p className="text-[32px] text-gray10 font-medium">
              등록된 상품이 아직 없습니다
            </p>
            <p className="mt-4 text-[20px] text-gray10">
              우측 상단 <span className="text-main06">상품 등록 버튼</span>을
              눌러 상품을 등록해주세요!
            </p>
          </div>
        }

        {data =>
          Object.entries(data).map(([k, v]) => (
            <div key={k}>
              <ItemDisplay displayName={k.toUpperCase()} items={v} />
            </div>
          ))
        }
      </ConditionalComponent>
    </div>
  );
};

export default ItemListPage;
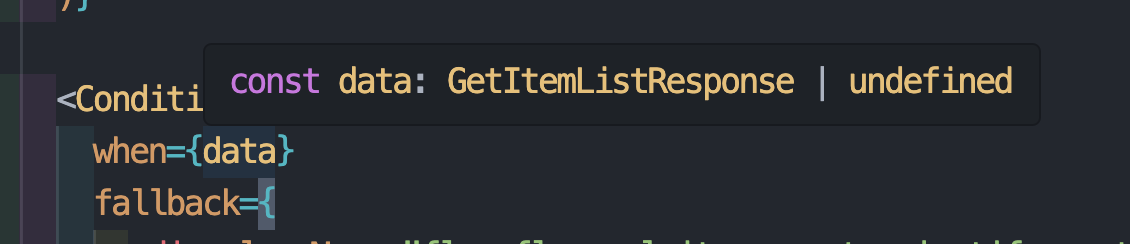
when 타입 추론
data 타입 추론
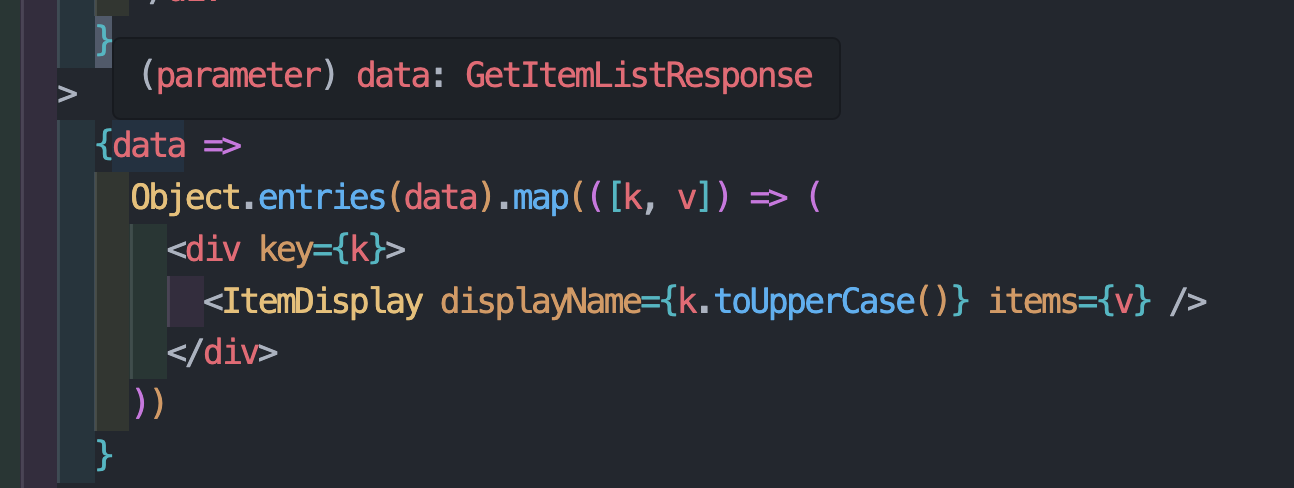
코드를 보면 등록된 상품이 이미 있는 경우, Object.entries(data).map((k, v]) => ...) 를 사용해서 ItemDisplay 컴포넌트들을 렌더링한다.
이처럼 when에서 조건으로 사용된 data 를 사용하여 하위 컴포넌트들을 렌더링하기 때문에 함수형으로도 받을 수 있도록 개발을 진행했다.
또한, 사진을 살펴보면 when에서는 data의 타입 추론이 GetItemListResponse | undefined 로 추론되지만, children쪽에서 data는 GetItemListResponse 로 추론된다.
그 이유는 ConditionalComponent 내부적으로 falsy한 경우에는 fallback을 렌더링하도록 했기 때문이다.
💡 이렇게 사용하면 뭐가 좋을까?
아마 코드를 살펴보면, 누군가는 조건부 렌더링을 사용하는게 더 깔끔하지 않나? 라는 생각을 할 수 있다.
하지만, 이런식으로 fallback 영역과 children 영역을 분리해서 코드를 작성해보면 어느 부분에서 컴포넌트를 분리해야할지 쉽게 눈으로 확인할 수 있다.
이런 방식으로 구조를 생각하면서 UI 레이어에서 작성되는 컴포넌트들을 나눈다면 분명 유지보수에서 이점을 얻을 수 있을거라고 생각한다
3. Query Component
필자는 본 프로젝트에서 모든 API 요청을 React Query를 사용해서 관리했다.
React Query에서 제공해주는 기능이 매력적이라고 생각했기 때문이다.
React Query를 사용해보면 알겠지만, 리액트 쿼리는 조건부 렌더링에 최적화되어있다.
가령 데이터 패치를 받을 때, isLoading, isError 의 boolean 값을 통해 조건부 렌더링을 쉽게 진행할 수 있기 때문이다.
필자는 위에서 작성한 Conditional Component 아이디어를 바탕으로 리액트 쿼리 전용 컴포넌트를 만들어보면 어떨까 생각하여 관련 컴포넌트 개발을 진행해봤다.
Sample Code
/**
 * @description
 * React Query 요청의 로딩, 에러, 빈 데이터 상태를 공통 처리하는 래퍼 컴포넌트입니다.
 * - `data`, `isLoading`, `isError` 상태에 따라 적절한 fallback UI를 렌더링하고,
 * - 데이터가 존재할 경우 `children` 함수로 실제 UI를 렌더링합니다.
 *
 * @example
 * <QueryComponent
 *   data={data}
 *   isLoading={isLoading}
 *   isError={isError}
 * >
 *   {(data) => <MyList data={data} />}
 * </QueryComponent>
 */

import React from "react";
import Skeleton from "../ui/Skeleton";
import NoDataComp from "../../pages/dashboardPage/views/@common/NoDataComp";

type Props<T> = {
  data: T | undefined;
  isLoading: boolean;
  isError: boolean;
  error?: Error | null;
  loadingFallback?: React.ReactNode;
  errorFallback?: React.ReactNode | ((_error: Error) => React.ReactNode);
  emptyFallback?: React.ReactNode;
  children: (_data: T) => React.ReactNode;
};

const QueryComponent = <T,>({
  data,
  isLoading,
  isError,
  loadingFallback = (
    <div className="h-[300px]">
      <Skeleton />
    </div>
  ),
  errorFallback,
  emptyFallback = <NoDataComp />,
  children,
}: Props<T>) => {
  if (isLoading) return <>{loadingFallback}</>;
  if (isError) return <>{errorFallback}</>;
  if (
    data === null ||
    data === undefined ||
    (Array.isArray(data) && data.length === 0)
  ) {
    return emptyFallback ? <>{emptyFallback}</> : null;
  }
  return <>{children(data)}</>;
};

export default QueryComponent;
기본 구조는 위에서 작성한 Conditional Component 와 동일하다
다만, isLoading과 isError에 대한 조건을 받고 그에 해당하는 컴포넌트를 추가로 입력받는다.
사용 예시는 다음과 같다.
Sample Code
type Props = {
  title: string;
  data: GetConversionItemResponse[] | undefined;
  isLoading: boolean;
  isError: boolean;
  barColor: string;
  lineColor: string;
  tooltipColorClass: {
    interested: string;
    purchased: string;
    rate: string;
  };
  legendColors: {
    interested: string;
    purchased: string;
  };
};

const ConversionRateCard = ({
  title,
  data,
  isLoading,
  isError,
  barColor,
  lineColor,
  tooltipColorClass,
  legendColors,
}: Props) => {
  return (
    <div className="relative w-[660px] h-[510px] bg-gray02 rounded-[50px] px-6 flex justify-center">
      <div className="mt-7 flex text-gray09 font-medium text-[28px]">
        {title}
      </div>

      <QueryComponent
        data={data}
        isLoading={isLoading}
        isError={isError}
        loadingFallback={
          <Skeleton
            className="absolute bottom-6"
            width="w-[612px]"
            height="h-[394px]"
          />
        }
        errorFallback={
          <NoDataComp
            className="absolute bottom-6"
            width="w-[612px]"
            height="h-[394px]"
          />
        }

        {data => (
          <div className="absolute bottom-6 w-[612px] h-[394px] bg-gray01 rounded-[40px] flex justify-center">
            <ConversionRateChart
              data={data}
              barColor={barColor}
              lineColor={lineColor}
              tooltipColorClass={tooltipColorClass}
              legendColors={legendColors}
            />
          </div>
        )}
      </QueryComponent>
    </div>
  );
};

export default ConversionRateCard;
Conditional Component와 마찬가지로 포맷이 정해진 상태로 컴포넌트를 구조화시킬 수 있었다.
💡 QueryComponent와 Conditional Component 분리 이유
아마 누군가는 이전에 개발한 Conditional Component에 loading과 error에 대한 Props를 Optional로 추가하면 되는거 아닌가? 라고 질문할 수 있다.
물론, 그렇게 진행하게되면 모든 컴포넌트에서 Conditional Component만 사용하여 구조화시킬 수 있다.
하지만, 프론트 개발자라면 공통 컴포넌트를 한번쯤은 만들어봤을 것이다.
필자의 경우 공통으로 사용되는 Modal 컴포넌트를 사용하고 있었는데, 개발을 진행하면서 여러개의 옵션이 붙어야하는 경우를 경험해봤다.
결국 공통으로 사용되는 Modal 컴포넌트를 수정해야하는 상황이 발생했고, 그로인해 생각치도 못한 UI가 깨지는 상황을 겪어본적이 있다.
이러한 경험을 해보고 우연히 관련 Velog를 읽어보고 도메인별로 분리하는게 꽤 괜찮은 방법이라고 생각하게 되어 이처럼 나누게 되었다.
OUTRO
이번 글에서는 조건부 렌더링으로 인해 복잡해진 코드를 어떻게 개선할 수 있을지에 대한 고민과 해결 과정을 공유해봤다.
ConditionalComponent 와 QueryComponent 를 만들면서 느낀 점은, 단순히 코드의 길이를 줄이는 것보다는 일관된 구조를 만드는 것이 더 중요하다는 것이었다.
물론 이런 방식이 모든 상황에서 최선의 해답은 아닐 수 있다.
하지만 적어도 팀원들과 함께 개발할 때 "조건부 렌더링은 이런 식으로 처리하자"라는 공통된 규칙을 만들 수 있었던 것 같다.
앞으로도 이런 작은 개선들을 통해 조금 더 읽기 쉽고 유지보수하기 좋은 코드를 작성해보려고 한다!