
Android fundamentals 02.1:Activities and intents
이 포스팅은 아래 구글 코드랩을 개인 학습용으로 정리한 글입니다.
1. Welcome
Introduction
-
Activity
- represents a single screen in your app
- your user can perform a single, focused task such as taking a photo, sending an email, or viewing a map
- usually presented to the user as a full-screen window
-
An app usually consists of multiple screens(activities) that are loosely bound to each other
-
Main activity
- presented to the user when the app is launched
- The main activity can then start other activities to perform different actions
➖
-
Each time a new activity starts, the previous activity is stopped
- the system preserves the previous activity in the back stack
-
When a new activity starts, that new activity is pushed onto the back stack and takes user focus (top of the back stack)
-
When the user is done with the current activity and presses the Back button,
- the current activity is popped from the stack and destroyed
- the previous activity resumes (top of the back stack)
➖
-
An activity is started or activated with an intent
-
Intent:
- an asynchronous message
- you can use in your activity to request an action from another activity, or from some other app component
- you can use an intent to start one activity from another activity, and to pass data between activities
➖
- An Intent can be explicit or implicit
- An explicit intent:
- you know the target of that intent.
- you already know the fully qualified class name of that specific activity.
- An implicit intent:
- you do not have the name of the target component
- but, you have a general action to perform
2. App overview
-
You build the app in three stages
-
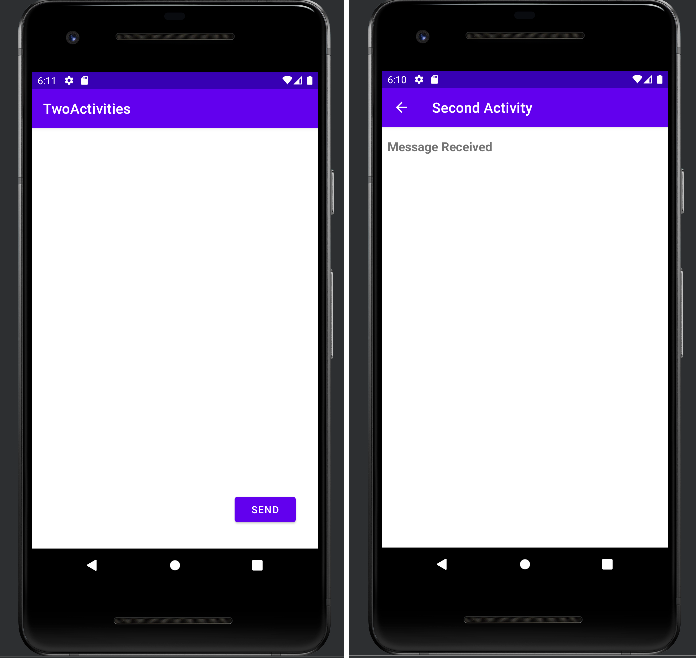
In the first stage:
- create an app whose main activity contains one button, Send
- When the user clicks this button, your main activity uses an intent to start the second activity
-
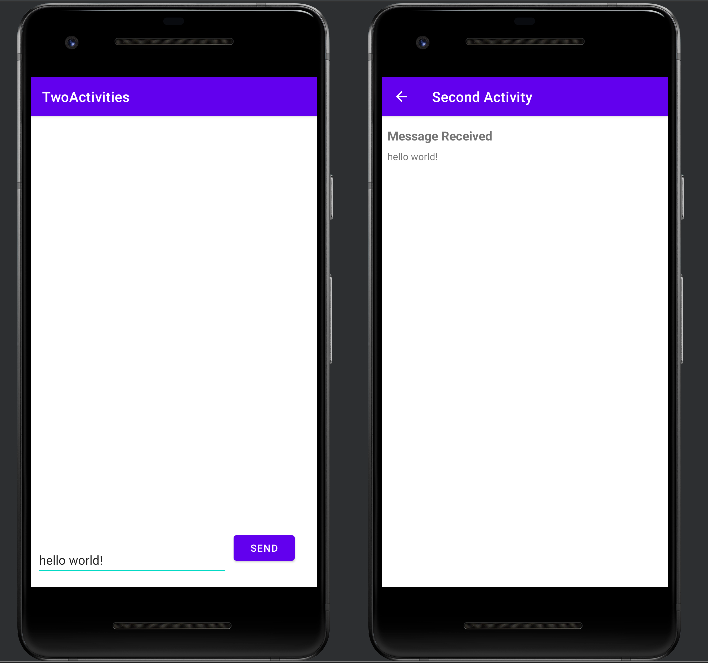
In the second stage:
- add an EditText view to the main activity
- The user enters a message and clicks Send
- The main activity uses an intent to start the second activity and send the user's message to the second activity
- The second activity displays the message it received
-
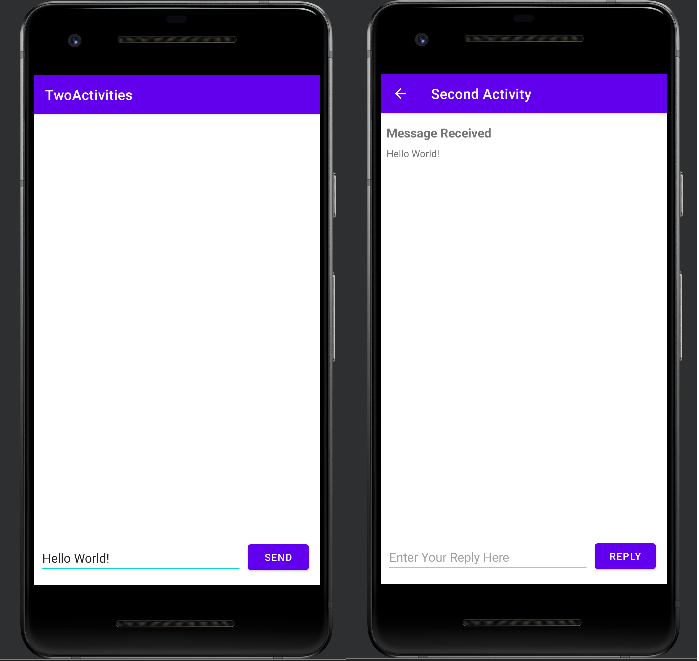
In the final stage:
- add an EditText and a Reply button to the second activity
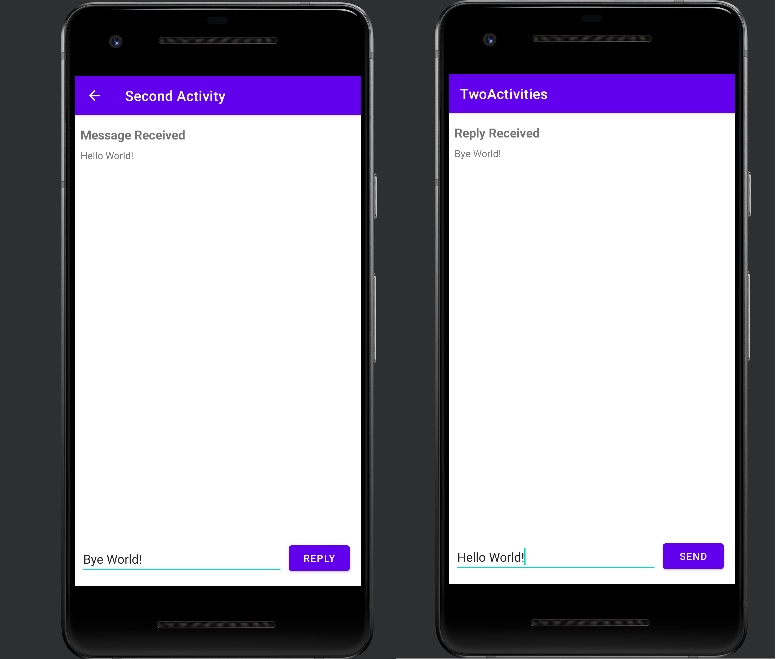
- The user can now type a reply message and tap Reply, and the reply is displayed on the main activity
- you use an intent to pass the reply back from the second activity to the main activity
3. Task 1: Create the TwoActivities project
1.1 Create the TwoActivities project
1.2 Define the layout for the main Activity
1.3 Define the Button action
- Inside launchSecondActivity(), add a Log statement that says "Button Clicked!"
Log.d(LOG_TAG, "Button clicked!");- At the top of the MainActivity class, add a constant for the LOG_TAG variable
-> This constant uses the name of the class itself as the tag.
private static final String LOG_TAG = MainActivity.class.getSimpleName();➕In kotlin:
private val TAG : String = MainActivity::class.java.simpleName.toString()
MainActivity.kt
package googleCodelabs.TwoActivities

import androidx.appcompat.app.AppCompatActivity
import android.os.Bundle
import android.util.Log
import android.view.View
import androidx.core.content.PackageManagerCompat.LOG_TAG

private val TAG : String = MainActivity::class.java.simpleName.toString()

class MainActivity : AppCompatActivity() {
    override fun onCreate(savedInstanceState: Bundle?) {
        super.onCreate(savedInstanceState)
        setContentView(R.layout.activity_main)
    }

    fun launchSecondActivity(view: View) {
        Log.d(TAG, "Button clicked!")
    }
}
4. Task 2: Create and launch the second Activity
-
Each new activity has its own layout and Java files, separate from those of the main activity.
-
They also have their own activity elements in the AndroidManifest.xml file.
- As with the main activity, new activity implementations extend from the AppCompatActivity class.
➖
- you can define an activity as a parent of another activity in the AndroidManifest.xml file
-> Parent-child relationship
-> enables Android to add navigation hints(such as left-facing arrows) in the title bar for each activity
➖
-
In this task you add a second activity to our app, with its own layout.
-
You modify the AndroidManifest.xml file
-> to define the main activity as the parent of the second activity. -
Then you modify the launchSecondActivity() method in MainActivity
-> to include an intent that launches the second activity when you click the button.
2.1 Create the second Activity
2.2 Modify the AndroidManifest.xml file
- Find the activity element that Android Studio created for the second Activity.
  <activity
            android:name=".SecondActivity"
            android:exported="false">
            <meta-data
                android:name="android.app.lib_name"
                android:value="" />
</activity>- Replace the entire activity element with the following:
  <activity android:name=".SecondActivity"
            android:label = "Second Activity"
            android:parentActivityName=".MainActivity">
            <meta-data
                android:name="android.support.PARENT_ACTIVITY"
                android:value=
                    "googleCodelabs.TwoActivities.MainActivity" />
</activity>-
label attribute:
adds the title of the Activity to the app bar. -
parentActivityName attribute:
you indicate that the main activity is the parent of the second activity. -
This relationship is used for Up navigation in your app
-> the app bar for the second activity will have a left-facing arrow
-> the user can navigate "upward" to the main activity -
meta-data element
you provide additional arbitrary information about the activity in the form of key-value pairs. -
In this case, the metadata attributes do the same thing as the android:parentActivityName attribute
-> they define a relationship between two activities for upward navigation. -
These metadata attributes are required for older versions of Android
-> the android:parentActivityName attribute is only available for API levels 16 and higher.
2.3 Define the layout for the second Activity
- Add the android:layout_marginLeft="8dp" attribute to the TextView to complement the layout_marginStart attribute for older versions of Android.
2.4 Add an Intent to the main Activity
- Create a new Intent in the launchSecondActivity() method.
- The Intent constructor takes two arguments for an explicit Intent
-> an application Context
-> the specific component that will receive that Intent
Intent intent = new Intent(this, SecondActivity.class);➕ In kotlin:
val intent = Intent(this, SecondActivity::class.java)
- Call the startActivity() method with the new Intent as the argument
startActivity(intent);MainActivity.kt
private val TAG : String = MainActivity::class.java.simpleName.toString()

class MainActivity : AppCompatActivity() {
    override fun onCreate(savedInstanceState: Bundle?) {
        super.onCreate(savedInstanceState)
        setContentView(R.layout.activity_main)
    }

    fun launchSecondActivity(view: View) {
        Log.d(TAG, "Button clicked!")
        val intent = Intent(this, SecondActivity::class.java)
        startActivity(intent)
    }
}
5. Task 3: Send data from the main Activity to the second Activity
- You can also use an intent to send data from one activity to another while launching it.
➖
-
Your intent object can pass data to the target activity in two ways:
-> in the data field or in the intent extras. -
intent data: a URI indicating the specific data to be acted on.
-
intent extras: you can put additional information into extras
-> if the information you want to pass is not a URI
-> if you want to send more than one piece of information
➖
-
intent extra: key/value pairs in a Bundle.
(Bundle: a collection of data, stored as key/value pairs.) -
To pass information from one activity to another:
-> you put keys and values into the intent extra Bundle from the sending activity
-> then get them back out again in the receiving activity
➖
-
In this task, you modify the explicit intent in MainActivity
-> to include additional data(in this case, a user-entered string) in the intent extra Bundle. -
You then modify SecondActivity
-> to get that data back out of the intent extra Bundle
-> and display it on the screen.
3.1 Add an EditText to the MainActivity layout
3.2 Add a string to the Intent extras
MainActivity.kt
private val TAG : String = MainActivity::class.java.simpleName.toString()

//public
val EXTRA_MESSAGE : String = "googleCodelabs.TwoActivities.extra.MESSAGE"

class MainActivity : AppCompatActivity() {

    lateinit var mMessageEditText : EditText

    override fun onCreate(savedInstanceState: Bundle?) {
        super.onCreate(savedInstanceState)
        setContentView(R.layout.activity_main)

        mMessageEditText = findViewById(R.id.editText_main)
    }

    fun launchSecondActivity(view: View) {
        Log.d(TAG, "Button clicked!")
        val intent = Intent(this, SecondActivity::class.java)

        val message = mMessageEditText.text.toString()
        intent.putExtra(EXTRA_MESSAGE, message)
        startActivity(intent)
    }
}
3.3 Add a TextView to SecondActivity for the message
3.4 Modify SecondActivity to get the extras and display the message
- Get the Intent that activated this Activity:
Intent intent = getIntent();➕In Kotlin:
val intent: Intent = intent
- Get the string containing the message from the Intent extras using the MainActivity.EXTRA_MESSAGE static variable as the key:
String message = intent.getStringExtra(MainActivity.EXTRA_MESSAGE);➕In Kotlin:
val message : String? = intent.getStringExtra(googleCodelabs.TwoActivities.EXTRA_MESSAGE)
SecondActivity.kt
class SecondActivity : AppCompatActivity() {
    override fun onCreate(savedInstanceState: Bundle?) {
        super.onCreate(savedInstanceState)
        setContentView(R.layout.activity_second)

        //Get the Intent that activated this Activity
        val intent: Intent = intent
        val message : String? = intent.getStringExtra(EXTRA_MESSAGE)

        val textView = findViewById<TextView>(R.id.text_message)
        textView.text = message
    }
6. Task 4: Return data back to the main Activity
4.1 Add an EditText and a Button to the SecondActivity layout
4.2 Create a response Intent in the second Activity
- Set the result to RESULT_OK
-> to indicate that the response was successful.
-> The Activity class defines the result codes (including RESULT_OK and RESULT_CANCELLED.)
setResult(RESULT_OK,replyIntent);- Call finish() to close the Activity and return to MainActivity.
finish();SecondActivity.kt
//public
val EXTRA_REPLY : String = "googleCodelabs.TwoActivities.extra.REPLY"

class SecondActivity : AppCompatActivity() {

    lateinit var mReply : EditText

    override fun onCreate(savedInstanceState: Bundle?) {
        super.onCreate(savedInstanceState)
        setContentView(R.layout.activity_second)

        //Get the Intent that activated this Activity
        val intent: Intent = intent
        val message : String? = intent.getStringExtra(EXTRA_MESSAGE)

        val textView = findViewById<TextView>(R.id.text_message)
        textView.text = message
    }

    fun returnReply(view: View) {
        mReply = findViewById(R.id.editText_second)
        val reply : String? = mReply.text.toString()

        val replyIntent = Intent()
        replyIntent.putExtra(EXTRA_REPLY, reply)

        setResult(RESULT_OK, replyIntent)
        finish()
    }
4.3 Add TextView elements to display the reply
4.4 Get the reply from the Intent extra and display it
- In this task you modify the app to start SecondActivity expecting a result
-> to extract that return data from the Intent
-> and to display that data in the TextView elements
MainActivity.kt
//public
val EXTRA_MESSAGE : String = "googleCodelabs.TwoActivities.extra.MESSAGE"

//public
val TEXT_REQUEST : Int = 1

class MainActivity : AppCompatActivity() {
...

	fun launchSecondActivity(view: View) {
        Log.d(TAG, "Button clicked!")
        val intent = Intent(this, SecondActivity::class.java)

        val message = mMessageEditText.text.toString()
        intent.putExtra(EXTRA_MESSAGE, message)

        startActivityForResult(intent, TEXT_REQUEST)
 	}

	override fun onActivityResult(requestCode: Int, resultCode: Int, data: Intent?) {
        super.onActivityResult(requestCode, resultCode, data)

        if(requestCode == TEXT_REQUEST){
            if(resultCode == RESULT_OK){
                val reply = data?.getStringExtra(EXTRA_REPLY)
                mReplyHeadTextView.visibility = View.VISIBLE
                mReplyTextView.visibility = View.VISIBLE
                mReplyTextView.text = reply
            }
        }
    }
 ...
 }
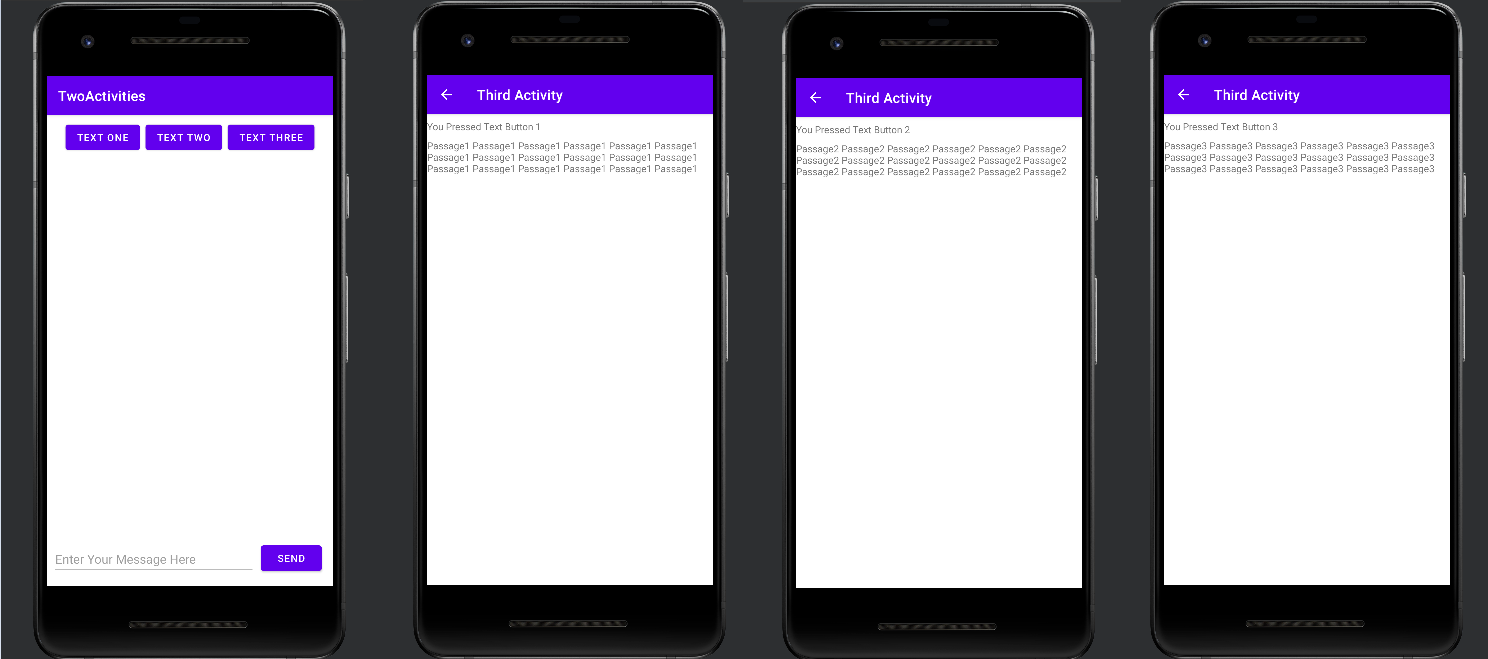
8. Coding challenge
📌참고자료
How to define log TAG constant:
- In Java:
private static final String TAG = MyClass.class.getSimpleName();
- In Kotlin:
private val TAG = MyClass::class.java.simpleName