
Android fundamentals 02.3:Implicit intents
이 포스팅은 아래 구글 코드랩을 개인 학습용으로 정리한 글입니다.
1. Welcome
- Implicit intent
- you initiate an activity without knowing which app or activity will handle the task
- ex. if you want your app to take a photo, send email, or display a location on a map
- you typically don't care which app or activity performs the task
➖
- your activity can declare one or more intent filters in the AndroidManifest.xml file
-> to advertise that the activity can accept implicit intents
-> and to define the types of intents that the activity will accept
➖
-
To match your request with an app installed on the device
-> the Android system matches your implicit intent with an activity whose intent filters indicate that they can perform the action -
If multiple apps match
-> the user is presented with an app chooser
-> lets them select which app they want to use to handle the intent.
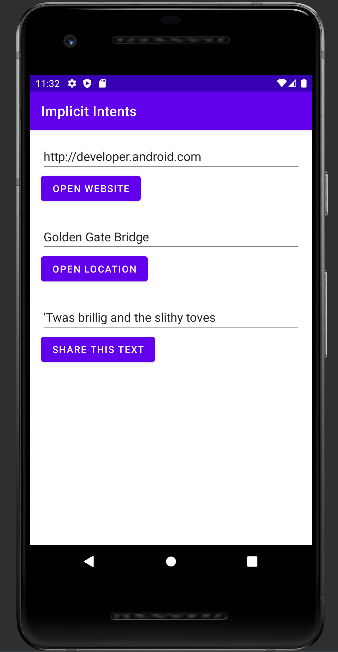
2. App overview
- In this section you create a new app with one Activity and three options for actions
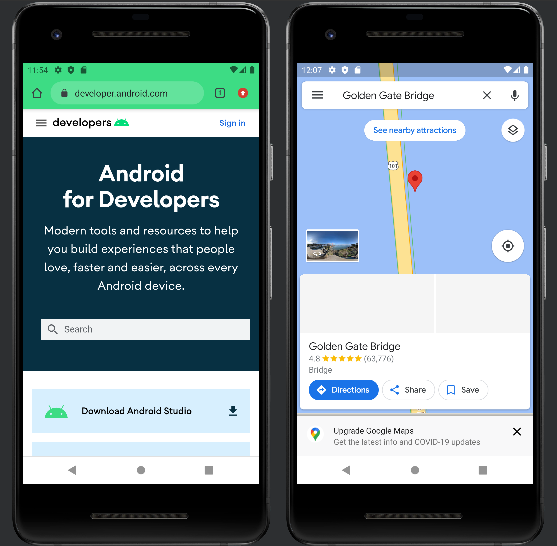
- open a web site
- open a location on a map
- share a snippet of text
3. Task 1: Create the project and layout
1.1 Create the project
1.2 Create the layout
4. Task 2: Implement the Open Website button
2.1 Define openWebsite()
2.2 Add code to openWebsite()
- Add a statement to the new openWebsite() method that gets the string value of the EditText
String url = mWebsiteEditText.getText().toString();- Encode and parse a string into a Uri object:
Uri webpage = Uri.parse(url);- Create a new Intent with Intent.ACTION_VIEW as the action* and the URI as the data*:
Intent intent = new Intent(Intent.ACTION_VIEW, webpage);- Use the resolveActivity() method and the Android package manager to find an Activity that can handle your implicit Intent.
if (intent.resolveActivity(getPackageManager()) != null) {
}- This request matches your Intent action and data with the Intent filters for installed apps on the device.
-> You use it to make sure there is at least one Activity that can handle your requests.
MainActivity.kt
class MainActivity : AppCompatActivity() {
    lateinit var mWebsiteEditText : EditText

    override fun onCreate(savedInstanceState: Bundle?) {
        super.onCreate(savedInstanceState)
        setContentView(R.layout.activity_main)

        mWebsiteEditText = findViewById(R.id.website_edittext)
    }

    fun openWebsite(view: View) {
        val url = mWebsiteEditText.text.toString()
        val webpage : Uri = Uri.parse(url)
        val intent : Intent = Intent(Intent.ACTION_VIEW, webpage)

        if(intent.resolveActivity(packageManager) != null) {
            startActivity(intent)
        }else{
            Log.d("Implicit Intents", "Can't handle this intent!")
        }
    }
}
5. Task 3: Implement the Open Location button
3.1 Define openLocation()
3.2 Add code to openLocation()
- In the new openLocation() method, add a statement to get the string value of the mLocationEditText EditText.
String loc = mLocationEditText.getText().toString();- Parse that string into a Uri object with a geo search query:
Uri addressUri = Uri.parse("geo:0,0?q=" + loc);- Create a new Intent with Intent.ACTION_VIEW as the action and loc as the data.
Intent intent = new Intent(Intent.ACTION_VIEW, addressUri);MainActivity.kt
fun openLocation(view: View) {
val loc = mLocationEditText.text.toString()
val adressUri = Uri.parse("geo:0,0?q=$loc")
val intent = Intent(Intent.ACTION_VIEW, adressUri)
if(intent.resolveActivity(packageManager) != null){
startActivity(intent)
}else{
Log.d("Implicit Intents", "Can't handle this intent!")
}
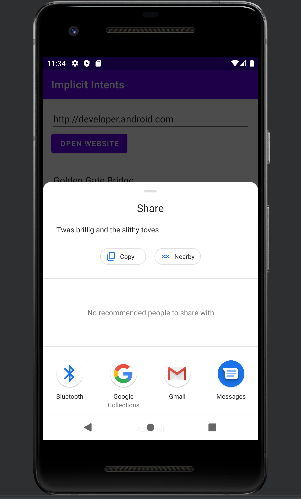
}6. Task 4: Implement the Share This Text button
-
A share action:
an easy way for users to share items in your app with social networks and other apps. -
Android provides the ShareCompat.IntentBuilder helper class
-> You can use ShareCompat.IntentBuilder to build an Intent and launch a chooser to let the user choose the destination app for sharing.
4.1 Define shareText()
4.2 Add code to shareText()
- In the new shareText() method, add a statement to get the string value of the mShareTextEditText EditText.
String txt = mShareTextEditText.getText().toString();- Define the mime type of the text to share:
String mimeType = "text/plain";- Call ShareCompat.IntentBuilder with these methods:
ShareCompat.IntentBuilder
           .from(this)
           .setType(mimeType)
           .setChooserTitle("Share this text with: ")
           .setText(txt)
.startChooser();-
from():
The Activity that launches this share Intent (this). -
setType():
The MIME type of the item to be shared. -
setChooserTitle():
The title that appears on the system app chooser. -
setText():
The actual text to be shared -
startChooser():
Show the system app chooser and send the Intent.
MainActivity.kt
 fun shareText(view: View) {
        val txt : String = mShareEditText.text.toString()
        val mimeType = "text/plain"
        ShareCompat.IntentBuilder
            .from(this)
            .setType(mimeType)
            .setChooserTitle(R.string.share_text_with)
            .setText(txt)
            .startChooser()
    }
4.3 Run the app
➕ shareText()는 정상적으로 작동하지만, openWebsite()와 openLocation()는 암시적 인텐트를 실행시킬 수 있는 액티비티/앱을 찾지 못함
- 해결 방법:
- 매니페스트에 queries 요소를 추가
- intent.resolveActivity() 대신 packageManager.queryIntentActivities() 호출

AndroidManifest.xml
<queries>
	<intent>
            <action android:name="android.intent.action.VIEW" />
            <category android:name="android.intent.category.BROWSABLE" />
            <data android:scheme="https" />
	</intent>
</queries>
MainActivity.kt
fun openWebsite(view: View) {
        val url = mWebsiteEditText.text.toString()
        val webpage : Uri = Uri.parse(url)
        val intent : Intent = Intent(Intent.ACTION_VIEW, webpage)

        if(packageManager.queryIntentActivities(intent, PackageManager.MATCH_ALL) != null) {
            startActivity(intent)
        }else{
            Log.d("Implicit Intents", "Can't handle this intent!")
        }
    }

    fun openLocation(view: View) {
        val loc = mLocationEditText.text.toString()
        val adressUri = Uri.parse("geo:0,0?q=$loc")
        val intent = Intent(Intent.ACTION_VIEW, adressUri)

        if(packageManager.queryIntentActivities(intent, PackageManager.MATCH_ALL) != null){
            startActivity(intent)
        }else{
            Log.d("Implicit Intents", "Can't handle this intent!")
        }
    }
📌참고자료
- Android 11에서는 앱이 사용자가 기기에 설치한 다른 앱을 쿼리하고 상호작용하는 방법을 변경
- 요소를 사용하여 앱은 액세스할 수 있는 다른 패키지 집합을 정의
브라우저 또는 다른 앱에서 URL 열기
- 앱에서 URL을 열려고 하기 전에 기기에 사용 가능한 브라우저가 최소 하나 이상 있는지 또는 특정 브라우저가 기본 브라우저인지 확인하는 것이 좋습니다.
<!-- Place inside the <queries> element. --> <intent> <action android:name="android.intent.action.VIEW" /> <category android:name="android.intent.category.BROWSABLE" /> <data android:scheme="https" /> </intent>- queryIntentActivities()를 호출하고 웹 인텐트를 인수로 전달하면 경우에 따라 반환된 목록에 사용 가능한 브라우저 앱이 포함됩니다.