Android fundamentals 04.5:RecyclerView
이 포스팅은 아래 구글 코드랩을 개인 학습용으로 정리한 글입니다.
1. Welcome
-
ScrollView:
- use it to scroll a View or ViewGroup.
- easy to use
- but not recommended for long, scrollable lists.
-
RecyclerView:
- a subclass of ViewGroup
- a more resource-efficient way to display scrollable lists.
-
Instead of creating a View for each item that may or may not be visible on the screen,
RecyclerView creates a limited number of list items and reuses them for visible content.
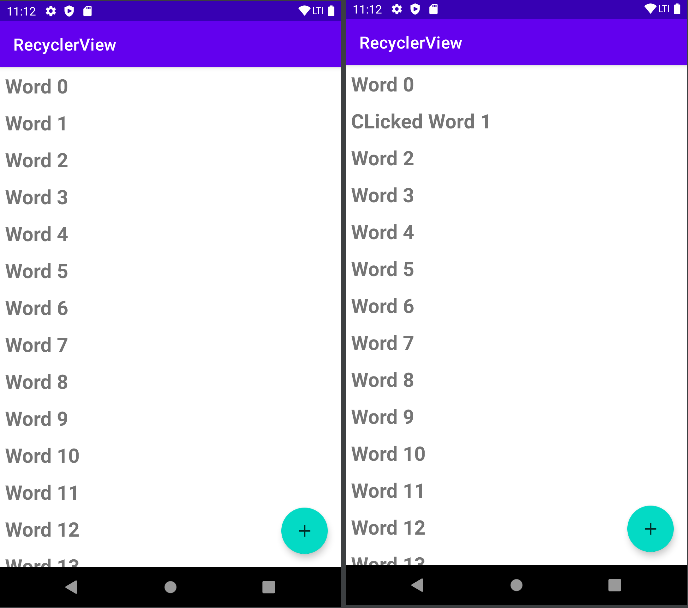
2. App Overview
- You create the dataset(the words), the RecyclerView itself, and the actions the user can take:
- Tapping a word marks it clicked.
- Tapping the floating action button(FAB) adds a new word.
3. Task 1: Create a new project and dataset
1.1. Create the project and layout
➕ 이 코드랩에서는 Basic Activity 템플릿을 이용해 새 프로젝트를 시작하였지만,
안드로이드 스튜디오의 새로 업데이트된 Basic Activity 템플릿은 코드랩과 상이함
-> 따라서 Empty Activity로 진행하였음
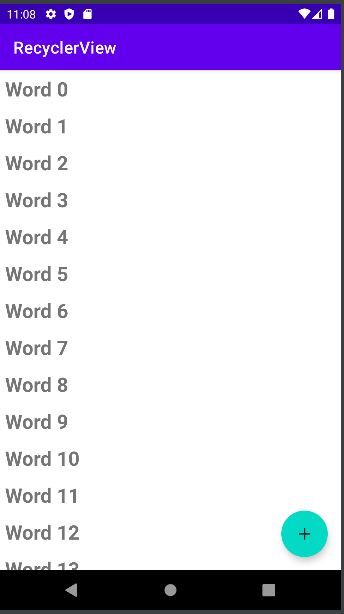
1.2. Add code to create data
- create a LinkedList of 20 word strings that end in increasing numbers
-> "Word 1", "Word 2", "Word 3", ....
class MainActivity : AppCompatActivity() {
    private val mWordList : MutableList<String> = mutableListOf()

    override fun onCreate(savedInstanceState: Bundle?) {
        super.onCreate(savedInstanceState)
        setContentView(R.layout.activity_main)

        for(i in 0 until 20){
            mWordList.add("Word $i")
        }
    }
}
1.3. Change the FAB icon
➕ activity_main.xml에 floating action button 추가
activity_main.xml
    <com.google.android.material.floatingactionbutton.FloatingActionButton
        android:id="@+id/fab"
        android:layout_width="wrap_content"
        android:layout_height="wrap_content"
        android:layout_gravity="bottom|end"
        android:layout_marginEnd="16dp"
        android:layout_marginBottom="16dp"
        app:layout_constraintBottom_toBottomOf="parent"
        app:layout_constraintEnd_toEndOf="parent" />
4. Task 2: Create a RecyclerView
-
need data to display
-> mWordList -
need a recyclerView
-> the scrolling list that contains the list items -
need a Layout for one item of data
-
need a layout manager
-> RecyclerView.LayoutManager
-> handles the hierarchy and layout of View elements -
RecyclerView requires an explicit layout manager
-> to manage the arrangement of list items contained within it.
-> layout could be vertical, horizontal, or a grid -
need A ViewHolder inside your adapter
-> contains the View information -
need an adapter
-> RecyclerView.Adapter
-> connects your data to the RecyclerView
-> prepares the data in a RecyclerView.ViewHolder
2.1. Modify the layout in content_main.xml
activity_main.xml
<androidx.recyclerview.widget.RecyclerView
        android:id="@+id/recyclerview"
        android:layout_width="match_parent"
        android:layout_height="match_parent">
    </androidx.recyclerview.widget.RecyclerView>
2.2. Create the layout for one list item
wordlist_item.xml
- item 레이아웃의 layout_height 속성 match_parent가 아닌 wrap_content로 지정
-> match_parent로 지정 시 recyclerView에 하나의 item만 보이게 됨
<LinearLayout xmlns:android="http://schemas.android.com/apk/res/android"
android:layout_width="match_parent"
android:layout_height="wrap_content"
android:orientation="vertical"
android:padding="6dp">
<TextView
android:id="@+id/word"
android:layout_width="match_parent"
android:layout_height="wrap_content"
android:textSize="24sp"
android:textStyle="bold"/>
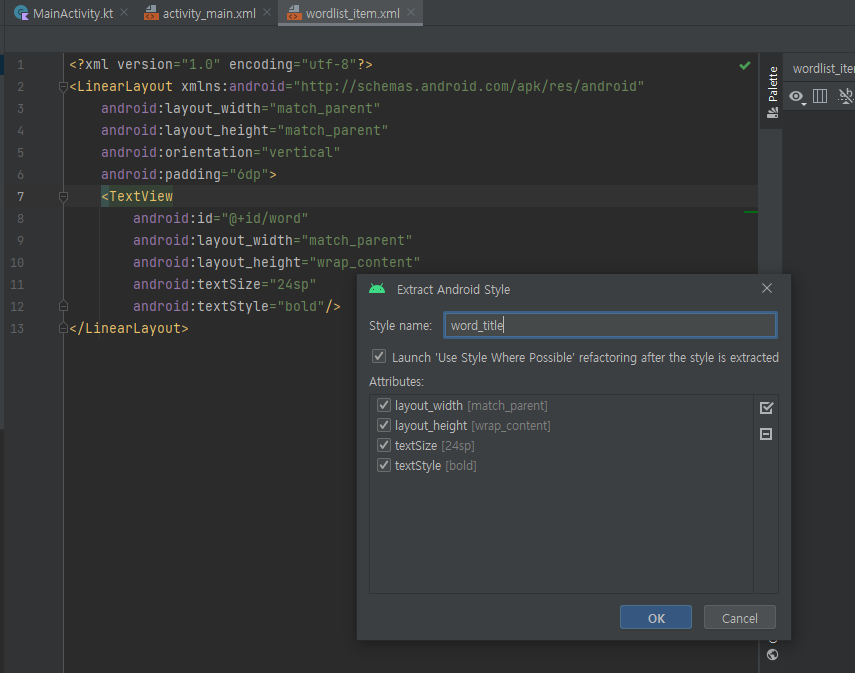
</LinearLayout>2.3 Create a style from the TextView attributes
-
You can use styles to allow elements to share groups of display attributes
-
TextView 우클릭 Refactor > Extract > Style
-> Extract Android Style dialog appears
-> Name your style
-> leave all other options selected
-> Select the Launch ‘Use Style Where Possible' option
-> click OK. -
When prompted, apply the style to the Whole Project
wordlist_item.xml
    <TextView
        android:id="@+id/word"
        style="@style/word_title" />
styles.xml
<resources>
<style name="word_title">
<item name="android:layout_width">match_parent</item>
<item name="android:layout_height">wrap_content</item>
<item name="android:textSize">24sp</item>
<item name="android:textStyle">bold</item>
</style>
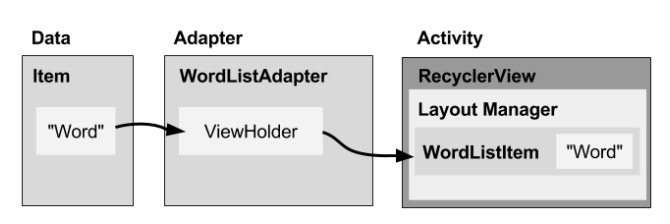
</resources>2.4. Create an adapter⭐
-
Android uses adapters to connect data with View items in a list.
-
To connect data with View items, the adapter needs to know about the View items
-> The adapter uses a ViewHolder that describes a View item and its position within the RecyclerView
2.5 Create the ViewHolder for the adapter⭐
WordListAdapter.kt
class WordListAdapter() : RecyclerView.Adapter<WordListAdapter.WordViewHolder>() {

    override fun onCreateViewHolder(parent: ViewGroup, viewType: Int): WordViewHolder {
        TODO("Not yet implemented")
    }

    override fun getItemCount(): Int {
        TODO("Not yet implemented")
    }

    override fun onBindViewHolder(holder: WordViewHolder, position: Int) {
        TODO("Not yet implemented")
    }


    class WordViewHolder(itemView: View) : RecyclerView.ViewHolder(itemView) {

        lateinit var wordItemView : TextView
        lateinit var mAdapter : WordListAdapter
        init{
            wordItemView = itemView.findViewById(R.id.word)
        }

        constructor(itemView: View, adapter: WordListAdapter) : this(itemView){
            this.mAdapter = adapter
        }
    }
}
2.6 Storing your data in the adapter⭐
- WordListAdapter needs a constructor that initializes the word list from the data
WordListAdapter.kt
class WordListAdapter() : RecyclerView.Adapter<WordListAdapter.WordViewHolder>() {

    lateinit var mWordList : MutableList<String>
    lateinit var mInflater: LayoutInflater

    constructor(context : Context, wordList: MutableList<String>) : this() {
        mWordList = wordList
        mInflater = LayoutInflater.from(context)
    }

    override fun onCreateViewHolder(parent: ViewGroup, viewType: Int): WordViewHolder {
        val mItemView = mInflater.inflate(R.layout.wordlist_item, parent, false)
        return WordViewHolder(mItemView, this)
    }

    override fun getItemCount(): Int {
        return mWordList.size
    }

    override fun onBindViewHolder(holder: WordViewHolder, position: Int) {
        val mCurrentWord : String = mWordList[position]
        holder.wordItemView.text = mCurrentWord
    }
    ...
}
2.7. Create the RecyclerView in the Activity
MainActivity.kt
class MainActivity : AppCompatActivity() {
	private val mWordList : MutableList<String> = mutableListOf()

    lateinit var mRecyclerView: RecyclerView
    lateinit var mAdapter: WordListAdapter

    override fun onCreate(savedInstanceState: Bundle?) {
        super.onCreate(savedInstanceState)
        setContentView(R.layout.activity_main)

        ...

        mRecyclerView = findViewById(R.id.recyclerview)
        mAdapter = WordListAdapter(this, mWordList)

        mRecyclerView.adapter = mAdapter
        mRecyclerView.layoutManager = LinearLayoutManager(this)

    }
}
5. Task 3: Make the list interactive
3.1. Make items respond to clicks
- Change the WordViewHolder class signature to implement View.onClickListener
WordListAdapter.kt
- WordViewHolder 클래스에서 WordListAdpater 클래스의 변수(mWordList)에 접근하기 위해 inner 키워드 추가
inner class WordViewHolder(itemView: View) : RecyclerView.ViewHolder(itemView), View.OnClickListener {

        lateinit var wordItemView : TextView
        lateinit var mAdapter : WordListAdapter

        constructor(itemView: View, adapter: WordListAdapter) : this(itemView){
            wordItemView = itemView.findViewById(R.id.word)
            this.mAdapter = adapter

            //Connect the onClickListener with the View
            itemView.setOnClickListener(this)
        }

        override fun onClick(p0: View?) {
            val mPosition = layoutPosition
            val element : String = mWordList[mPosition]
            mWordList[mPosition] = "CLicked $element"

            // Notify the adapter that the data has changed so it can
			// update the RecyclerView to display the data.
            mAdapter.notifyDataSetChanged()
        }
    }
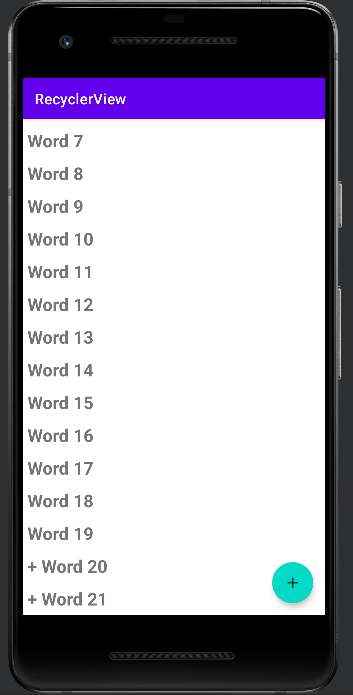
3.2. Add behavior to the FAB
- implement an action for the FAB to
-> Add a word to the end of the list of words.
-> Notify the adapter that the data has changed.
-> Scroll to the inserted item.
MainActivity.kt
    override fun onCreate(savedInstanceState: Bundle?) {
		...

        mRecyclerView = findViewById(R.id.recyclerview)
        mAdapter = WordListAdapter(this, mWordList)

        mRecyclerView.adapter = mAdapter
        mRecyclerView.layoutManager = LinearLayoutManager(this)

        val fab = findViewById<FloatingActionButton>(R.id.fab)
        fab.apply{
            setImageResource(R.drawable.ic_add_for_fab)
            setOnClickListener {
                val wordListSize : Int = mWordList.size
                mWordList.add("+ Word $wordListSize")

                (mRecyclerView.adapter as WordListAdapter).notifyItemInserted(wordListSize)
                mRecyclerView.smoothScrollToPosition(wordListSize)
            }
        }

    }