Android fundamentals 04.3:Menus and pickers
이 포스팅은 아래 구글 코드랩을 개인 학습용으로 정리한 글입니다.
1. Welcome
-
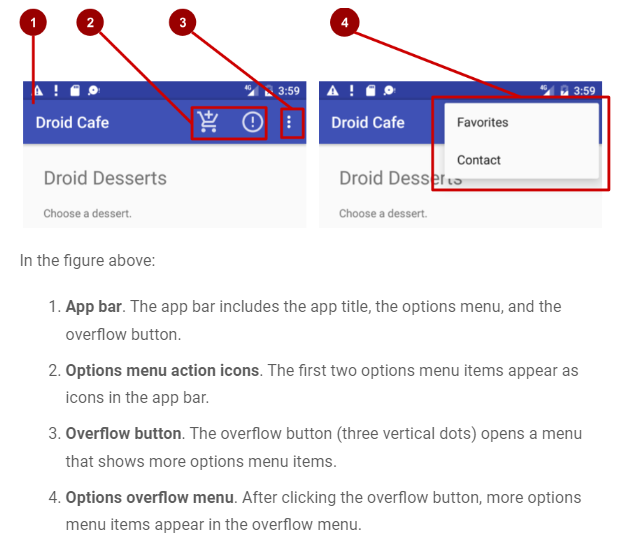
the app bar (also called the action bar)
-> a dedicated space at the top of each activity screen -
The options menu in the app bar
-> provides choices for navigation
(ex. navigation to another activity in the app)
-> provide choices that affect the use of the app itself
(ex. ways to change settings or profile information)
-
A dialog: a window that appears on top of the display or fills the display, interrupting the flow of activity.
-
Android provides ready-to-use dialogs(= pickers) for picking a time or a date
-> ensure that your users pick a valid time or date that is formatted correctly and adjusted to the user's local time and date.
2. App overview
3. Task 1: Add items to the options menu
1.1 Examine the code
-
activity_main.xml: The main layout for MainActivity, the first screen the user sees.
-
content_main.xml: The layout for the content of the MainActivity screen, which (as you will see shortly) is included within activity_main.xml.
-
activity_order.xml: The layout for OrderActivity, which you added in the practical on using input controls.
➕ Android fundamentals 04.1:Clickable images에서부터 Empty Activity로 코드랩을 진행하였음. 따라서 위 코드랩의 xml 파일 설명과 같도록 content_main.xml 파일을 생성하고 activity_main.xml을 수정해주어야 함.
activity_main.xml
- include layout="@layout/content_main"/
<?xml version="1.0" encoding="utf-8"?>
<androidx.constraintlayout.widget.ConstraintLayout xmlns:android="http://schemas.android.com/apk/res/android"
    xmlns:app="http://schemas.android.com/apk/res-auto"
    xmlns:tools="http://schemas.android.com/tools"
    android:layout_width="match_parent"
    android:layout_height="match_parent"
    tools:context=".MainActivity">

    <include layout="@layout/content_main"/>

    <com.google.android.material.floatingactionbutton.FloatingActionButton
        android:id="@+id/fab"
        android:layout_width="wrap_content"
        android:layout_height="wrap_content"
        android:layout_gravity="bottom|end"
        android:layout_marginEnd="16dp"
        android:layout_marginBottom="16dp"
        app:layout_constraintBottom_toBottomOf="parent"
        app:layout_constraintEnd_toEndOf="parent" />

</androidx.constraintlayout.widget.ConstraintLayout>
content_main.xml
- app:layout_behavior ="@string/appbar_scrolling_view_behavior"
- tools:showIn="@layout/activity_main"
<?xml version="1.0" encoding="utf-8"?>
<androidx.constraintlayout.widget.ConstraintLayout xmlns:android="http://schemas.android.com/apk/res/android"
    xmlns:app="http://schemas.android.com/apk/res-auto"
    xmlns:tools="http://schemas.android.com/tools"
    android:layout_width="match_parent"
    android:layout_height="match_parent"
    app:layout_behavior="@string/appbar_scrolling_view_behavior"
    tools:showIn="@layout/activity_main"
    >

	...

</androidx.constraintlayout.widget.ConstraintLayout>
app_bar_menu.xml
<?xml version="1.0" encoding="utf-8"?>
<menu
    xmlns:android="http://schemas.android.com/apk/res/android"
    xmlns:app="http://schemas.android.com/apk/res-auto">
    <item
        android:id="@+id/action_settings"
        android:icon="@drawable/ic_settings"
        android:title="@string/settings"
        app:showAsAction="never"
        />
</menu>
MainActivity.kt
- 앱바에 메뉴를 추가하기 위해 onCreateOptionsMenu, onOptionsItemSelected 함수 오버라이딩
class MainActivity : AppCompatActivity() {

    private var mOrderMessage : String = ""

    override fun onCreate(savedInstanceState: Bundle?) {
        super.onCreate(savedInstanceState)
        setContentView(R.layout.activity_main)

        val donutImageView = findViewById<ImageView>(R.id.donut)
        val iceCreamImageView = findViewById<ImageView>(R.id.ice_cream)
        val froyoImageView = findViewById<ImageView>(R.id.froyo)

        donutImageView.setOnClickListener{
            mOrderMessage = getString(R.string.donut_order_message)
            displayToast(mOrderMessage)
        }
        iceCreamImageView.setOnClickListener{
            mOrderMessage = getString(R.string.ice_cream_order_message)
            displayToast(mOrderMessage)
        }
        froyoImageView.setOnClickListener{
            mOrderMessage = getString(R.string.froyo_order_message)
            displayToast(mOrderMessage)
        }

        if(savedInstanceState != null){
            mOrderMessage = savedInstanceState.getString("mOrderMessage") as String
        }

        val fab = findViewById<FloatingActionButton>(R.id.fab)
        fab.apply{
            setImageResource(R.drawable.ic_shopping_cart)
            setOnClickListener {
                val intent = Intent(context, OrderActivity::class.java)
                intent.putExtra(EXTRA_ORDER_MESSAGE, mOrderMessage)
                startActivity(intent)
            }
        }

    }
    override fun onCreateOptionsMenu(menu: Menu): Boolean {
        val inflater: MenuInflater = menuInflater
        inflater.inflate(R.menu.app_bar_menu, menu)
        return true
    }
    override fun onOptionsItemSelected(item: MenuItem): Boolean {
        when(item.itemId){
            R.id.action_settings -> {
                Toast.makeText(this, "settings item clicked", Toast.LENGTH_SHORT).show()
            }
        }
        return super.onOptionsItemSelected(item)
    }
	...
}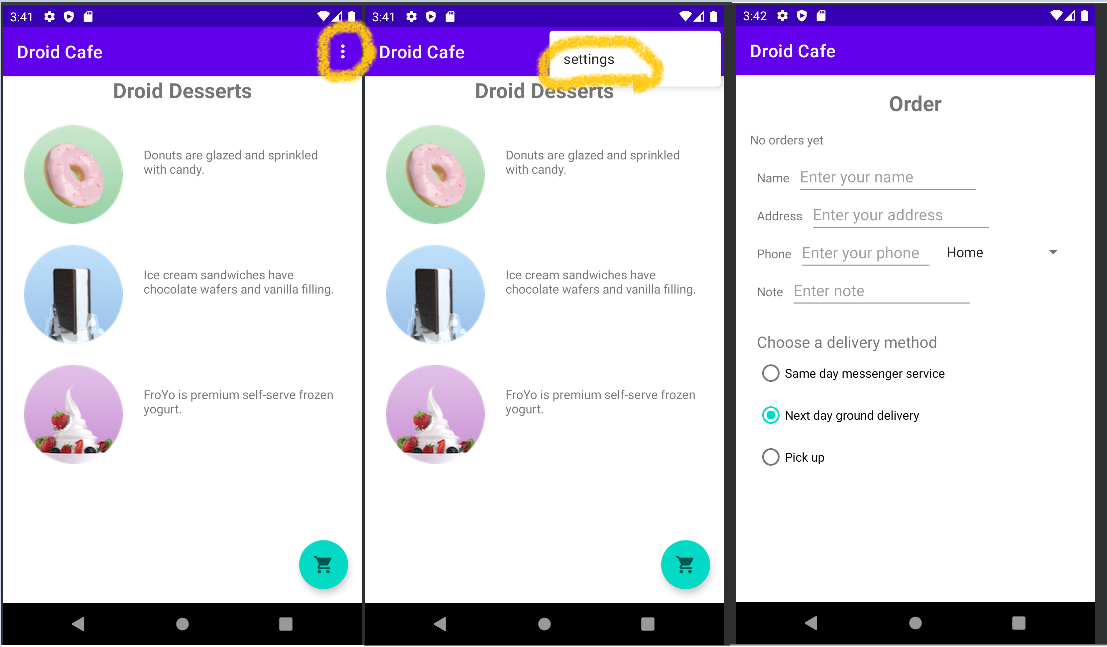
1.2 Add more menu items to the options menu
✍...
📌참고자료
- CoordinatorLayout is a super-powered FrameLayout
- two primary uses:
- As a top-level application ⚡decor or ⚡chrome layout
- As a container for a specific interaction with one or more child views
- By specifying Behaviors for child views of a CoordinatorLayout
-> you can provide many different interactions within a single parent
-> those views can also interact with one another- View classes can specify a default behavior when used as a child of a CoordinatorLayout
-> by implementing the AttachedBehavior interface
- Interaction behavior plugin for child views of CoordinatorLayout
- A Behavior implements one or more interactions that a user can take on a child view.
-> These interactions may include drags, swipes, flings, ...
activity_main.xml
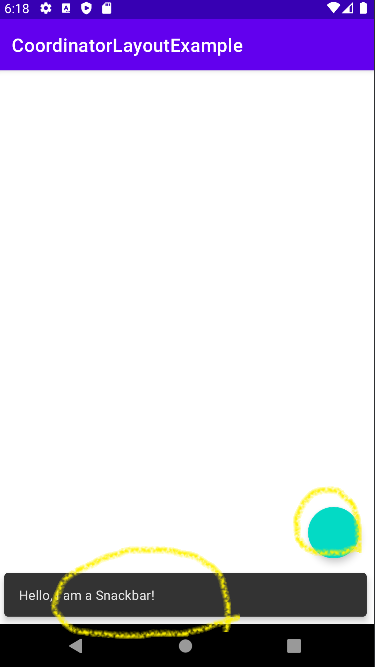
<?xml version="1.0" encoding="utf-8"?>
<androidx.coordinatorlayout.widget.CoordinatorLayout xmlns:android="http://schemas.android.com/apk/res/android"
    xmlns:app="http://schemas.android.com/apk/res-auto"
    xmlns:tools="http://schemas.android.com/tools"
    android:layout_width="match_parent"
    android:layout_height="match_parent"
    tools:context=".MainActivity">
  <com.google.android.material.floatingactionbutton.FloatingActionButton
        android:id="@+id/fab"
        android:layout_margin="16dp"
        android:layout_gravity="end|bottom"
        android:layout_width="wrap_content"
        android:layout_height="wrap_content"/>
</androidx.coordinatorlayout.widget.CoordinatorLayout>
MainActivity.kt
class MainActivity : AppCompatActivity() {
    override fun onCreate(savedInstanceState: Bundle?) {
        super.onCreate(savedInstanceState)
        setContentView(R.layout.activity_main)
        val fab  = findViewById< FloatingActionButton>(R.id.fab).apply{
            setOnClickListener {
                Snackbar.make(this, "Hello, I am a Snackbar!", Snackbar.LENGTH_LONG).show()
            }
        }
    }
}