# 앱 아이콘 추가하기
-
오늘은 드디어 앱 아이콘을 추가해봤다! 아이콘 이미지 뭘로 하지 하다가 전에 금손 친구가 만들어준 미모지를 썼다. 교수님 말씀대로 인터넷에서 대충
iOS icon maker로 검색해서 뜨는 사이트에서 사이즈별로 아이콘을 생성한 다음, 다운받은 폴더 그대로Assets에 넣어줬다. 그러고 나서EmojiArt-General-App Icons and Launch Images에서source를 해당 폴더로 바꿔주면 끝! -
엄청 간단한데 만족도가 생각보다 매우 높아서(xcode 상태바?에도 뜨고 시뮬레이터 돌릴 때도 괜히 귀여움...) 다음부터는 아이콘 설정부터 해줘야지 생각했다ㅋㅋㅋㅋㅋㅋ
# 기억해 xxxx년 xx월 xx일 xx시 xx분 xx초...내가 종료된 상태...
-
유저들은 사실 앱을 켰을 때 마지막 종료 시(에러로 인한 강종 포함) 화면이 그대로 뜰 거라고 생각할텐데 아직 우리 앱은 종료하면 변경 사항은 저장되나
EmojiArt와palette의 줌/팬 정돈나 순서 등이 초기 상태로 돌아간다. 따라서@SceneStroage를 써서 이러한 기능을 구현해줄 것이다. -
@SceneStorage는Scene별로 정보를 시스템에 저장하는데, 이 정보는 앱을 닫거나 강제종료해도 유지되므로, 다음에 다시 앱을 켰을 때 저장된 값이 있다면 이를 불러와서 해당 상태로 복구한다. 따라서 현재 우리가 원하는 복구 기능을 구현하는 데 적합한 친구!SceneStorage에 변화가 발생하면 현재View가 무효화된다. 주의할 점은 저장과 복원은 시스템에서 모두 처리해주나, 저장할 수 있는 타입이 매우 한정되어 있다는 것. -
저장하려는 변수 앞에
@SceneStorage("someIdtoIdentifyThisVar")와 같이 선언해주면 바로 앱 실행 시 자동 저장/복구가 가능하다! 이제 이모지 팔레트가 날씨-동물-음식 순이고 내가 음식 팔레트로 이동한 상태에서 앱을 껐다 다시 키면 날씨 팔레트가 아니라 음식 팔레트가 뜬다.
struct PaletteChooser: View {
    ...
    // required to identify this var in the SceneStorage
    @SceneStorage("chosenPaletteIndex")
    private var chosenPaletteIndex = 0
    ...
}-
다만
SceneStorage가 기본으로 지원하지 않는 타입의 경우SceneStorage가 지원하는RawRepresentable로 변환해야 한다. 예컨대 우리의 경우 이모지 아트를 줌/팬 한 정도도 기억하고 싶을 수 있는데, 각각CGFloat,CGSize이므로 변환이 필요하다. -
RawRepresentable이란raw value(우리가 아는 기본 타입들) 로의 변환/재변환이 가능한 타입이다. 따라서 이러한 변환 과정을 지정해주면 해당 프로토콜에 순응하게 할 수 있다! 우리는String타입으로 변환해줄 것이기 때문에 아래와 같이RawRepresentable에extension을 추가해서CGFloat과CGSize를RawRepresentable로 만들어주면, 이제 드디어SceneStorage를SteadyStateZoomOffset,SteadyStatePanOffset에도 적용할 수 있다.
extension RawRepresentable where Self: Codable {
    public var rawValue: String {
        if let json = try? JSONEncoder().encode(self), let string = String(data: json, encoding: .utf8) {
            return string
        } else {
            return ""
        }
    }
    public init?(rawValue: String) {
        if let value = try? JSONDecoder().decode(Self.self, from: Data(rawValue.utf8)) {
            self = value
        } else {
            return nil
        }
    }
}

extension CGSize: RawRepresentable { }
extension CGFloat: RawRepresentable { }
# 시스템 폰트 크기 설정 일괄 적용하기
%20(5th%20generation)%20-%202021-11-26%20at%2000.03.16.png)
- 디바이스 환경설정에서 폰트를 변경할 수 있는데, 문제는 우리가 별도로
.font(size:)로 폰트를 지정한View들의 경우 디바이스에서 설정한 크기가 적용되지 않는다. 위에서 보면 이모지 팔레트 이름이나 메뉴는 시스템 설정에 따라 변경되었는데defaultEmojiFontSize를 지정해줬던 이모지들은 사이즈가 그대로다.
@ScaledMetric 을 붙이면 해당 변수의 크기를 유저의 시스템 설정 값과 일치하게 조정해준다!
struct EmojiArtDocumentView: View {
    ...
    @ScaledMetric var defaultEmojiFontSize: CGFloat = 40
    ...
}%20(5th%20generation)%20-%202021-11-26%20at%2000.09.39.png)
# App
App 프로토콜은 앱의 구조와 작동방식을 나타내며 한 앱당 오직 하나의 구조체만이 해당 프로토콜에 순응한다. 해당 구조체 앞에@main을 붙임으로써App의entry point임을 표시한다.App 프로토콜은 앱을 실행하기 위해 시스템이 호출하는main()메서드를 내장하고 있다.App의body는Scene인스턴스들로 구성된다.
@main
struct myApp: App {

    var body: some Scene {
        WindowGroup {
            ContentView()
        }
    }
}
# Scene
-
Scene은 우리가 UI 상에 나타내려고 하는,View체계에서 가장 상위에 있는View를 담고 있으며, 시스템에서 생명주기를 관리한다. -
Scene의 대표적인 3가지WindowGroup { return aTopLevelView }DocumentGroup(newDocument:) { config in ... return aTopLevelView }DocumentGroup(viewing:) { config in ... return aTopLevelView}
-
Scene의content인자는some View를 리턴하는 클로저인데, 유저가 새로운 창을 띄울 때마다 호출되며, 새로운Scene의 최상위View를 리턴한다.
WindowGroup
non-document-oriented Scene-building Scene- 그룹의
content로 선언한View구조가 해당 그룹으로부터 앱이 생성한 각window의 템플릿으로 사용된다. 각window는 독립적인 상태를 유지한다, 즉 새로운Scene의 각View구조 내부의State혹은StateObject변수들은 별도로 메모리에 저장된다. - 주의할 점은, 아래 코드에서
viewModelsharedInAllScenes 변수의 경우MyApp에서 선언되어inject되고 있으므로 모든Scene이 공유한다.
@main
struct MyApp: App {
    @StateObject var viewModelharedInAllScenes = MyViewModel()
    var body: some Scene {
        WindowGroup {
            MyView(viewModel: viewModelSharedInAllScenes)  // Declare a view hierarchy here.
        }
    }
}
DocumentGroup
%20(3rd%20generation)%20-%202021-11-26%20at%2022.03.13.png)
document-oriented Scene-building Scenedocument Model과 해당document타입을 나타낼 수 있는View를 사용해서 만든다.SwiftUI는 모델을 사용해서 앱에서 해당document를 지원한다.- 새로운
document가 생성되거나 열릴 때마다SwiftUI는 새로운ViewModel을 만든다. config인자에는 해당document의ViewModel과document를 여는 데 필요한fileURL이 들어있으며, 해당URL을 통해ViewModel에 접근해서 새로운Scene을 위한View를 만든다- e.g.
EmojiArt에서config.document는EmojiArtDocument타입!
- e.g.
newDocument인자는 비어있는 새로운document를 만드는 데 사용하는 클로저DocumentGroup이 제대로 작동하기 위해서는ViewModel이ReferenceFileDocument프로토콜에 순응해야 하며Undo를 구현해야 한다 :Undo를 구현하는 대신FileDocument프로토콜에 순응하게 할 수도 있음 (슬라이드 참조)
A document is a body of information, such as pages of text, stored in a file locally or in iCloud. 출처: Apple Documentation
struct EmojiArtApp: app {
    var body: some Scene {
        DocumentGroup(newDocument: { EmojiArtDocument() }) { config in
            EmojiArtDocumentView(document: config.document)
        }
    }
}
# 커스텀 document type 만들기
-
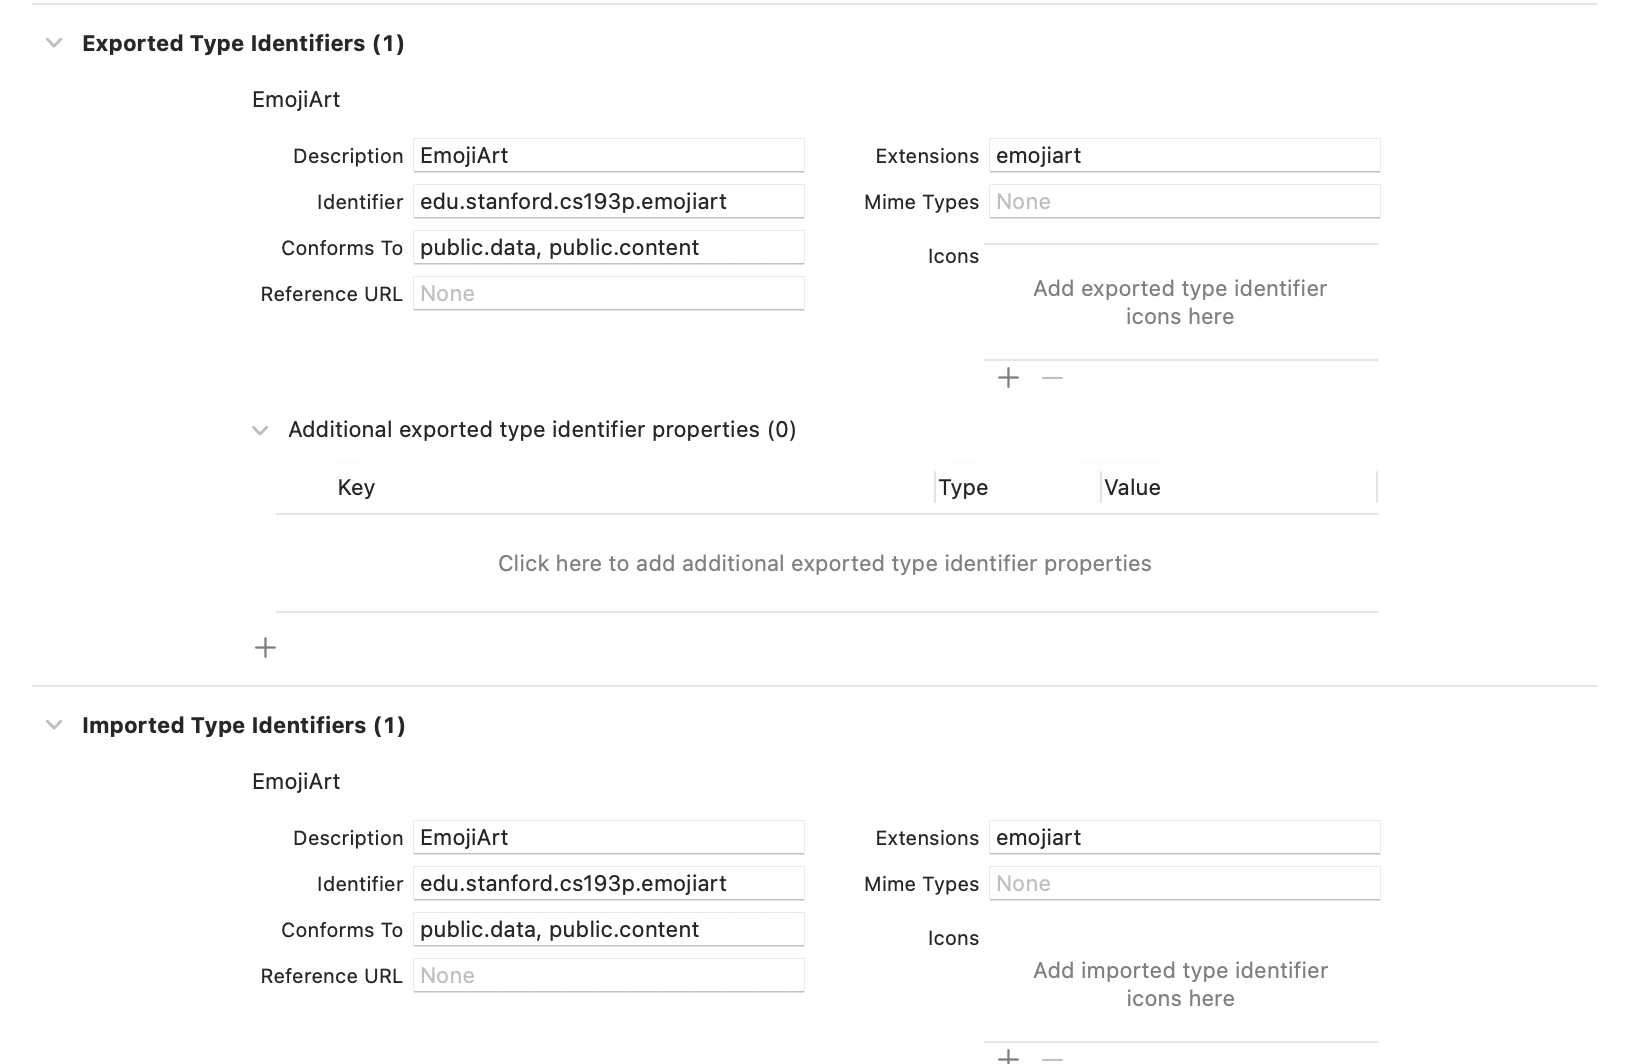
document기반의 앱을 만들고 있으므로 어떤 타입의 파일을 열고 수정할 수 있는지 표시해야 하는데, 특히 우리처럼custom document를 사용하는 경우 새로운 타입을 선언해야 한다. 따라서Uniform Type Identifiers를 사용할 건데,extension을 통해 커스텀 타입을 추가할 수 있다.Uniform Type Identifiers: 파일 혹은 데이터의 타입을 식별하는 데 사용되는 기본 타입들을 제공한다.
-
Xcode는 앱을 빌드할 때,
document타입에 관한 정보를 앱의information property list(이하 Info.plist)파일에 넣고, 유저들이 앱을 설치하면 시스템에서 해당 정보를 사용해 앱이 열 수 있는 파일들을 결정한다. 따라서Info.plist에서 타입을 선언하면 된다. -
EmojiArt - Targets: EmojiArt - Info에서Exported Types Identifiers,Imported Type Identifiers,Document Types를 셋팅해주면 된다. 이하는 공식문서와 강의를 참고해서 정리했다.
-
타입을 선언할 때는 먼저
UTType-열거나, 보내거나, 받을 데이터의 타입을 나타내는 구조체-을 선언한다. 즉, 우리의 앱이source가 되는exported type인지, 아니면 외부에서 선언된 타입을 사용하는imported type인지 선언한다. 커스텀document타입을 사용하는 경우exported type과imported type을 모두 선언해줘야 한다. 우리의 경우emojiart라는 커스텀 타입을 사용할 것이고 파일을 열기도하고(import) 저장하거나 내보내기(export)도 할 것이므로 둘 다 선언해 준다.- 고유한
identifier가 필요하기 때문에edu.stanford.cs193p와 같은reverse DNS형식으로 선언해준다. type conformance도 선언할 수 있는데,document type을 선언할 때는 아래의 두identifier에 반드시 순응해야 한다.public.data:Finder혹은Files app이 해당document type을 표시할 수 있도록 함 (i.e. 저장된 아이템이 해당 타입인지 식별/표시)public.content: 유저들이 에어드랍을 통해 해당 타입을 공유할 수 있게 함
.jpeg와 같이 해당 타입을 나타낼 확장자도 지정할 수 있다! 우리의 경우emojiart로 지정하면 이제 모든 파일에.emojiart가 붙는다.
- 고유한
-
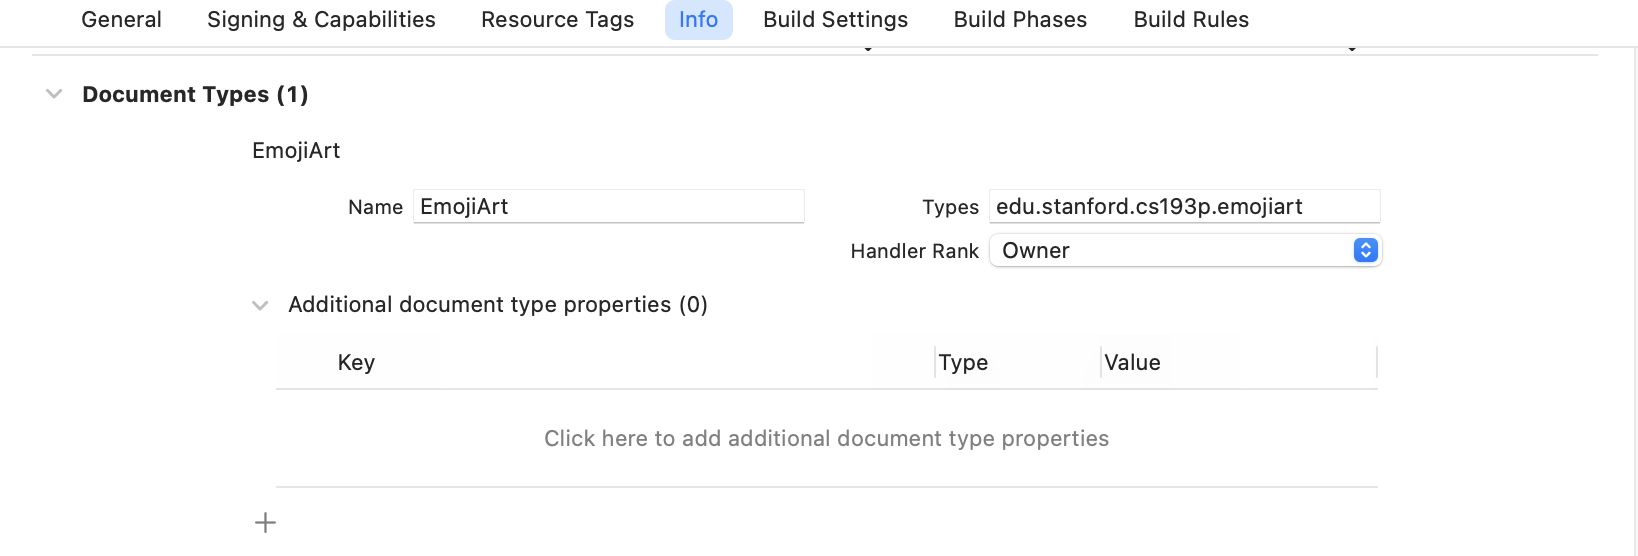
UTType을 선언한 뒤에는 위에서 선언한 두UTI가 우리의 앱이 소유하는document를 나타낸다는 것을 알려주는Document Type을 선언해야 한다- 우리는 단순히
Viewer가 아니고emojiart를 편집할 수 있으므로Handler Rank를Owner로 설정한다
- 우리는 단순히
# ViewModel과 ReferenceFileDocument protocol
-
Info.plist뿐만 아니라 코드에도 우리가 읽고 쓸 수 있는UTTypes들을 선언해줘야 한다. -
먼저 우리가
Info.plist에 선언한 타입을extension을 사용해서UTType의static프로퍼티로 선언해주면 해당 타입을 의미하는UTType.emojiart가 새로 정의된다. 이 친구를 이제 아래에서 만나볼ReferenceFileDocument프로토콜에 순응하도록 구현하는 과정에서 쓴다.
extension UTType {
    static let emojiart = UTType(exportedAs: "edu.stanford.cs193p.emojiart")
}
ReferenceFileDocument
-
파일(디스크)로부터/에
EmojiArtDocument를 읽어오기/쓰기 위해 필요한 프로토콜로 이전에 우리가 직접 작성했던autosaving관련 코드를 모두 대체한다.- 원리는
Model에 변화가 발생하면 백그라운드 스레드에서snapshot(contentType:)이 호출되고,snapshot을 담을 수 있는filewrapper가 요청된다.
- 원리는
-
ObservableObject프로토콜에 순응하므로ViewModel에만 적용할 수 있으며,snapshot을 이용해 쓰기 작업을 백그라운드 스레드에서 수행한다.
- cf.FileDocument:Model을 디스크에/로부터 저장하고/불러오는 데 필요한 프로토콜 -
readableContentTypes:document가 열 수 있는 타입들 -
writeableContentTypes:document가 저장하거나 변환될 수 있는 타입 -
fileWrapper(snapshot:configuration:):snapshot을 직렬화해서 파일 시스템에 저장하며, 저장 위치를 반환한다. 보통은 데이터blob에 불과하지만 더 복잡한 데이터를 담을 수도 있다.
-file wrappers: 파일 시스템 상의 노드(파일, 디렉토리, 심볼릭 링크)를 나타내는 객체로FileWrapper클래스의 인스턴스. 종류에 따라 노드명, 컨텐츠, 도착 노드 등에 대한 정보를 담고 있다 -
snapshot(contentType:):document의 현재 상태를 담은Snapshot을 생성해서 리턴한다. 이때Snapshot은 제너릭으로 보통Data타입으로, 직렬화에 사용된다.
-Snapshot이 생성될 때까지document는 수정 불가하며,Snapshot이 생성되면,document는 다시 수정 가능해지고Snapshot은write(snapshot:to:contentType:)메서드를 이용해 직렬화한다. -
init(configuration:): 주어진ReadConfiguration에 들어있는 정보(UTType,file wrapper)를 불러와서self를 초기화한다.
-ReadConfiguration,WriteConfiguration: 어디서/에document를 불러오고 저장할 지 알려준다.
EmojiArtDocument가 ReferenceFileDocument 프로토콜 따르게 하기
-
먼저 우리가 불러오고 저장할 타입이 아까 위에서 지정한
UTType.emojiart라고 선언해준다. -
그리고 우리는
Snapshot의 타입을Data로 선언해줄 거다! -
snapshot(contentType:)은EmojiArtModel을Data로 변환한 값을 리턴하므로Model을Data로 바꿔줘야 한다.EMojiArtModel의json메서드를 사용해 모델을Data형태로 인코딩한다. -
fileWrapper(snapshot:configuration:)함수의 경우FileWrapper를 리턴해야 하는데,FileWrapper(regularFileWithContents:)의 인자로snapshot을 넣어주면 해당Data를 담고 있는regular-file file wrapper를 생성한다. -
required init(configuration:)에서는configuration에 있는filewrapper에 저장되어 있는contents를 불러온 다음 역직렬화해서emojiArt로 설정한다.Model을 불러온 다음에는 배경 이미지도 꼭 불러와주기...! 실패하는 경우 에러를 던지는데 보통은 그럴 일이 없을 거라고 하셨다....
class EmojiArtDocument: ReferenceFileDocument{

    // MARK: - ReferenceFileDocument

    static var readableContentTypes = [UTType.emojiart]
    static var writeableContentTypes = [UTType.emojiart]

    required init(configuration: ReadConfiguration) throws {
        if let data = configuration.file.regularFileContents {
            emojiArt = try EmojiArtModel(json: data)
            fetchBackgroundImageDataIfNecessary()
        } else {
            throw CocoaError(.fileReadCorruptFile)
        }
    }

    func snapshot(contentType: UTType) throws -> Data {
        // Model converted (possibly) to some other type, like a Data
        try emojiArt.json()
    }

    // writing the document out to a file
    func fileWrapper(snapshot: Data, configuration: WriteConfiguration) throws -> FileWrapper {
        FileWrapper(regularFileWithContents: snapshot)
    }
    ...
}
# Undo를 할 수 있다는 것...? 저장할 일이 생겼다는 것...!
-
아까
ReferenceFileDocument프로토콜에 따르게 하면 자동저장이 된다고 했는데, 새 파일을 생성해서 이모지를 추가한 다음 껐다 키면 다시 빈 파일이 우리를 맞이한다...아직Undo를 구현하지 않았기 때문인데,SwiftUI는undo가 등록될 때? how do i say register...변화가 생겼음을 인식하고, 그제서야snapshot(contentType:)을 호출한다. -
Undo구현은undoManager를 사용해서 하는데, 특정 작업을 수행할 때 해당 작업에 대한undo operation을undo stack에 넣으면 해당 작업을undoable하게 만들 수 있다. 스택에 넣은 뒤에undo()메서드를 호출하면undo작업이 수행된다.UndoManager의registerUndo(withTarget:handler:)메서드를 사용하면undo stack에handler 클로저를target에 대한undo operation으로 넣을 수 있고,undo()호출 시 해당 클로저가 실행된다.
undo manager가undo/redo작업을 수행할 수 있도록target은reference type으로 전달되어야 하며,ARC를 피하기 위해서unowned reference를 갖는다.
-
주로
Intent 함수들을 호출할 때 유저가undo하고 싶을 것이므로 보통ViewModel내 관련 코드가 위치하는데,Model이value type인 경우 (handler에서 쓰일)snapshot을 만들기 쉬워 쉽게undo할 수 있다 -
그러나
UndoManager자체는View의Environment의 일부이므로,Intent 함수가 호출될 때View로부터 넘겨받아야 한다.
undoablyPerform(operation:with:doit)
undo작업을 좀 더 쉽게 하기 위해 만든 함수인데 기본 메커니즘은undoable하게 만들고 싶은 작업인doit을 수행하기 전에Model을 로컬 변수에 저장한 다음(스냅샷을 저장),doit을 수행하면서,undoManager를 사용해서undo operation을 등록하는 것. 이때,undo operation은 현재Model을 아까 로컬 변수에 저장한Model로 바꿔주는 클로저다.- 여기서
undo operation을undoablyPeform하면undo를undo하는 것이므로redo가 가능해진다! operation인자는 나중에View에서menu item이 어떤 작업을undo할지 표시하는 데 쓰기 위해서 받는String
- 여기서
class EmojiArtDocument: ReferenceFileDocument {
    ...
    private func undoablyPerform(operation: String, with undoManager: UndoManager? = nil, doit: () -> Void) {
        let oldEmojiArt = emojiArt  // snapshot our Model so we can undo back to it
        doit()  // do some operation
        // make it undoable
        undoManager?.registerUndo(withTarget: self) { myself in
            // made it redo by making undo undoable...
            myself.undoablyPerform(operation: operation, with: undoManager) {
                myself.emojiArt = oldEmojiArt
            }
        }
        undoManager?.setActionName(operation)
    }
}- 우리는
Intent 함수들의 작업을undo하려고 하는 것이므로 각Intent 함수내부에서 작업을 수행하는 코드를undoablyPerform(operation:with:doit:)의doit인자로 넣어주면 해당 작업이undoable해진다!
class EmojiArtDocument: ReferenceFileDocument {
    func setBackground(_ background: EmojiArtModel.Background, undoManager: UndoManager?) {
        undoablyPerform(operation: "Set Background", with: undoManager) {
            emojiArt.background = background
        }
    }

    func addEmoji(_ emoji: String, at location: (x: Int, y: Int), size: CGFloat, undoManager: UndoManager?) {
        undoablyPerform(operation: "Add \(emoji)", with: undoManager) {
            emojiArt.addEmoji(emoji, at: location, size: Int(size))
        }
    }

    func moveEmoji(_ emoji: EmojiArtModel.Emoji, by offset: CGSize, undoManager: UndoManager?) {
        if let index = emojiArt.emojis.index(matching: emoji) {
            undoablyPerform(operation: "Move", with: undoManager) {
                emojiArt.emojis[index].x += Int(offset.width)
                emojiArt.emojis[index].y += Int(offset.height)
            }
        }
    }

    func scaleEmoji(_ emoji: EmojiArtModel.Emoji, by scale: CGFloat, undoManager: UndoManager?) {
        if let index = emojiArt.emojis.index(matching: emoji) {
            undoablyPerform(operation: "Scale", with: undoManager) {
                emojiArt.emojis[index].size = Int((CGFloat(emojiArt.emojis[index].size) * scale).rounded(.toNearestOrAwayFromZero))
            }
        }
    }
}
@Environment(.undoManager)
- 위에서 얘기했듯이,
undoManager는View의Environment Value에 해당되므로View에서intent 함수를 호출할 때 인자로 넣어줘야 한다. 따라서 아래와 같이undoManager를 선언해서 쓴다!
struct EmojiArtDocumentView: View {
    ...
    @Environment(\.undoManager) var undoManager
    ...
}
# undo/redo 버튼 만들기
%20(3rd%20generation)%20-%202021-11-27%20at%2002.00.03.png)
undo/redo를 구현했으니, 유저가 실제로 해당 작업을 할 수 있도록View의toolbar에undo/redo버튼을 달아주면 이제 진짜 끝이다..다음extension과View를 사용했는데,UndoManager extension은 만약undo/redo할 작업이 있는 경우 해당 작업의 이름이나 디폴트값을 리턴하도록 하고,UndoButton은 작업의 이름을 인자로 받아서undo/redo할 작업이 있는 경우에만 버튼의 라벨로 써서 버튼을 나타낸다.
struct UndoButton: View {
    let undo: String?
    let redo: String?

    @Environment(\.undoManager) var undoManager

    var body: some View {
        let canUndo = undoManager?.canUndo ?? false
        let canRedo = undoManager?.canRedo ?? false
        if canUndo || canRedo {
            Button {
                if canUndo {
                    undoManager?.undo()
                } else {
                    undoManager?.redo()
                }
            } label: {
                if canUndo {
                    Image(systemName: "arrow.uturn.backward.circle")
                } else {
                    Image(systemName: "arrow.uturn.forward.circle")
                }
            }
            .contextMenu {
                if canUndo {
                    Button {
                        undoManager?.undo()
                    } label: {
                        Label(undo ?? "Undo", systemImage: "arrow.uturn.backward")
                    }
                }
                if canRedo {
                    Button {
                        undoManager?.redo()
                    } label: {
                        Label(redo ?? "Redo", systemImage: "arrow.uturn.forward")
                    }
                }
            }
        }
    }
}

extension UndoManager {
    var optionalUndoMenuItemTitle: String? {
        canUndo ? undoMenuItemTitle : nil
    }
    var optionalRedoMenuItemTitle: String? {
        canRedo ? redoMenuItemTitle : nil
    }
}
struct EmojiArtDocumentView: View {
...
@Environment(\.undoManager) var undoManager
var documentBody: some View {
GeometryReader { geometry in
ZStack {
// some code
}
.toolbar {
UndoButton(
undo: undoManager?.optionalUndoMenuItemTitle,
redo: undoManager?.optionalRedoMenuItemTitle
)
}
}
}
...
}# system file에서 해당 타입 열 수 있게 하기
%20(3rd%20generation)%20-%202021-11-27%20at%2001.48.08.png)
%20(3rd%20generation)%20-%202021-11-27%20at%2001.48.12.png)
-
EmojiArt랑 비슷해 보이지만 아이패드의Files를 이용해서 저장된 파일들을 본 건데,Sun.emojiart를 누르면emojiart가 뜨는 게 아니고 그냥 설명만 뜬다 -
iOS에
시스템 Files app에서.emojiart document들을 열어도 된다고 알려줘야 하는데Info.plist에서우클릭 - Add Row - Supports Document Browser를Yes로 설정해주면 된다! 이렇게 하면시스템 Files 앱에서.emojiart파일들을 눌렀을 때 파일이 열리면서EmojiArt앱으로 연결된다.
☀️ 느낀점
-
사실 새 프로젝트를 생성할 때마다 자동으로 생성되는
App파일을 들여다보지 않은 게 걸려서 완강하고 나면 꼭 공부해봐야지 했는데 역시...교수님은 계획이 다 있으셨다...초반에는 배울 게 너무 많아서App파일을 보고도 아 미래의 나에게 맡기자라고 생각했는데 슬슬Swift이제 좀 익숙해졌다 싶어서 아 이것도 이제 진짜 봐야지 싶을 때 딱 강의 주제로 나오다니 소름...ㅋㅋㅋㅋㅋㅋㅋ -
Document-oriented App이란 무엇인가에 대해서 감이 잘 오지 않았는데 이번 강의를 들으면서 일반 앱과의 차이를 알 수 있었다.
App Architecture
- SceneStorage : state restoration, essentially b/c ur gonna restore the state of ur applicatoin from when u had quit or killed
- AppStorage : kinda an interface to UseDefaults, but does invalidate ur View when u change it
- ScaledMetric: lets u modify fonts that have been set with custom fonts for their own
SwiftUI has the whole thing that helps enhance accessiblity..try to look it up later
Document Architecture
-
each of the Scenes(i.e. the top level View) in the documentGroup is using its own VM
-
protocol ReferenceFileDocument : it's all about putting ur document onto disc and getting it off the disc
-
Undo: the way that the document architecture knows that ur documnet has changed and can auto-save it
- the whole saving mechanism in iOS is based on auto-saving ur documnet(unlike Mac, there's no save menu) -
FileDocument: sth that the Model must conform to if we don't want to implement Undo...it's about put the model in and out of disc
- init : gives ReadConfiguration which tells u the file from which u r suppose to read ur document- fileWrapper : asks u to give it a FileWrapper that contains urself encoded somehow for the file system. filewrapper is usually just storing a blob of data in there but it can do more sophisticated storage of complicated files
- used with Value types
-
ReferenceFileDocument
- for reference types...- fileWrapper method now requires and return a snapshot
Undo
- it's easy to Undo in ur ViewModel if ur Model is a struct b/c value types can be copied around easily
making UTTypes : 45분 전후
- need to fill things to desribe to the system what our app type is
- define exported/imported type identifiers
- Document type : tell exported/imported type identifiers represent a document that our application owns
Redo Undo : 1:05분
.jpg? .emojiart!
-
make type EmojiArtDocument...
-
mark Document Type as owner b/c we're not just a viewer, we actually own this type, so we're the ones who r gonna be registering it on the iOS device and all that
-
make reference blahblah protocol
-
undo/redo