Chapter 01. Welcome to Core Data
Why Is Core Data So Important?
In Most cases, our data structure is a refined representation of our app business.
Your local data store is the soul of your app. It looks different from one user to anotehr and holds the user's most private data.
A little Bit about Core Data History
1990s, working with objects created a problem - SQL databases work in a two dimentional datas structure.
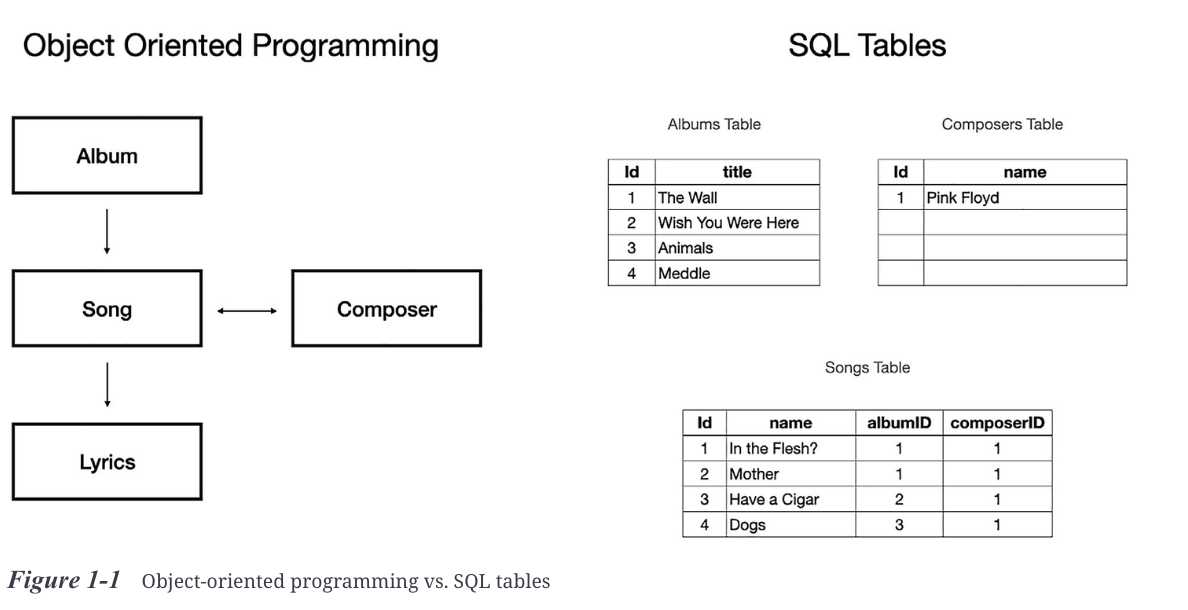
What developers had to do (and still need to) is to convert query results from tables to objects and vice versa - insert multidimensional objects into a two-dimensional data structure.
Core Data was born
EOF worked with both Java and Objective-C and was used to abstract the low-level data format and allow it to be based on non-SQL stores.
When apple launched "Cocoa," their OOP interface, they included Core Data and two other frameworks - Foundation Kit and Application Kit.
Chapter 02. Core Data Basics and Setup
What exactly is Core Data?
Sometimes, our store is not event persistent because Core Data is first and foremost and object graph manaer.
Core Data is tightly connected to our app model. If XIB, SwiftUI, or Stroyboards are the "V" in MVC/MVVM, then Core Data represents the "M"(the Model)
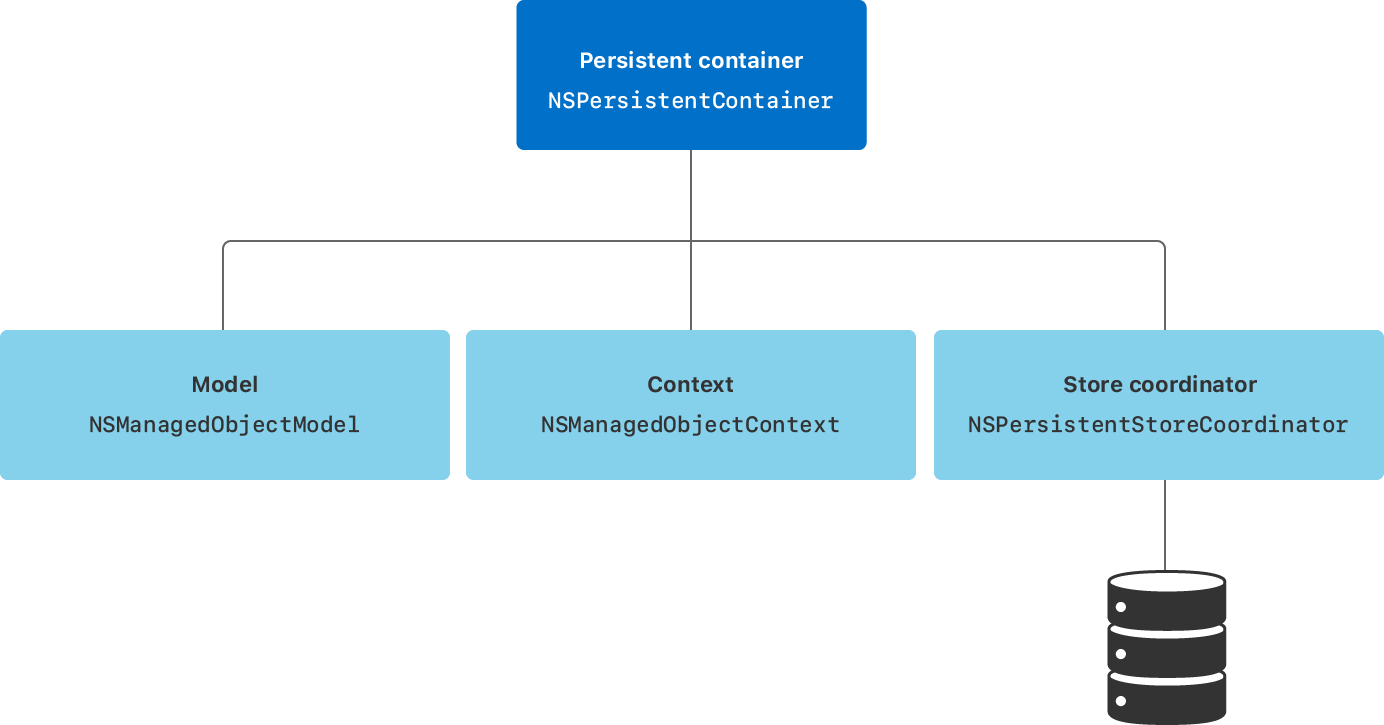
The Core Data Stack
+-----------------------------+
|  Managed Object Context     |
+-----------------------------+
            |  ^
            |  | Context saves and fetches from
            v  | Persistent Store Coordinator
+-----------------------------+
| Persistent Store Coordinator|
+-----------------------------+
            |  ^
            |  | Coordinator interacts with
            v  | Persistent Store
+-----------------------------+
|       Persistent Store      |
+-----------------------------+


+-----------------------------+
|  Managed Object Context     | <--- You interact with this
+-----------------------------+
            |  ^
            |  | Context communicates with
            v  | Persistent Store Coordinator
+-----------------------------+
| Persistent Store Coordinator| <--- Central hub for managing data stores
+-----------------------------+
        /           \
       /             \
      v               v
+-----------+    +-----------+
| Store #1  |    | Store #2  |    <--- Can manage multiple stores
+-----------+    +-----------+
(SQLite)       (In-Memory, etc.)
The main three components that Core Data is built upon - the managed data model, the persistent store coordinator, and the managed object context.
private lazy var managedObjectModel: NSManagedObjectModel = {
	guard let url = Bundle.main.url(forResource: "MyModel", withExtension: "momd") else {
    	fatalError("Unable to Find Data Model")
    }
    guard let managedObjectModel = NSManagedObjectModel(contentsOf: url) else {
    	fatalError("Unable to Load Data Model")
    }
    return managedObjectModel
}
At first, we get the model file URL, and then initialize object model while passing the model file URL. We just created the first layer of our Stack.
The persistent store is the place where Core Data saves our objects, Whenever we create a new entity or modify an existing one, at the end of the road, the data is being saved in our persistent store.
Apple provices us with four different store types - one in memory and three saved on disk.
The in-memory store type is a unique one because it's not a persistent store. Core Data objects behave as usual in this
Core Data is not a "Database". It's an "object graph and persistent framework." it's a framework that helps your objects' relationships. Its additional feature is to save those objects and their relationships to disk. This means that persistent storage is an optional feature of Core Data!"
So in memory stores are being used when we want to maintain a temporary graph of objects.
private lazy var persistentStoreCoordinator: NSPersistentStoreCoordinator = {
	let persistentStoreCoordinator = NSPersistentStoreCoordinator(managedObjectModel: self.managedObjectModel)
    do {
   		try persistentStoreCoordinator.addPersistentStore(ofType: NSInMemoryStoreType,
        												  configurationName: nil,
                                                          at: nil,
                                                          options: nil)
   } catch {
       fatalError("Unable to Add In-Memory Store")
   }

   return persistentStoreCoordinator
}()
The
NSPersistentStoreCoordinatormission is to connect our object model to our store.
When using the in-memory store type, all the "saved" data are gone when the app is killed. So for a persistent storage, we have better solutions, like a SQLite-based store.
The SQLite Store type is probably the most common store type used in Core Data.
Core Data makes a SQLite query, parses the results, and keeps what's relevant in memory to make fetch requests.
private lazy var persistentStoreCoordinator: NSPersistentStoreCoordinator = {
        let persistentStoreCoordinator = NSPersistentStoreCoordinator(managedObjectModel: self.managedObjectModel)
        let fileManager = FileManager.default
        let storeName = "MyStorage.sqlite"
        let documentsDirectoryURL = fileManager.urls(for: .documentDirectory, in: .userDomainMask)[0]
        let persistentStoreURL = documentsDirectoryURL.appendingPathComponent(storeName)
        do {
           let options = [
               NSMigratePersistentStoresAutomaticallyOption : true,
               NSInferMappingModelAutomaticallyOption : true
           ]
           try persistentStoreCoordinator.addPersistentStore
           (ofType: NSSQLiteStoreType, configurationName: nil,
           at: persistentStoreURL, options: options)
        } catch {
           fatalError("Unable to Add Persistent Store")
        }
        return persistentStoreCoordinator
    }()
If we change the object model after the SQLite DB file is already created, you app might crash. But Core Data has a solution for that.
Core Data has its unique way of organizing your entities' data in tables, and the SQLite file is for the use of the Core Data framework only.
The Context
A context often means "environment," which is precisely the usage of context in Core Data. Any work with objects is relevant only to the specific context that we work on until we "save" it
lazy var managedObjectContext: NSManagedObjectContext = {
    let managedObjectContext = NSManagedObjectContext(concurrencyType: .mainQueueConcurrency Type)
    managedObjectContext.persistentStoreCoordinator = self.persistentStoreCoordinator
    return managedObjectContext
}()
Remember, our context is on context is on top of the stack, linked to our data model and the persistent store.
Core Data Container
+---------------------------------+
|      NSPersistentContainer      |
| +-----------------------------+ |
| |  Managed Object Context     | | <--- You interact with this
| +-----------------------------+ |
|             |  ^                |
|             |  |                |
|             v  |                |
| +-----------------------------+ |
| | Persistent Store Coordinator| | <--- Orchestrates data flow
| +-----------------------------+ |
|             |  ^                |
|             |  |                |
|             v  |                |
| +-----------------------------+ |
| |       Persistent Store      | | <--- Actual data storage
| +-----------------------------+ |
+---------------------------------+
let container = NSPersistentContainer(name: "MyStore")
container.loadPersistentStores(completionHandler: { (storeDescription, error) in }Two lines of code are more than enough to set up Core data. The container has everything we need to move on with our code.
+-------------------------------------------+
|                   App                     |
| +-------------+  +---------------------+  |
| | Main Queue  |  | Background Queue(s) |  |
| | +---------+ |  | +-----------------+ |  |
| | | Context | |  | | Context         | |  |
| | +---------+ |  | | (One per Queue) | |  |
| +-------------+  +---------------------+  |
|   |       ^          |       ^            |
|   |       |          |       |            |
|   v       |          v       |            |
| +---------------------------------------+ |
| |            Core Data Stack            | |
| +---------------------------------------+ |
+-------------------------------------------+
let context = persistentContainer.viewContextWhy is it called "
viewContext"? Remember that context is used to handle our data in a multi-thread environment. It also means that every queue has its own context, and it's true for main queue as well.
The viewContext belongs to the main queue, the one that also manages the UI. That's the reason the
viewContextis called like that.
#1
let container = NSPersistentContainer(name: "MyStore")#2
var objectModel: NSManagedObjectModel {
    guard let url = Bundle.main.url(forResource: "MyModel", withExtension: "momd") else {
        fatalError("Unable to Find Data Model")
    }
    guard let managedObjectModel = NSManagedObjectModel(contentsOf: url) else {
        fatalError("Unable to Load Data Model")
    }
    return managedObjectModel
}

func persistentContainer() {
    let container = NSPersistentContainer(name: "mysqlFile", managedObjectModel: objectModel)
}
+---------------------------------------------------+
| NSPersistentContainer |
| +-----------------------------------------------+ |
| | Core Data Stack | |
| | +-------------------------------------------+ | |
| | | Managed Object Context | | | <-- Interaction point for CRUD operations
| | +-------------------------------------------+ | |
| | | ^ | |
| | Reads from | | Writes to | |
| | v | | |
| | +-------------------------------------------+ | |
| | | Persistent Store Coordinator | | | <-- Coordinates between context and stores
| | +-------------------------------------------+ | |
| | | ^ | |
| | Translates to/from | | SQL, Binary, etc. | |
| | v | | |
| | +-------------------------------------------+ | |
| | | Persistent Stores (e.g., SQLite file) | | | <-- Actual data storage
| | +-------------------------------------------+ | |
| | +-------------------------------------------+ | |
| | | Managed Object Model | | | <-- Model definitions for your data
| | +-------------------------------------------+ | |
| +-----------------------------------------------+ |
+---------------------------------------------------+
Introduced in iOS 10, NSPersistentContainer simplifies the setup of the Core Data stack.
It encapsulates the creation and configuration of the stack components, reducing the boilerplate code needed to get Core Data up and running.
 // MARK: - Core Data stack
lazy var persistentContainer: NSPersistentContainer = {
    /*
     The persistent container for the application. This implementation creates and returns a container, having loaded the store for the application to it. This property is optional since there are legitimate error conditions that could cause the creation of the store to fail.
    */
    let container = NSPersistentContainer(name: "MyCoreDataApp2")
    container.loadPersistentStores(completionHandler: { (storeDescription, error) in
        if let error = error as NSError? {
           // Replace this implementation with code to handle the error appropriately.
            // fatalError() causes the application to generate a crash log and terminate. You should not use this function in a shipping application, although it may be useful during development.
            /*
            Typical reasons for an error here include:
             * The parent directory does not exist, cannot be created, or disallows writing.
             * The persistent store is not accessible, due to permissions or data protection when the device is locked.
             * The device is out of space.
             * The store could not be migrated to the current model version.
                 Check the error message to determine what the actual problem was.
             */
            fatalError("Unresolved error \(error), \(error.userInfo)")
        }
    })
    return container
}()
Apple chose to put the container in your App Delegate because we need one and only one instance of the Core Data container.
CoreData in SwiftUI
There is no App Delegate. There is a struct conforming to the App protocol, and just like other structs that conform to View, the “app” struct is immutable. So we can’t use the data held by the persistent store.
Chapter 03. The Data Model
The Entity
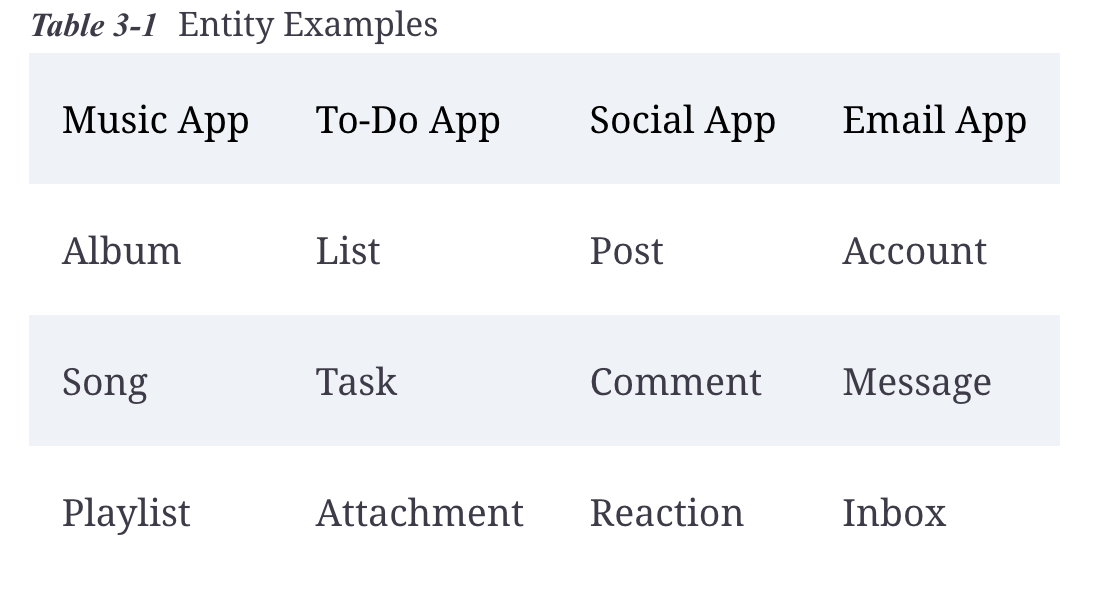
The entity is the core of our model, and as mentioned before, it's also the core of our app's main business in many cases.
The first reaction to entities is to try and compare them to what we know from SQLite and see them as database tables.
Entities should be an explicit and declarative representation of our app's main idea. On the other hand, tables represent the implementation of these ideas.
Number
there are six types of “Number” in Core Data .
The first three are integers: Integer 16, 32, and 64. This is equivalent to Swift int16, int32, and int64.
Integer 16 – For numbers between –32,768 and 32,767
Integer 32 – For numbers between –2,147,483,648 and 2,147,483,647
Integer 64 – For numbers between –9,223,372,036,854,775,808 and 9,223,372,036,854,775,807
var sum: Float = 0.3 + 0.6
let result = (sum == 0.9) // return false!
So why do we need the Decimal type? Don’t Float and Double hold fractional numbers? Float and Double may result in inaccurate answers when trying to do math calculations or trying to test their values.
Float and Double data types are suitable for storing values used on UI animation and painting, for example.
How Is Your Data Model Really Created
let model = NSManagedObjectModel()
let album = NSEntityDescription()
album.name = "Album"
album.managedObjectClassName = "Album"
let titleAttribute = NSAttributeDescription()
titleAttribute.name = "Title"
titleAttribute.attributeType = .stringAttributeType
let properties = [titleAttribute]
album.properties = properties
model.entities = [album]
Using the Core Data model gives us the feeling that the data model is static and cannot be created in runtime. But it’s not true. Core Data is much more dynamic than you think. In fact, you can even create your whole data model, in runtime, straight from your code!
What Is NSEntityDescription?
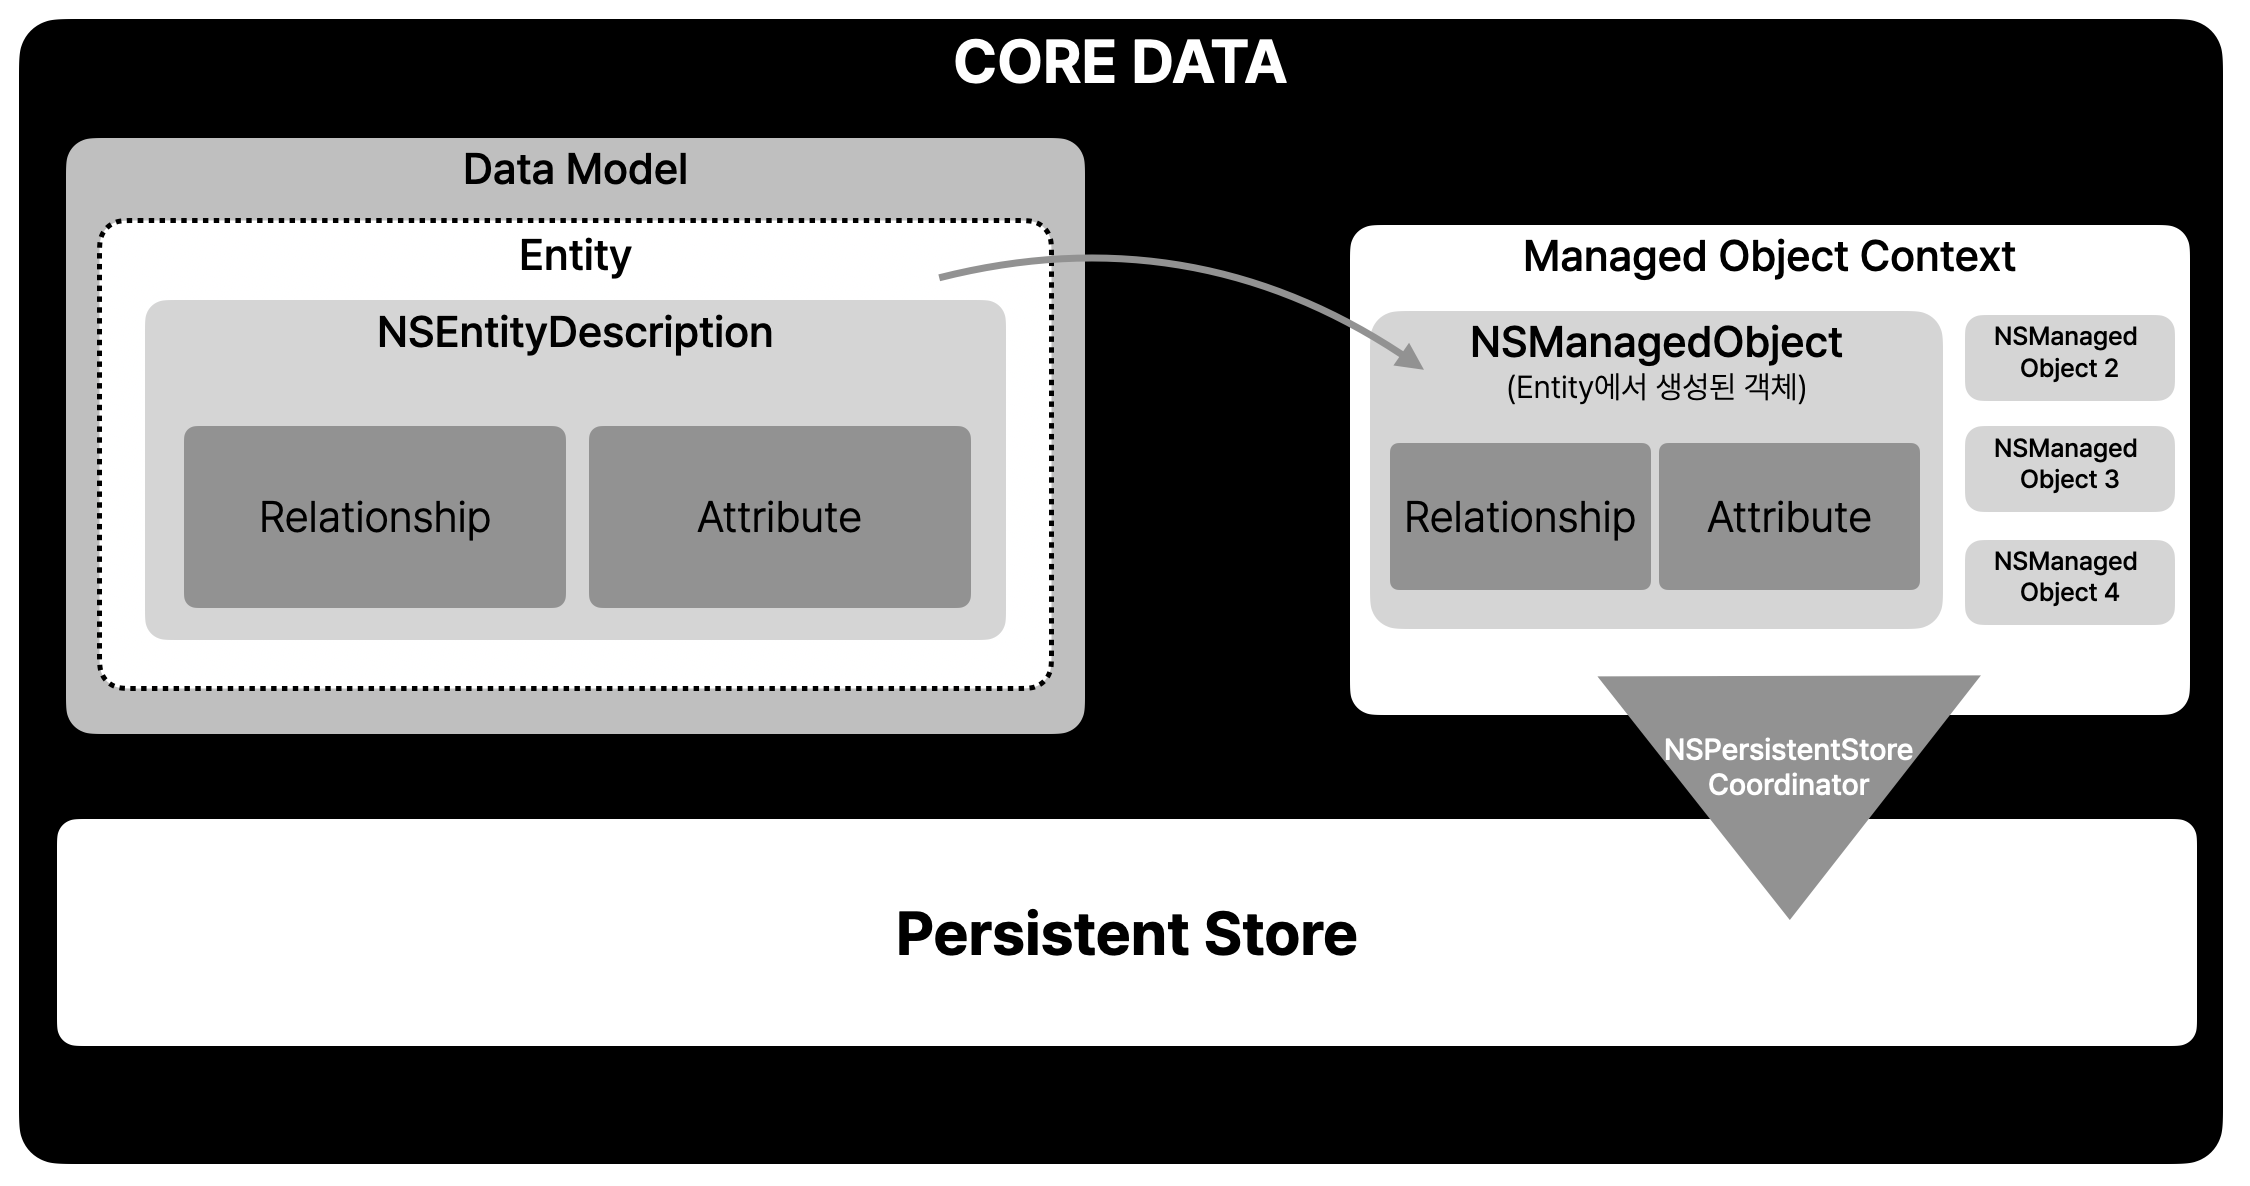
When we set up a SQL database, the first thing we do is create a table. Creating a table doesn’t mean we create any entities – it just means we give the table its name and define its properties and their type.
In Core Data, NSEntityDescription is much like tables in SQLite (or “classes” in object-oriented programming) – it defines how our entities will look.
let entities : [NSEntityDescription] = PersistenceController.shared.container.managedObjectModel.entities // get all entity descriptions in our data model
let entity : NSEntityDescription = PersistenceController.shared.container.managedObjectModel.entitiesByName["Album"]! // get specific description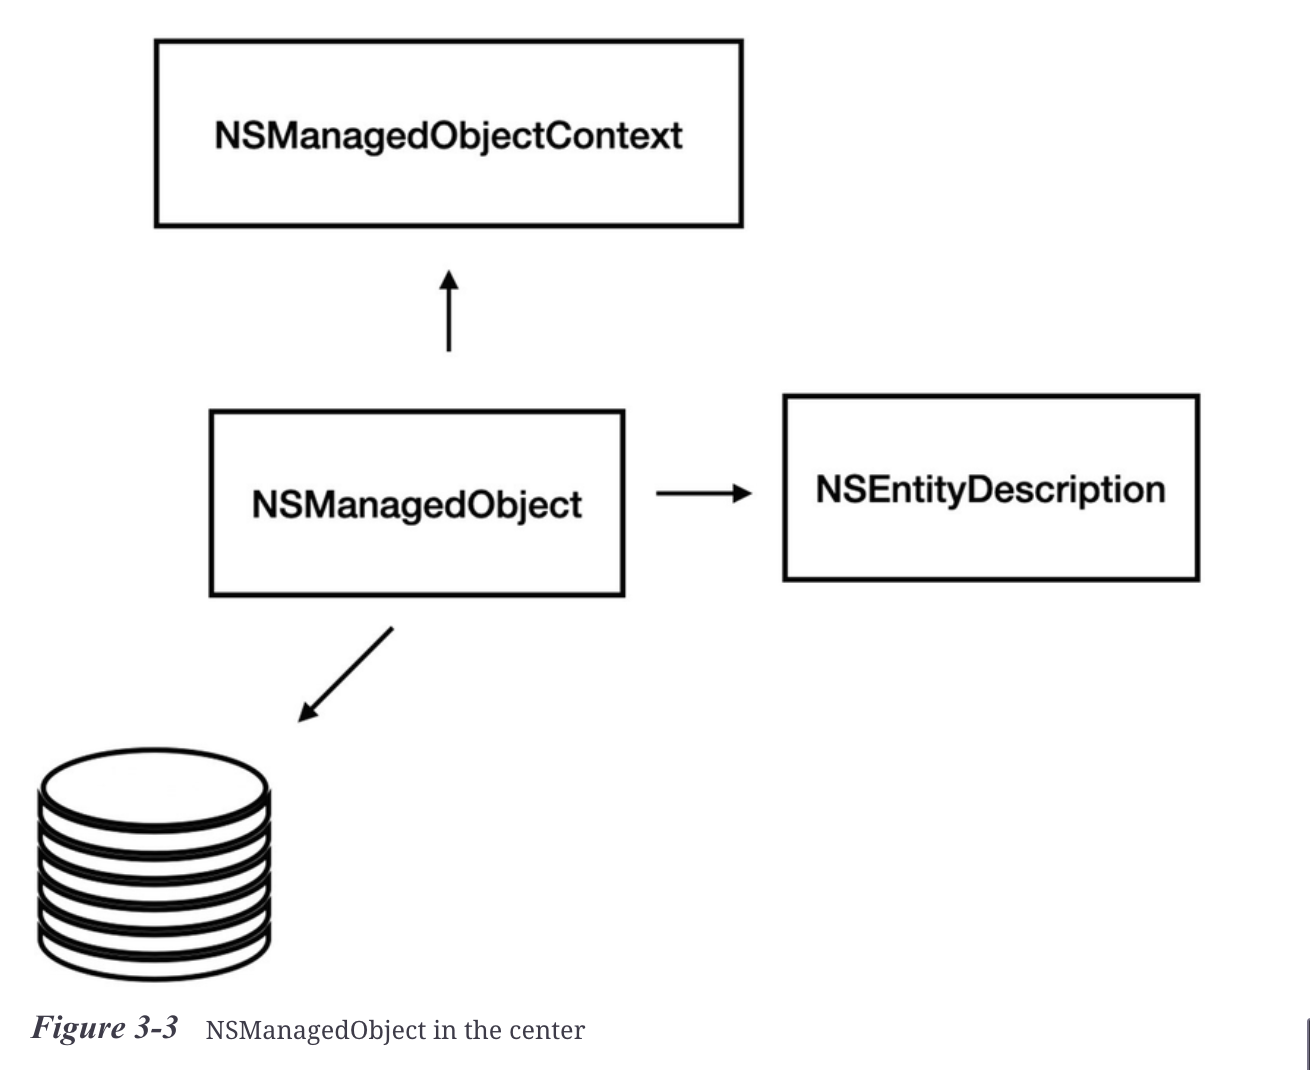
+----------------------------------+
|      NSManagedObjectContext      |
|  +----------------------------+  |
|  |       NSManagedObject      |  |
|  |  +----------------------+  |  |
|  |  |  NSEntityDescription  |  |  |
|  |  |                      |  |  |
|  |  +----------------------+  |  |
|  +----------------------------+  |
+----------------------------------+
NSEntityDescription is like the grand blueprint in the king's castle. It defines the structure and properties of a data entity.
NSManagedObject, akin to a living, breathing citizen of the kingdom. This citizen is created based on the blueprint provided by NSEntityDescription. Each NSManagedObject represents a single, concrete instance of an entity in your data model.
NSManagedObjectContext acts as the realm or the environment where these entities interact. It's like the kingdom itself, where all the citizens (NSManagedObjects) live and interact.
NSEntityDescription provides the blueprint (entity structure), NSManagedObject brings it to life (data instance), and NSManagedObjectContext oversees their interactions in the kingdom (data management context).
Save Data
+-----------------------+
|   Core Data Update    |
| +-------------------+ |
| | 1. Fetch Entity   | |
| |    Attributes     | |
| +-------------------+ |
| +-------------------+ |
| | 2. Retrieve       | |
| |    Current Value  | |
| +-------------------+ |
| +-------------------+ |
| | 3. Update Value   | |
| +-------------------+ |
+-----------------------+
//Act 1: Uncovering the Attributes
let allAttributes = myAlbum.entity.attributesByName
//Act 2: Discovering the Current Tale
let title = myAlbum.value(forKey: "title") as? String
//Act 3: Bestowing a New Title
myAlbum.setValue("Dark Side of The Moon", forKey: "title")We are in a weird situation here. First, I showed you that managed objects could have a “title” property. But then, I told you that attributes are always being added in runtime. How can we add properties before we know what the corresponding attributes are?
+---------------------------+
|   @NSManaged Magic        |
| +-----------------------+ |
| | Runtime Property      | |
| |    Creation           | |
| +-----------------------+ |
| +-----------------------+ |
| | Dynamic Setters and   | |
| |   Getters             | |
| +-----------------------+ |
+---------------------------+
class Album {
@NSManaged var title : String
}You're instructing the compiler that the implementation of this property (how it stores and retrieves data) will be handled by Core Data at runtime, not by the usual Swift code.
Class Definition
Class Definition is the simplest and easiest way of generating managed classes for your Core Data entities. Class Definition is the “automatic” way of generating classes.
Manual/None
When selecting the Manual/None option , Xcode does the opposite of Class Definition, meaning nothing.
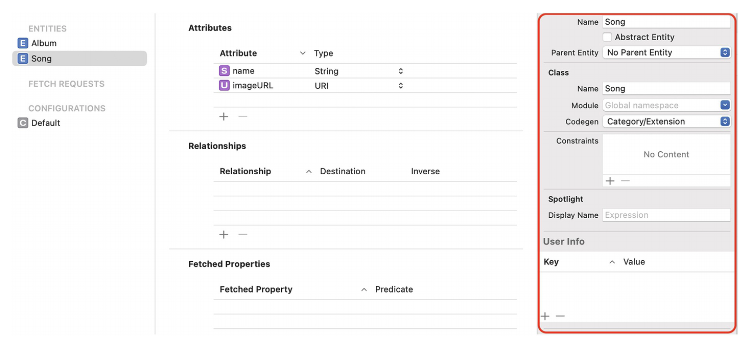
After we select a group and location to save the generated files, we get two files – Song+CoreDataClass and Song+CoreDataProperties.
import Foundation
import CoreData
extension Song {
    @nonobjc public class func fetchRequest() -> NSFetchRequest<Song> {
        return NSFetchRequest<Song>(entityName: "Song")
    }
    @NSManaged public var imageURL: URL?
    @NSManaged public var name: String?
}
extension Song : Identifiable {
}
import Foundation
import CoreData

@objc(Song)
public class Song: NSManagedObject {
}
The question is, Why did Xcode decide to create two separate files for each entity?
+-------------------------------+
|   Core Data Code Generation   |
| +---------------------------+ |
| | Old Way: Single File      | |
| |   Overwrite Issues        | |
| +---------------------------+ |
| +---------------------------+ |
| | New Way: Two Files        | |
| |   - Properties Extension  | |
| |   - Developer's Class     | |
| +---------------------------+ |
+-------------------------------+
The Scroll of Properties: This first scroll, crafted by the master scribe, held the basic truths of the entity – its attributes and relationships as defined in the Core Data blueprints. Whenever the blueprints changed, this scroll would be rewritten, but it contained only the fundamental facts, nothing more.
The Scroll of Custom Tales: The second scroll was given to the developer wizards for their exclusive use. Here, they could write their custom enchantments, safe in the knowledge that the master scribe's rewrites would not touch this scroll. The wizards were now free to pen their unique spells and tales, adding rich layers to the entities' stories without fear of losing their work.
Category/Extension
+-----------------------------------+
|   Category/Extension Codegen      |
| +-------------------------------+ |
| | First Scroll: Managed by Code | |
| |   (Manual)                    | |
| +-------------------------------+ |
| +-------------------------------+ |
| | Second Scroll: Auto-Generated | |
| |   by Xcode (Properties)       | |
| +-------------------------------+ |
+-----------------------------------+
If you choose “Category/Extension,” the properties extension will be created in the derived data and maintained by Xcode.
Optional
Optional in Core Data means that when we save the data, the optional property can be left empty (nil).
The reason Core Data generates an optional property, even if declared as non-optional, is the way Core Data works. When we create a new entity, the property is still empty, and until the time you need to save it, it’s totally valid.
Transient
var fullname: String {
    return (self.firstName ?? "") + " " + (self.lastName ?? "")
}
It's a transient attribute because this fullName is not written down in the records; it is conjured up whenever someone asks for it.
This can give you added “smart” properties without maintaining them
Use Scalar Type
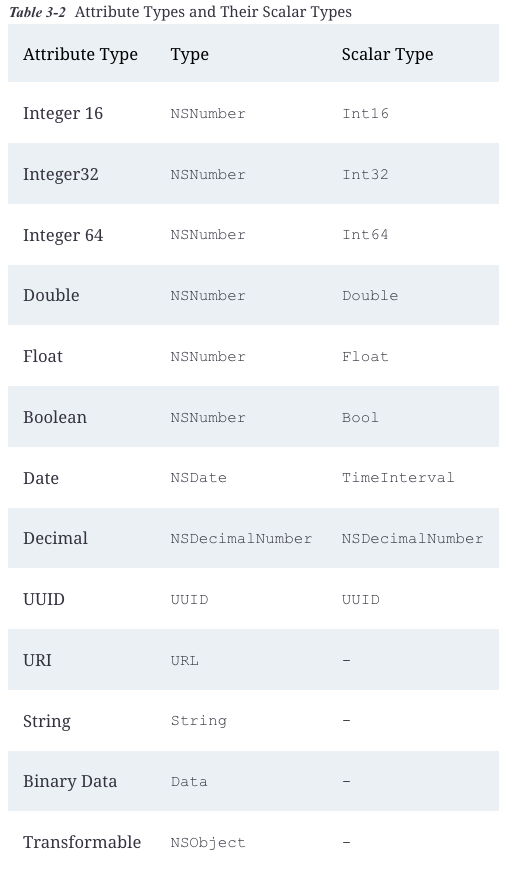
You already saw that Core Data attributes are generated as classes and not primitive types .
So, for every attribute type, there’s a scalar type – the type that is used in memory.
//On the opposite direction, when setting a new value, we need to wrap it as NSNumber:
album.duration = NSNumber(value: 5.3)
Apple's current direction with Swift and Core Data encourages the use of Swift’s native types for simplicity, efficiency, and type safety. The automatic bridging between Swift and Objective-C makes this approach seamless, reducing the need to explicitly use NSNumber unless you're working in an Objective-C environment or with older codebases.
Chapter04. Relationships
Some theory first
The primary three forms of linking between entities are basically
- One-to-many
- Many-to-many
- One-to-one
One-to-Many
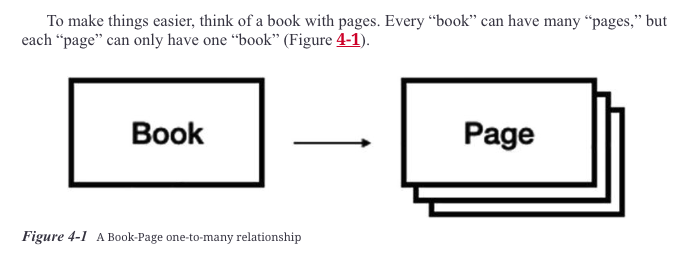
What is usually common in one-to-many relationships is that we use it to represent a hierarchy in our scheme, and that could be your finger rule.
The one-to-many relationship in data modeling is a fundamental way to represent hierarchical structures, mirroring many natural and human-made relationships. It helps organize and structure data in a way that reflects real-world interactions, making it intuitive and efficient to manage complex data sets in your applications.
Many-to-Many
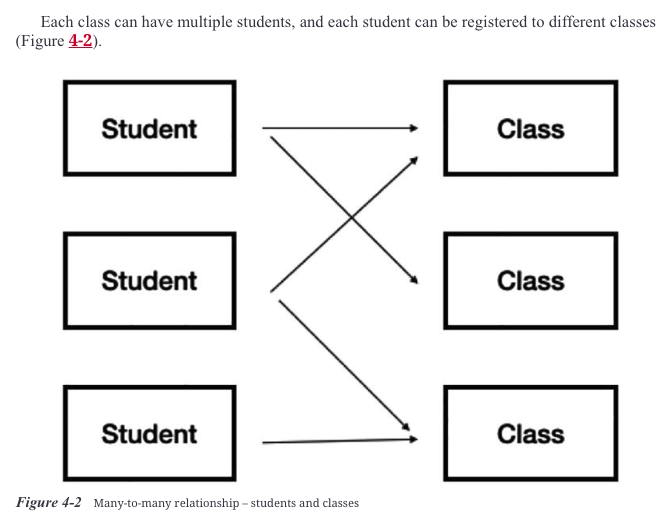
The example of “Student” and “Class” is just a classic one. In general, a many-to-many relationship often represents a subscription or a registration between entities.
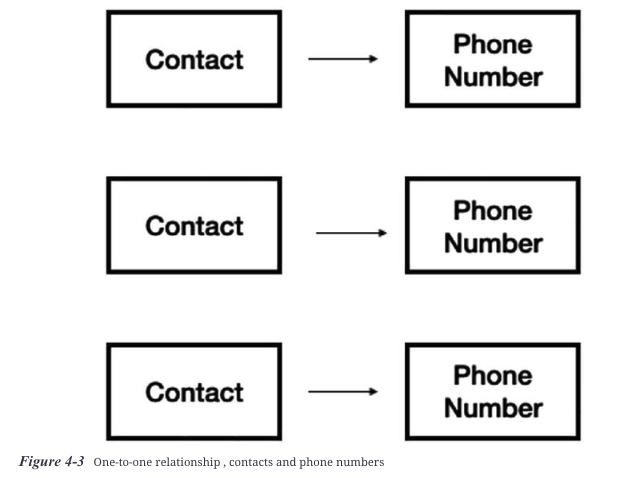
One to One
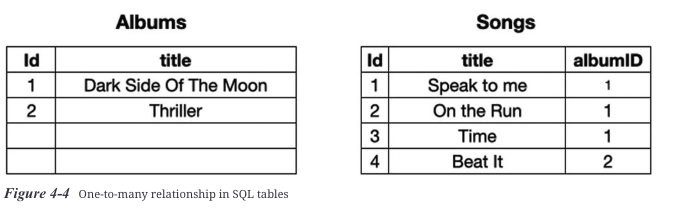
Relationships in SQL Tables
Back to Xcode
Creating Our First Relationship
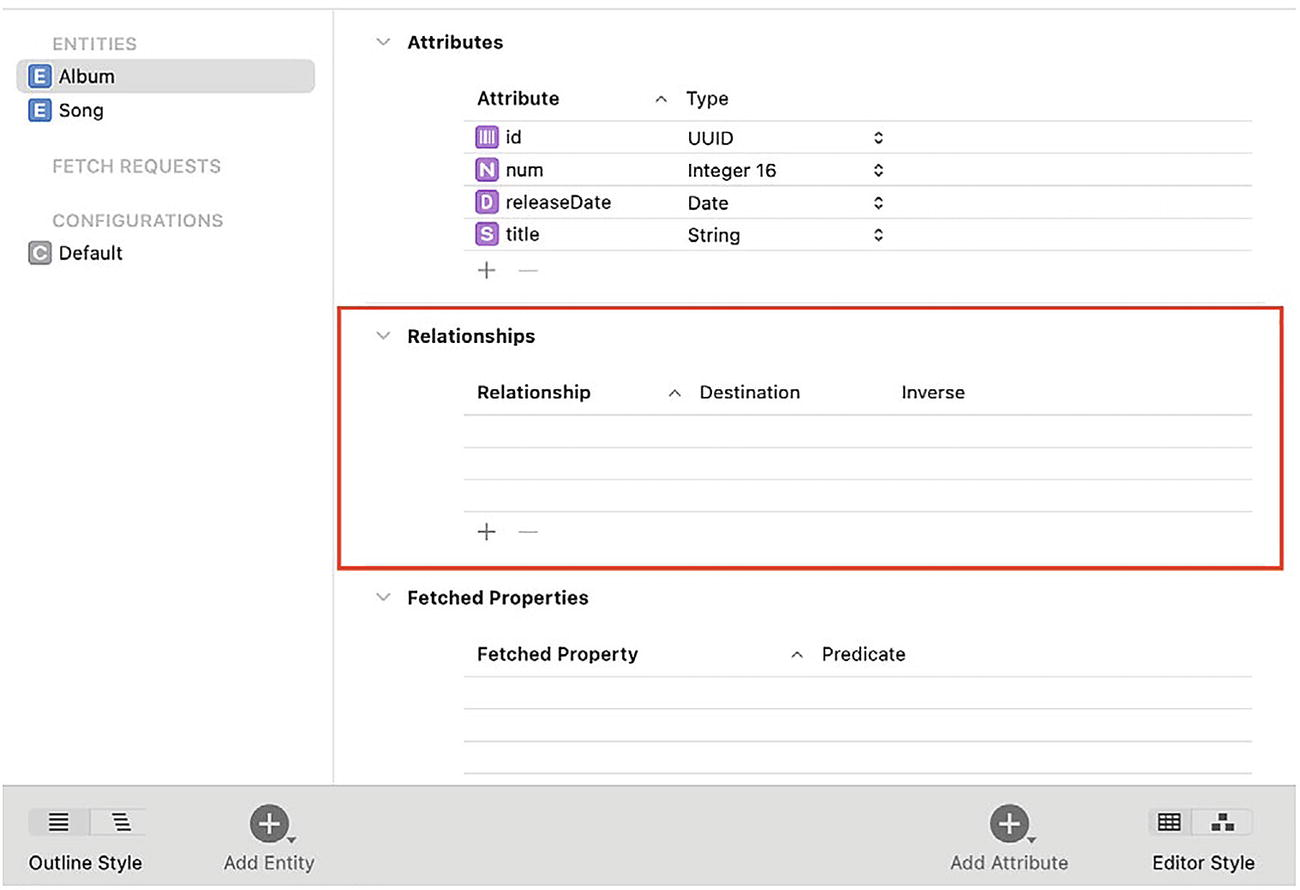
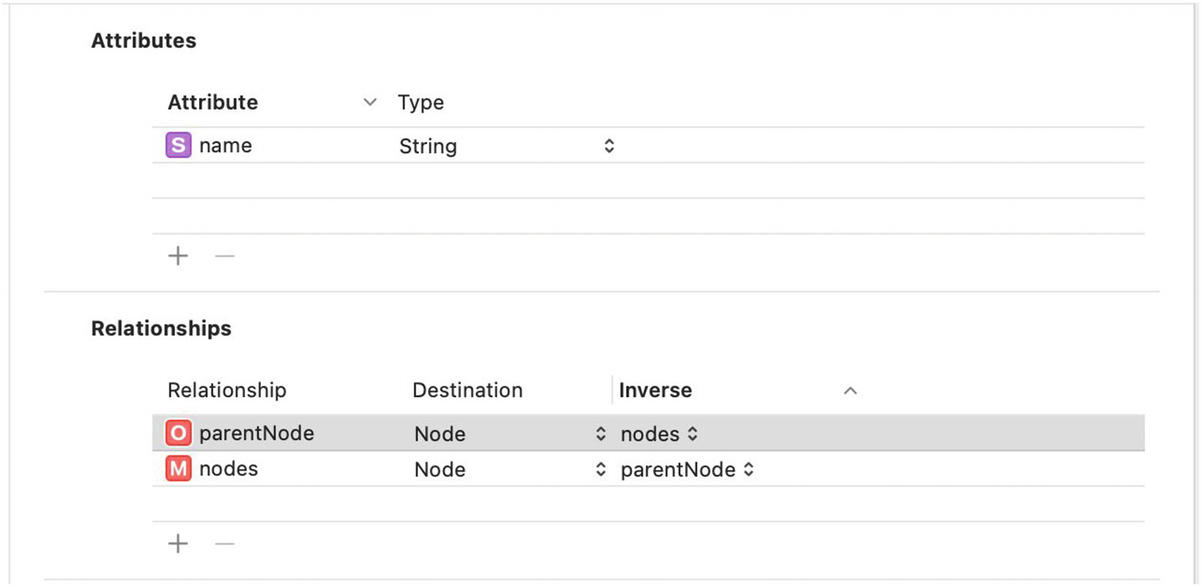
The Relationships table has three columns – Relationship, Destination, and Inverse.
The Inverse part is essential. When we link two entities (A and B) together, we need to create two relationships – from A to B and B to A. In fact, a relationship in Core Data is one way only. So, to actually link two entities, we need to define how to approach each other from both ways.
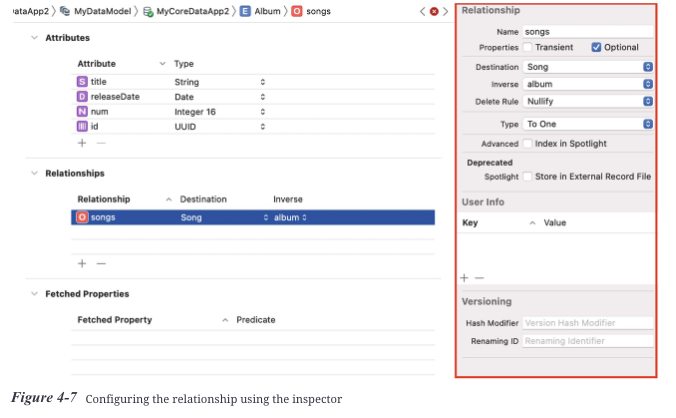
There are two options – “To One” and “To Many.”
Remember, because relationships in Core Data are one way only, we need to provide two relationships to connect two entities, one from each side.
Delete Rules
+-----------------------------+
|     Core Data:              |
|  Delete Rules Metaphor      |
|                             |
|  Album & Songs Example:     |
|                             |
|  - No Action                |
|  - Nullify                  |
|  - Cascade                  |
|  - Deny                     |
|                             |
|  Like a Tree & its Leaves   |
+-----------------------------+
No Action:
Imagine if, when a tree (Album) is cut down, its leaves (Songs) remain magically floating in the air, unaffected. This is 'No Action' - deleting the tree doesn't affect the leaves; they just exist without any connection to a tree.
Nullify:
Now picture when the tree is removed, the leaves gently fall to the ground. They're still there, but they're no longer attached to any tree. In 'Nullify', when an album is deleted, the songs remain but lose their association with the album.
Cascade:
Think of a scenario where if you cut down a tree, all its leaves also disappear. In 'Cascade', deleting an album leads to all its associated songs being deleted too.
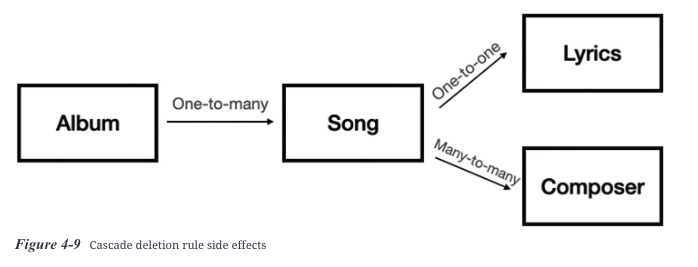
Deleting an album would delete all its songs. That’s good.
As a result, all the songs’ lyrics will be deleted as well. That also sounds like a logical behavior.
Another side effect is that Core Data will also delete all the songs’ composers.
Deny:
Finally, imagine trying to cut down a tree but being unable to do so because it still has leaves. In 'Deny', you can't delete an album if it still has songs.
The Deny rule’s goal is to protect our data from being corrupted by having orphan entities in our store “without a parent.”
Count (Again, Only for “To-Many” Relationships)
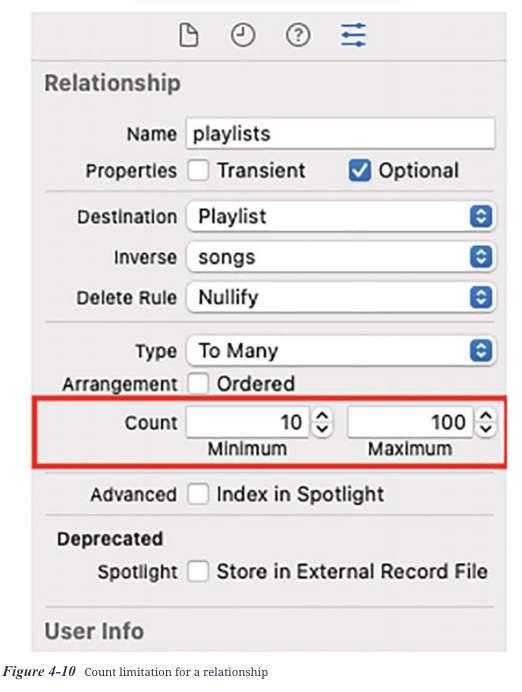
We can set the minimum and maximum number of entities in the collection, and if the collection holds a different count, saving the changes will eventually fail.
Editor Style
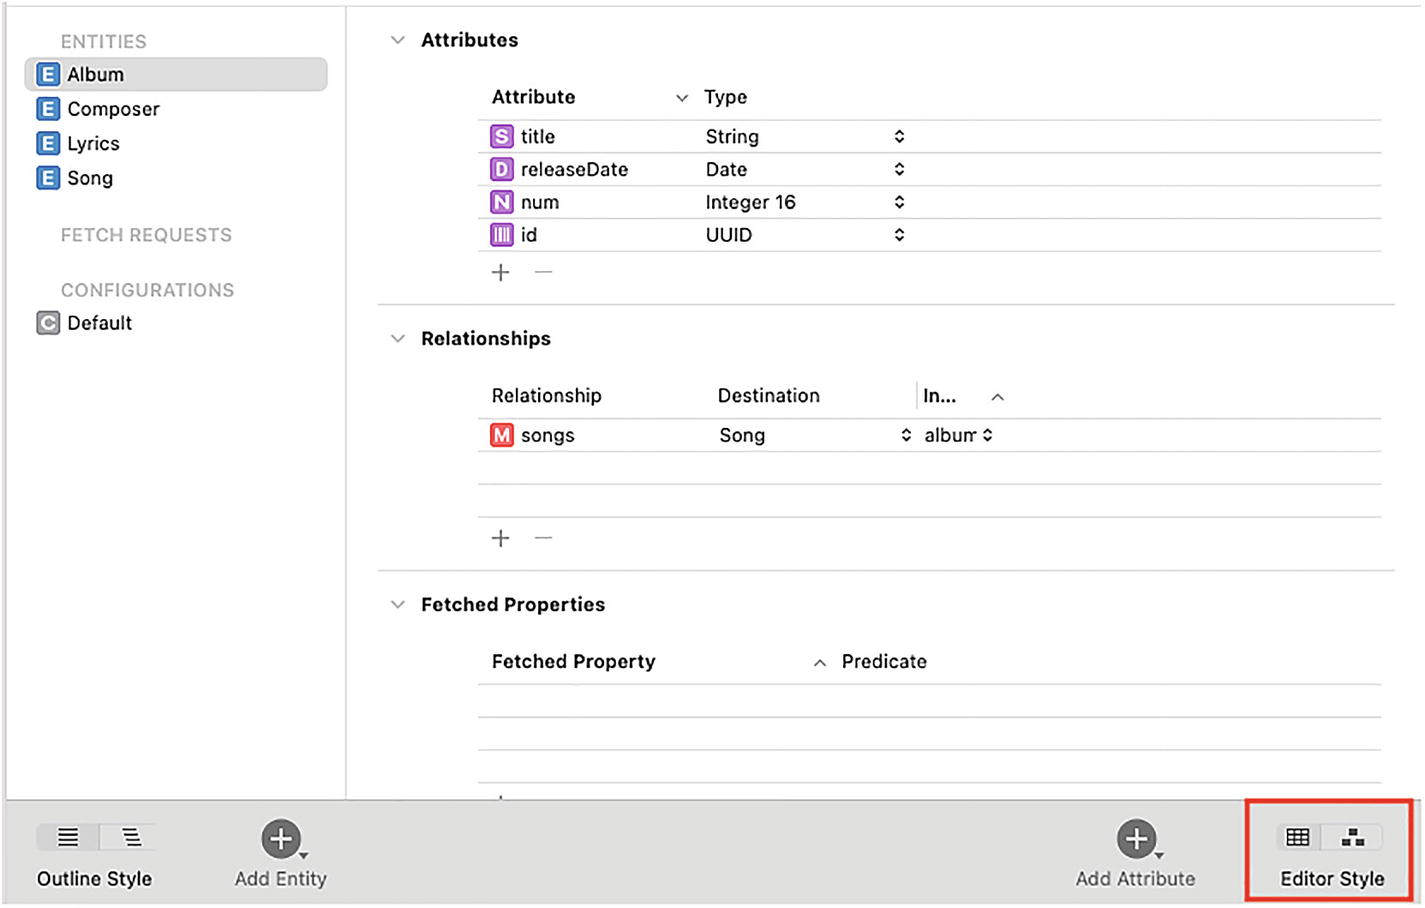
I must say that when your app grows and your data becomes much more complex, it is much harder to use this feature, as the screen gets loaded with entities and relationships.
Using it at an early stage of your app can be very useful.
Let’s Return to Code
+-------------------------------------------------+
|  Code Explanation:                              |
|                                                 |
|  let songEntityDescription =                    |
|      delegate.persistentContainer.              |
|          managedObjectModel.entitiesByName["Song"]|
|                                                 |
|  [AppDelegate]                                  |
|      |                                          |
|      | (Accesses)                               |
|      V                                          |
|  [Persistent Container]                         |
|      |                                          |
|      | (Contains)                               |
|      V                                          |
|  [Managed Object Model]                         |
|      |                                          |
|      | (Fetches Entity Description by Name)     |
|      V                                          |
|  [Song Entity Description]                      |
|                                                 |
|  let titleAttributeDescription =                |
|      songEntityDescription.attributesByName["title"]|
|                                                 |
|  [Song Entity Description]                      |
|      |                                          |
|      | (Fetches Attribute Description by Name)  |
|      V                                          |
|  [Title Attribute Description]                  |
+-------------------------------------------------+
let songEntityDescription = delegate.persistentContainer.managedObjectModel.entitiesByName["Song"]
let titleAttributeDescription = songEntityDescription.attributesByName["title"]The same goes for relationships. We can retrieve all our relationships from the description using the variable relationshipsByName.
+-------------------------------------------------+
|  Code Explanation:                              |
|                                                 |
|  let songEntityDescription =                    |
|      delegate.persistentContainer.              |
|          managedObjectModel.entitiesByName["Song"]|
|                                                 |
|  [AppDelegate]                                  |
|      |                                          |
|      | (Accesses)                               |
|      V                                          |
|  [Persistent Container]                         |
|      |                                          |
|      | (Contains)                               |
|      V                                          |
|  [Managed Object Model]                         |
|      |                                          |
|      | (Fetches Entity Description by Name)     |
|      V                                          |
|  [Song Entity Description]                      |
|                                                 |
|  let toComposer =                               |
|      songEntityDescription.relationshipsByName["composer"]|
|                                                 |
|  [Song Entity Description]                      |
|      |                                          |
|      | (Fetches Relationship Description by Name)|
|      V                                          |
|  [Composer Relationship Description]            |
+-------------------------------------------------+
let songEntityDescription = delegate.persistentContainer.managedObjectModel.entitiesByName["Song"]
let toComposer = songEntityDescription.relationshipsByName["composer"]Connecting Entities Together
+---------------------------------------+
|  Core Data Relationship: 1 to Many    |
|                                       |
|  Composer (1) ---> Songs (Many)       |
|                                       |
|  [Composer Entity]                    |
|     |                                 |
|     |---[Relationship: "Songs"]------>|
|     |                                 |
|  [Song Entity]                        |
+---------------------------------------+
let song = NSEntityDescription.insertNewObject(forEntityName: "Song", into: context)
let composer = NSEntityDescription.insertNewObject(forEntityName: "Composer", into: context)
song.setValue(composer, forKey: "composer")In the preceding code, we create a new “Song” and a new “Composer” and then set the composer to the new song, using a simple setValue method.
For a “to-one” relationship, it’s even simpler – we just set the generated property to nil.
class Album: NSManagedObject {
    @NSManaged var title: String
    @NSManaged var artist: Artist?
}

class Artist: NSManagedObject {
    @NSManaged var name: String
    // Other artist properties
}

// Assuming you have an instance of Album
let myAlbum: Album = //... fetch or create the album instance

// Set the artist relationship to nil
myAlbum.artist = nil

// Save the context to persist changes
do {
    try myAlbum.managedObjectContext?.save()
} catch {
    // Handle the error
}
In this example, we're effectively saying that myAlbum no longer has an associated Artist.
A Relationship to Itself

Practical Example: Organizational Hierarchy
Consider an entity named Employee. Each employee in a company might have a manager, who is also an employee. In this case, you can create a self-referencing relationship within the Employee entity to represent this hierarchy.
- Entity: Employee
- Attributes: name, id, role, etc.
- Self-Referencing Relationship: manager, which also points to an Employee entity.
Chapter05. Contexts
What Are Contexts?
Contexts are the top layer of our Core Data stack. They connect our code to the persistent store and the data model, and we use them to manipulate and modify our objects.
The preceding goals list length is an excellent indication of how much central contexts are in Core Data programming. Most of your daily work will be dealing with contexts rather than handling the other levels of the stack.
But what are contexts exactly?
The Concept
So what we want to do is to disconnect what we’re doing in our fetched objects from what is happening in other places in our app.
This is kind of what contexts in Core Data are doing. They let us “play” with our data, isolated from the rest of the stack.
Creating a Context
let newContext = NSManagedObjectContext(concurrencyType: .mainQueueConcurrencyType)

let privateContext = persistentContainer.newBackgroundContext()
Manipulating Data
Insert New Objects
Entity
Type of object. Equivalent to “class” in object-oriented programming or “table” in SQL
Entity Description
The declaration of the entity
// first way
let newObject =  NSEntityDescription.insertNewObject(forEntityName: "Song", into: context)
// second way
let songEntityDescription = appDelegate.persistentContainer.managedObjectModel.entitiesByName["Song"]!
let newObject = NSManagedObject(entity: songEntityDescription, insertInto: context)
Now that we have an NSManagedObject, we probably want to cast it to the subclass we generated from our data model:
let song = newObject as? Song
song.title = "The Great Gig in the Sky"
try context.save()
import CoreData
func saveObject() {
// Assume 'persistentContainer' is your Core Data stack
let context = persistentContainer.viewContext
// Creating a new entity (like starting a new story)
let newEntity = NSEntityDescription.insertNewObject(forEntityName: "YourEntity", into: context)
// Setting attributes (like writing the content of the story)
newEntity.setValue("Value", forKey: "yourAttribute")
do {
// Saving the context (like sealing the story in the library)
try context.save()
print("Object saved successfully!")
} catch {
print("Failed to save object: \(error)")
}
}Fetching Objects
let fetchRequest = NSFetchRequest<Song>(entityName: "Song")
let songs = try context.fetch(fetchRequest)
func fetchObjects() {
let context = persistentContainer.viewContext
let request = NSFetchRequest<NSFetchRequestResult>(entityName: "YourEntity")
do {
// Retrieving the stories (fetching the objects)
let result = try context.fetch(request)
for data in result as! [NSManagedObject] {
print(data.value(forKey: "yourAttribute") as! String)
}
} catch {
print("Failed to fetch objects: \(error)")
}
}Add a predicate
Currently, without any modifications, the fetch request returns all the instances from the provided entity.
let request = NSFetchRequest<NSManagedObject>(entityName: "DragonStories")
request.predicate = NSPredicate(format: "name == %@", "Smaug")
To add a predicate to the fetch request, we just need to set its optional predicate property.
Sorting
When fetching objects from Core Data using NSFetchRequest, they will be returned randomly .
let request = NSFetchRequest<NSManagedObject>(entityName: "DragonStories")
let sortDescriptor = NSSortDescriptor(key: "age", ascending: true)
request.sortDescriptors = [sortDescriptor]
One option is to sort them after receiving them, but we lose the optimizations Core Data provides us.
NSFetchRequest has a property named sortDescriptors.
Fetch Offset and Limit
