JSON Web Token을 이용해서 토큰 방식 인증을 구현, https 서버를 구축한다
1. 초기세팅
1) https 서버를 이용하기 때문에 mkcert을 통해 받은 인증서를 서버 카테고리에 넣어준다
2).env 파일에 mysql 비밀번호를 넣어주고 ACCESS_SECRET과 REFRESH_SECRET에는 아무 단어나 넣어주면 된다
DATABASE_PASSWORD=****
DATABASE_USERNAME=root
DATABASE_NAME=authentication
ACCESS_SECRET=code
REFRESH_SECRET=code
3) sever > index.js 에 가서 module.exports = server; 이렇게 바꿔주면 테스트 케이스가 돌아간다
let server;
if (fs.existsSync("./key.pem") && fs.existsSync("./cert.pem")) {
  const privateKey = fs.readFileSync(__dirname + "/key.pem", "utf8");
  const certificate = fs.readFileSync(__dirname + "/cert.pem", "utf8");
  const credentials = { key: privateKey, cert: certificate };

  server = https.createServer(credentials, app);
  server.listen(HTTPS_PORT, () => console.log("server runnning"));
} else {
  server = app.listen(HTTPS_PORT);
}
module.exports = server;
Express에 https 적용하는 부분으로서 인증서 파일들이 존재하는 경우,
HTTP 서비스와 동일한 HTTPS 서비스를 생성하는 부분이라는 것을 확인하실 수 있다
인증서 파일이 존재하지 않는다면 HTTP 서버만 돌아갈 수 있도록 구현되어 있는 로직이다
server라는 변수 안에 https.createServer(credentials, app);를 적용하여 module.exports = server로 변경해 주어야 테스트가 잘 돌아간다
2. 서버 구현

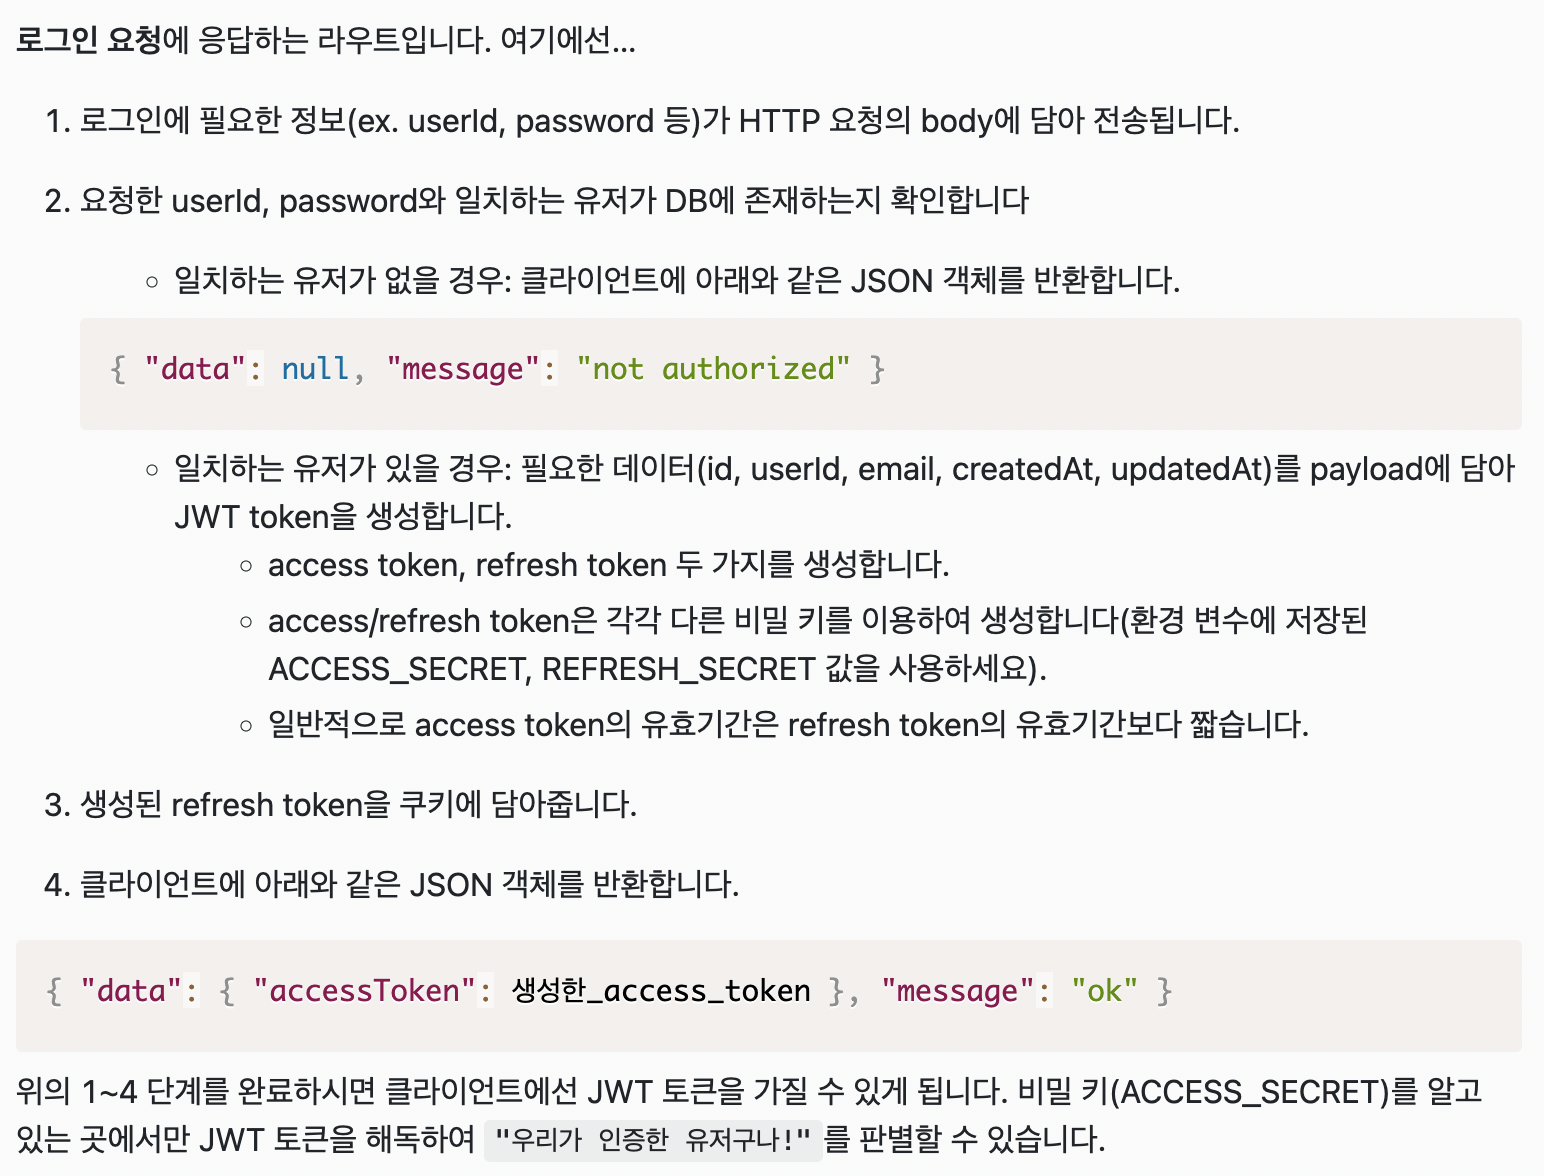
jsonwebtoken 라이브러리를 사용해 토큰을 생성하는 방법
const jwt = require('jsonwebtoken');
const token = jwt.sign(토큰에_담을_값, ACCESS_SECRET, { 옵션1: 값, 옵션2: 값, ... });
const { Users } = require('../../models');
const jwt = require('jsonwebtoken');


module.exports = async(req, res) => {
  // TODO: urclass의 가이드를 참고하여 POST /login 구현에 필요한 로직을 작성하세요.

  const userInfo = await Users.findOne({
    where: { userId: req.body.userId, password: req.body.password },
  });
  if(!userInfo){
    res.status(404).send({ "data": null, "message": "not authorized" });
  }else{
    const payload = {
      id : userInfo.id ,
      userId : userInfo.userId,
      email: userInfo.email,
      createdAt: userInfo.createdAt,
      updatedAt: userInfo.updatedAt
    }

    const accessToken = jwt.sign(payload, process.env.ACCESS_SECRET, { expiresIn: '1d' });
    const refreshToken = jwt.sign(payload, process.env.REFRESH_SECRET, { expiresIn: '2d' });

    res.cookie('refreshToken', refreshToken)
    res.status(200).send({"data": { "accessToken": accessToken }, "message": "ok"})
  }
};

const { Users } = require('../../models');


module.exports = (req, res) => {
  // TODO: urclass의 가이드를 참고하여 GET /accesstokenrequest 구현에 필요한 로직을 작성하세요.
  console.log(req.headers)

// {
//   host: '127.0.0.1:4000',
//   'accept-encoding': 'gzip, deflate',
//   authorization: 'Bearer 토큰...',
//   connection: 'close'
// }

};
헤더에 토큰값이 들어온다고 했으니 헤더를 콘솔로 찍어보면 authorization에 토큰 값이 들어오는걸 확인 할 수 있다 이걸 활용해서 코드를 짜주자
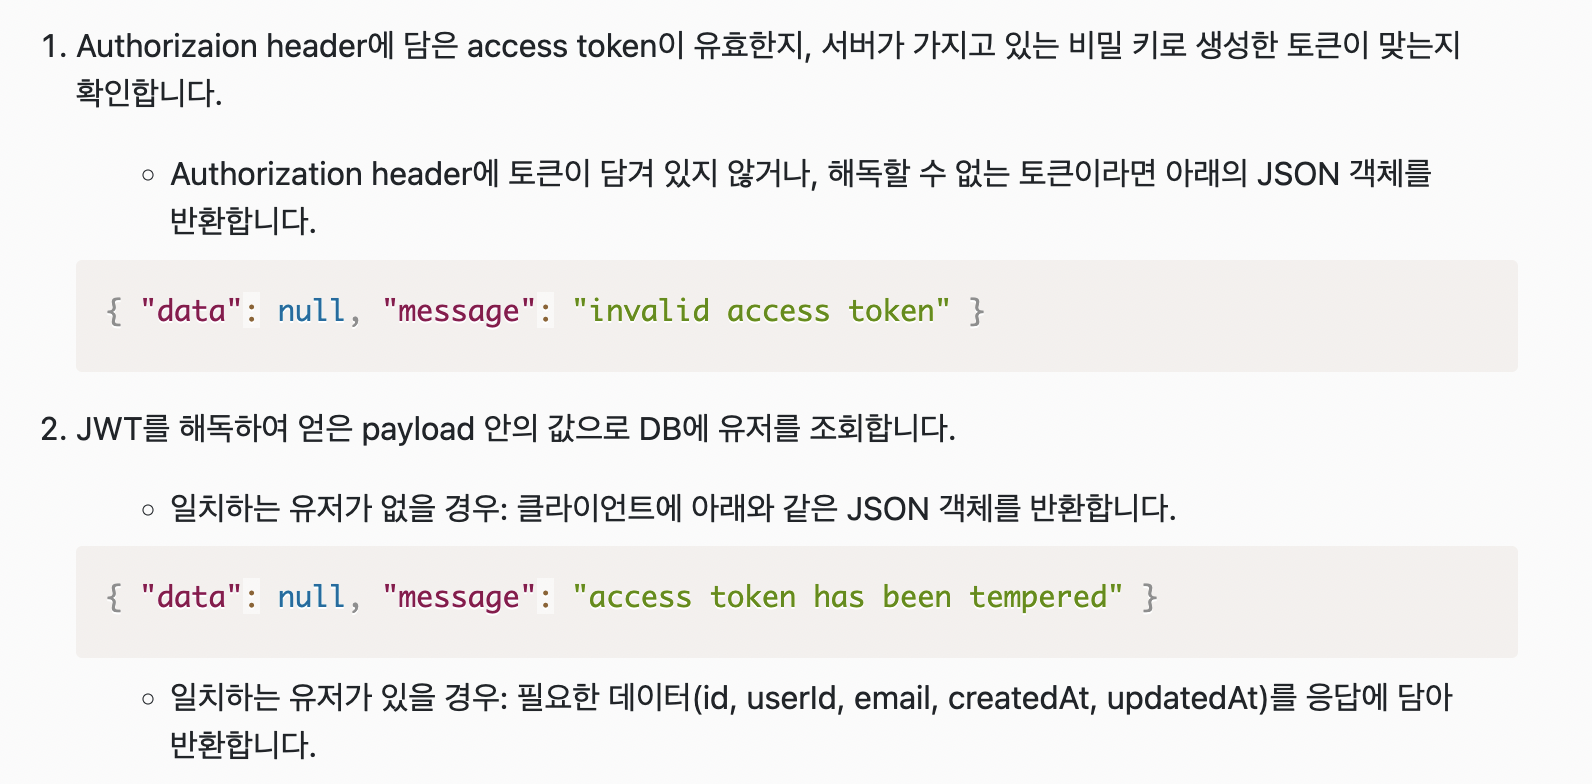
jsonwebtoken 라이브러리를 사용해 토큰을 verify(해독, 검증) 하는 방법
const jwt = require('jsonwebtoken');
const authorization = req.headers['authorization'];
const token = authorization.split(' ')[1];
const data = jwt.verify(token, ACCESS_SECRET);
authorization 토큰 값이 들어오기 때문에 얘를 token으로 선언 해 준 뒤
verify로 해독해서 사용하자
const { Users } = require('../../models');
const jwt = require('jsonwebtoken');

module.exports = (req, res) => {
  if(!req.headers.authorization){
    res.status(404).send({ "data": null, "message": "invalid access token" })
  }else{
    const authorization = req.headers['authorization'];
    const token = authorization.split(' ')[1];
    const data = jwt.verify(token, process.env.ACCESS_SECRET);
    // console.log(data)
    if(!data){
      res.status(400).send({ "data": null, "message": "invalid access token" })
    }else{
      res.status(200).send({
        data:{
          userInfo:{
            id: data.id,
            userId: data.userId,
            email: data.email,
            createdAt: data.createdAt,
            updatedAt: data.updatedAt
          }
        }, message:'ok'
      })
    }

  }
};
테스트 케이스에 가보면 .data.userInfo에 데이터를 넣어줘야 하고 ok 메세지도 포함 해야 한다고 알려주고 있다
      it(`헤더 authorization 부분에 jwt 토큰이 존재하며 토큰에 유저정보가 담겨져 있는경우, 해당 유저의 정보를 리턴해야 합니다 `, async () => {
        const accessToken = sign(tokenBodyData, process.env.ACCESS_SECRET);
        const response = await agent
          .get('/accesstokenrequest')
          .set({ authorization: `Bearer ${accessToken}` });

        expect(response.body.data).to.have.keys('userInfo');
        expect(response.body.data.userInfo).to.not.have.keys('password');
        expect(response.body.data.userInfo).to.eql(tokenBodyData);
        expect(response.body.message).to.eql('ok');
      });
    });

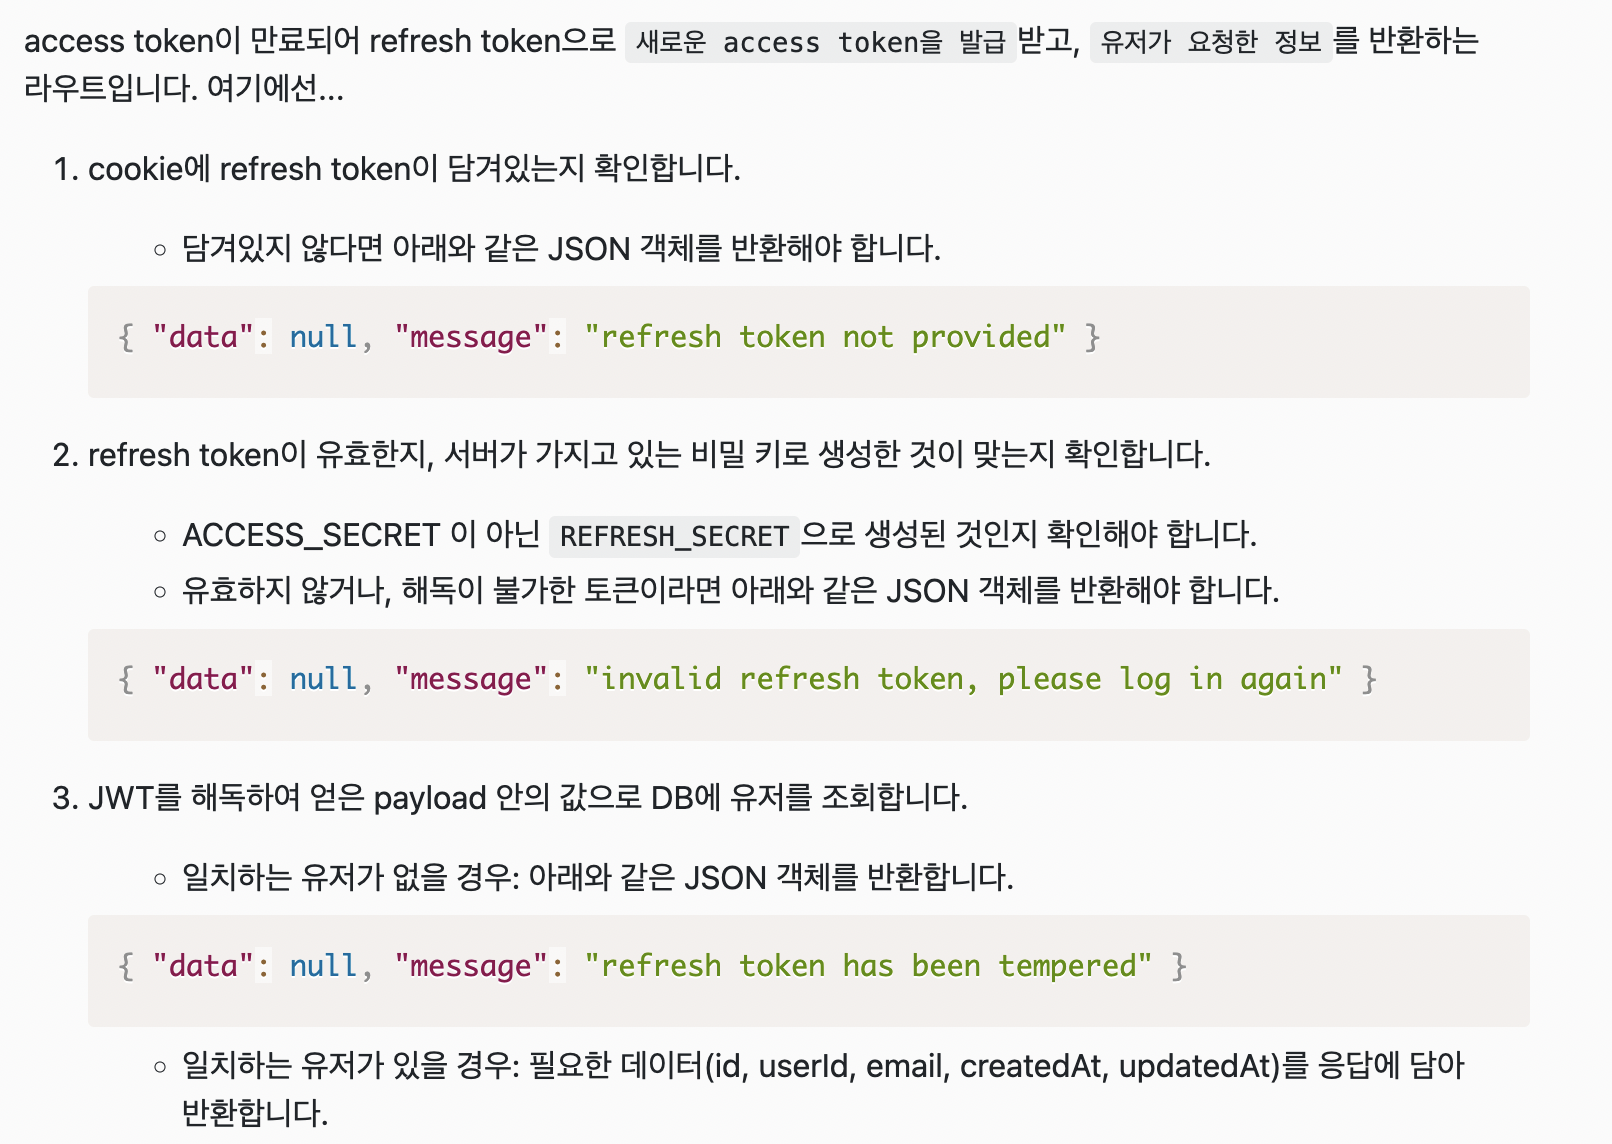
req.cookies로 리프레시 토큰이 들어오고 있으니 req.cookies.refreshToken를 활용해서
1. 토큰값이 있는지 확인
2. 토큰이 유효한지
3. 해독한 payload가 db의 값과 같은지 확인하면 된다
const { Users } = require('../../models');
const jwt = require('jsonwebtoken');


module.exports = (req, res) => {
  const isRefreshToken = req.cookies.refreshToken
 // 토큰 값이 있는지 확인
  if(!isRefreshToken){
    res.status(400).send({ "data": null, "message": "refresh token not provided" });
 // 토큰이 유효한지 확인
  }else if(isRefreshToken === 'invalidtoken'){
    res.status(400).send({ "data": null, "message": "invalid refresh token, please log in again" });
 // 토큰이 유효한데 해독한 데이터가 db의 정보와 같은지
  }else{
    const data = jwt.verify(isRefreshToken, process.env.REFRESH_SECRET);
    if(!data){
      res.status(400).send({ "data": null, "message": "refresh token has been tempered" })
 // 정보가 같다면 payload에 데이터와
 // accessToken을 새로 생성해서 보내줘야 한다
    }else{
      const payload = {
        id : data.id ,
        userId : data.userId,
        email: data.email,
        createdAt: data.createdAt,
        updatedAt: data.updatedAt
      }
      const accessToken = jwt.sign(payload, process.env.ACCESS_SECRET, { expiresIn: '1d' });


      res.status(200).send({
        "data":{
          accessToken: accessToken,
          userInfo: payload
        }, message:'ok'
      })
    }

  }
};
3. 클라이언트 구현
일단 app.js를 살펴보자
import Login from "./components/Login";
import Mypage from "./components/Mypage";
render() {
const { isLogin } = this.state;
return (
<div className='App'>
{isLogin ? <Mypage/> : <Login/>}
</div>
);
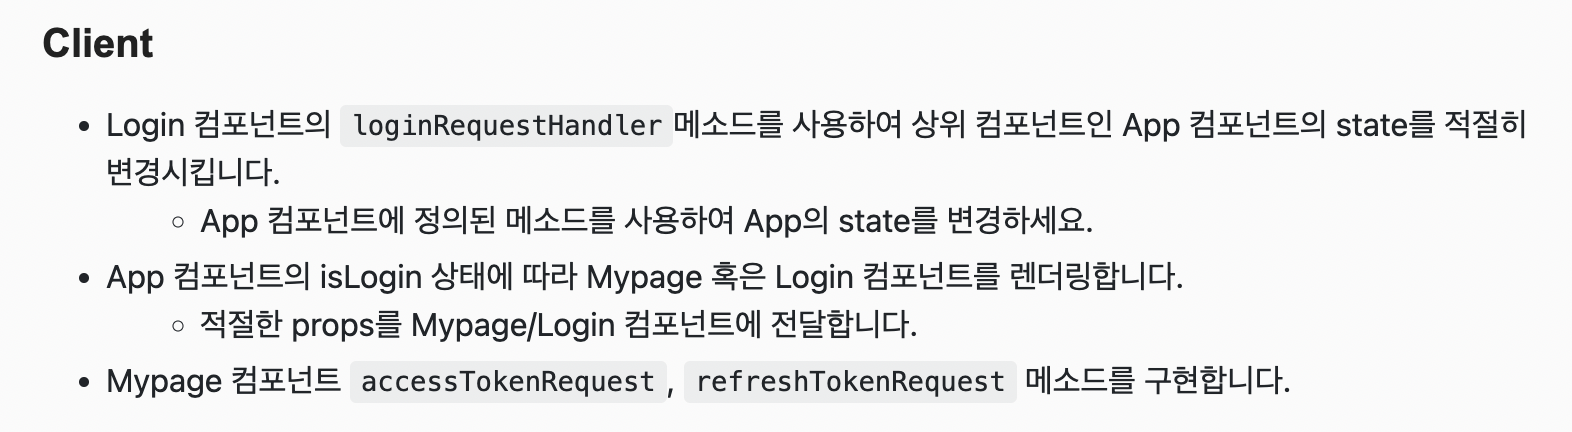
}로그인 상태에 따라서 삼항 연산자로 마이페이지, 로그인페이지로 렌더링 해주면 된다
그 다음 app.js에 만들어져 있는 핸들러들을 살펴보고 마이페이지 로그인 컴포넌트로 전달 해줘야 한다
loginHandler는 로그인의 상태를 변동시키고
issueAccessToken은 토큰의 값을 변경시킨다
내려주는 프롭스는 state의 상태를 변경시키므로 this.setState로 값을 바꿔주면 된다
로그인페이지 : issueAccessToken과 loginHandler를 내려주고
마이페이지 : 리프레시 토큰으로 엑세스 토큰을 다시 생성 해야 한다
issueAccessToken과 app.js의 state인 accessToken을 내려주자
import React, { Component } from "react";

import Login from "./components/Login";
import Mypage from "./components/Mypage";

class App extends Component {
  constructor(props) {
    super(props);
    this.state = {
      isLogin: false,
      accessToken: "",
    };

    this.loginHandler = this.loginHandler.bind(this);
    this.issueAccessToken = this.issueAccessToken.bind(this);
  }


  loginHandler(data) {
    this.setState({isLogin: true})
  }

  issueAccessToken(token) {
    this.setState({accessToken: token})
  }

  render() {
    const { isLogin } = this.state;
    return (
      <div className='App'>
        {isLogin ?
        <Mypage
          accessToken={this.state.accessToken}
          issueAccessToken={this.issueAccessToken}
          /> :
        <Login
          loginHandler={this.loginHandler}
          issueAccessToken={this.issueAccessToken}
        />}
      </div>
    );
  }
}

export default App;
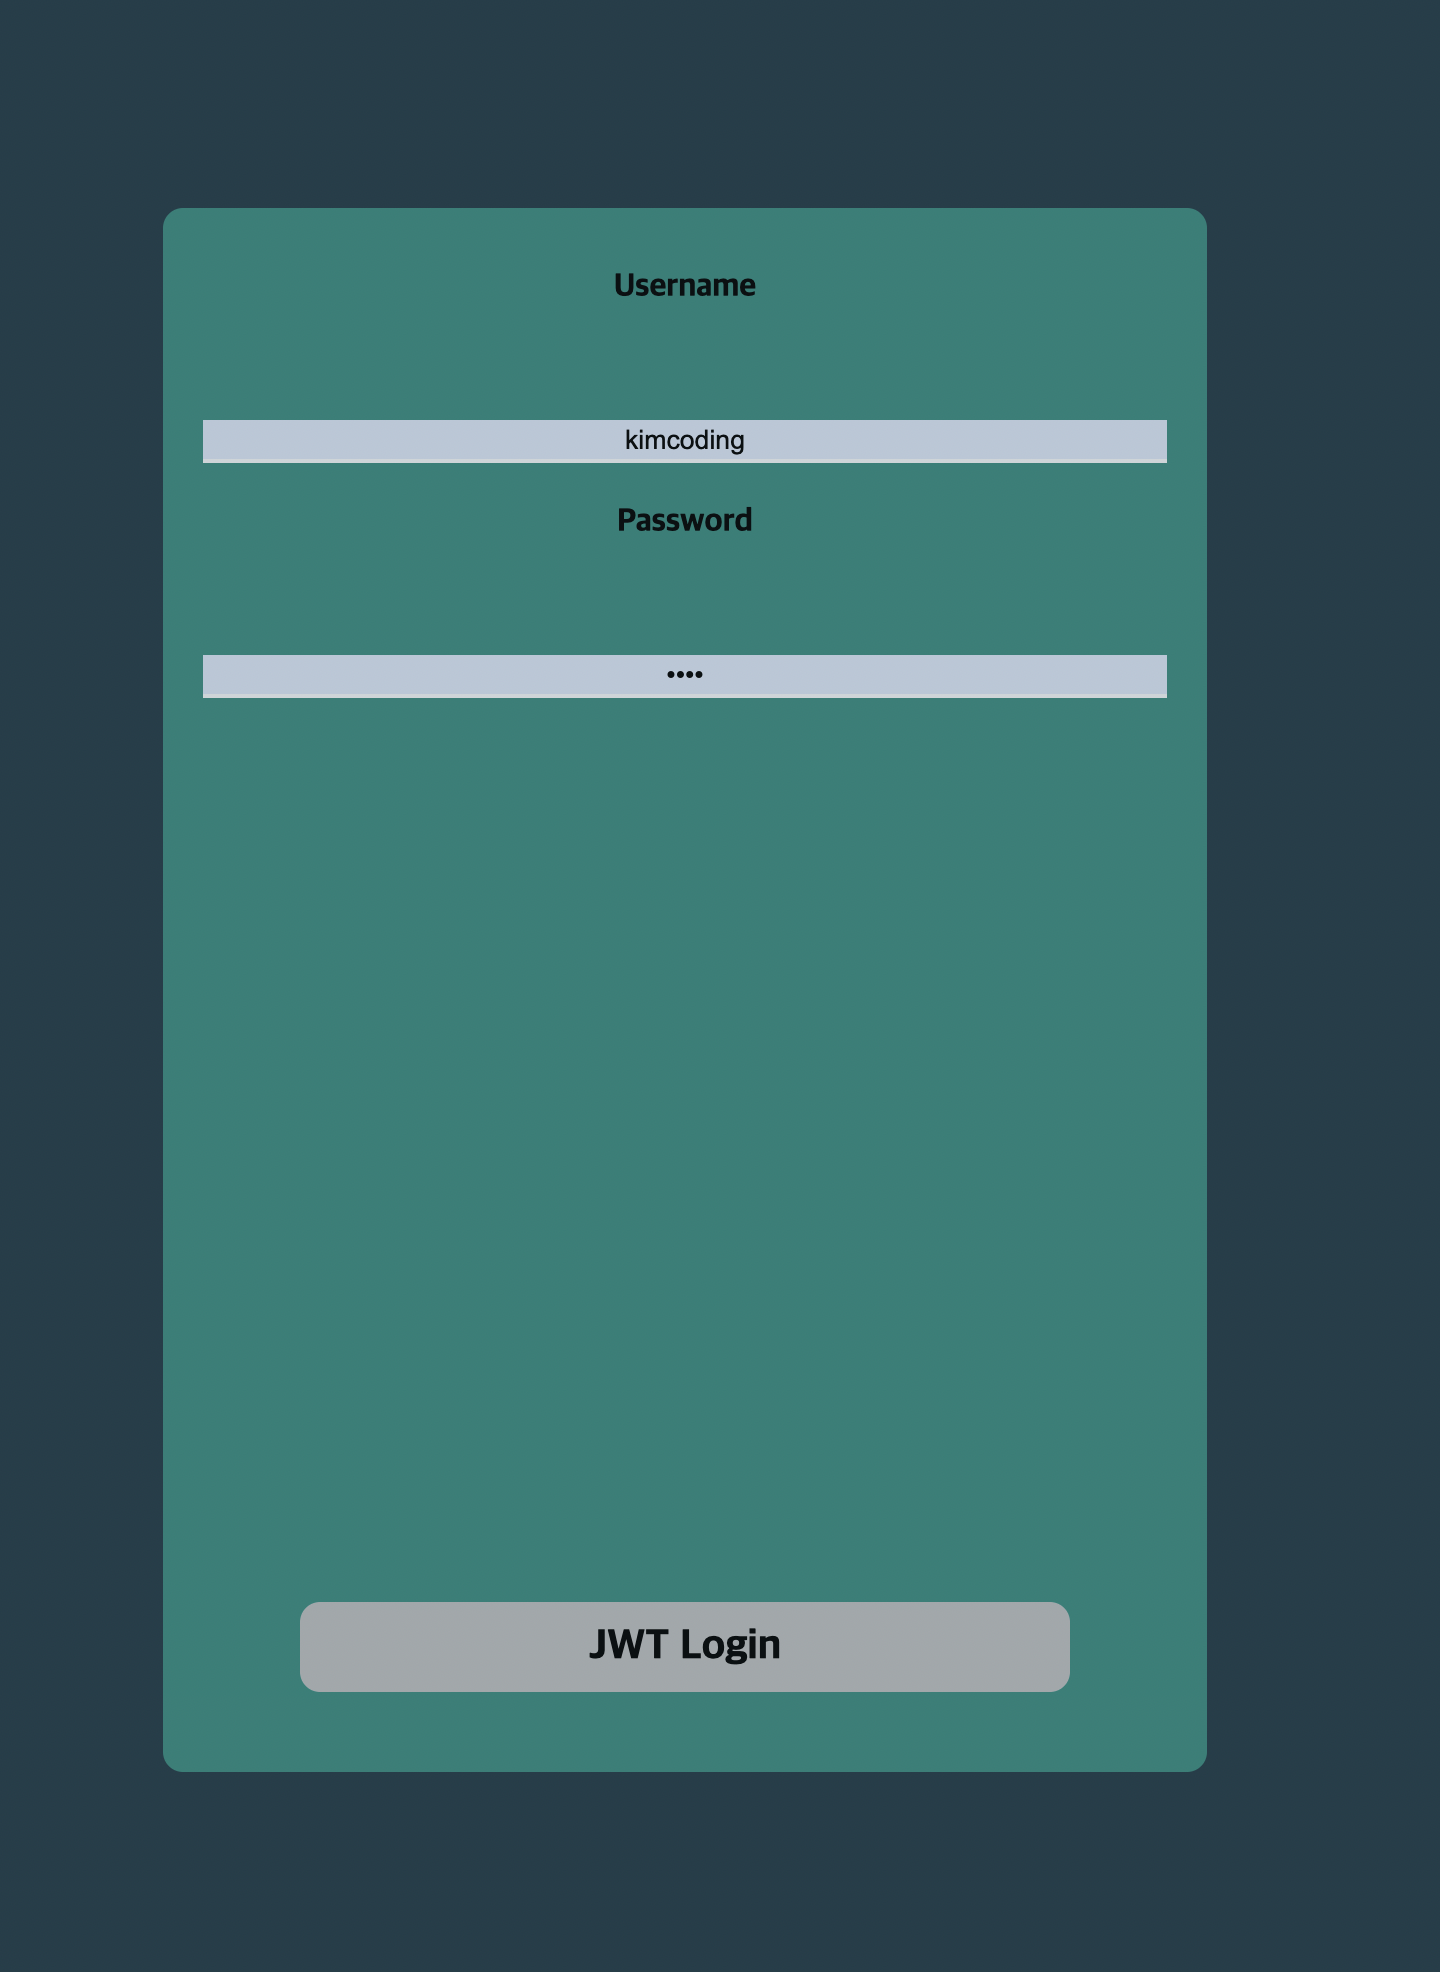
login.js

loginRequestHandler를 작성해주면 된다
로그인 버튼을 누르면 서버 url을 axios로 연결, 로그인요청을 보내는 역할을 한다
 loginRequestHandler() {
    /*
    TODO: Login 컴포넌트가 가지고 있는 state를 이용해 로그인을 구현합니다.
    로그인을 담당하는 api endpoint에 요청을 보내고, 받은 데이터로 상위 컴포넌트 App의 state를 변경하세요.
    초기 App:
    state = { isLogin: false, accessToken: "" }
    로그인 요청 후 App:
    state = { isLogin: true, accessToken: 서버에_요청하여_받은_access_token }
    */

  }
axios로 요청을 해서 콘솔을 찍어보면 res.data.data.accessToken에 들어오는 값으로 상위 컴포넌트인 app.js의 state를 바꿔주자
  loginRequestHandler() {
    axios.post('https://localhost:4000/login')
    .then(res=> console.log(res))
    //  data: { data: { accessToken: 'fakeAccessToken' } }
  }
로그인 요청을 할때 아이디와 비밀번호를 같이 보내주고
res를 받고 난 뒤 엑세스토큰을 app.js에 보내주면 된다
  loginRequestHandler() {
    axios.post('https://localhost:4000/login', {
      userId: this.state.userId,
      password: this.state.password
    })
    .then(res=> {
      this.props.issueAccessToken(res.data.data.accessToken)
      this.props.loginHandler(res.data.data.accessToken)
    } )
    //  data: { data: { accessToken: 'fakeAccessToken' } }
  }
App.js
  loginHandler(data) {
    this.setState({isLogin: true})
  }

  issueAccessToken(token) {
    this.setState({accessToken: token})
  }
App.js 에서는 받은 데이터를 가지고 스테이트를 변경해주자
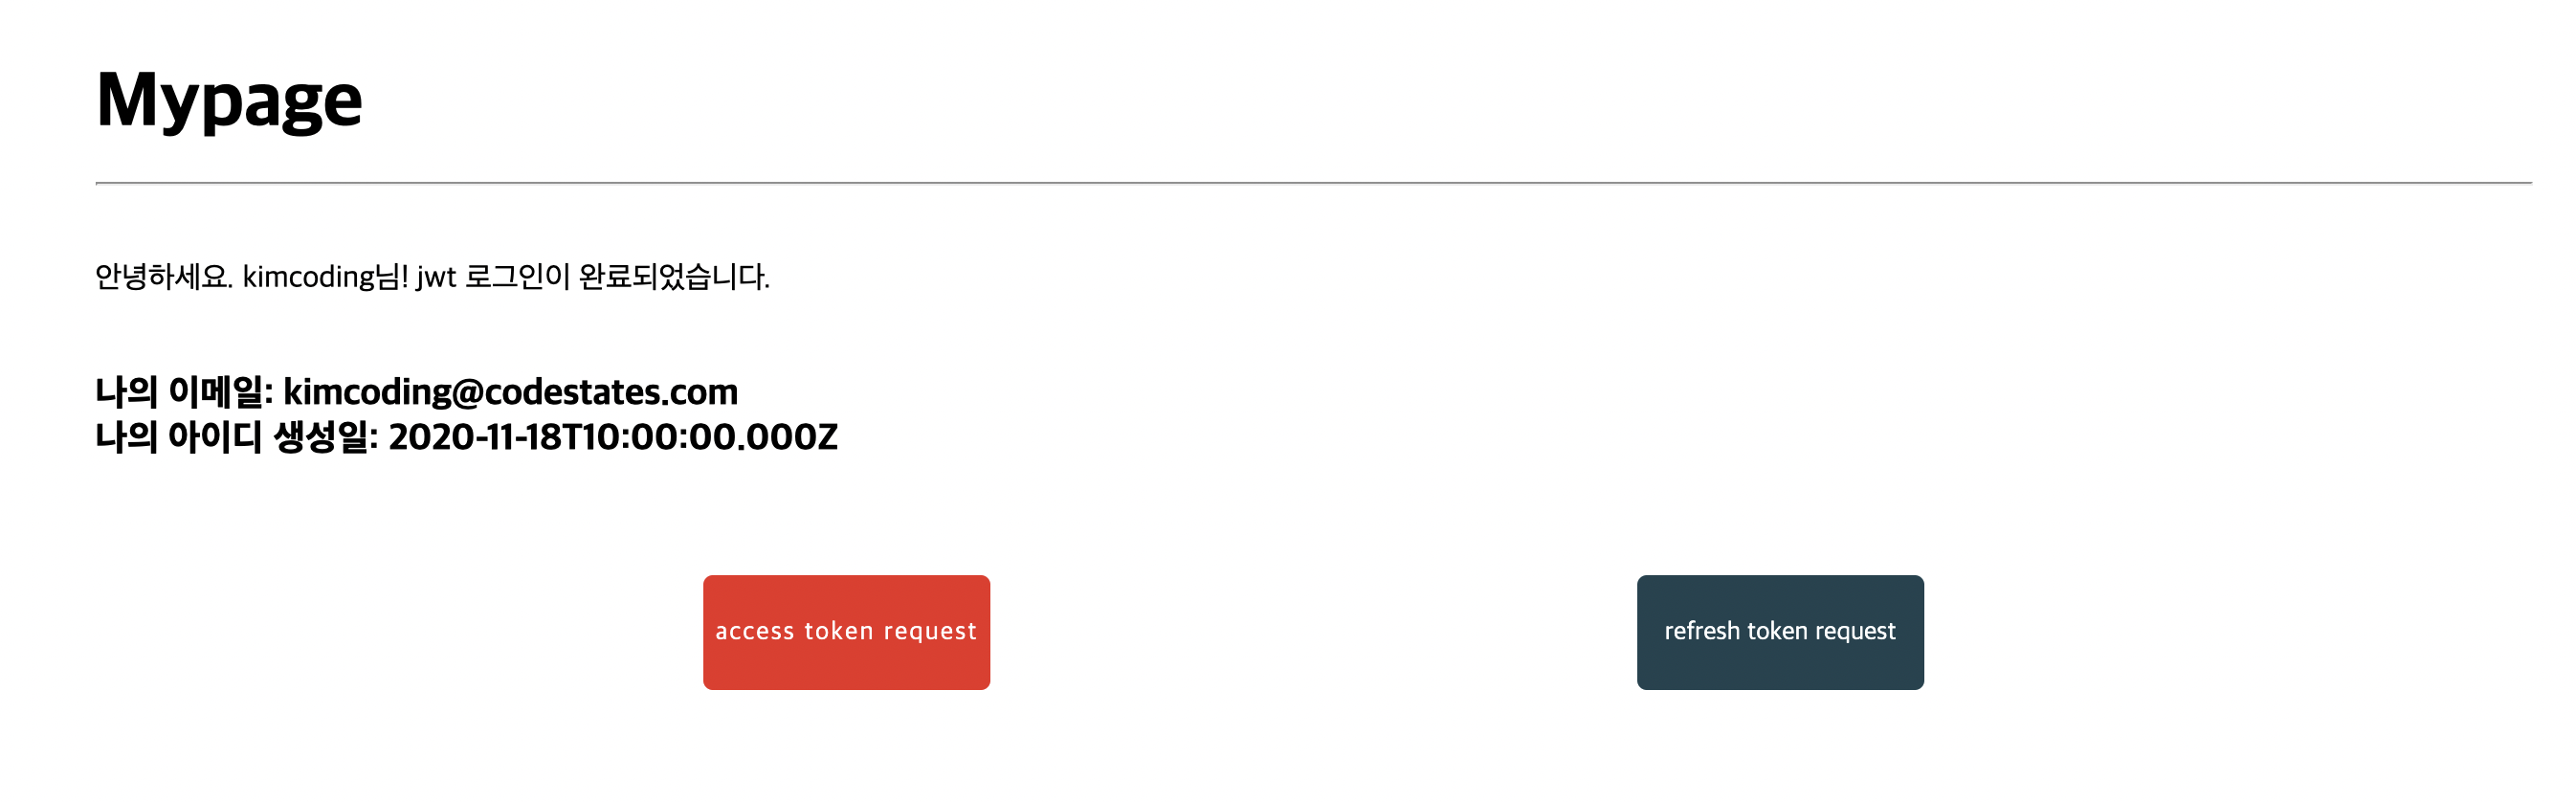
Mypage.js

Mypage의 accessTokenRequest은 엑세스 토큰으로 get 요청을 보내 토큰이 갖고있던 데이터를 마이페이지 state의 userInfo로 넣어준다
refreshTokenRequest는 새로 엑세스토큰을 발급받기 위한 컴포넌트이다
app.js에서 프롭스로 받아온 issueAccessToken에 데이터 인자로 res를 넣어주고 마이페이지의 state에 res로 받은 데이터를 넣어주면 된다
  accessTokenRequest() {
    /*
    TODO: 상위 컴포넌트인 App에서 받은 props를 이용해 accessTokenRequest 메소드를 구현합니다.
    access token을 처리할 수 있는 api endpoint에 요청을 보내고, 받은 데이터로 Mypage 컴포넌트의 state (userId, email, createdAt)를 변경하세요
    초기 Mypage:
    state = { userId: "", email: "", createdAt: "" }
    accessTokenRequest 후 Mypage:
    state = { userId: "특정유저id", email: "특정유저email", created: "특정유저createdAt" }

    ** 주의사항 **
    App 컴포넌트에서 내려받은 accessToken props를 authorization header에 담아 요청을 보내야 합니다.
    */

  }

  refreshTokenRequest() {
    /*
    TODO: 쿠키에 담겨져 있는 refreshToken을 이용하여 refreshTokenRequest 메소드를 구현합니다.
    refresh token을 처리할 수 있는 api endpoint에 요청을 보내고, 받은 데이터로 2가지를 구현합니다.
    1. Mypage 컴포넌트의 state(userId, email, createdAt)를 변경
    2. 상위 컴포넌트 App의 state에 accessToken을 받은 새 토큰으로 교환
    */

  }
코드 작성
  accessTokenRequest() {
    axios.get('https://localhost:4000/accesstokenrequest', {headers: {authorization: `Bearer ${this.props.accessToken}`}})
    .then(res => {
      this.setState({
        ...res.data.data.userInfo
      })
    })
  }

  refreshTokenRequest() {
 	axios.get('https://localhost:4000/refreshtokenrequest')
    .then(res=>{
      this.setState({
        ...res.data.data.userInfo
      })
      this.props.issueAccessToken(res.data.data.accessToken)
    })
  }
마지막으로 client > package.json
scripts > start 부분의 fillmyin을 인증서 파일의 경로로 바꿔주고 나면 구동되는 앱을 볼 수 있다
 "scripts": {
    "start": "HTTPS=true SSL_CRT_FILE=FILL_ME_IN SSL_KEY_FILE=FILL_ME_IN react-scripts start",
    "build": "react-scripts build",
    "test": "mocha --require @babel/register '__tests__/client.test.js'",
    "report": "mocha --require @babel/register '__tests__/client.test.js' --reporter @mochajs/json-file-reporter",
    "submit": "codestates-submission"
  },