기존에 Nuxt 3로 만들어진 PC용 사이트에 서브도메인을 적용시켜, 서브도메인에 따라 PC/모바일용 화면이 구분되게 만들어야 했다. 이번 포스트에서는 Nuxt 3로 만들어진 사이트에서 서브도메인에 따라 페이지를 구분하는 법을 작성하고자 한다.
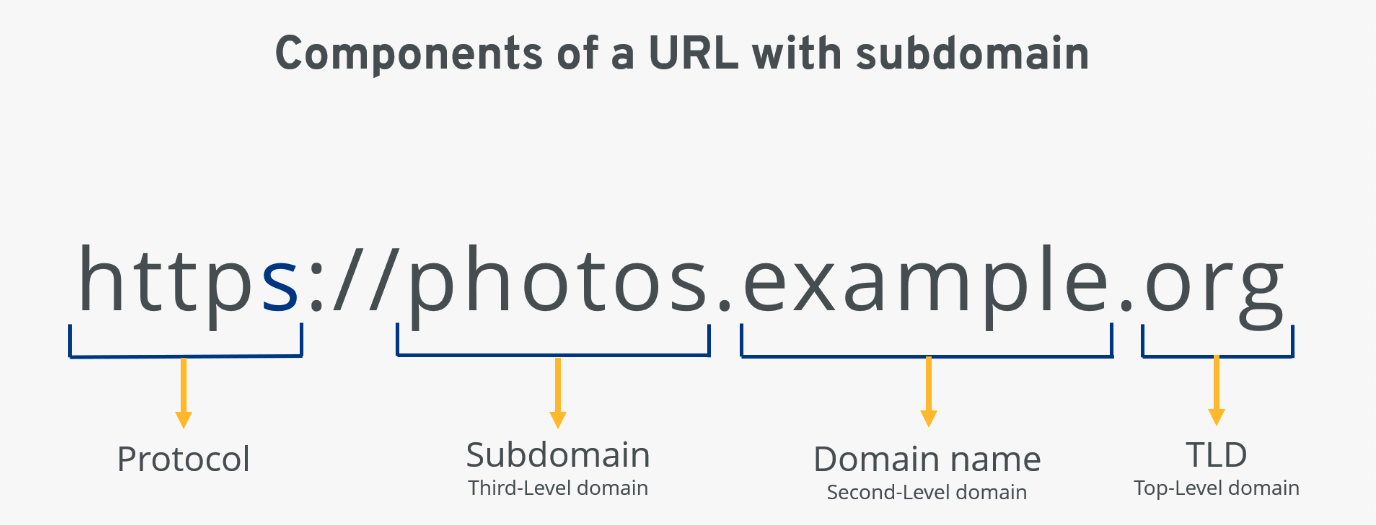
서브도메인이란?
서브도메인은 웹 사이트의 영역을 구분하기 위해 도메인 이름에 추가되는 접두사를 말한다. 서브도메인을 사용하면 기존 사이트에서 상점, 블로그, 게시판과 같은 자체적인 계층 구조가 필요한 영역을 관리하기 용이하다.
예를 들어 네이버 포털 사이트는 여러가지 서비스들을 아래와 같이 서브도메인을 통해 구분지어 놓았다.
1) 네이버 홈: https://www.naver.com
2) 네이버 카페 : https://section.cafe.naver.com
3) 네이버 블로그 : https://section.blog.naver.com
4) 네이버 쇼핑 : https://shopping.naver.com
적용방법
Nuxt 3는 기본적으로 파일 기반 라우팅을 사용한다. 별도의 설정을 하지 않는 이상 pages 폴더 내부에 있는 경로를 기반으로 route 주소를 생성한다. 예를 들어, pages/test-123/index.vue 파일을 만들면 해당 경로는 http://localhost:3000/test-123이 된다. 이러한 방식은 React 기반의 Next.js와도 유사하다.
따라서 서브도메인을 설정하려면 라우팅 설정을 수정해야 한다. Nuxt 3 공식 문서를 보면 app/router.options.ts 파일을 만들어서 라우팅을 커스텀하라고 나와있다.
우선 나의 경우에는 pages 폴더를 다음과 같이 구분해주었다.
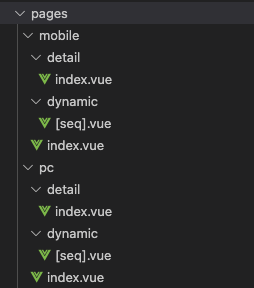
pages 폴더 내부에 pc, mobile 폴더를 따로 나누고 각각 사용될 페이지 폴더와 파일들을 만들어준다. 그리고 root 폴더에 app 폴더를 만들어주고, 안에 router.options.ts 파일을 만든 후 아래와 같이 작성한다.
import type { RouterConfig } from "@nuxt/schema";
export default <RouterConfig>{
routes: (_routes) => {
const { ssrContext } = useNuxtApp();
const pcSubDomain = "localhost";
const mobileSubDomain = "m";
let routesDirectory: any = null;
// server-side에서 url로 subDomain 체크
if (process.server && ssrContext && ssrContext.event.node.req) {
const req = ssrContext.event.node.req;
const subDomain = req.headers.host?.split(".")[0];
if (subDomain === "www" || subDomain === pcSubDomain) {
routesDirectory = "pc";
} else if (subDomain === mobileSubDomain) {
routesDirectory = "mobile";
}
}
// client-side에서 url로 subDomain 체크
if (process.client && window.location.hostname) {
const subDomain = window.location.hostname.split(".")[0];
if (subDomain === "www" || subDomain === pcSubDomain) {
routesDirectory = "pc";
} else if (subDomain === mobileSubDomain) {
routesDirectory = "mobile";
}
}
// route의 경로와 pages 폴더의 경로를 비교
function checkIsUnderDirectory(route: any, directory: "pc" | "mobile") {
const path = route.path;
return path === "/" + directory || path.startsWith("/" + directory + "/");
}
let newRoutes = [..._routes];
if (routesDirectory) {
newRoutes = _routes
.filter((route: any) => {
// routesDirectory가 pc면 pc 경로만, mobile이면 mobile 경로만 가져옴
return checkIsUnderDirectory(route, routesDirectory);
})
.map((route: any) => {
// 접근가능한 route 경로 재설정
return {
...route,
path: route.path.substr(routesDirectory.length + 1) || "/",
name: route.name || "index",
};
});
return newRoutes;
}
},
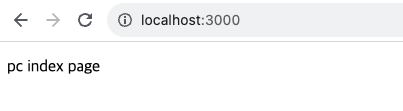
};위의 코드는 local 환경에서 테스트를 했을때 기준이고, pc버전이면 http://localhost:3000, 모바일일 경우 http://m.localhost:3000일때 각각 화면이 출력되게끔 작성한 코드이다.
코드를 풀어서 설명하자면 다음과 같다.
const { ssrContext } = useNuxtApp();
const pcSubDomain = "localhost";
const mobileSubDomain = "m";
let routesDirectory: any = null;

// server-side에서 url로 subDomain 체크
if (process.server && ssrContext && ssrContext.event.node.req) {
  const req = ssrContext.event.node.req;
  const subDomain = req.headers.host?.split(".")[0];

  if (subDomain === "www" || subDomain === pcSubDomain) {
    routesDirectory = "pc";
  } else if (subDomain === mobileSubDomain) {
    routesDirectory = "mobile";
  }
}

// client-side에서 url로 subDomain 체크
if (process.client && window.location.hostname) {
  const subDomain = window.location.hostname.split(".")[0];

  if (subDomain === "www" || subDomain === pcSubDomain) {
    routesDirectory = "pc";
  } else if (subDomain === mobileSubDomain) {
    routesDirectory = "mobile";
  }
}
먼저 라우트 경로를 split(".") 함수로 쪼개면 문자열 배열을 반환하는데, 첫번째 문자열이 'm'인지 아닌지 여부에 따라 routesDirectory 변수에 pc 또는 mobile 값을 넣어준다. 이러한 과정은 올바른 경로를 체크하여, subDomain에 m이나 localhost 이외에 잘못된 값이 입력되었을때 404 Error을 출력하기 위함이다.
위에선 server-side, client-side 둘 다 체크하고 있는데, 만약 nuxt.config.ts에서 ssr 옵션을 false로 하여 CSR 사이트를 만들기로 했다면 중간에 server-side에서 체크하는 로직은 주석 처리해도 무방하다.
// route의 경로와 pages 폴더의 경로를 비교
function checkIsUnderDirectory(route: any, directory: "pc" | "mobile") {
  const path = route.path;
  return path === "/" + directory || path.startsWith("/" + directory + "/");
}

let newRoutes = [..._routes];

if (routesDirectory) {
  newRoutes = _routes
    .filter((route: any) => {
    // routesDirectory가 pc면 pc 경로만, mobile이면 mobile 경로만 가져옴
    return checkIsUnderDirectory(route, routesDirectory);
  })
    .map((route: any) => {
    // 접근가능한 route 경로 재설정
    return {
      ...route,
      path: route.path.substr(routesDirectory.length + 1) || "/",
      name: route.name || "index",
    };
  });
  return newRoutes;
}
그 다음으로는 Nuxt에서 파일 라우팅 기반으로 자동 생성한 route 객체를 수정해야 한다. route 객체는 _routes 객체 배열에 담겨있는데, filter 함수로 매 route마다 checkIsUnderDirectory 함수를 호출하여 파라미터로 받은 경로가 pages 폴더 내부에 있는 경로와 일치하는 것만 걸러준다.
따라서 routesDirectory의 값이 pc이면 pages/pc 하위 항목들만 가져오고, mobile이면 pages/mobile 하위 항목들만 가져오게 된다.
이렇게 필터링된 newRoutes 배열을 한번 더 map 함수로 반복하여 routes 객체의 path 값을 수정하면 Nuxt.js에선 자동으로 해당 항목만 접근이 가능하게 처리한다.
※ api 사용시 에러 핸들링
만약 api를 사용할때 cors에러가 나는 경우가 있다면, 서버의 origin 예외처리 항목에 http://m.localhost.com 을 추가해주어야 한다.
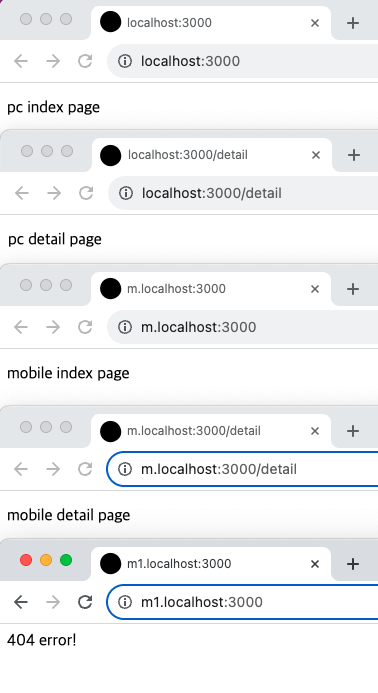
실행결과
하위 경로는 유지된 채 서브도메인에 맞는 페이지가 노출되고, 서브도메인에 잘못된 경로를 넣으면 에러 페이지로 보내는 것을 확인할 수 있다.
샘플코드
git 저장소 이동 (https://github.com/MochaChoco/sub-domain-test)
참고자료
Adding custom routes - Nuxt.js document
How to use subdomain in Nuxt 3 - stackoverflow