
NAT, PAT 구성 및 확인
- 네트워크 구성, 토폴로지 및 IP 주소 테이블
- 장비 기본 설정
- NAT 구성 및 확인
- PAD 구성 및 확인
- static NAT 구성 및 확인
토폴로지 및 IP 주소 테이블
- 토폴로지
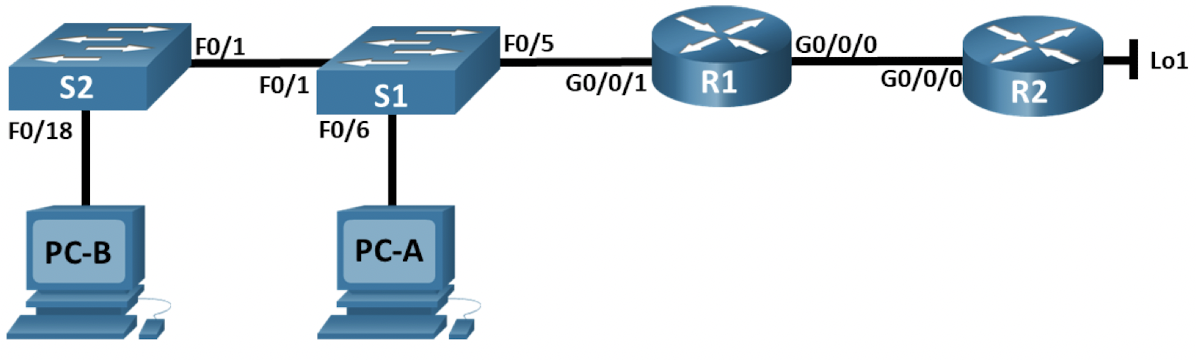
- IP 주소 테이블
| 장비 | 인터페이스 | IP 주소 | 서브넷 마스크 |
|---|---|---|---|
| R1 | g0/0 | 209.165.200.230 | 255.255.255.248 |
| g0/1 | 192.168.1.1 | 255.255.255.0 | |
| R2 | g0/0 | 209.165.200.225 | 255.255.255.248 |
| Loopback | 209.168.200.1 | 255.255.255.224 | |
| S1 | VLAN 1 | 192.168.1.11 | 255.255.255.0 |
| S2 | VLAN 2 | 192.168.1.12 | 255.255.255.0 |
| PC-A | NIC | 192.168.1.2 | 255.255.255.0 |
| PC-B | NIC | 192.168.1.3 | 255.255.255.0 |
실습을 진행할 때 이전 포스트에서 언급한 것처럼 S2의 fa0/18번이 없어 fa0/10으로 진행했다.
장비 기본 설정
- 라우터 설정
Router> en
Router# conf t
Router(config)# ho R1
R1(config)# no ip domain-lookup
R1(config)# enable secret class
R1(config)# line con 0
R1(config-line)# password cisco
R1(config-line)# login
R1(config-line)# line vty 0 4
R1(config-line)# password cisco
R1(config-line)# login
R1(config-line)# exit
R1(config)# service password-encrytion
R1(config)# banner motd $ DO NOT ENTER WITHOUT PERMISSION! $
R1(config)# end
R1# copy running-config startup-config
- 지난 실습에서 했던 것 처럼 기본 설정을 마친다.
- IP 구성
R1# conf t
R1(config)# int g0/0
R1(config-if)# ip addr 209.165.200.230 255.255.255.248
R1(config-if)# no shut
R1(config-if)# int g0/1
R1(config-if)# ip addr 192.168.1.1 255.255.255.0
R1(config-if)# no shut
R1(config-if)# exit
- 위의 IP 주소 테이블에 나와있는 것처럼 알맞는 인터페이스에 IP 를 부여한다.(R2도 마찬가지로 진행한다.)
- 기본 경로 설정
R1(config)# ip route 0.0.0.0 209.165.200.225
R1(config)# end
R1# copy running-config startup-config
- ip route 명령을 통해 기본 경로를 설정하고 실행중인 시작 구성파일에 저장한다.
- 스위치 설정
Switch> en
Switch# conf t
Switch(config)# ho S1
S1(config)# no ip domain-lookup
S1(config)# line con 0
S1(config-line)# password cisco
S1(config-line)# login
S1(config-line)# line vty 0 15
S1(config-line)# password cisco
S1(config-line)# login
S1(config-line)# exit
S1(config)# service password-encryption
S1(config)# banner motd $ DO NOT ENTER WITHOUT PERMISSION! $
S1(config)# int range f0/2-4, f0/7-24, g0/1-2
S1(config-if-range)# shut
S1(config-if-range)# int vlan 1
S1(config-if)# ip addr 192.168.1.11 255.255.255.0
S1(config-if)# no shut
S1(config-if)# exit
S1(config)# ip default-gateway 192.168.1.1
S1(config)# end
S1# copy runnning-config startup-config
- 라우터와 마찬가지로 기본적인 설정을 마친 후 각 인터페이스에 맞게 ip를 부여하고 사용하지 않는 포트는 종료시킨다.
NAT 구성 및 확인
- 라우터 NAT 구성
R1# conf t
R1(config)# access-list 1 permit 192.168.1.0 0.0.0.255
R1(config)# ip nat pool PUBLIC_ACCESS 209.165.200.226 209.165.200.228 netmask 255.255.255.248
R1(config)# ip nat inside source list 1 pool PUBLIC_ACCESS
R1(config)# int g0/1
R1(config-if)# ip nat inside
R1(config-if)# int g0/0
R1(config-if)# ip nat outside
R1(config-if)# end
- R1에서 nat 구성을 마친 모습이다.
- int g0/1은 inside로 정의하고, int g0/0은 outside로 정의한다.(토폴로지 참고)
- nat 확인 및 테스트
R1# sh ip nat translations
Pro  Inside global         	Inside local          Outside local         Outside global
—  	209.165.200.227       	192.168.1.2           —                   —
—  	209.165.200.226       	192.168.1.3           —                   —
(하략)- ping 테스트 이후 재확인
R1# sh ip nat translations
Pro  Inside global         	Inside local          Outside local         Outside global
—  	209.165.200.227       	192.168.1.2           —                   	—
—  	209.165.200.226       	192.168.1.3           —                   	—
—  	209.165.200.228       	192.168.1.11          —                   	—
(하략)
- 주소가 3개만 할당되고 4개의 장치에서 Lo1을 ping 하면 R1에 오류문구가 출력된다.
%NAT-6-ADDR_ALLOC_FAILURE: Address allocation failed; pool 1 may be exhausted [2]
- sh ip nat translates verbose
R1# sh ip nat translates verbose
Pro  Inside global         	Inside local          Outside local         Outside global
—  	209.165.200.226       	192.168.1.3           —                   	—
  create: 09/23/19 15:35:27, use: 09/23/19 15:35:27, timeout: 23:56:42
  Map-Id(In): 1
(하략)
- nat는 1대 1 번역이므로 위 명령어를 입력하면 timeout이 24시간으로 나타는것을 볼 수 있다.
- 이로 유추할 수 있는 것은 nat가 현재 애플리케이션에 적합하지 않다는 것을 알 수 있다.
- NAT 삭제
R1# clear ip nat translations *
R1# clear ip nat statistics
R1# conf t
R1(config)# no ip nat inside source list 1 pool PUBLIC_ACCESS
PAT 구성 및 확인
- R1에서 PAT 추가 후 확인
R1(config)# ip nat inside source list 1 pool PUBLIC_ACCESS overload
R1(config)# end
R1# sh ip nat translations
Pro  Inside global         Inside local          Outside local         Outside global
icmp 209.165.200.226:1     192.168.1.3:1         209.165.200.1:1       209.165.200.1:1
Total number of translations: 1#
- 추가 후 위 명령어로 확인이 되었으면 ping 메세지를 통해 nat설 정 후 확인한 절차로 다시 한 번 확인할 필요가 있다.
R1# sh ip nat translations verbose
Pro  Inside global         Inside local          Outside local         Outside global
icmp 209.165.200.226:1     192.168.1.2:1         209.165.200.1:1       209.165.200.1:1
  create: 09/23/19 16:57:22, use: 09/23/19 16:57:25, timeout: 00:01:00
- nat에서 확인한 것과 다르게 timeout 부분이 24시간에서 1분으로 줄어든 것을 확인할 수 있다.
- 삭제
R1# clear ip nat translations *
R1# clear ip nat statistics
R1# conf t
R1(config)# no ip nat inside source list 1 pool PUBLICE_ACCESS overload

Dynamic mapping in use, do tou want to delete all entries? [no]: yes
R1(config)# no ip nat pool PUBLIC_ACCESS
- nat 통계 등을 모두 삭제하고 R1에서 nat pool translations를 모두 제거한다.
- PAT 추가 및 확인
R1(config)# ip nat insice source list 1 g0/0 overload
R1(config)# end
R1# sh ip nat translations
Pro  Inside global         Inside local          Outside local         Outside global
icmp 209.165.200.230:1     192.168.1.3:1         209.165.200.1:1       209.165.200.1:1
- 외부 인터페이스를 지정하여 PAT overload 명령을 추가 후 작동하는지 확인한다.
- ping 테스트 이후 확인
R1# sh ip nat translations
Pro  Inside global         Inside local          Outside local         Outside global
icmp 209.165.200.230:3     192.168.1.11:1        209.165.200.1:1       209.165.200.1:3
icmp 209.165.200.230:2     192.168.1.2:1         209.165.200.1:1       209.165.200.1:2
icmp 209.165.200.230:4     192.168.1.3:1         209.165.200.1:1       209.165.200.1:4
icmp 209.165.200.230:1     192.168.1.12:1        209.165.200.1:1       209.165.200.1:1
- ping 테스트를 진행하면서 확인해본 결과 이전과는 다르게 정상적으로 4개의 ip가 나타나는 것을 확인할 수 있다.
static NAT 구성 및 확인
- 삭제
R1# clear ip nat translations *
R1# clear ip nat statistics
- 기록이 나타났던 로그를 삭제한다.
- static NAT 구성 및 확인
R1# conf t
R1(config)# ip nat inside source static 192.168.1.2 209.165.200.229
R1(config)# end
R1# sh ip nat translations
Pro  Inside global         	Inside local          Outside local         Outside global
—  	209.165.200.229       	192.168.1.2           —                   	—
- 구성 완료 후 확인해본 결과 static mapping이 활성화된 것을 확인할 수 있다.
- ping 테스트 후 확인
R1# sh ip nat translations
Pro  Inside global         Inside local          Outside local         Outside global
—  	 209.165.200.229       192.168.1.2           —                     —
icmp 209.165.200.229:3     192.168.1.2:3         209.165.200.225:3     209.165.200.225:3
- ping 테스트 후 해당 명령어를 통해 확인된 결과로 static NAT가 정상적으로 작동한다는 것을 확인할 수 있다.

아침엔 운동하고 밤엔 잠을 잔다.