
packet tracer가 아닌 cisco 라우터로 실습한 내용
기본적인 single area ospfv2구성
- 참고한 토폴로지
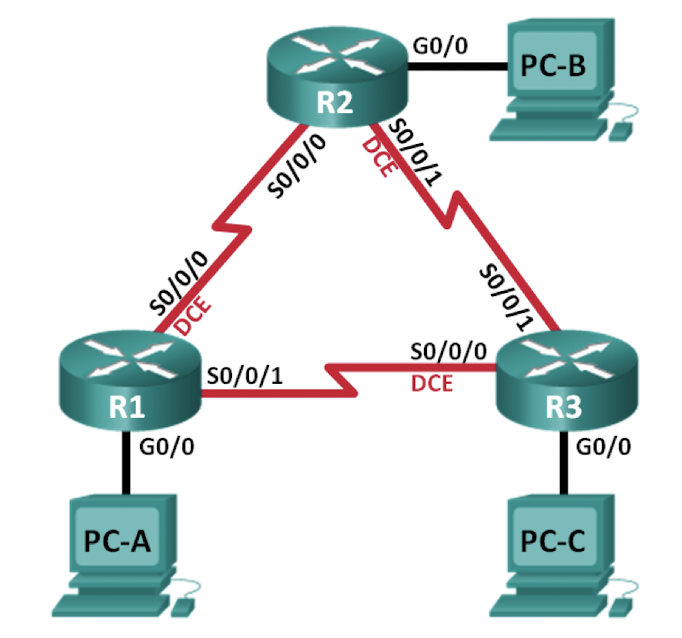
- 참고한 IP 주소 테이블
| 장비 | 인터페이스 | ip주소 | 서브넷마스크 | 게이트웨이 |
|---|---|---|---|---|
| R1 | g0/0 | 192.168.1.1 | 255.255.255.0 | |
| s0/0/0(DCE) | 192.168.12.1 | 255.255.255.252 | ||
| s0/0/1 | 192.168.13.1 | 255.255.255.252 | ||
| R2 | g0/0 | 192.168.2.1 | 255.255.255.0 | |
| s0/0/0 | 192.168.12.2 | 255.255.255.252 | ||
| s0/0/1(DCE) | 192.168.23.1 | 255.255.255.252 | ||
| R3 | g0/0 | 192.168.3.1 | 255.255.255.0 | |
| s0/0/0(DCE) | 192.168.13.2 | 255.255.255.252 | ||
| s0/0/1 | 192.168.23.2 | 255.255.255.252 | ||
| PC-A | 192.168.1.3 | 255.255.255.0 | 192.168.1.1 | |
| PC-B | 192.168.2.3 | 255.255.255.0 | 192.168.2.1 | |
| PC-C | 192.168.3.3 | 255.255.255.0 | 192.168.3.1 |
내용
- 토폴로지를 바탕으로 네트워크망 구성
- 각 라우터마다 기본설정 구성
- ospf 라우팅 구성
- 라우터ID 할당 및 변경
- passive interface 구성
- metric ospf 변경
네트워크 망 구성
네트워크 망을 구성하는 것은 어렵지 않았다.
다만 포트별로 적혀있는 글씨를 잘 구분해서 위 그림과 같이 DTE-DCE케이블을 정확한 위치에 연결하는 것이 제일 중요하다.
기본설정 구성
토폴로지에 보이는 3개의 라우터를 모두 기본설정을 구성해야 한다.
- R1
Router> enable
Router# configure terminal
Router(config)# hostname R1
R1(config)# no ip domain-lookup
R1(config)# enable secret class
R1(config)# line console 0
R1(config-line)# password cisco
R1(config-line)# login
R1(config-line)# line vty 0 4
R1(config-line)# password cisco
R1(config-line)# login
R1(config-line)# exit
R1(config)# service password-encryption
R1(config)# banner motd @ DO NOT ENTER WITHOUT PERMISSION @
R1(config)# line console 0
R1(config-line)# logging synchronous
R1(config-line)# exit
R1(config)# int g0/1
R1(config-if)# ip address 192.168.1.1 255.255.255.0
R1(config-if)# no shutdown
R1(config-if)# int s0/0/0
R1(config-if)# ip addr 192.168.12.1 255.255.255.252
R1(config-if)# no shutdown
R1(config-if)# clock rate 128000
R1(config-if)# int s0/0/1
R1(config-if)# ip addr 192.168.13.1 255.255.255.252
R1(config-if)# no shutdown
R1(config-if)# end
R1# copy running-config startup-config
R1에서 구성한 설정 내용을 보면서 R2와 R3도 동일하게 적용했다.
- 라우터의 이름을 구성하고 DNS조회를 비활성화한다.
- 암호 설정
- motd 배너 설정
- logging synchronous 설정
- 모든 인터페이스에 ip address 구성
- DCE 인터페이스에 clock rate를 128000으로 설정
- startup-config로 구성 복사
주의할 점은 토폴로지를 참고하면서 DCE 인터페이스가 어떤 인터페이스에 연결되어 있는지 확인해야한다.
- 라우터에 각각 연결되어 있는 PC는 ip 주소테이블을 참고하여 단순하게 구성하면 된다.
만약 완벽하게 구성했다면 ping 테스트를 했을 때 라우터끼리의 ping과 PC와 게이트웨이끼리는 테스트가 성공적일 것이다.
안된다면...구성을 잘못했거나 물리적인 구성이 잘되었는지 확인해보는 것도 방법이다.
ospf 라우팅 구성
- R1
R1# en
R1(config)# router ospf 1
R1(config-router)# network 192.168.1.0 0.0.0.255 area 0
R1(config-router)# network 192.168.1.0 0.0.0.3 area 0
R1(config-router)# network 192.168.12.0 0.0.0.3 area 0
R1(config-router)# network 192.168.13.0 0.0.0.3 area 0
R1(config-router)# end
각 인터페이스마다 subnet mask의 역수인 wildmask를 적용하여 area ID 0을 사용한다.
R2와 R3도 위와 같은 방법으로 area 0으로 ospf를 구성한다.
모든 구성이 완료되면 각 라우터에 인접성 메세지가 표시된다.
- ospf 라우팅 정보 확인
R1# show ip ospf neighbor
Neighbor ID 	Pri State 		Dead Time 	Address			Interface
192.168.23.2 0 	0	FULL/ -		00:00:33	192.168.13.2	Serial0/0/1
192.168.23.1 0	0	FULL/ -		00:00:30	192.168.12.2	Serial0/0/0
R1# show ip route
(생략)
Gateway of last resort is not set
  	192.168.1.0/24 is variably subnetted, 2 subnets, 2 masks
C     192.168.1.0/24 is directly connected, GigabitEthernet0/0
L	  192.168.1.1/32 is directly connected, GigabitEthernet0/0
O	 192.168.2.0/24 [110/65] via 192.168.12.2, 00:32:33, Serial0/0/0
O	 192.168.3.0/24 [110/65] via 192.168.13.2, 00:31:48, Serial0/0/1
	192.168.12.0/24 is variably subnetted, 2 subnets, 2 masks
C	  192.168.12.0/30 is directly connected, Serial0/0/0
L	  192.168.12.1/32 is directly connected, Serial0/0/0
	192.168.13.0/24 is variably subnetted, 2 subnets, 2 masks
C     192.168.13.0/30 is directly connected, Serial0/0/1
L	  192.168.13.1/32 is directly connected, Serial0/0/1
	192.168.23.0/30 is subnetted, 1 subnets
O	  192.168.23.0/30 [110/128] via 192.168.12.2, 00:31:38, Serial0/0/0
					  [110/128] via 192.168.13.2, 00:31:38, Serial0/0/1
- show ip ospf neighbor 명령어와 show ip route ospf 를 통해 각 라우터가 네트워크 내의 다른 라우터를 neighbor로 지정되어 나타나는지 확인하고, 모든 네트워크가 모든 라우터의 라우팅 테이블에 표시되는지 확인한다.
- 프로토콜 설정 및 프로세스 정보 확인
R1# show ip protocols
*** IP Routing is NSF aware ***

Routing Protocol is "ospf 1"
	Outgoing update filter list for all interfaces is not set
    Incoming update filter list for all interfaces is not set
    Router ID 192.168.13.1
	Number of areas in this router is 1. 1 normal 0 stub 0 nssa
    Maximum path: 4
	Routing for Networks:
		192.168.1.0 0.0.0.255 area 0
        192.168.12.0 0.0.0.3 area 0
        192.168.13.0 0.0.0.3 area 0
    Routing Information Sources:
    	Gateway 		Distance 	Last Update
    	192.168.23.2 	110			00:19:16
        192.168.23.1 	110			00:20:03
	Distance: (default is 110)
R1# show ip ospf
Routing Process "ospf 1" with ID 192.168.13.1
Start time: 00:20:23.260, Time elapsed: 00:25:08.296
Supports only single TOS(TOS0) routes
Supports opaque LSA
Supports Link-local Signaling (LLS)
Supports area transit capability
Supports NSSA (compatible with RFC 3101)
Event-log enabled, Maximum number of events: 1000, Mode: cyclic
Router is not originating router-LSAs with maximum metric Initial SPF schedule delay 5000 msecs
Minimum hold time between two consecutive SPFs 10000 msecs Maximum wait time between two consecutive SPFs 10000 msecs Incremental-SPF disabled
Minimum LSA interval 5 secs
Minimum LSA arrival 1000 msecs
LSA group pacing timer 240 secs
Interface flood pacing timer 33 msecs
Retransmission pacing timer 66 msecs
Number of external LSA 0. Checksum Sum 0x000000
Number of opaque AS LSA 0. Checksum Sum 0x000000
Number of DCbitless external and opaque AS LSA 0
Number of DoNotAge external and opaque AS LSA 0
Number of areas in this router is 1. 1 normal 0 stub 0 nssa Number of areas transit capable is 0
External flood list length 0
IETF NSF helper support enabled
Cisco NSF helper support enabled
Reference bandwidth unit is 100 mbps
	Area BACKBONE(0)
		Number of interfaces in this area is 3
		Area has no authentication
		SPF algorithm last executed 00:22:53.756 ago
		SPF algorithm executed 7 times
		Area ranges are
		Number of LSA 3. Checksum Sum 0x019A61
		Number of opaque link LSA 0. Checksum Sum 0x000000
        Number of DCbitless LSA 0
		Number of indication LSA 0
		Number of DoNotAge LSA 0
		Flood list length 0
- show ip protocols 명령어로 ospf 구성정보를 빠르게 확인할 수 있다.
- show ip ospf 명령어는 프로세스 ID, 라우터 ID를 검사할 수 있으며, ospf 정보와 SPF 알고리즘이 마지막으로 계산된 시간을 표시한다.
- 인터페이스 설정 확인
R1# show ip ospf interface brief
Interface	PID	Area	IP Address/Mask	Cost	State	Nbrs	F/C
Se0/0/1		1 	0 		192.168.13.1/30 64 		P2P 	1/1
Se0/0/0		1 	0		192.168.12.1/30 64 		P2P 	1/1
Gi0/0		1	0		192.168.1.1/24 	1 		DR 		0/0
- show ip ospf interface brief ㅁ영령어로 ospf의 지원 인터페이스의 요약을 표시할 수 있다.
- 좀 더 자세한 확인이 필요하다면 show ip ospf interface 명령어를 사용하면 자세한 정보를 확인할 수 있다.
라우터 ID 할당 및 변경
각 라우터의 loopback에 IP를 할당한다.
- R1
R1# conf t
R1(config)# int lo0
R1(config-if)# ip addr 1.1.1.1 255.255.255.255
R1(config-if)# end
R1# copy running-config startup-config
R1# reload
- R2와 R3도 R1과 같은 방법으로 loopback에 IP를 할당하면 된다.
주의할 점은 R2는 2.2.2.2/32, R3는 3.3.3.3/32를 사용하도록 구성한다.
- reload를 하는 이유는 라우터 ID를 loopback 주소로 재설정하기 위함이므로 세 라우터 모드 설정 완료 후 reload가 필요하다.
- 변경사항 확인
R1> en
R1# show ip ospf neighbor
Neighbor ID 	Pri State 		Dead Time 	Address			Interface
3.3.3.3	  		0	FULL/ -		00:00:31	192.168.13.2	Serial0/0/1
2.2.2.2 		0	FULL/ -		00:00:32	192.168.12.2	Serial0/0/0
reload 후 세개의 라우터가 인접한 라우터의 라우터 ID가 변경되었는지 확인한다.
loopback으로 할당된 라우터의 라우터 ID를 변경한다.
- R1
R1# conf t
R1(config)# router ospf 1
R1(config-router)# router-id 11.11.11.11
R1(config-router)# end
R1# clear ip ospf process
Reset ALL OSPF process?	[no] : yes
R1# show ip protocols
(생략)
Routing Protocol is "ospf 1"
	Outgoing update filter list for all interfaces is not set
    Incoming update filter list for all interfaces is not set
    Router ID 11.11.11.11
	Number of areas in this router is 1. 1 normal 0 stub 0 nssa
    Maximum path: 4
	Routing for Networks:
		192.168.1.0 0.0.0.255 area 0
        192.168.12.0 0.0.0.3 area 0
        192.168.13.0 0.0.0.3 area 0
(하략)
show ip protocols 명령어를 통해 R1의 라우터 ID가 변경된 것을 확인할 수 있다.
R2와 R3도 각각 22.22.22.22와 33.33.33.33로 설정 후 위와 같은 과정을 통해 변경된 ID를 확인한다.
- 변경사항 확인
R1# show ip ospf neighbor
Neighbor ID 	Pri State 		Dead Time 	Address			Interface
33.33.33.33	  	0	FULL/ -		00:00:35	192.168.13.2	Serial0/0/1
22.22.22.22 	0	FULL/ -		00:00:36	192.168.12.2	Serial0/0/0
passive interface 구성
passive interface명령어를 사용하면 라우팅 업데이트가 DR 라우터 인터페이스를 통해 전송되지 않는다.
일반적으로 dynamic routing protocol을 수신할 필요가 없기 때문에 LAN의 트래픽을 줄이기 위해 수행되는 과정이다.
- R1
R1# sh ip ospf int g0/0
(생략)
	Timer intervals configured, Hello 10, Dead 40, Wait 40, Retransmit 5
    	oob-resync timeout 40
R1# conf t
R1(config)# router ospf 1
R1(config-router)# passive-interface g0/0
R1(config-router)# end
R1# sh ip ospf int g0/0
(생략)
	Timer intervals configured, Hello 10, Dead 40, Wait 40, Retransmit 5
    	oob-resync timeout 40
		No Hellos (Passive interface)
passive-interface 명령어를 수행 하기 전 show ip interface g0/0 명령어를 입력하면 Hello 패킷이 10초마다 전송되고 ospf라우터 간에 인접 라우터가 작동 중인 것을 확인할 수 있다.
passive-interface 명령어를 입력 후 다시 show ip interface g0/0 명령어를 입력하면 맨 아래 줄에 No Hellos (Passive interface)라는 문구가 추가 된 것을 확인할 수 있다.
- R2
R2# conf t
R2(config)# router ospf 1
R2(config-router)# passive-interface default
R2에서 passive-interface default 명령을 실행하여 모든 ospf 인터페이스의 기본값을 수동으로 설정한다.
이에 따른 결과로 R2가 더 이상 ospf neighbor로 나열되지 않는다.
R1과 R3에서 sh ip route 명령어를 통해 확인해보면 이제 R1과 R3에는 더 이상 192.168.2.0/24 네트워크에 대한 경로가 나타나지 않는다.
- no passive-interface
R2(config-router)# no passive-interface s0/0/0R2에서 ospf 라우팅 업데이트를 송수신이 가능하도록 no passive-interface 명령어를 입력하면 R1과 인접관계가 설정되었다는 매세지가 출력된다.
metric 변경
auto-cost reference-bandwidth, bandwidth, ip ospf cost 명령을 사용해 ospf metric을 변경한다.
모든 DCE 인터페이스는 clock rate가 128000로 설정되어 있어야 한다.(기본설정구성 부분 참고)
- ospf의 기본 기준 대역폭은 100Mb/s(fast ethernet speed)지만, 대부분의 최신 인프라 장치는 이보다 빠른 링크를 가지고 있다.
- ospf cost는 정수이므로 100Mb/s이상인 모든 링크의 cost는 1이다.
- 따라서 fast ethernet, gigabit ethernet, 10G ethernet 인터페이스는 모두 동일한 cost를 부담하므로 100Mb/s보다 빠른 링크를 가진 네트워크를 수용하기 위해 기준 대역폭을 더 높은 값으로 변경해야한다.
- 기본 대역폭 및 경로 확인
R1# sh int g0/0
(생략)
 MTU 1500 bytes, BW 1000000Kbit/sec, DLY 10 usec,
 	reliabilty 255/255, txload 1/255, rxload 1/255
(하략)
R1# sh ip route ospf
(생략)
Gateway of last resort is not set

O	 192.168.2.0/24 [110/782] via 192.168.12.2, 00:09:07, Serial0/0/0
O	 192.168.3.0/24 [110/782] via 192.168.13.2, 00:31:48, Serial0/0/1
	192.168.23.0/30 is subnetted, 1 subnets
O 192.168.23.0 [110/1562] via 192.168.12.2, 00:09:07, Serial0/0/0- R3 routing cost 확인
R3# sh ip ospf int g0/0
(생략)
	Internet Address 192.168.3.1/24, Area 0, Attached via Networlk Statement
    Process ID 1, Router ID 33.33.33.33, Network Type BROADCAST, cost: 1
    Topology-MTID	Cost	Disabled	Shutdown	Topology Name
    0				1		no			no			Base
(하략)- R1 routing cost 확인
R1# sh ip ospf s0/0/1
(생략)
	Internet Address 192.168.13.1/30, Area 0, Attached via Networlk Statement
    Process ID 1, Router ID 11.11.11.11, Network Type BROADCAST, cost: 781
    Topology-MTID	Cost	Disabled	Shutdown	Topology Name
    0				781		no			no			Base
(하략)
R1, R3의 cost 합은 sh ip route명령어의 출력 값에서 볼 수 있는 것처럼 1 + 781 = 782인 누적 cost이다.
- 대역폭 설정 변경
R1# conf t
R1(config)# router ospf 1
R1(config-router)# auto-cost reference-bandwidth 10000
R1(config-router)# end
R2와 R3에서도 동일한 위와 명령어를 입력한다.
- routing cost 확인
R3# sh ip ospf int g0/0
(생략)
	Internet Address 192.168.3.1/24, Area 0, Attached via Networlk Statement
    Process ID 1, Router ID 33.33.33.33, Network Type BROADCAST, cost: 10
    Topology-MTID	Cost	Disabled	Shutdown	Topology Name
    0				10		no			no			Base
(하략)
R1# sh ip ospf int s0/0/1
(생략)
Internet Address 192.168.13.1/24, Area 0, Attached via Networlk Statement
Process ID 1, Router ID 11.11.11.11, Network Type BROADCAST, cost: 65535
Topology-MTID Cost Disabled Shutdown Topology Name
0 65535 no no Base
(하략)- 새로 계산된 누적 cost 확인
R1# sh ip route ospf
(생략)
Gateway of last resort is not set

O	 192.168.2.0/24 [110/65545] via 192.168.12.2, 00:09:07, Serial0/0/0
O	 192.168.3.0/24 [110/65545] via 192.168.13.2, 00:31:48, Serial0/0/1
	192.168.23.0/30 is subnetted, 1 subnets
O	  192.168.23.0 [110/131070] via 192.168.13.2, 00:09:07, Serial0/0/1
				   [110/131070] via 192.168.12.2, 00:09:07, Serial0/0/0
cost 부분을 보면 65545로 R1의 cost인 65535와 R2, R3의 cost인 10이 더해진 수치인 것을 확인할 수 있다.
- 기준 대역폭을 기본값으로 재설정
R1# conf t
R1(config)# router ospf 1
R1(config-router)# auto-cost reference-bandwidth 100
R1(config-router)# end
대역폭을 기본값으로 설정하기 위해 세개의 라우터 모두 auto-cost reference-bandwidth 100 명령어를 입력한다.
- R1의 s0/0/0 대역폭 설정
R1# conf t
R1(config)# int s0/0/0
R1(config-if)# bandwidth 128
R1(config-if)# end
R1# sh ip route ospf
(생략)
Gateway of last resort is not set

O	 192.168.2.0/24 [110/782] via 192.168.12.2, 00:09:07, Serial0/0/0
O	 192.168.3.0/24 [110/782] via 192.168.13.2, 00:31:48, Serial0/0/1
	192.168.23.0/30 is subnetted, 1 subnets
O	  192.168.23.0 [110/1562] via 192.168.13.2, 00:09:07, Serial0/0/1
- 대역폭을 변경 후 sh ip route ospf 명령어를 통해 볼 수 있는 것으로 s0/0/1을 경유하는 것이 cost가 s0/0/0보다 낮기 때문에 192.168.23.0/24 네트워크에 대한 경로를 표시하지 않는다는 점이다.
- s0/0/1에 대해서도 위와 동일하게 대역폭을 변경하면 다시 네트워크에 대한 경로를 표시하게 된다.
- routing cost 변경
R1# conf t
R1(config)# int s0/0/1
R1(config-if)# ip ospf cost 1565
R1(config-if)# end
R1# sh ip route ospf
(생략)
Gateway of last resort is not set

O	 192.168.2.0/24 [110/782] via 192.168.12.2, 00:08:18, Serial0/0/0
O	 192.168.3.0/24 [110/1563] via 192.168.12.2, 00:00:03, Serial0/0/0
	192.168.23.0/30 is subnetted, 1 subnets
O	  192.168.23.0 [110/1562] via 192.168.12.2, 00:08:18, Serial0/0/0
cost를 변경하고 sh ip route ospf 명령어로 cost가 어떻게 바뀌고 어떤 영향을 미치는지 확인할 수 있다.