
INTRO
Ublox C099-F9P GPS를 사용하여 측위 정보 수신
RTK 신호를 통해 정밀한 측위 정보를 제공받고 LLA to UTM 으로 변환
u-center를 사용하여 수신 주기 조절
개발환경
Ubuntu 18.04 LTS / ROS Melodic
사용장비
Ublox C099 - F9P
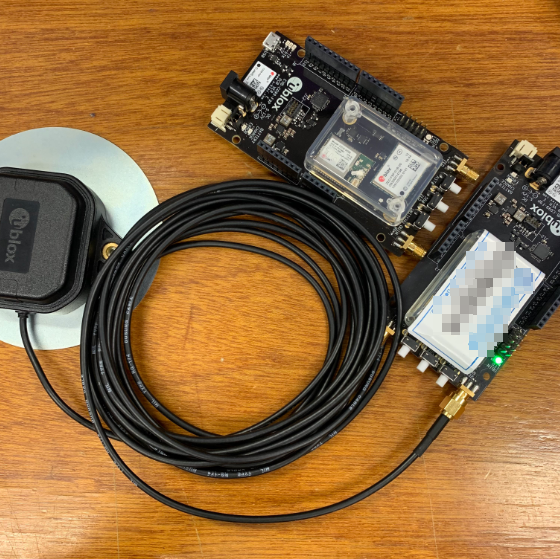
C099-F9P 설치 및 연결
보드 연결하기
- 위 그림과 같이 ZED-RF 에 안테나를 연결하고, 5핀단자를 연결한다.
- USB를 컴퓨터에 연결하고, 보드가 인식되었는지를 확인한다.
$ ls -l /dev/ttyACM*

- 기기 실행 권한을 부여한다
$ sudo chmod 777 /dev/ttyACM0
드라이버 설치
ROS 에서 사용해주기 위해 드라이버를 설치
$ cd catkin_ws/src
$ git clone https://github.com/ros-agriculture/ublox_f9p.git
$ cd ..
$ catkin_make
launch 파일 수정 및 실행
launch 파일을 수정하기 전, config 폴더에 있는 zed_f9p.yaml 파일을 수정해줘야한다.
다른 yaml 파일을 사용해도 상관은 없다.
$ cd ~/catkin_ws/src/ublox_f9p/ublox_gps/config
또는
$ roscd ublox_gps/config/
$ gedit zed-f9p.yaml
device 가 내가 연결한 포트와 동일한지 확인.
device: /dev/ttyACM0
frame_id: gps
이제 ~/catkin_ws/src/ublox_f9p/ublox_gps/launch 경로로 이동하여 ublox_device.launch 파일을 수정한다.
노드이름과 파라미터 파일의 이름만 추가해주면 된다.
  <arg name="node_name" value="ublox_gps"/>
  <arg name="param_file_name" value="zed-f9p" />
  <arg name="output" default="screen" />
  <arg name="respawn" default="true" />
  <arg name="respawn_delay" default="30" />
  <arg name="clear_params" default="true" />
빌드 후 실행해보자.
// 빌드
$ cd
$ cd catkin_ws
$ catkin_make

// 실행하기
$ roslaunch ublox_gps ublox_device.launch
$ rostopic list -v 를 통해 현재 토픽을 확인할 수 있다.
Published topics:
 * /ublox_gps/navrelposned [ublox_msgs/NavRELPOSNED] 1 publisher
 * /rosout [rosgraph_msgs/Log] 1 publisher
 * /ublox_gps/navsat [ublox_msgs/NavSAT] 1 publisher
 * /rosout_agg [rosgraph_msgs/Log] 1 publisher
 * /ublox_gps/fix_velocity [geometry_msgs/TwistWithCovarianceStamped] 1 publisher
 * /ublox_gps/fix [sensor_msgs/NavSatFix] 1 publisher
 * /ublox_gps/navclock [ublox_msgs/NavCLOCK] 1 publisher
 * /ublox_gps/navstatus [ublox_msgs/NavSTATUS] 1 publisher
 * /ublox_gps/navpvt [ublox_msgs/NavPVT] 1 publisher
 * /diagnostics [diagnostic_msgs/DiagnosticArray] 1 publisher
 * /ublox_gps/navposecef [ublox_msgs/NavPOSECEF] 1 publisher

Subscribed topics:
 * /rtcm_topic [rtcm_msgs/Message] 1 subscriber
 * /rosout [rosgraph_msgs/Log] 1 subscriber
$ rostopic echo /ublox_gps/fix 로 내용을 확인해보자.
---
header:
  seq: 2319
  stamp:
    secs: 1645864064
    nsecs: 625306652
  frame_id: "gps"
status:
  status: 0
  service: 0
latitude: 35.859753
longitude: 128.487405
altitude: 87.067
position_covariance: [0.45427600000000007, 0.0, 0.0, 0.0, 0.45427600000000007, 0.0, 0.0, 0.0, 0.4529290000000001]
position_covariance_type: 2
---
신호가 잘 수신되는 모습을 확인할 수 있다.
RTK 신호 받기
RTK 란?
정밀 측위를 위해 RTK 신호를 사용해보자.
RTK 신호를 통해 근처 기지국으로부터의 보정 신호로 정밀한 측위 정보를 얻을 수 있다.
대략적인 과정은 아래와 같다.
- 수신기와 근처 기지국은 각각 GPS 신호를 수신한다.
- 기지국은 자신의 정확한 위치정보를 알고있으므로 수신된 정보와의 오차를 비교할 수 있다.
- 수신기는 전달받은 오차 정보를 통해 자신의 위치를 보정할 수 있다.
국토지리정보원에 가입하여 VRS 를 받을 수 있으니 아래 링크를 참고
RTCM, NTRIP 패키지 설치
우선 기지국으로부터 보정신호를 받아오기 위해 RTCM 패키지를 설치해준다.
$ cd ~/catkin_ws/src/ublox_f9p/
$ git clone https://github.com/tilk/rtcm_msgs.git
다음은 NTRIP 패키지를 설치하고 빌드 해준다.
$ git clone https://github.com/ros-agriculture/ntrip_ros
$ cd
$ cd catkin_ws
$ catkin_make
RTCM Subscribe
아까 처음 설치했던 ublox_gps 패키지에서 RTCM 신호를 Subscribe 할 수 있도록 수정해주자.
/ublox_gps/src/node.cpp 의 1861번째 line 을 수정해주면 된다.
  //param_nh.param("rtcm_topic", rtcm_topic, std::string("rtcm"));  수정 전
  param_nh.param("/ublox_gps/rtcm", rtcm_topic, std::string("rtcm")); 수정 후
ntrip_ros.launch 파일 수정
$ rosed ntrip_ros ntrip_ros.launch
아래와 같이 파일을 수정해주자.
<launch>
  <include file="$(find ublox_gps)/launch/ublox_device.launch"/>
  <node pkg="ntrip_ros" type="ntripclient.py" name="ntrip_ros" output="screen">
 	 <param name="rtcm_topic" value="/ublox_gps/rtcm"/> //rtcm 토픽
 	 <param name="ntrip_server" value="vrs3.ngii.go.kr:2101"/> //접속경로:포트
 	 <param name="ntrip_user" value="-------"/> //개인별 아이디
 	 <param name="ntrip_pass" value="ngii"/> //비밀번호
 	 <param name="ntrip_stream" value="VRS-RTCM31"/> //마운트포인트
 	 <param name="nmea_gga" value="$GPGGA,132350.925,3551.588,N,12829.261,E,1,12,1.0,0.0,M,0.0,M,,*64"/>
  </node>
</launch>
nmea_gga 에 사용할 $GPGGA 메시지는 여기에서 얻을 수 있다.
측정 위치의 근처를 선택한 후 "Generate NMEA file" 을 실행시키고 메모장을 열어 복사/붙여넣기하면 된다.
실행해보자
$ roslaunch ublox_gps ublox_device.launch
$ roslaunch ntrip_ros ntrip_ros.launch
//터미널
header:
seq: 148
stamp:
secs: 1645867858
nsecs: 249903283
frame_id: "gps"
status:
status: 0
service: 0
latitude: 35.8597985
longitude: 128.4874035
altitude: 80.26
position_covariance: [0.020735999999999997, 0.0, 0.0, 0.0, 0.020735999999999997, 0.0, 0.0, 0.0, 0.054756000000000006]
position_covariance_type: 2
오차(position covariance)가 현저히 줄어든 것을 확인할 수 있다.
5핀연결부분에 있는 RTK LED 가 노란불로 점등된다면, RTK FIX 상태를 의미한다.
아래는 RTK FIX 상태를 구글어스에 찍어본 결과
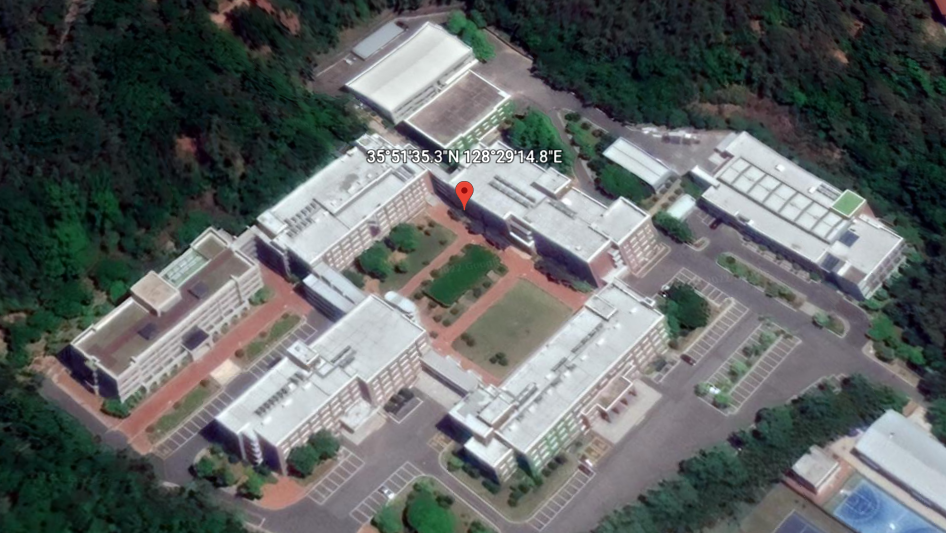
거의 정확하게 수신된다.
수신 주기 조절
u-center 설치
기본값으로 설정된 수신 주기인 1hz 에서 메뉴얼 상의 8hz 로 변경해보자.
메뉴얼 상에서는 baud rate 가 460800 일때 8hz 가 권장된다고 한다.
자세한 u-center 사용법은 추후 업로드 예정
우선 ublox 사의 소프트웨어 u-center 를 설치
실행 후 GPS를 연결한다.
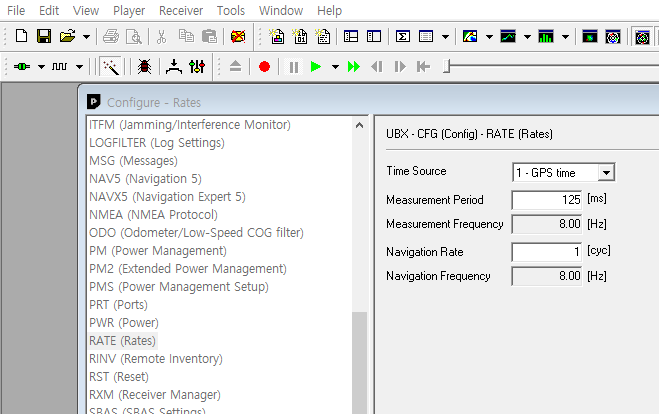
좌측 상단의 view - Configure - Rate(rates)로 이동하여 Measurement Period 를 125ms(= 8hz)로 설정해준다.
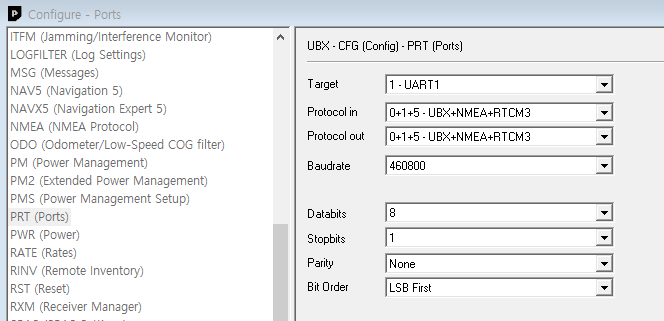
PRT(Ports) 에서 baud rate 를 460800으로 설정해준다.
GPS 의 설정을 CFG 에서 Flash(or EEPROM)에 저장해준다.
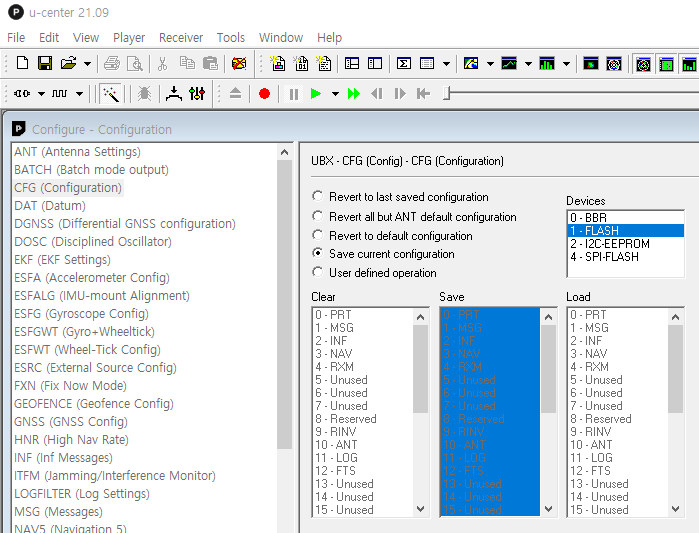
ubuntu 로 돌아와서 roslaunch 를 실행해보면 수신주기가 훨씬 빨라졌음을 확인할 수 있을 것이다.
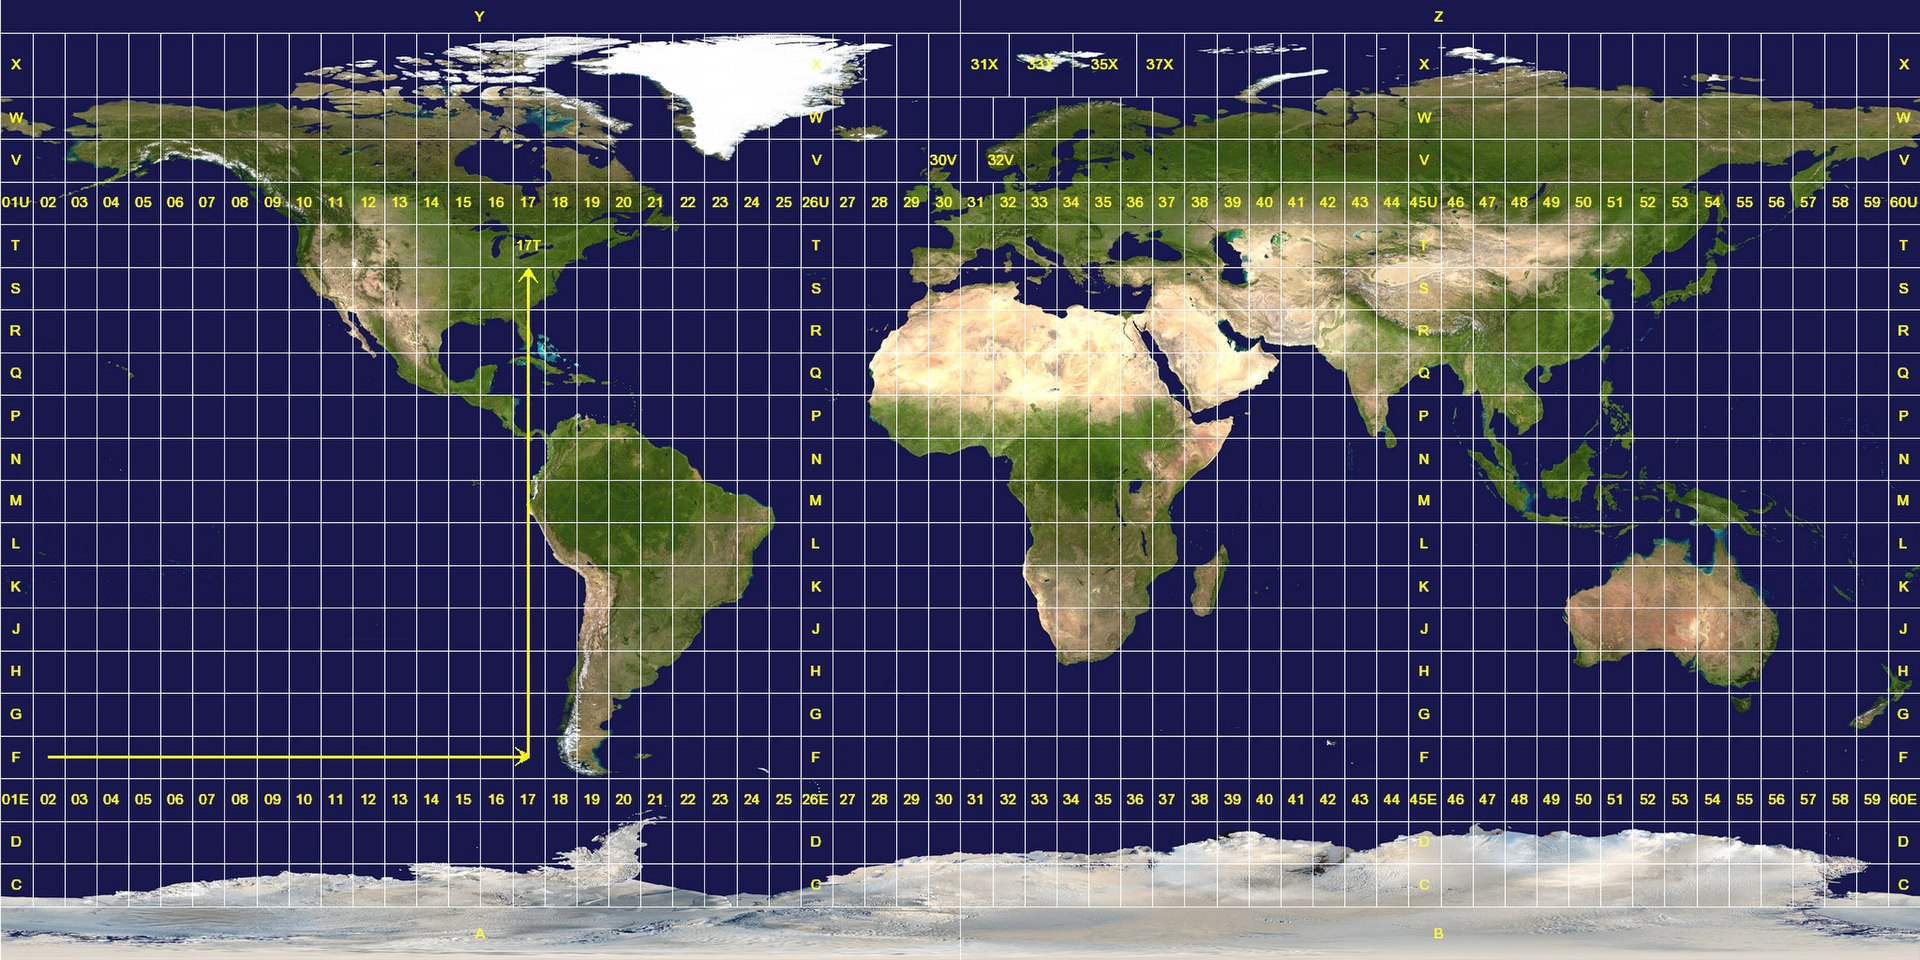
LLA to UTM 변환
이제 RTK신호를 8hz로 수신할 수 있게 되었다.
위도(latitude), 경도(longitude), 고도(altitude)의 지리좌표계에서
x, y, z 로 표현되는 UTM 좌표계로 변경해보자.
LLAtoUTM 패키지 설치
아래의 패키지를 설치한다.
$ cd ~/catkin_ws/src/ublox_f9p/
$ git clone https://github.com/arpg/ROS-UTM-LLA.git
소스 파일 수정
~/catkin_ws/src/ublox_f9p/ROS-UTM-LLA/src 에 위치한 convert_ndt2lla.cpp 의 41 line 을 수정해주자.
//ros::Subscriber  sub2 = n.subscribe("/gps/fix",1000,&ULConverter::GPSCallback, &con); //수정 전
ros::Subscriber  sub2 = n.subscribe("/ublox_gps/fix",1000,&ULConverter::GPSCallback, &con); //수정 후
coordinate_convertion.launch 파일 수정
실행할 런치파일의 파라미터를 수정해주자.
<launch>
    <!-- The following is denver UTM zone. check your UTM zone at  https://mangomap.com/robertyoung/maps/69585/what-utm-zone-am-i-in-# -->
    <param name="utm_zone" type="int" value="52" />
    <param name="hemisphere" type="string" value="North" />
    <node type="utm_lla_converter" pkg="utm_lla" name="utm_lla_converter" output="screen"/>
</launch>
첫번째 파라미터인 utm_zone 을 설정해주는 것 이외에 다른 설정은 건들 필요가 없다.
대한민국의 UTM-zone 은 52 에 속한다.
launch 파일 실행
빌드 후 실행해보자
$ cd
$ cd catkin_ws
$ catkin_make
$ roslaunch utm_lla coordinate_convertion.launch
실행결과
//터미널
[ INFO] [1645872814.134544321]: Get data lagitude from GPS: [35.859773]
[ INFO] [1645872814.134636071]: Get data longitude from GPS: [128.486988]
[ INFO] [1645872814.134674136]: Get data altitude from GPS: [131.651000]
[ INFO] [1645872814.134727536]: Convert to x: [453681.527447]
[ INFO] [1645872814.134784539]: Convert to y: [3968516.897792]
[ INFO] [1645872814.134827212]: Convert to z: [131.651000]
[ INFO] [1645872814.261624609]: Get data lagitude from GPS: [35.859773]
[ INFO] [1645872814.261719909]: Get data longitude from GPS: [128.486988]
[ INFO] [1645872814.261786979]: Get data altitude from GPS: [131.660000]
[ INFO] [1645872814.261871893]: Convert to x: [453681.527331]
[ INFO] [1645872814.261932057]: Convert to y: [3968516.875609]
[ INFO] [1645872814.261988610]: Convert to z: [131.660000]
$ rostopic echo /utm 으로 확인해보면
header:
  seq: 1184
  stamp:
    secs: 1645873041
    nsecs: 375128972
  frame_id: "gps"
pose:
  position:
    x: 453689.848412
    y: 3968514.44726
    z: 123.625
  orientation:
    x: 0.0
    y: 0.0
    z: 0.0
    w: 0.0
LLA to UTM 으로 잘 변환된 모습을 확인할 수 있다.
위 작성된 내용은 미흡한 부분이 많을 수 있습니다.
참고자료

6개의 댓글


정성스럽게 작성해 주신 글 잘 봤습니다. 하지만 한가지문제가 있어 댓글 남김니다.
ntrip_Ros를 통해 launch수정하였고 VRS-RTCM31을 받으려고 합니다. 이를 실행하면 ICY 200 OK라는 글만 터미널에 뜨고 아무런 반응이 없습니다. 또한32 및 FKP-31에도 동일한 증상을 보이며 유일하게 SSR-SSRG 만이 숫자를 출력합니다.
하지만 SSRG또한 지속적으로 뜨지 않으며 간헐적으로 많은 데이터가 한번에 올라옵니다. 또한 데이터가 올라와도 보드에 노란불이 뜨지 않습니다. 이러한 문제에 대한 해결법을 아시는지요?
승우씨 글로벌 하나 만들죠