작성한 리스트 보기 구현
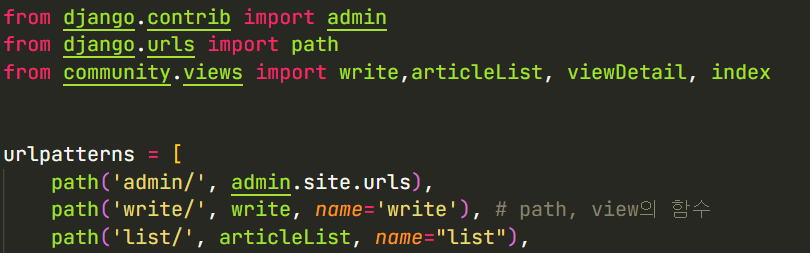
list url 패턴 생성
urls.py
앱의 View 함수 정의하기
views.py

list.html 템플릿 생성 후 작성

list.html

세부내용 확인하기 구현
view_detail url 패턴 생성
urls.py

<int:num> 선언한 이유는 뒤에서 설명하겠다.
앱의 View 함수 정의하기
views.py

view_detail.html 템플릿 생성 후 작성
view_detail.html

하고 list.html 코드를 수정해야한다.

num변수를 int형, 정수형으로 계속 받아온다. 그 다음 URL을 명시한
<a>태그안을 보면"/view_detail/{{ article.id }}">{{article.id}}</a>을 들여다 보자. 태그 a가 article.id 변수를 감싸고 있으므로 id가 URL이 되고 id를 클릭하면
이와 같이
vie_detail/다음id값으로 주소를 호출한다. 이 원리로 처음에int:num을 선언하였다.


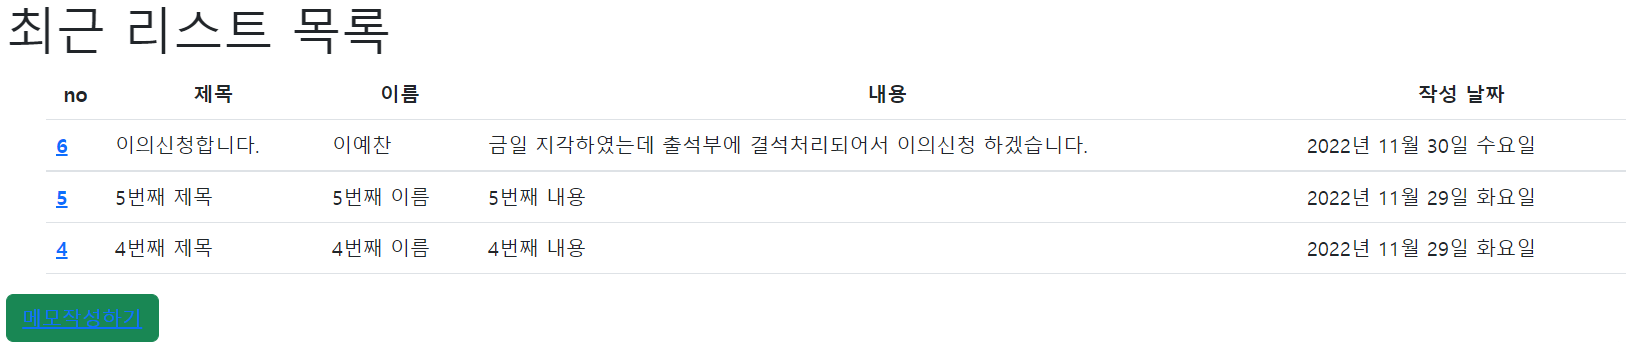
index 페이지 만들기
목록에서 최근 값 가져오기
- 인덱스 페이지에 최근 목록 3개만 보이도록 하자
- 버튼을 누르면 메모 작성하기(write.html)로 가도록 구현하자
views.py

urls.py
- 최근 목록 리스트는 대부분 Home화면에서 보여지는 것이므로 아예 index.html을 초기화면으로 설정한다.

수정한 list.html의 for문처럼 index의lastest_article_list을in다음으로 받아 변수를 선언하자.

다음코드처럼메모작성하기버튼을 추가하여 write.html경로에 연결하고 bootstrap에서 버튼모양과 색을 설정하자.
<button type="button" class="btn btn-success">
	<a href="/community/write">메모작성하기</a></button>

작성 버튼을 누르면 write.html로 이동하고,
하이퍼 링크를 누르면 view_detail.html로 이동한다.
community 앱의 디렉토리 구조 변경하기

list, view_detail, write html파일들을 templates\community로 이동, index.html은 이동X
- 구조를 변경하면 views의 경로들을 재정의해야한다.

index 페이지 bootstrap table 적용

- index 페이지를 table-hover로 적용시키려고 한다.
- 먼저, 문서에서 table의 기본구조를 복사하자.
<table class="table">
  <thead>
    <tr>
      <th scope="col">#</th>
      <th scope="col">First</th>
      <th scope="col">Last</th>
      <th scope="col">Handle</th>
    </tr>
  </thead>
  <tbody>
    <tr>
      <th scope="row">1</th>
      <td>Mark</td>
      <td>Otto</td>
      <td>@mdo</td>
    </tr>
    <tr>
      <th scope="row">2</th>
      <td>Jacob</td>
      <td>Thornton</td>
      <td>@fat</td>
    </tr>
    <tr>
      <th scope="row">3</th>
      <td colspan="2">Larry the Bird</td>
      <td>@twitter</td>
    </tr>
  </tbody>
</table>
index의 행이름과 열변수들을 bootstrap 구조에 알맞게 입력하자.

이런 화면이 나오게된다.

ctrl+shift+p -> Wrap with Abbreviation -> div.container를 입력하면
div class="container"로 감싸게 되어 반응형 컨테이너를 추가해주면 된다.


👨Education Computer Engineering 🎓Expected Graduation: February 2023 📞Contact info thstjddn77@gmail.com