
기본 사용법
before와 after 수정자를 사용하여 ::before와 ::after 가상 요소를 스타일링할 수 있다. 기본적으로 Tailwind CSS는 content: ''를 자동으로 추가하므로, 다른 값을 지정하지 않는 한 이를 별도로 설정할 필요가 없다.
예시 1: 필수 입력 표시
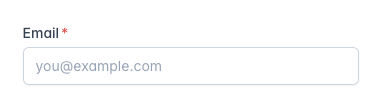
<label class="block">
  <span class="after:content-['*'] after:ml-0.5 after:text-red-500 block text-sm font-medium text-slate-700">
    Email
  </span>
  <input type="email" name="email" class="mt-1 px-3 py-2 bg-white border shadow-sm border-slate-300 placeholder-slate-400 focus:outline-none focus:border-sky-500 focus:ring-sky-500 block w-full rounded-md sm:text-sm focus:ring-1" placeholder="you@example.com" />
</label>
위 예시에서는 Email 레이블 뒤에 빨간색 * 표시를 추가한다.
예시 2: 블록 인용 스타일링
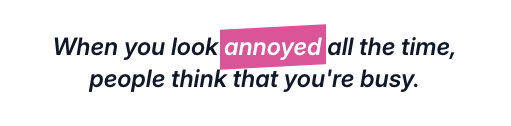
<blockquote class="text-2xl font-semibold italic text-center text-slate-900">
  When you look
  <span class="before:block before:absolute before:-inset-1 before:-skew-y-3 before:bg-pink-500 relative inline-block">
    <span class="relative text-white">annoyed</span>
  </span>
  all the time, people think that you're busy.
</blockquote>
이 예시에서는 텍스트의 배경에 스케유(skew)된 색상 블록을 추가하여 강조 효과를 준다.
::before와 ::after 대신 HTML 요소 사용하기
대부분의 경우 ::before와 ::after 가상 요소 대신 실제 HTML 요소를 사용하는 것이 더 간단하고 읽기 쉬운 코드가 된다. 아래는 동일한 디자인을 <span> 요소를 사용하여 구현한 예시이다.
예시: 실제 HTML 요소 사용
<blockquote class="text-2xl font-semibold italic text-center text-slate-900">
  When you look
  <span class="relative">
    <span class="block absolute -inset-1 -skew-y-3 bg-pink-500" aria-hidden="true"></span>
    <span class="relative text-white">annoyed</span>
  </span>
  all the time, people think that you're busy.
</blockquote>
이 예시에서는 ::before 가상 요소 대신 실제 <span> 요소를 사용하여 동일한 스타일링을 구현한다.
주의 사항
- Preflight 비활성화 시 주의점: Tailwind CSS의 preflight 기본 스타일이 비활성화된 경우,
content속성은 기본적으로 빈 문자열로 설정되지 않으므로,before와after수정자를 사용할 때content-['']를 명시적으로 설정해야 한다.
예시: content 속성 수동 설정
<div class="before:content-[''] before:block ...">
  <!-- ... -->
</div>
이 가이드를 통해 Tailwind CSS를 사용하여 ::before와 ::after 가상 요소를 손쉽게 스타일링할 수 있다. 이를 통해 사용자 경험을 향상시키는 다양한 시각적 효과를 구현할 수 있다.

LG CNS 클라우드 엔지니어 / 웹 프론트엔드 개발자