Redux-thunk
redux-thunk는 리액트에서 비동기 작업을 처리할 때 사용하는 미들웨어 입니다.
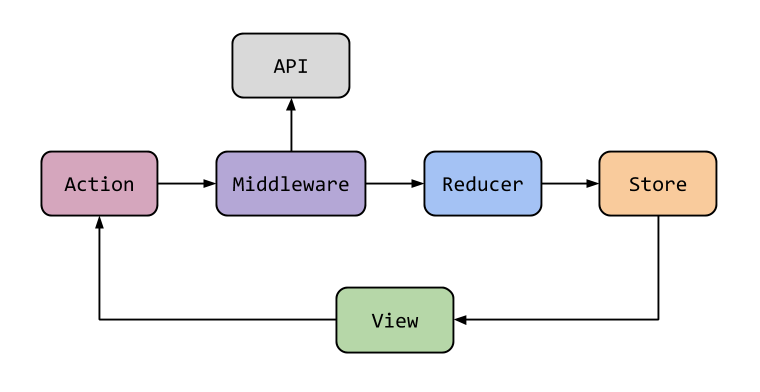
미들웨어는 앞에서 잠시 보았듯이 리듀서가 액션을 처리하기 전에 실행되는 함수 입니다. 액션에서 리듀서로 바로 넘어가도 되지만 그러지않는 이유는
- 디버깅 목적
- 예외를 서버로 전송하는 목적
- 액션 처리를 일정시간 동안 연기시키기 위해서
가 있습니다.
이 두번째 목적에 가까운게 redux-thunkd입니다.
redux- thunk는 객체 대신 함수를 생성하는 액션 생성함수를 작성할 수 있도록 도와줍니다.
미들웨어 구조
const middleWare = store => next => action => next(action)

= //같습니다.

const middleWare = function(store) { //리덕스 스토어 인스턴스
	return function(next) { // 다음 처리해야할 미들웨어에게 액션 넘겨줌
    	return function(action) {
        	return next(action)
        }
    }
}
Thunk?
특정 작업을 나중에 하도록 미루기 위해서 함수형태로 감싼 것을 말합니다.
-
store : createStore로 만든 스토어를 의미합니다. 이 store는 compose, dispatch(action), subscribe(listener)라는 3개의 메서드를 가진 객체 입니다.
-
next : 미들웨어를 여러 개 사용하는 경우 next에 다음 미들웨어가 들어옵니다.
미들웨어가 없으면 dispatch() 함수가 들어옵니다.
next(action)을 하면 리듀서로 넘기거나, 다음 미들웨어가 처리가 되도록 합니다. -
action : 액션 객체
redux- thunk
thunk를 사용하면 store.distpacth의 매개변수에 함수를 전달 할 수 있습니다.
store.dispatch((dispatch, getstate) => {
	dispatch({ type: something})
})
우리가 redux-thunk를 배우는 이유는 비동기 처리를 하기 위해서입니다. 이 비동기 처리를 위해 필요한 것이 매개변수를 함수로 전달하는 것입니다. 그러기위해 위에서 미들웨어가 뭔지 알아본 것입니다.
- 동기 액션 생성 객체
export functin addTodo(title) {
	return {
    	type : something
      	payload : {
    		id: choi
    	}
    }
}- 비동기 액션 생성 객체
export function asyncAddTodo(title) {
	return (dispatch, getState) => {
   		setTimeout(() => {
        	dispatch(addTodo(title))
        }, 5000);
    }
}
이때 리턴하는 함수는 dispatch함수와 getState함수를 매개변수로 갖습니다.
getState 함수
getState 함수는 스토어가 가진 함수와 마찬가지로 모든 상태를 리턴합니다.
그래서 모든 상태를 참조할 수 있고, 액션 리듀서의 처리를 간략하게 할 수 있습니다.
(1) 설치
npm install --save redux-thunk(2) import
리덕스 셋업 코드를 작성한 파일에서 redux-thunk를 import해오고 리덕스의 미들웨어로 적용시킵니다.
import { createStore, applyMiddleware } from 'redux';
//redux에서 createStore와 applyMiddleware를 import
// 그리고 'thunk' 미들웨어도 import
import thunk from 'redux-thunk';
import rootReducer from './reducers/index';

// createStore는 마지막 인자로 "store enhancer"를 전달 받습니다.
// 여기서 우리는 applyMiddleware를 사용해서 썽크 미들웨어를 기반으로 헌 store enhancer를 생성하여 인자로 전달해줍니다.
const store = createStore(
  rootReducer,
  applyMiddleware(thunk)
);
applyMiddleware
import {createStore, applyMiddleware } from 'redux'; //createStore와 같이 import

const store = createStore(reducer, applyMiddleware('미들웨어'))
(2) 적용
- store.js
import { createStore, applyMiddleware } from 'redux';
import modules from './modules';

import { createLogger } from 'redux-logger';
import ReduxThunk from 'redux-thunk';

const logger = createLogger();
// 객체가 들어옵니다.
const store = createStore(modules, applyMiddleware(logger, ReduxThunk))

export default store;applyMiddleware를 사용해서 createStore()안에서 리덕스와 연결합니다.
(3) Thunk 생성 함수
- counter.js
export const increase = createAction(INCREASE);
export const decrease = createAction(DECREASE);

// 1초 뒤에 increase 혹은 decrease 함수를 디스패치함
export const increaseAsync = () => dispatch => {
    setTimeout(() => {
        dispatch(increase());
    }, 1000);
};
export const decreaseAsync = () => dispatch => {
    setTimeout(() => {
        dispatch(decrease());
    }, 1000);
};
출처
https://ahnanne.tistory.com/6
https://lechuck.netlify.app/study/Redux3/
https://velopert.com/3401
https://lechuck.netlify.app/study/Redux3/