🎰 Pascal VOC 데이터 세트 탐색하기
PASCAL VOC 2012 데이터 다운로드 받기
- data 디렉토리 생성
!mkdir ./data- pascal voc 2012 데이터를 다운로드
- DOWNLOAD시 약 3분정도 시간 소요
- 아래 디렉토리가 잘 동작하지 않을 경우
!wget http://host.robots.ox.ac.uk/pascal/VOC/voc2012/VOCtrainval_11-May-2012.tar/content/data디렉토리에 압축 해제
!wget http://host.robots.ox.ac.uk/pascal/VOC/voc2012/VOCtrainval_11-May-2012.tar
!tar -xvf VOCtrainval_11-May-2012.tar -C /content/data- 실행 결과

- 이미지(JPEGImages)와 주석(Annotation)이 1:1 매핑
JPEGImages 디렉토리에 있는 임의의 이미지 보기
import cv2
import matplotlib.pyplot as plt
import os
%matplotlib inline- 상대 경로를 사용하지 않는 코랩 환경
/content디렉토리를 기준으로 절대 경로 이용/content/data- default_dir 지정
os.path.join()- 상세 파일 및 디렉토리 지정
default_dir = '/content/data'
img = cv2.imread(os.path.join(default_dir, 'VOCdevkit/VOC2012/JPEGImages/2007_000032.jpg'))
img_rgb = cv2.cvtColor(img, cv2.COLOR_BGR2RGB)
print('img shape:', img.shape)

plt.figure(figsize=(8, 8))
plt.imshow(img_rgb)
plt.show()- 실행 결과
img shape: (281, 500, 3).png)
Annotations 디렉토리에 있는 임의의 annotation 파일 보기
<object>- 개별 오브젝트
<name>- 대상
!cat /content/data/VOCdevkit/VOC2012/Annotations/2007_000032.xml<annotation>
<folder>VOC2012</folder>
<filename>2007_000032.jpg</filename>
<source>
<database>The VOC2007 Database</database>
<annotation>PASCAL VOC2007</annotation>
<image>flickr</image>
</source>
<size>
<width>500</width>
<height>281</height>
<depth>3</depth>
</size>
<segmented>1</segmented>
<object>
<name>aeroplane</name>
<pose>Frontal</pose>
<truncated>0</truncated>
<difficult>0</difficult>
<bndbox>
<xmin>104</xmin>
<ymin>78</ymin>
<xmax>375</xmax>
<ymax>183</ymax>
</bndbox>
</object>
<object>
<name>aeroplane</name>
<pose>Left</pose>
<truncated>0</truncated>
<difficult>0</difficult>
<bndbox>
<xmin>133</xmin>
<ymin>88</ymin>
<xmax>197</xmax>
<ymax>123</ymax>
</bndbox>
</object>
<object>
<name>person</name>
<pose>Rear</pose>
<truncated>0</truncated>
<difficult>0</difficult>
<bndbox>
<xmin>195</xmin>
<ymin>180</ymin>
<xmax>213</xmax>
<ymax>229</ymax>
</bndbox>
</object>
<object>
<name>person</name>
<pose>Rear</pose>
<truncated>0</truncated>
<difficult>0</difficult>
<bndbox>
<xmin>26</xmin>
<ymin>189</ymin>
<xmax>44</xmax>
<ymax>238</ymax>
</bndbox>
</object>
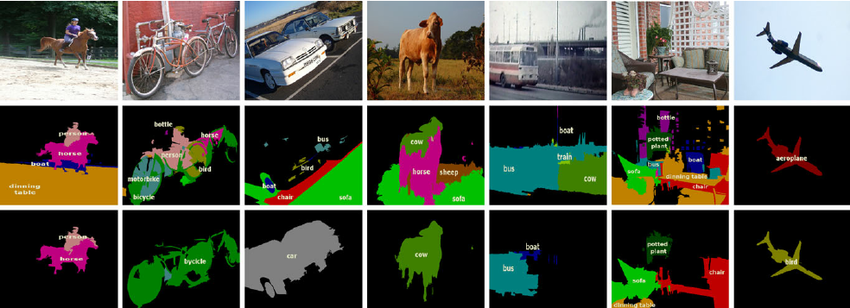
</annotation>SegmentationObject 디렉토리에 있는 임의의 masking 이미지 보기
- Object 외, 다른 정보 제거
- jpg 파일, annotation 파일과 매핑
- png 파일
img = cv2.imread(os.path.join(default_dir, 'VOCdevkit/VOC2012/SegmentationObject/2007_000032.png'))
img_rgb = cv2.cvtColor(img, cv2.COLOR_BGR2RGB)
print('img shape:', img.shape)

plt.figure(figsize=(8, 8))
plt.imshow(img_rgb)
plt.show()- 실행 결과
img shape: (281, 500, 3).png)
Annotation xml 파일에 있는 요소들을 파싱하여 접근하기
- 파싱
- 컴퓨터에서 컴파일러 또는 번역기가 원시 부호를 기계어로 번역하는 과정의 한 단계
- 각 문장의 문법적인 구성 또는 구문을 분석하는 과정
- ElementTree를 이용하여 XML 파싱
- lxml 패키지는 이미 코랩에 설치 됨
- 설치가 안 된 경우
pip install lxml
- 코랩 버전 절대 경로 수정
import os
import random

VOC_ROOT_DIR ="/content/data/VOCdevkit/VOC2012/"
ANNO_DIR = os.path.join(VOC_ROOT_DIR, "Annotations")
IMAGE_DIR = os.path.join(VOC_ROOT_DIR, "JPEGImages")- 파일 다섯 개만 리스트로 출력 + 전체 xml 파일 개수 출력
xml_files = os.listdir(ANNO_DIR)
print(xml_files[:5]); print(len(xml_files))
['2008_007742.xml', '2011_006132.xml', '2008_001078.xml', '2012_000544.xml', '2012_000276.xml']
17125- XML 파일을 Parsing하여 Element 생성
ElementTree- 수직적 구조인 XML에서 Object를 효율적으로 파싱하는데 도움
.getroot()- 루트 노드 찾기
<annotation>
import os
import xml.etree.ElementTree as ET

xml_file = os.path.join(ANNO_DIR, '2007_000032.xml')

tree = ET.parse(xml_file)
root = tree.getroot()- image 관련 정보는 root의 자식으로 존재
filename<annotation>의 자식 노드.text: 파일명 가져오기
image_name = root.find('filename').text
full_image_name = os.path.join(IMAGE_DIR, image_name)
image_size = root.find('size')
image_width = int(image_size.find('width').text)
image_height = int(image_size.find('height').text)- 파일 내에 있는 모든 object Element를 찾음
<object>의 자식 element에서<bndbox>를 찾음<bndbox>의 자식 element에서xmin,ymin,xmax,ymax를 찾고 그 값을 추출(text)
objects_list = []

for obj in root.findall('object'):
    xmlbox = obj.find('bndbox')
    x1 = int(xmlbox.find('xmin').text)
    y1 = int(xmlbox.find('ymin').text)
    x2 = int(xmlbox.find('xmax').text)
    y2 = int(xmlbox.find('ymax').text)

    bndbox_pos = (x1, y1, x2, y2)
    class_name=obj.find('name').text
    object_dict={'class_name': class_name, 'bndbox_pos':bndbox_pos}
    objects_list.append(object_dict)

print('full_image_name:', full_image_name,'\n', 'image_size:', (image_width, image_height))

for object in objects_list:
    print(object)
full_image_name: /content/data/VOCdevkit/VOC2012/JPEGImages/2007_000032.jpg
image_size: (500, 281)
{'class_name': 'aeroplane', 'bndbox_pos': (104, 78, 375, 183)}
{'class_name': 'aeroplane', 'bndbox_pos': (133, 88, 197, 123)}
{'class_name': 'person', 'bndbox_pos': (195, 180, 213, 229)}
{'class_name': 'person', 'bndbox_pos': (26, 189, 44, 238)}Annotation 내 Object들의 bounding box 정보를 이용하여 bounding box 시각화
- 전반부는 앞 내용과 동일
import cv2
import os
import xml.etree.ElementTree as ET

xml_file = os.path.join(ANNO_DIR, '2007_000032.xml')

tree = ET.parse(xml_file)
root = tree.getroot()

image_name = root.find('filename').text
full_image_name = os.path.join(IMAGE_DIR, image_name)

img = cv2.imread(full_image_name)- OpenCV의
rectangle()- 인자로 들어온 이미지 배열에 그대로 사각형을 그려준다
- 별도의 이미지 배열에 그림 작업 수행
- 인자로 들어온 이미지 배열에 그대로 사각형을 그려준다
draw_img = img.copy()

# OpenCV는 RGB가 아니라 BGR >> 빨간색: (0, 0, 255)
green_color=(0, 255, 0)
red_color=(0, 0, 255)- 파일 내에 있는 모든 object Element 찾기
- bounding box와 클래스명 추가하기
objects_list = []

for obj in root.findall('object'):
    xmlbox = obj.find('bndbox')

    left = int(xmlbox.find('xmin').text)
    top = int(xmlbox.find('ymin').text)
    right = int(xmlbox.find('xmax').text)
    bottom = int(xmlbox.find('ymax').text)

    class_name=obj.find('name').text

    # draw_img 배열의 좌상단 우하단 좌표에 녹색으로 box 표시
    cv2.rectangle(draw_img, (left, top), (right, bottom), color=green_color, thickness=1)
    # draw_img 배열의 좌상단 좌표에 빨간색으로 클래스명 표시
    cv2.putText(draw_img, class_name, (left, top - 5), cv2.FONT_HERSHEY_SIMPLEX, 0.4, red_color, thickness=1)

img_rgb = cv2.cvtColor(draw_img, cv2.COLOR_BGR2RGB)
plt.figure(figsize=(10, 10))
plt.imshow(img_rgb).png)
* 출처: 인프런 '딥러닝 컴퓨터 비전 완벽 가이드'
There's Only One Thing To Do: Learn All We Can