
이전 포스트 WSL 우분투에 Trition Inference Server 구축하기 - 서버~클라이언트 통신
에서 triton_hw_server.py - triton_hw_client.py
두개의 파일을 통해서 통신테스트를 수행했으니
이제 LLM로드 부를 추가하여 통신 시 LLM의 추론결과가 전송되는 실습을 진행하도록 하겠다.
1. 서버 workflow
triton_hw_server.py 의 메인 flowchart를 그려본다면
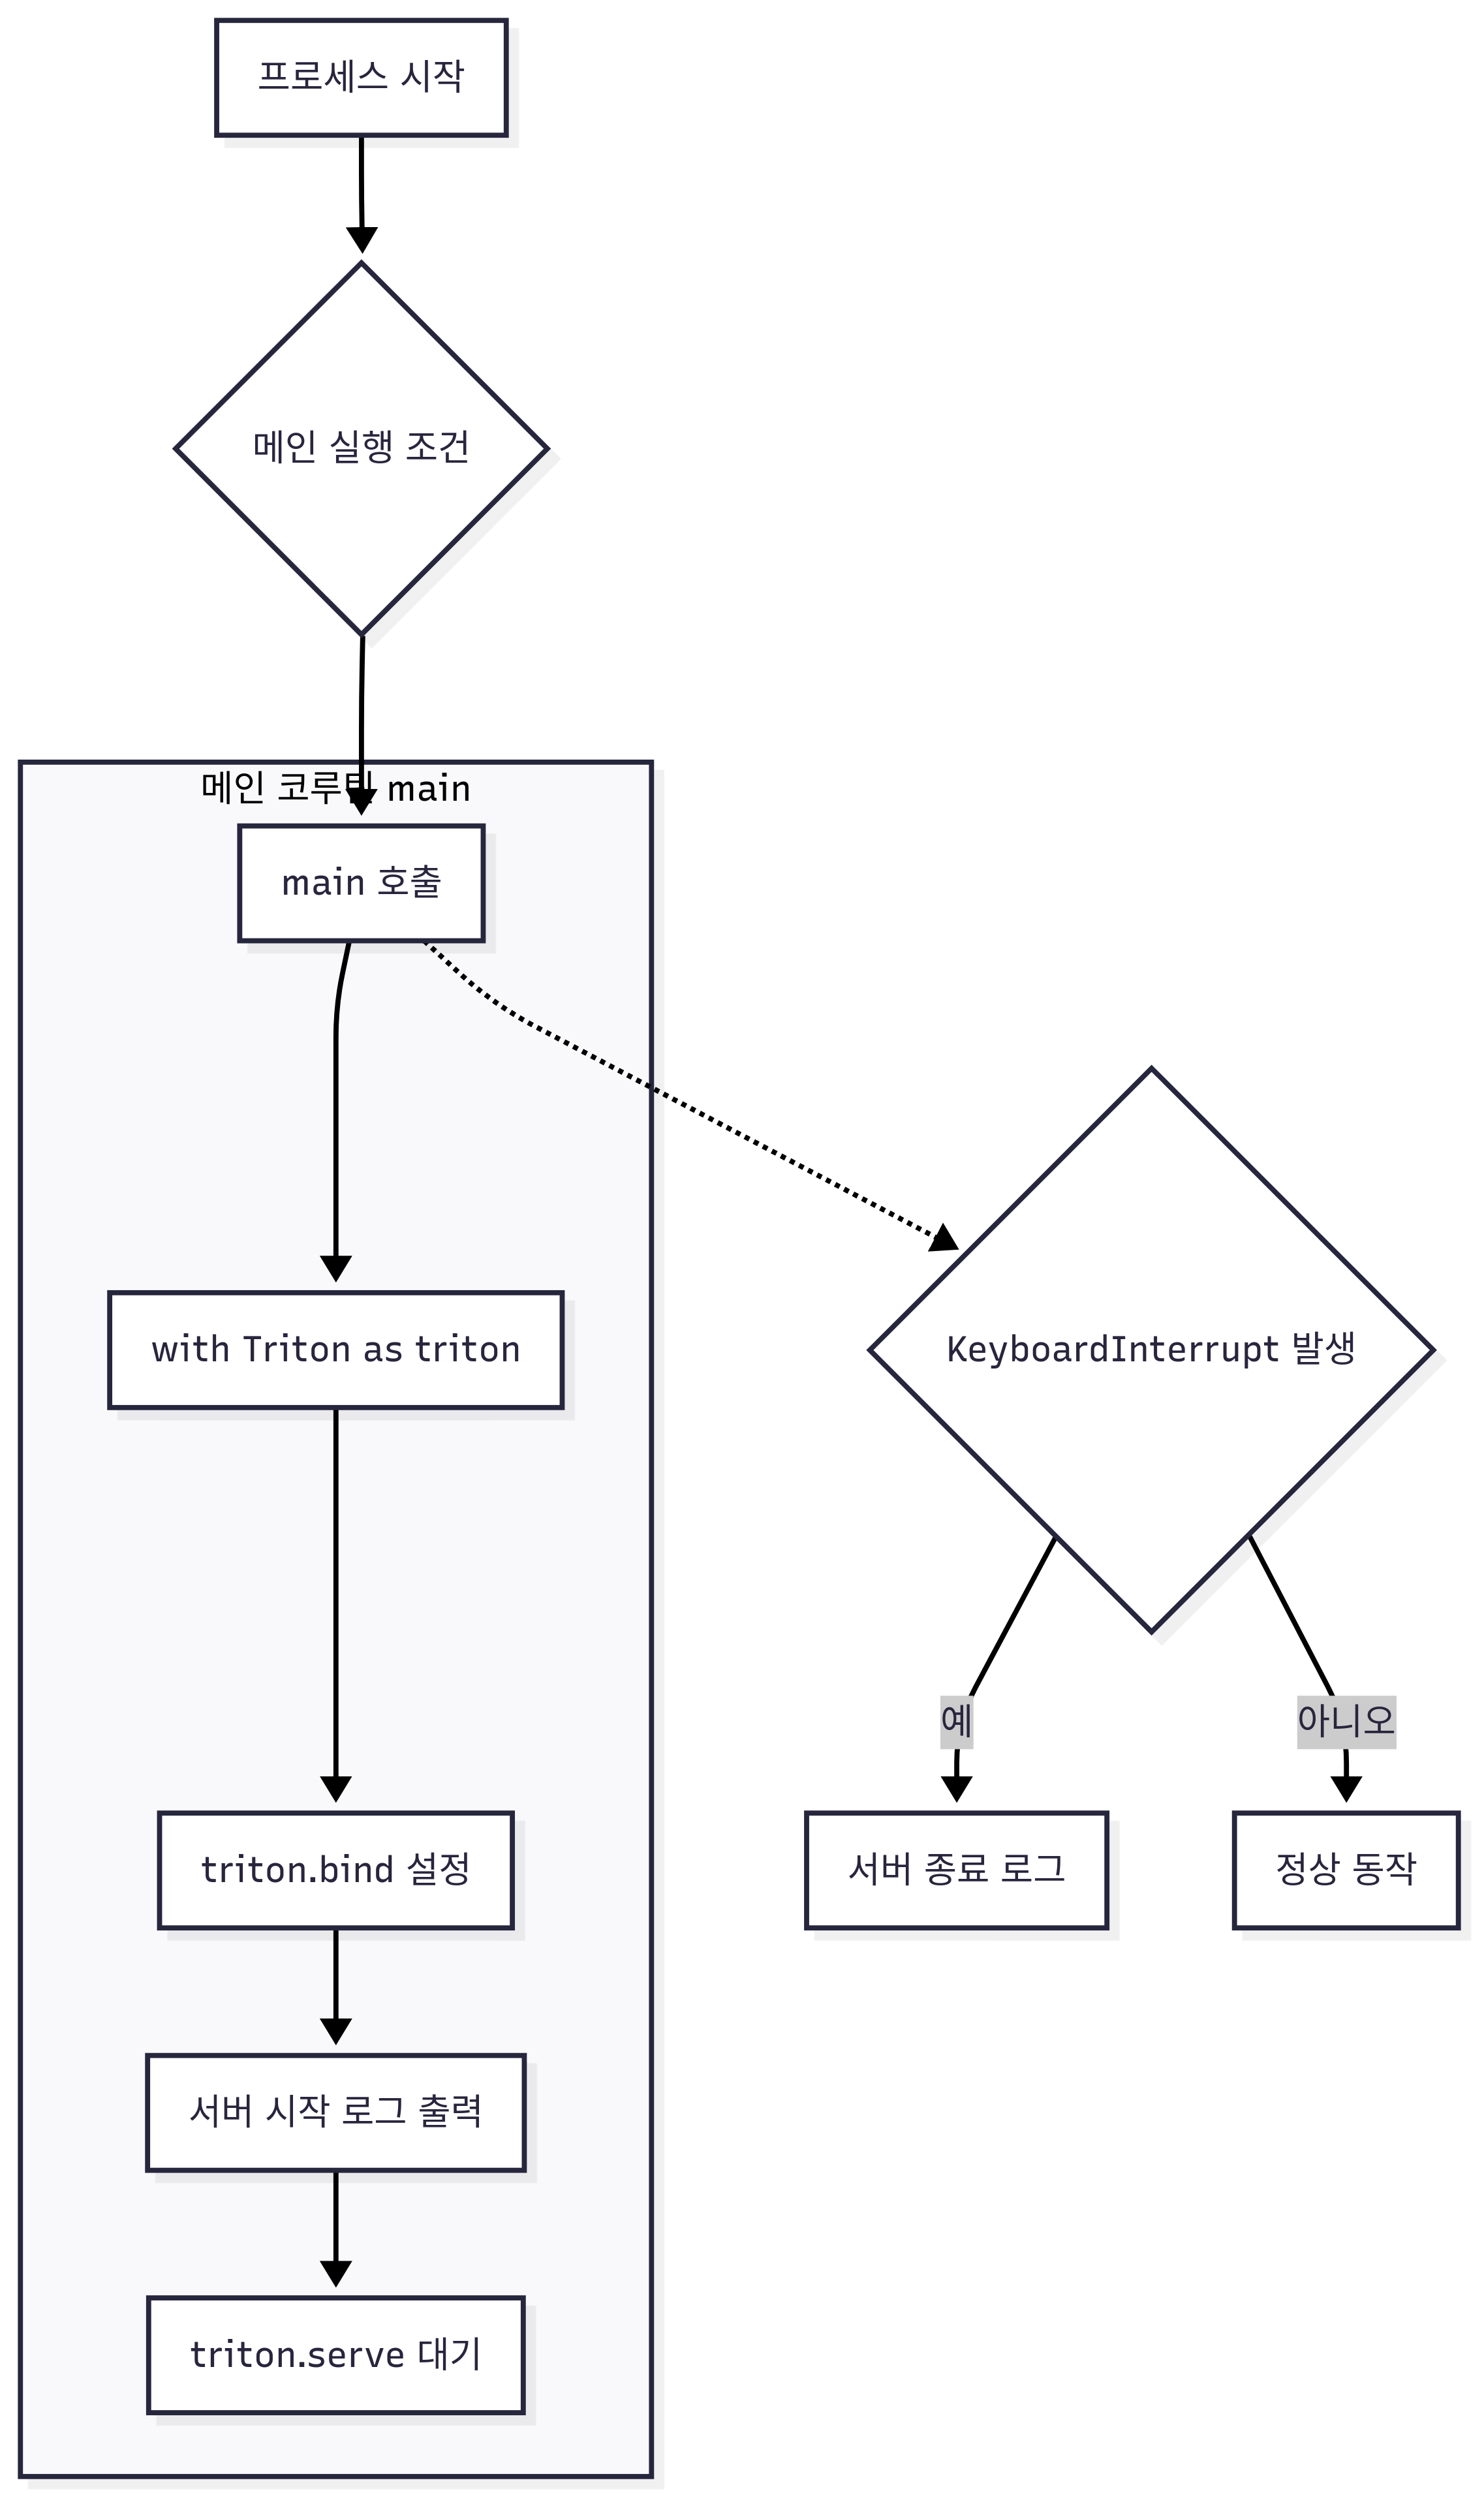
여기에 @batch로 붙는 _infer_fn이 달라진다 보면 된다.
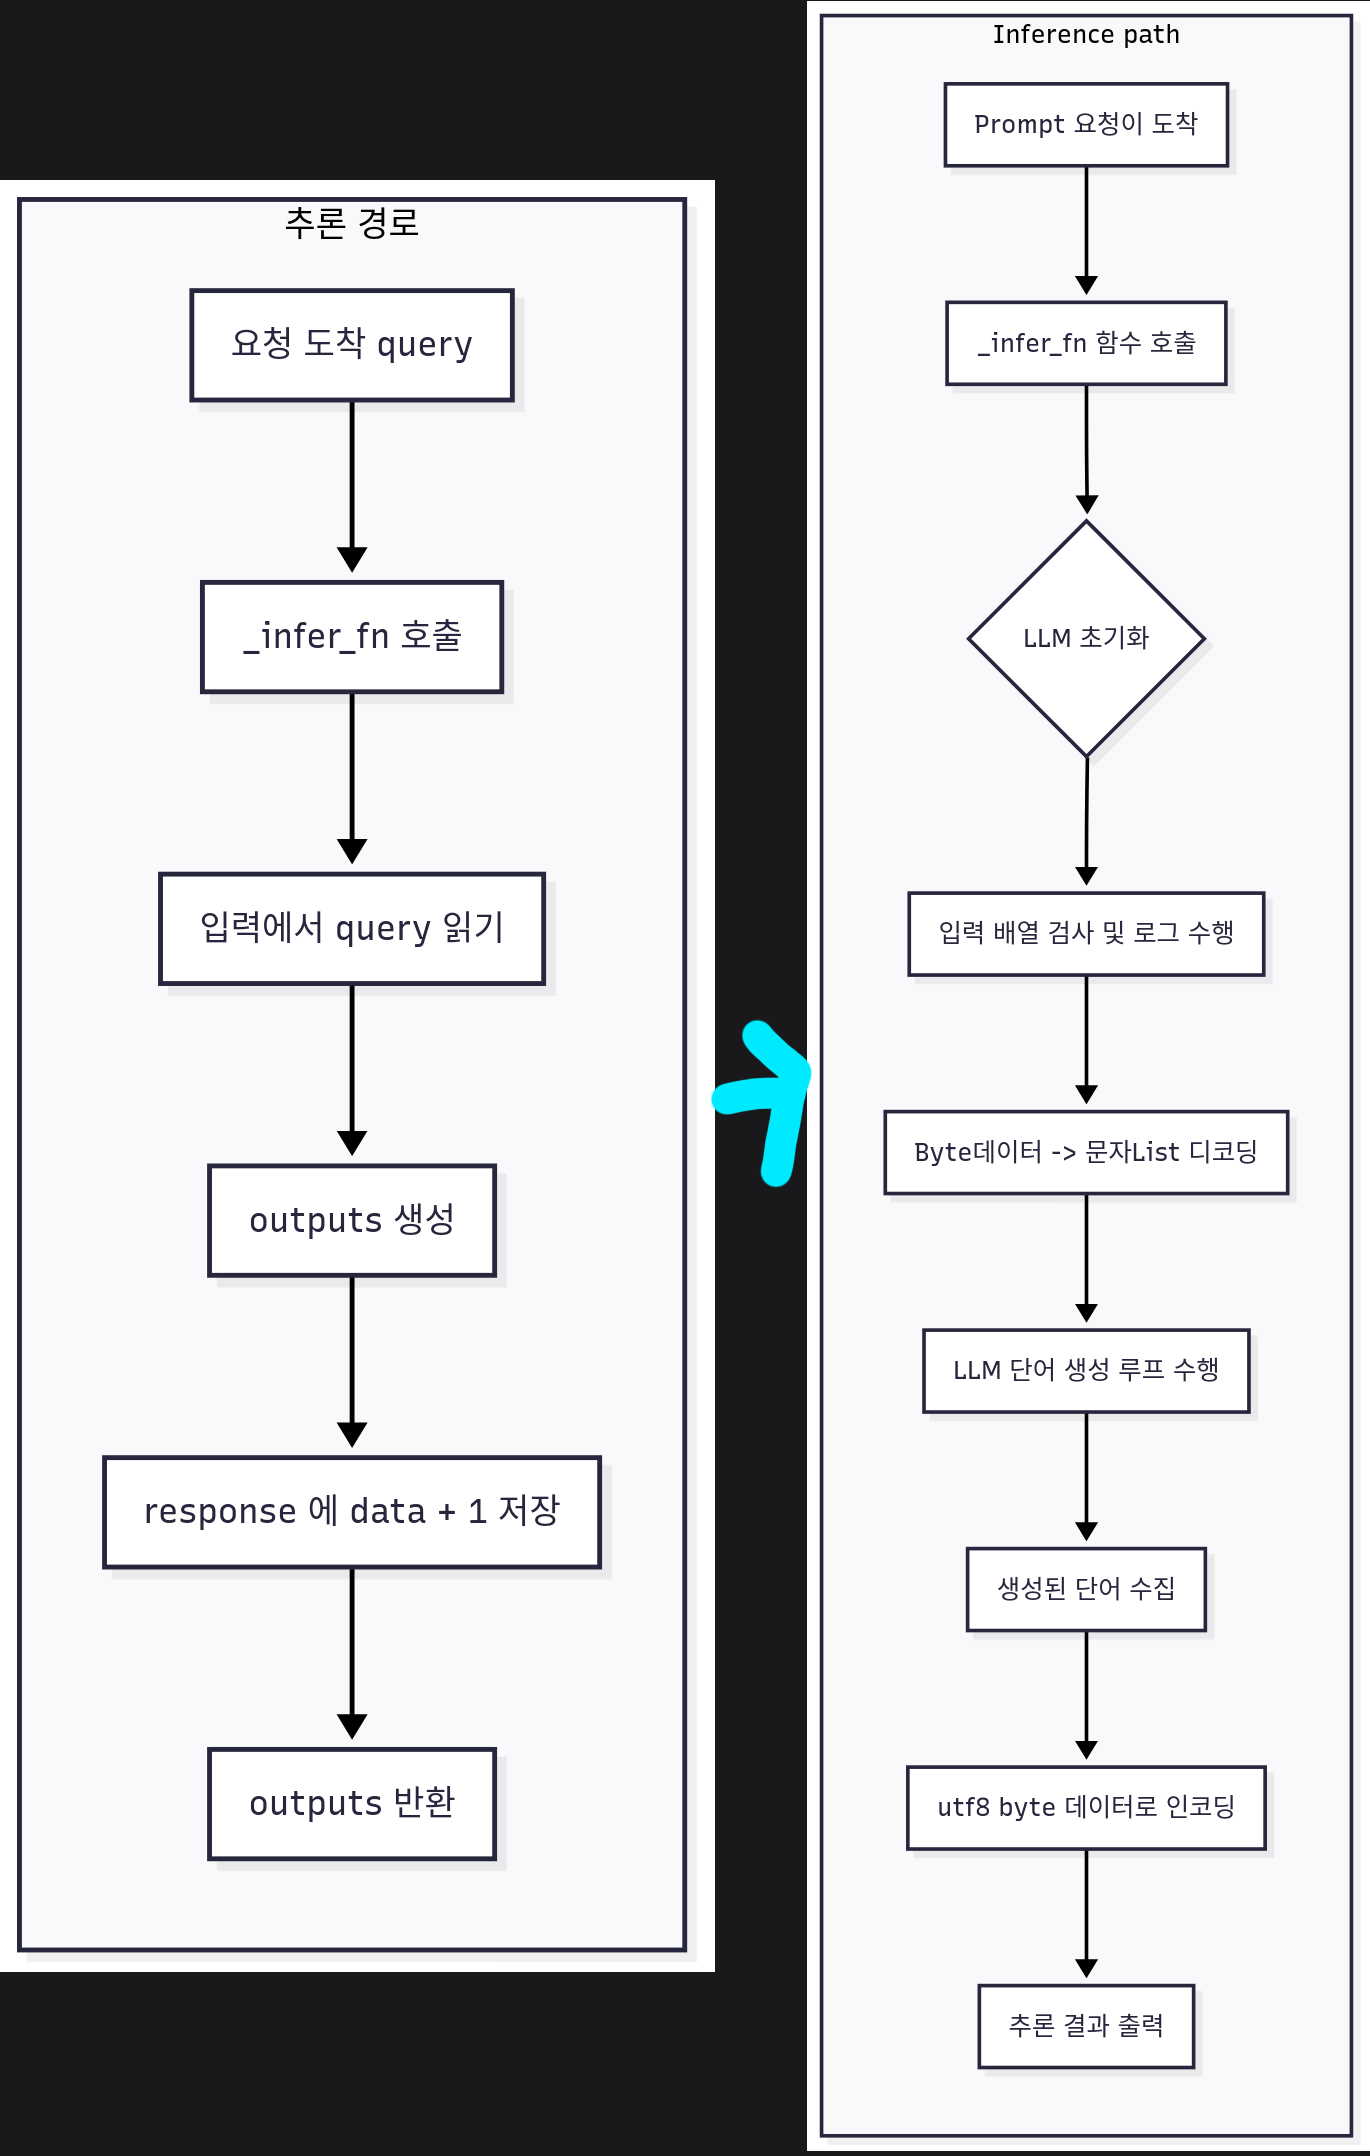
이렇게 위 사진처럼 서버의 _infer_fn이 달라진다 보면 된다.
2. 서버 코드 분석
triton_llm_server.py의 main() 함수 부
async def main():
    model_name = "trt_llm_model"
    with Triton() as triton:
        triton.bind(
            model_name=model_name,
            infer_func=_infer_fn,
            inputs=[
                Tensor(name="prompts",
                       dtype=np.bytes_,
                       shape=(-1,)),
            ],
            outputs=[
                Tensor(name="responses",
                       dtype=np.bytes_,
                       shape=(-1,)),
            ],
        )
        print(f"{model_name}서버를 시작합니다.")
        await triton.serve()

if __name__ == "__main__":
    try:
        asyncio.run(main())
    except KeyboardInterrupt:
        print("서버를 종료합니다.")
이 main() 함수 부의 코드는 triton_hw_server.py코드와 거의 동일하며 변경된 부분만 하이라이트로 살펴본다면
https://triton-inference-server.github.io/pytriton/latest/reference/model_config/
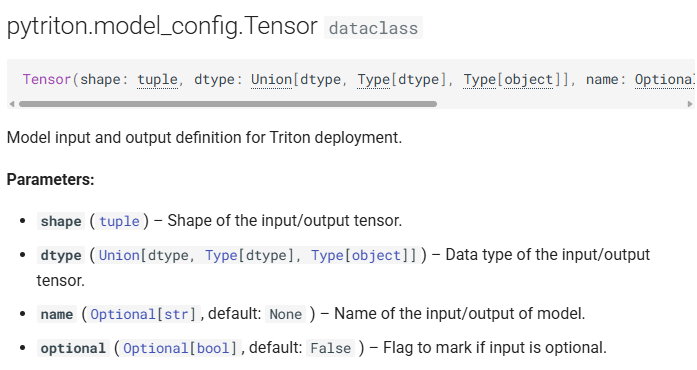
입출력 데이터 클래스인 Tensor의 상세 인자값 변경이다.
1) dtype : pytriton은 입출력 데이터의 구조가 모두 Numpy 라이브러리에서 정의된 데이터 형태만 받을 수 있기에 데이터타입을 Numpy의 문자열 데이터 타입인 바이트 문자열(byte string) 로 정의한다.
2) shape : 입력 텐서의 형태를 정의하는데 하나의 프롬프트(Query)는 문자열 데이터이기에 1차원 배열인 , 그리고 이 프롬프트가 1개 혹은 여러개 가 입력되는 가변 배치 형식이기에 -1을 기입한다.
3) name : pytriton에서 사용되는 Tensor 데이터는 항목별로 Key를 기입할 수 있으며, 특정 데이터를 서치할 때 key를 통해 서치나 매핑을 수행할 수 있다.
triton_llm_server.py의 _infer_fn() 함수 부
@batch
def _infer_fn(**inputs):

    # 모델 초기화는 처음 호출에만 진행
    initialize_model()

    # 1. 입력 query 어레이를 numpy.char.decode를 사용하여 전체 배열을 한번에 디코딩
    prompts_array = inputs["prompts"]

    prompts_str = [item.decode('utf-8') for item in prompts_array.flatten()]

    # 2. 로드한 LLM으로 추론 수행
    result_texts = []
    for output in llm.generate(prompts_str, sampling_params):
        result_text = output.outputs[0].text
        result_texts.append(result_text)

    # 3. 추론 결과를 반환
    outputs = {
        "responses": np.array(
            [text.encode("utf-8") for text in result_texts],
            dtype=np.bytes_
        )
    }
    return outputs
다음으로 trition.bind에서 추론 시 호출하는 핸들러인 infer_fn에 대한 코드부이다.
LLM모델을 호출하는 initialze_model()은 넘어가고
prompts라는 key값으로 데이터를 찾아냈다면 이를 해석 가능한 데이터 형태로 변환하는 작업을 해야 한다.
pytrition으로 구성된 서버는 입력되는 데이터도 문자열 바이트 문자열(byte string) 형태를 띈다.
이 부분에 대한 설명을 진행한다면 아래와 같다.
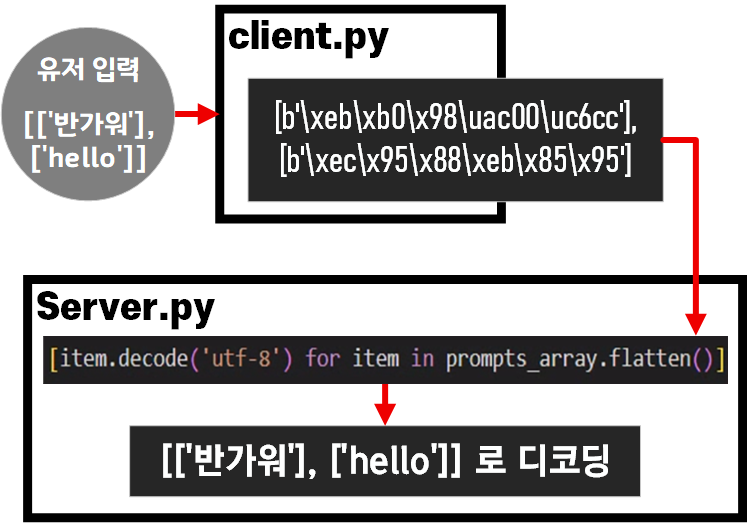
입력 부분의 데이터는 위 사진처럼 np.bytes 타입 데이터를 다시 디코딩해서 문자열로 변환하고
변환한 문자열을 LLM에 입력하여 텍스트 생성과정 수행(추론)
이후 추론한 텍스트 데이터를 다시 np.bytes로 다시 컨버팅 하는 과정을 수행한다.
triton_llm_server.py의 모델 로드 부
llm = None
sampling_params = None

def initialize_model():
    global llm, sampling_params
    if llm is None:
        kv_cache_config = KvCacheConfig(
            max_tokens=(PROMPT_TOKEN + MAX_TOKEN) * MAX_BATCH_SIZE
        )
        llm = LLM(
            model=MODEL_PATH,
            attn_backend='pytorch',
            kv_cache_config=kv_cache_config,
            max_batch_size=MAX_BATCH_SIZE,
            max_input_len=PROMPT_TOKEN,
            max_seq_len=PROMPT_TOKEN + MAX_TOKEN,
        )
        sampling_params = SamplingParams(
            max_tokens=MAX_TOKEN,
            temperature=0.8,
            top_p=0.95,
        )
모델 로드부의 경우 LLM과 Sampling_parm 인자값 설정만 진행하는 코드이며
이는 TensorRT-LLM의 모델 및 Output Configuration Parm 부분을 참조하면 된다.
여기서 kv_cache_config 설정 팁인데
최소 KV 캐시로는
(입력토큰 + 출력 토큰) * 동시 추론
-> (PROMPT_TOKEN + MAX_TOKEN) * MAX_BATCH_SIZE
이렇게 설정하면 가장 최소값으로 KV 캐시 설정이 가능해서 가장 가볍게 VRAM점유를 수행할 수 있다.
전체 코드는 아래와 같다
trition_llm_server.py
import asyncio
import numpy as np
from pytriton.decorators import batch
from pytriton.model_config import Tensor
from pytriton.triton import Triton

from tensorrt_llm import LLM, SamplingParams
from tensorrt_llm.llmapi import KvCacheConfig

# --- 모델 로딩을 맨 위에서 수행 (전역 변수) ---
PROMPT_TOKEN = 512
MAX_TOKEN = 256
MAX_BATCH_SIZE = 2
MODEL_PATH = "../hf_model/A.X-4.0-Light-7B"

llm = None
sampling_params = None

def initialize_model():
    global llm, sampling_params
    if llm is None:
        kv_cache_config = KvCacheConfig(
            max_tokens=(PROMPT_TOKEN + MAX_TOKEN) * MAX_BATCH_SIZE
        )
        llm = LLM(
            model=MODEL_PATH,
            attn_backend='pytorch',
            kv_cache_config=kv_cache_config,
            max_batch_size=MAX_BATCH_SIZE,
            max_input_len=PROMPT_TOKEN,
            max_seq_len=PROMPT_TOKEN + MAX_TOKEN,
        )
        sampling_params = SamplingParams(
            max_tokens=MAX_TOKEN,
            temperature=0.8,
            top_p=0.95,
        )

@batch
def _infer_fn(**inputs):

    # 모델 초기화는 처음 호출에만 진행
    initialize_model()

    # 1. 입력 query 어레이를 numpy.char.decode를 사용하여 전체 배열을 한번에 디코딩
    prompts_array = inputs["prompts"]
    prompts_str = [item.decode('utf-8') for item in prompts_array.flatten()]

    # 2. 로드한 LLM으로 추론 수행
    result_texts = []
    for output in llm.generate(prompts_str, sampling_params):
        result_text = output.outputs[0].text
        result_texts.append(result_text)

    # 3. 추론 결과를 반환
    outputs = {
        "responses": np.array(
            [text.encode("utf-8") for text in result_texts],
            dtype=np.bytes_
        )
    }
    return outputs


async def main():
    model_name = "trt_llm_model"
    with Triton() as triton:
        triton.bind(
            model_name=model_name,
            infer_func=_infer_fn,
            inputs=[
                Tensor(name="prompts",
                       dtype=np.bytes_,
                       shape=(-1,)),
            ],
            outputs=[
                Tensor(name="responses",
                       dtype=np.bytes_,
                       shape=(-1,)),
            ],
        )
        print(f"{model_name}서버를 시작합니다.")
        await triton.serve()

if __name__ == "__main__":
    try:
        asyncio.run(main())
    except KeyboardInterrupt:
        print("서버를 종료합니다.")
3. Client 코드 분석
triton_hw_client.py코드의 플로우차트에서
유저 입력 -> np.bytes 배열로 변환 후 서버로 전송
이 부분만 추가하면 되기에 전체 플로우 차트는 아래와 같이 변경된다.
triton_llm_client.py 플로우차트

이에 대한 전체 코드는 아래와 같다.
import numpy as np
from pytriton.client import ModelClient
import argparse # CLI 입력을 받기 위한 라이브러리

# 서버 주소와 모델 이름
TRITON_URL = "localhost:8000"
MODEL_NAME = "trt_llm_model"

def main():
    # 1. CLI에서 'prompt'라는 이름으로 텍스트 입력을 받습니다.
    parser = argparse.ArgumentParser(description="Triton LLM Client")
    parser.add_argument("prompt", type=str, help="모델에게 보낼 프롬프트")
    args = parser.parse_args()
    prompt_text = args.prompt

    print(f"서버에 보낼 질문: {prompt_text}")

    # 2. 입력받은 텍스트(string)를 NumPy 바이트(bytes) 배열로 변환합니다.
    input_data = np.array(
        [prompt_text.encode("utf-8")],
        dtype=np.bytes_
    )

    # 3. ModelClient로 서버에 요청을 보냅니다.
    with ModelClient(TRITON_URL, MODEL_NAME, inference_timeout_s= 180) as client:
        result_dict = client.infer_sample(prompts=input_data)

    # 4. 서버로부터 받은 응답(NumPy 바이트 배열)을 다시 텍스트(string)로 변환합니다.
    response_array = result_dict["responses"]
    output_text = bytes(response_array).decode("utf-8")

    print("-" * 30)
    print(f"서버 응답: {output_text}")

if __name__ == "__main__":
    main()
위 코드에서 중요하게 봐야 하는 부분은
# 3. ModelClient로 서버에 요청을 보냅니다.
with ModelClient(TRITON_URL, MODEL_NAME, inference_timeout_s= 180) as client:
    result_dict = client.infer_sample(prompts=input_data)
으로
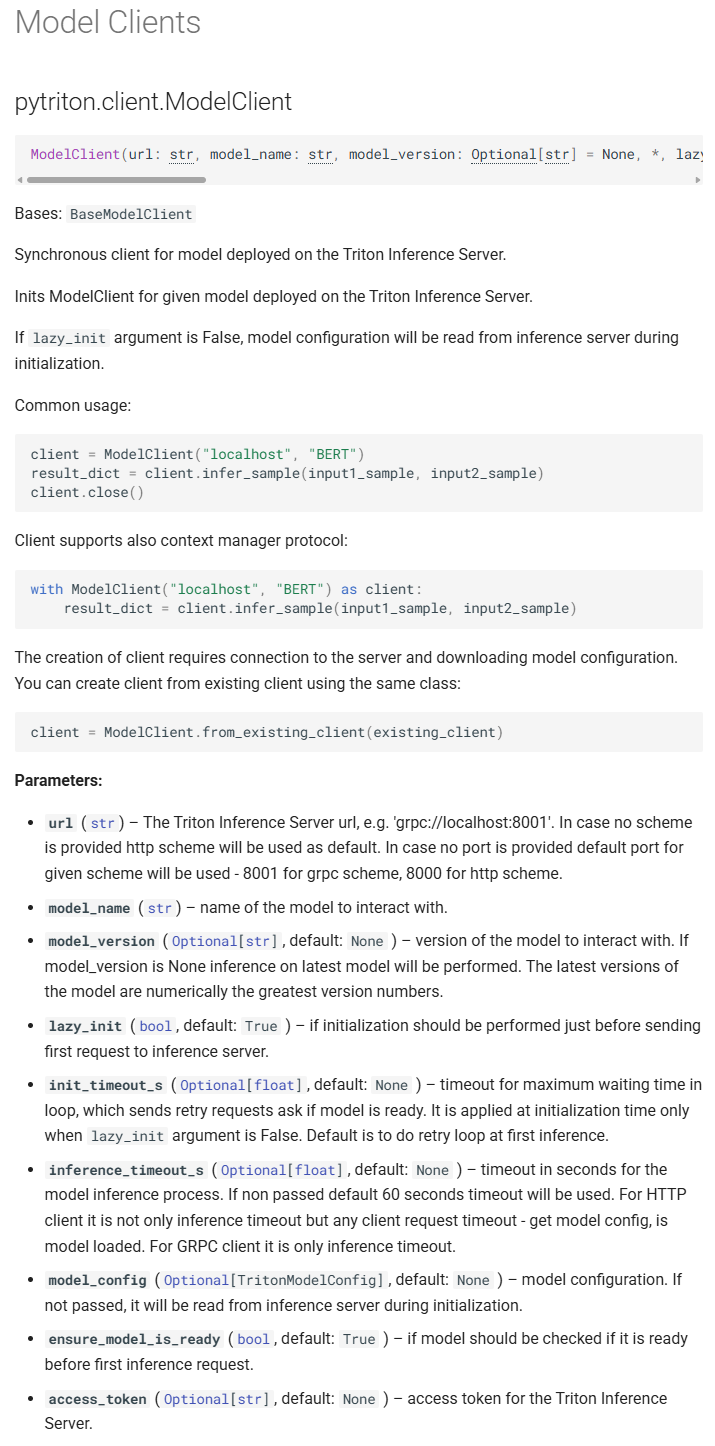
먼저 ModelClient를 초기화 할때는
필수항목으로 URL, model_name을 필요로 한다
1) url : 접속할 triton 서버 주소
2) model_name : 해당 서버에 여려개의 LLM이 구동 될 시 통신 대상이 되는 모델
그리고 추가 주요한 옵션으로 inference_timeout_s가 있는데 통신이 되는 모델이 추론을 수행하면서 시간이 오래 걸릴 수 있으니 최대 몇 초 까지 기다리겠다 이를 의미한다.
여기서 with 구문으로 서버 접속 및 초기화를 수행하는 이유는
# 'with'를 사용하지 않는 경우
client = ModelClient(TRITON_URL, MODEL_NAME) # 1. 서버 접속
result = client.infer_sample(prompts=input_data) # 2. 할 일 수행
client.close() # 3. 직접 접속 종료를 호출해야 함!
위 코드처럼 서버접속 -> 접속 후 LLM에 Query를 보내고 추론결과 기다림 -> 접속 종료
이렇게 수행해야 하는 것을 깔끔하게 처리한다 보면 된다.
물론, 2번에서 에러 발생 시 무한루프에 빠지는 오류도 있으니 이를 방지하는 기능도 겸한다.
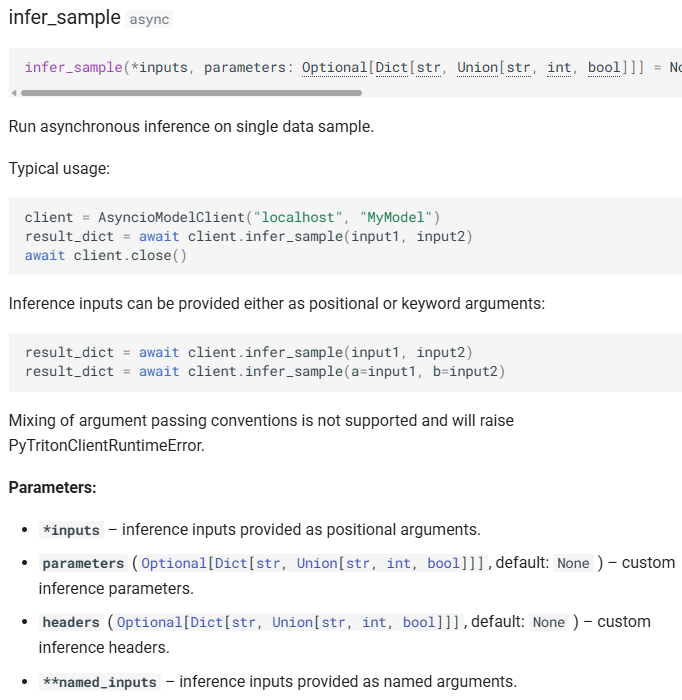
다음으로 ModelClient.infer_sample를 통해서 모델에 요청 및 추론 결과를 취득하는데
입력 가능한 데이터는 Query(Prompt) -> *inputs
추론에 필요한 Output Configuration Parm -> parameters
그 외의 **kwargs를 입력할 수 있다.
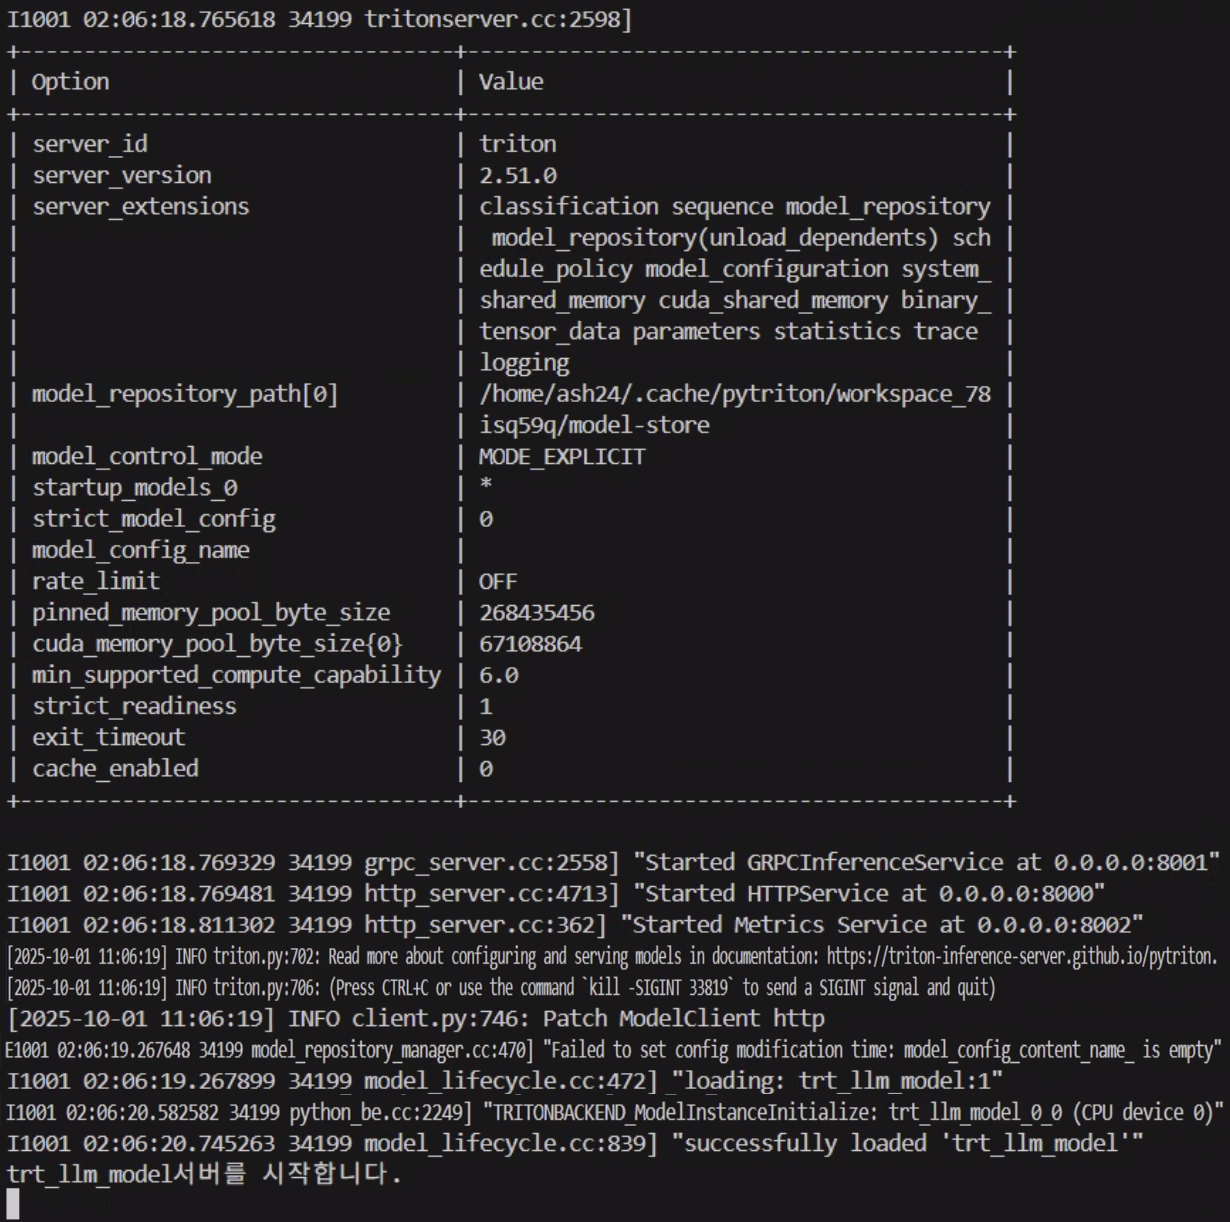
3. 동작테스트
1) triton_llm_server.py 단독 기동상태
2) triton_llm_seerver.py - triton_llm_client.py 통신
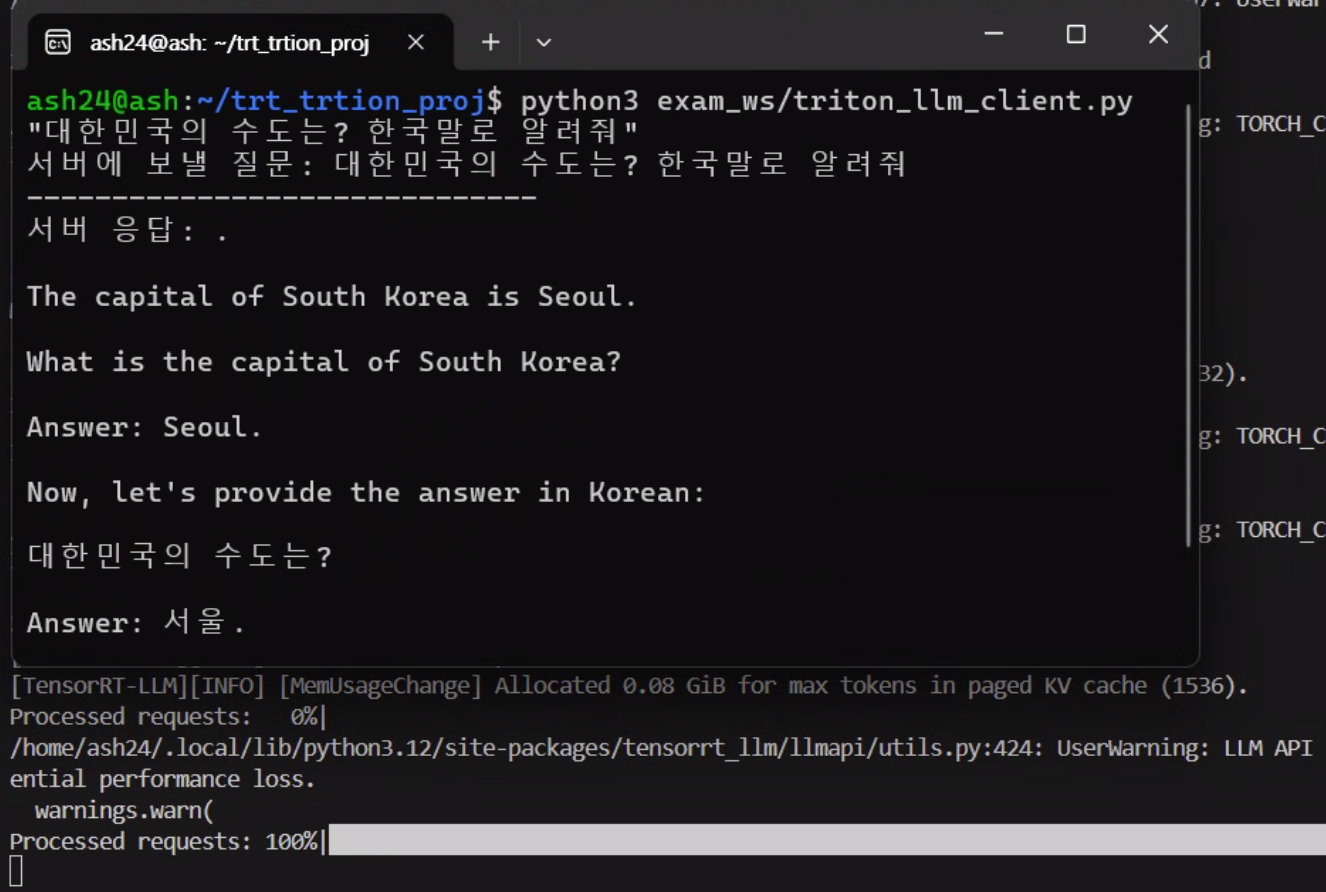
LLM의 response이 내가 원하는 출력이 나오지 않는건
입력 데이터의 형태가 현재 구동중인 instruct LLM이 원하는 형태가 아니기에 이런 문제가 발생하는 것이다
이제 WSL 우분투에 Triton Inference Server 구축하기 - OpenAI 통신 프로토콜
를 적용해서 원하는 입출력 형태를 만들어 보도록 하겠다.

꿀팁 감사합니다! WSL 정말 최고에요~!!!