- 이 글에서는 Diffusion의 간단한 개념과 Diffusion 과정을 MNIST 생성을 통해 다뤄보고자 한다.
- DDPM 모델 기반으로 다룬다.
Diffusion Model
- 확산 모델은 인공지능 기술 중 하나로, 이미지, 음성, 텍스트와 같은 데이터를 단계적으로 노이즈로 변환시킨 후, 역방향 과정을 거슬러 올라가 원래 데이터를 복원하는 방식으로 학습되는 생성 모델이다.
- 쉽게 말해, 이미지를 점점 흐릿하게 만든 후 다시 선명하게 만드는 과정을 통해 데이터 생성 능력을 배우는 모델이라고 생각하면 된다.
대표적인 확산모델
-
DDPM(Denoising Diffusion Probabilistic Models) :
- 이 모델은 디퓨전 프로세스를 통해 고품질 이미지를 생성하는 방법을 처음으로 제안된 모델이다.
-
LDM(Latent Diffusion Models) :
- 이 모델은 잠재 공간(latent space)에서 디퓨전 프로세스를 수행하는 모델이다.
- 프로세스 앞, 뒤에 이미지 인코더, 디코더를 붙여 계산 비용을 크게 줄인다는 장점이 있다.
- Stable Diffusion이 LDM 개념을 기반으로 개발되었다.
동작 원리
-
노이즈 제거 학습:
모델은 노이즈가 무작위로 추가된 데이터를 원래의 데이터로 복원하는 방법을 학습한다. -
데이터 생성:
학습이 완료된 후에는 모델이 랜덤한 노이즈에서 시작하여 점진적으로 노이즈를 제거하면서 새로운 데이터를 생성할 수 있다.

모델 구조
- 신경망 모델 구조는 U-Net 아키텍처를 사용한다.
- 아래 그림은 예시이며 자세한 구조는 바뀔 수 있다.
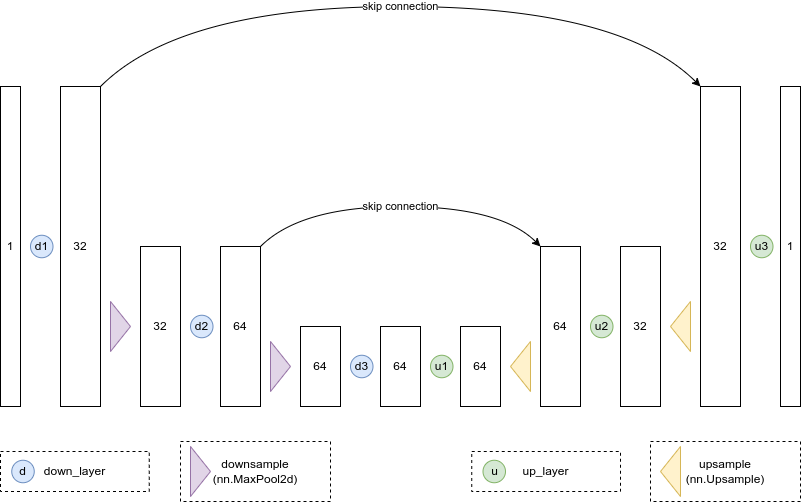
- 아래 코드는 U-Net 모델 pytorch 코드이다.
class BasicUNet(nn.Module):
    def __init__(self, in_channels=1, out_channels=1):
        super().__init__()
        self.down_layers = torch.nn.ModuleList([
            nn.Conv2d(in_channels, 32, kernel_size=5, padding=2),
            nn.Conv2d(32, 64, kernel_size=5, padding=2),
            nn.Conv2d(64, 64, kernel_size=5, padding=2),
        ])
        self.up_layers = torch.nn.ModuleList([
            nn.Conv2d(64, 64, kernel_size=5, padding=2),
            nn.Conv2d(64, 32, kernel_size=5, padding=2),
            nn.Conv2d(32, out_channels, kernel_size=5, padding=2),
        ])
        self.act = nn.SiLU()
        self.downscale = nn.MaxPool2d(2)
        self.upscale = nn.Upsample(scale_factor=2)

    def forward(self, x):
        h = []
        for i, l in enumerate(self.down_layers):
            x = self.act(l(x))
            if i < 2:
              h.append(x)
              x = self.downscale(x)

        for i, l in enumerate(self.up_layers):
            if i > 0:
              x = self.upscale(x)
              x += h.pop()
            x = self.act(l(x))

        return x
노이즈 추가
- 이미지에 노이즈 추가는 다음 수식(코드)과 같이 추가된다.
noise = torch.rand_like(x)
noisy_x = (1-amount)*x + amount*noise- 아래 코드는 이미지에 노이즈를 비율로 추가해주는 함수이다.
def corrupt(x, amount):
  noise = torch.rand_like(x)
  amount = amount.view(-1, 1, 1, 1) # Sort shape so broadcasting works
return x*(1-amount) + noise*amount- 테스트 해보자.
# Plotting the input data
fig, axs = plt.subplots(2, 1, figsize=(12, 5))
axs[0].set_title('Input data')
axs[0].imshow(torchvision.utils.make_grid(x)[0], cmap='Greys')

# Adding noise
amount = torch.linspace(0, 1, x.shape[0]) # Left to right -> more corruption
noised_x = corrupt(x, amount)

# Plotting the noised version
axs[1].set_title('Corrupted data (-- amount increases -->)')
axs[1].imshow(torchvision.utils.make_grid(noised_x)[0], cmap='Greys');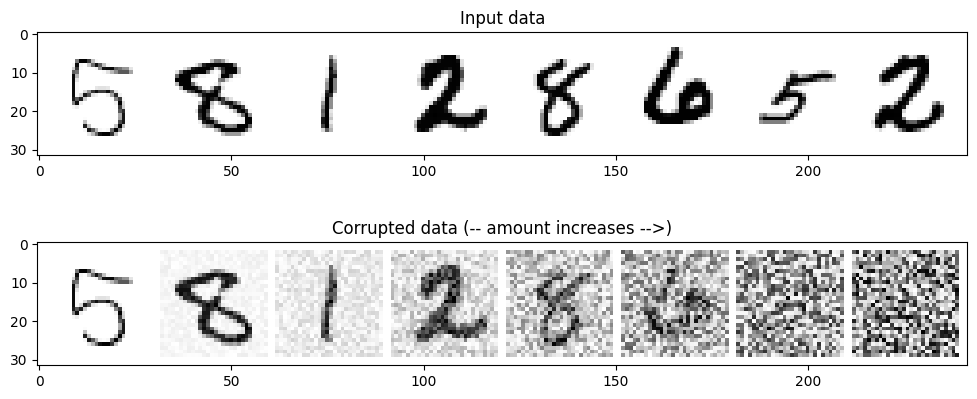
학습 프로세스
- 이해를 위한 과정이므로 train step 부분만 자세히 보자.
- 노이즈가 무작위로 추가된 x를 U-Net에 넣어 denoised될 것이라고 기대하는 output을 얻는다.
- 그 output을 노이즈 추가되지 전 깨끗한 x와 MSE를 구해 backprop을 진행한다.
# clean x와 noisy x를 준비한다.
x = x.to(device)
noise_amount = torch.rand(x.shape[0]).to(device) # 0~1
noisy_x = corrupt(x, noise_amount)

# noisy x -> denoised x
pred = net(noisy_x)

# Calculate the MSE loss
loss = loss_fn(pred, x)

# Backprop and update
opt.zero_grad()
loss.backward()
opt.step()- 학습 프로세스는 의외로 간단하다.
- 다만 나중글에 다룰 내용에는 output이 denoised된 x가 아닌 noise 그 자체가 out으로 나온다.
- x에 어떤 noise를 씌웠는지가 out으로 나오는 noise mask라고 생각하면 되겠다.
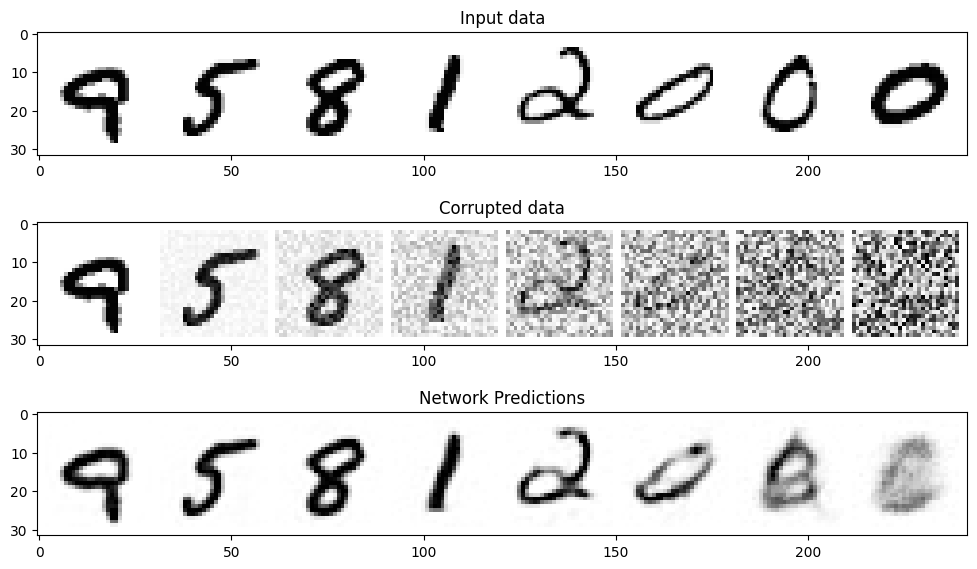
학습 결과
- 모델을 학습시켰으니 결과를 보자.
- 당연하게도 노이즈 비율이 높을 수록 denoise를 잘 못한다.
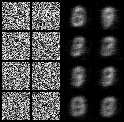
Diffusion 프로세스
- 보다시피 노이즈를 한 번에 벗기면 좋은 해상도 이미지를 얻을 수 없다.
- 따라서 노이즈를 여러 steps를 가지고 천천히 denoise한다.
n_steps = 5
x = torch.rand(8, 1, 28, 28).to(device) # x는 완전 노이즈에서 시작
step_history = [x.detach().cpu()]
pred_output_history = []

for step in range(n_steps):
    with torch.no_grad():
        pred = net(x) # 현재 x를 denoise

    mix_factor = 1/(n_steps - step) # pred와 현재 x 비율 계산
    x = x*(1-mix_factor) + pred*mix_factor # 현재 step이 클수록 x비율이 작아짐

    pred_output_history.append(pred.detach().cpu())
    step_history.append(x.detach().cpu())

fig, axs = plt.subplots(n_steps, 2, figsize=(9, 4), sharex=True)
axs[0,0].set_title('x (model input)')
axs[0,1].set_title('model prediction')
for i in range(n_steps):
    axs[i, 0].imshow(torchvision.utils.make_grid(step_history[i])[0].clip(0, 1), cmap='Greys')
axs[i, 1].imshow(torchvision.utils.make_grid(pred_output_history[i])[0].clip(0, 1), cmap='Greys')- 여러 step을 거쳐서 진행하니 완전 노이즈로 부터 나름(?) 선명한 이미지가 생성되었다.