이 글에서는 diffusion 모델에 color guidance와 clip guidance를 적용해 보고자 한다.
Pretrained 모델 받기
- 사용할 사전학습모델과 scheduler는 아래 코드와 같다.
pipeline_name = "johnowhitaker/sd-class-wikiart-from-bedrooms"
image_pipe = DDPMPipeline.from_pretrained(pipeline_name).to(device)

scheduler = DDIMScheduler.from_pretrained(pipeline_name)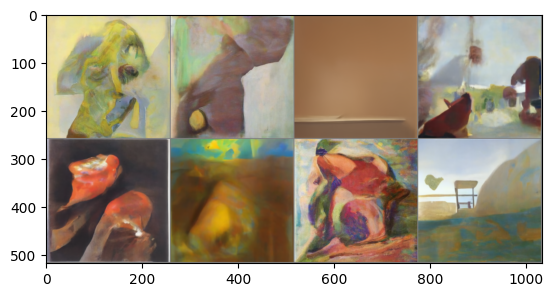
scheduler.set_timesteps(num_inference_steps=40)- 이미지를 간단히 생성해 보자.
Color Guidance 적용
- 이 글에서 guidance를 적용하기 위해 각 step을 지난 x에 대한 새로운 loss를 정의해야 한다.
- x에 대한 loss 함수는 다음과 같다.
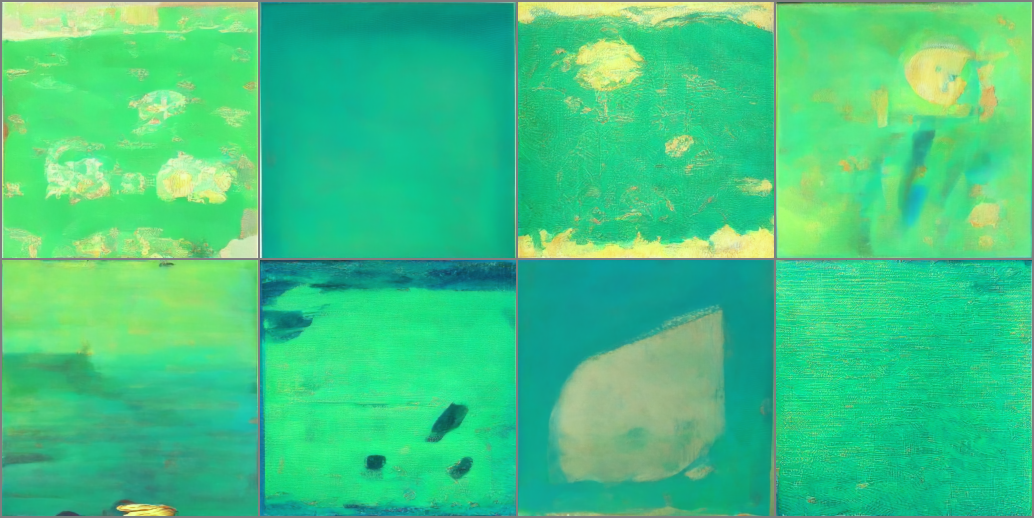
- RGB 중 녹색에 loss를 많이 부여 한다는 것을 알 수 있다.
def color_loss(images, target_color=(0.1, 0.9, 0.5)):
    # Map target color to (-1, 1)
    target = torch.tensor(target_color).to(images.device) * 2 - 1
    target = target[None, :, None, None]  # (b, c, h, w)
    error = torch.abs(images - target).mean()
return error- 아래는 loss를 적용하는 diffusion 프로세스 코드이다.
guidance_loss_scale = 40
x = torch.randn(8, 3, 256, 256).to(device)

for i, t in tqdm(enumerate(scheduler.timesteps)):
    model_input = scheduler.scale_model_input(x, t)

    with torch.no_grad():
        noise_pred = image_pipe.unet(model_input, t)["sample"]

    x = x.detach().requires_grad_()
    x0 = scheduler.step(noise_pred, t, x).pred_original_sample

	# Apply gradients
    loss = color_loss(x0) * guidance_loss_scale
    cond_grad = -torch.autograd.grad(loss, x)[0]
    x = x.detach() + cond_grad

    x = scheduler.step(noise_pred, t, x).prev_sample

# View the output
grid = torchvision.utils.make_grid(x, nrow=4)
im = grid.permute(1, 2, 0).cpu().clip(-1, 1) * 0.5 + 0.5
Image.fromarray(np.array(im * 255).astype(np.uint8))- grad를 적용하기 위해 x에 'requires_grad'를 설정해준다.
- 여기서 x0는 denoised된 이미지이다.
x = x.detach().requires_grad_()
x0 = scheduler.step(noise_pred, t, x).pred_original_sample- loss는 x0와 color guidance 간의 차이 인데 grad는 x에 적용됨에 주의한다.
# Apply gradients
loss = color_loss(x0) * guidance_loss_scale
cond_grad = -torch.autograd.grad(loss, x)[0]
x = x.detach() + cond_grad- 다음은 color guidance를 적용한 이미지이다.
CLIP Guidance 적용
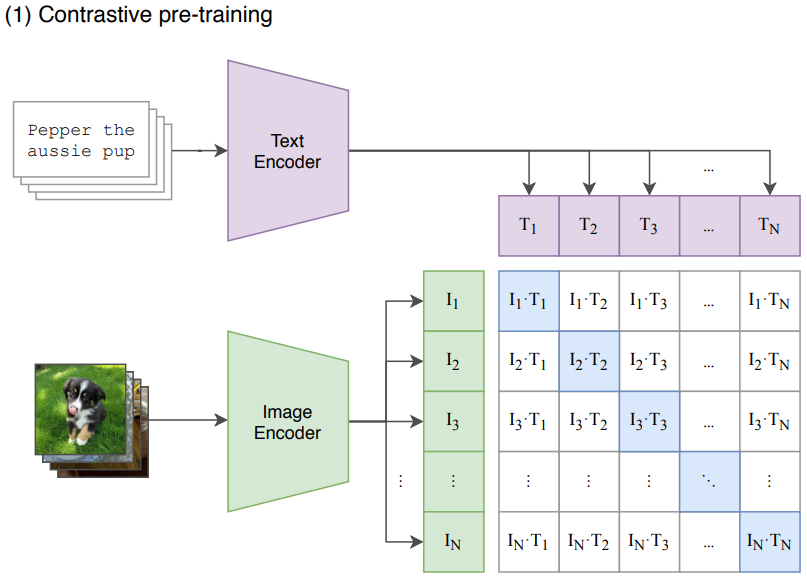
- 먼저 clip (Contrastive Language-Image Pre-training) model에 대해 간단히 알아보자.
- clip model은 말뭉치와 이미지 쌍에 대해서는 거리가 가깝도록 학습이 되고,
쌍이 아닌 것에 대해서는 거리가 멀어지도록 학습된다.
- guidance로 적용할 loss 함수 코드를 확인해보자.
- 이미지를 벡터화 시킨후 문장 벡터와의 거리를 return한다.
import open_clip

clip_model, _, preprocess = open_clip.create_model_and_transforms(
    "ViT-B-32", pretrained="openai"
)
clip_model.to(device)

tfms = torchvision.transforms.Compose(
    [
        torchvision.transforms.RandomResizedCrop(224),
        torchvision.transforms.RandomAffine(5),
        torchvision.transforms.RandomHorizontalFlip(),
        torchvision.transforms.Normalize(
            mean=(0.48145466, 0.4578275, 0.40821073),
            std=(0.26862954, 0.26130258, 0.27577711),
        ),
    ]
)

def clip_loss(image, text_features):
    image_features = clip_model.encode_image(tfms(image)) # (batch, 512)
    input_normed = torch.nn.functional.normalize(image_features.unsqueeze(1), dim=2)
    embed_normed = torch.nn.functional.normalize(text_features.unsqueeze(0), dim=2)
    # Squared Great Circle Distance
    dists = input_normed.sub(embed_normed).norm(dim=2).div(2).arcsin().pow(2).mul(2)
return dists.mean()- 아래는 CLIP guidance를 적용하는 diffusion 프로세스 코드이다.
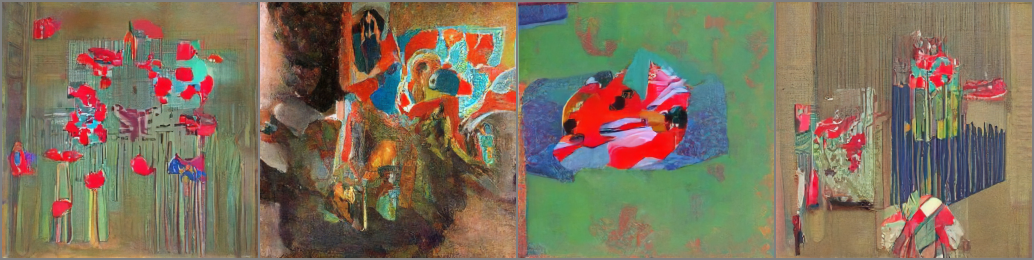
prompt = "Red Rose (still life), red flower painting"

guidance_scale = 8
n_cuts = 4
scheduler.set_timesteps(50)

#
text = open_clip.tokenize([prompt]).to(device)
with torch.no_grad(), torch.cuda.amp.autocast():
    text_features = clip_model.encode_text(text) # (1, 512)

x = torch.randn(4, 3, 256, 256).to(device)

for i, t in tqdm(enumerate(scheduler.timesteps)):
	# forward
    model_input = scheduler.scale_model_input(x, t)
    with torch.no_grad():
        noise_pred = image_pipe.unet(model_input, t)["sample"]

	# cond_grad 평균 구하기
    cond_grad = 0
    for cut in range(n_cuts):
        x = x.detach().requires_grad_()
        x0 = scheduler.step(noise_pred, t, x).pred_original_sample
        loss = clip_loss(x0, text_features) * guidance_scale
        cond_grad -= torch.autograd.grad(loss, x)[0] / n_cuts

    if i % 25 == 0:
        print("Step:", i, ", Guidance loss:", loss.item())

	# x에 grad 적용
    alpha_bar = scheduler.alphas_cumprod[i]
    x = x.detach() + cond_grad * alpha_bar.sqrt()

    x = scheduler.step(noise_pred, t, x).prev_sample

# 이미지 확인
grid = torchvision.utils.make_grid(x.detach(), nrow=4)
im = grid.permute(1, 2, 0).cpu().clip(-1, 1) * 0.5 + 0.5
Image.fromarray(np.array(im * 255).astype(np.uint8))- prompt를 tokenize 후에 encoder로 text features를 얻는다.
text = open_clip.tokenize([prompt]).to(device)
with torch.no_grad(), torch.cuda.amp.autocast():
text_features = clip_model.encode_text(text) # (1, 512)- denoised 이미지가 text_features와 가까워 지는 방향으로 cond_grad의 평균을 구한다.
# cond_grad 평균 구하기
cond_grad = 0
for cut in range(n_cuts):
	x = x.detach().requires_grad_()
	x0 = scheduler.step(noise_pred, t, x).pred_original_sample
	loss = clip_loss(x0, text_features) * guidance_scale
cond_grad -= torch.autograd.grad(loss, x)[0] / n_cuts- 이미지를 확인하면 다음과 같다.