
SRT Transform
Translation을 표현하기 위해 Affine 변환행렬 (4x4)을 사용한다.
행우선 방식이냐, 열우선 방식이냐에 따라 행렬 표현과 곱 순서가 달라진다. OpenGL은 열우선 방식을, DirectX는 행우선 방식을 사용한다.
참고: https://blog.naver.com/tlqor123/220551564955
Basis Transform
기저변환 행렬을 통해 Scale, Rotation, Translation 변환을 표현할 수 있다. 왼쪽이 행우선 방식, 오른쪽이 열우선 방식이다.
FMatrix FMatrix::BasisTransform(const FVector& u, const FVector& v, const FVector& w, const FVector& p = FVector::Zero) {
#ifdef _ROW_MAJOR_SYSTEM
	return FMatrix({
		u.x, v.x, w.x, 0.f,
		u.y, v.y, w.y, 0.f,
		u.z, v.z, w.z, 0.f,
		p.x, p.y, p.z, 1.f
	});
#else
	return FMatrix({
		u.x, u.y, u.z, p.x,
		v.x, v.y, v.z, p.y,
		w.x, w.y, w.z, p.z,
		0.f, 0.f, 0.f, 1.f
	});
#endif
}
Scale Transform
행우선 / 열우선 방식 상관없이 동일하다.
FMatrix FMatrix::Scale(float sx, float sy, float sz) {
	return BasisTransform(
		FVector(sx, 0, 0),
		FVector(0, sy, 0),
		FVector(0, 0, sz)
	);
}
Rotation Transform
Rotation의 역행렬은 전치행렬과 같다.
x축 회전 (Roll)
FMatrix FMatrix::RotateX(float rx) {
	return BasisTransform(
		FVector(1.f, 0.f, 0.f),
		FVector(0.f, cosf(rx), -sinf(rx)),
		FVector(0.f, sinf(rx), cosf(rx))
	);
}
y축 회전 (Pitch)
FMatrix FMatrix::RotateY(float ry) {
	return BasisTransform(
		FVector(cosf(ry), 0.f, sinf(ry)),
		FVector(0.f, 1.f, 0.f),
		FVector(-sinf(ry), 0.f, cosf(ry))
	);
}
z축 회전 (Yaw)
FMatrix FMatrix::RotateZ(float rz) {
	return BasisTransform(
		FVector(cosf(rz), -sinf(rz), 0.f),
		FVector(sinf(rz), cosf(rz), 0.f),
		FVector(0.f, 0.f, 1.f)
	);
}
Translation Transform
FMatrix FMatrix::Translate(float tx, float ty, float tz) {
	return BasisTransform(
		FVector(1.f, 0.f, 0.f),
		FVector(0.f, 1.f, 0.f),
		FVector(0.f, 0.f, 1.f),
		FVector(tx, ty, tz)
	);
}
곱 순서
Scale -> Rotation -> Translation -> 부모의 SRT 으로 진행된다.
FMatrix USceneComponent::Transformation() const {
#ifdef _ROW_MAJOR_SYSTEM
	FMatrix m = FMatrix::Scale(RelativeScale3D) * FMatrix::RotateXYZ(RelativeRotation) * FMatrix::Translate(RelativeLocation);
#else
    FMatrix m = FMatrix::Translate(RelativeLocation) * FMatrix::RotateXYZ(RelativeRotation) * FMatrix::Scale(RelativeScale3D);
#endif
    return m;
}
그러나 언리얼 기준으론 (S -> 부모의 S -> 부모의 S...) * (RT -> 부모의 RT -> 부모의 RT...) 순서로 곱해진다고 한다.
MVP Matrix
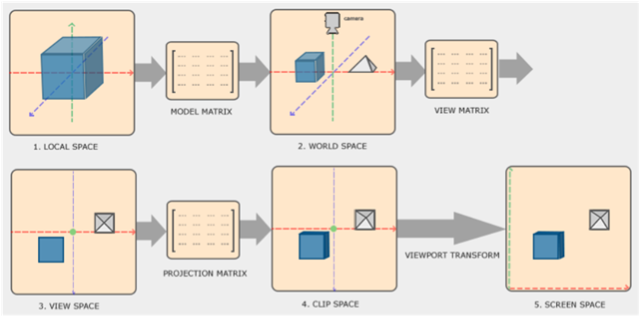
Model Matrix
로컬 좌표계 -> 월드 좌표계
로컬 좌표계 을 원점으로 하는 버텍스들을 월드 좌표계로 옮기는 변환. 오브젝트의 Scale, Rotation, Translation를 곱한 행렬의 역행렬로 구할 수 있다.
View Matrix
월드 좌표계 -> 카메라 좌표계
카메라 좌표 를 원점으로 하는 카메라 좌표계로 옮기는 변환.
2가지 방법이 있다.
- Model Matrix와 마찬가지로 카메라의 Rotation, Translation (Scale은 무방)의 역행렬로 구하기
그러나 회전 변환이 오일러각을 사용한다면 짐벌락이 발생할 수 있고, 이후 월드 좌표계 변환이 어려워진다. - Front 벡터 (또는 EyePos, LookAtPos), pseudo Up 벡터로 구하기
Front와 Up를 외적하면 Right가 나오는데, 이를 다시 Front와 외적하여 진짜 Up벡터를 구해 사용하는 방식이다.
이때 왼손좌표계냐 오른손좌표계냐에 따라 Front의 방향이 정해진다.
참고: https://bbungprogram.tistory.com/17
Projection Matrix
카메라 좌표계 -> NDC 좌표계 (Clip Space)
카메라 좌표계에서 ~ 크기의 정규화된 공간 좌표계로 옮기는 변환.
이 변환을 거치면 값이 튀어나오는데 Rasterizer Stage에서 원근감을 나타내기 위해 사용된다. 그러니까 이 커밋처럼 로 나눌 필요 없다.
2가지 종류가 있다.
Perspective Projection
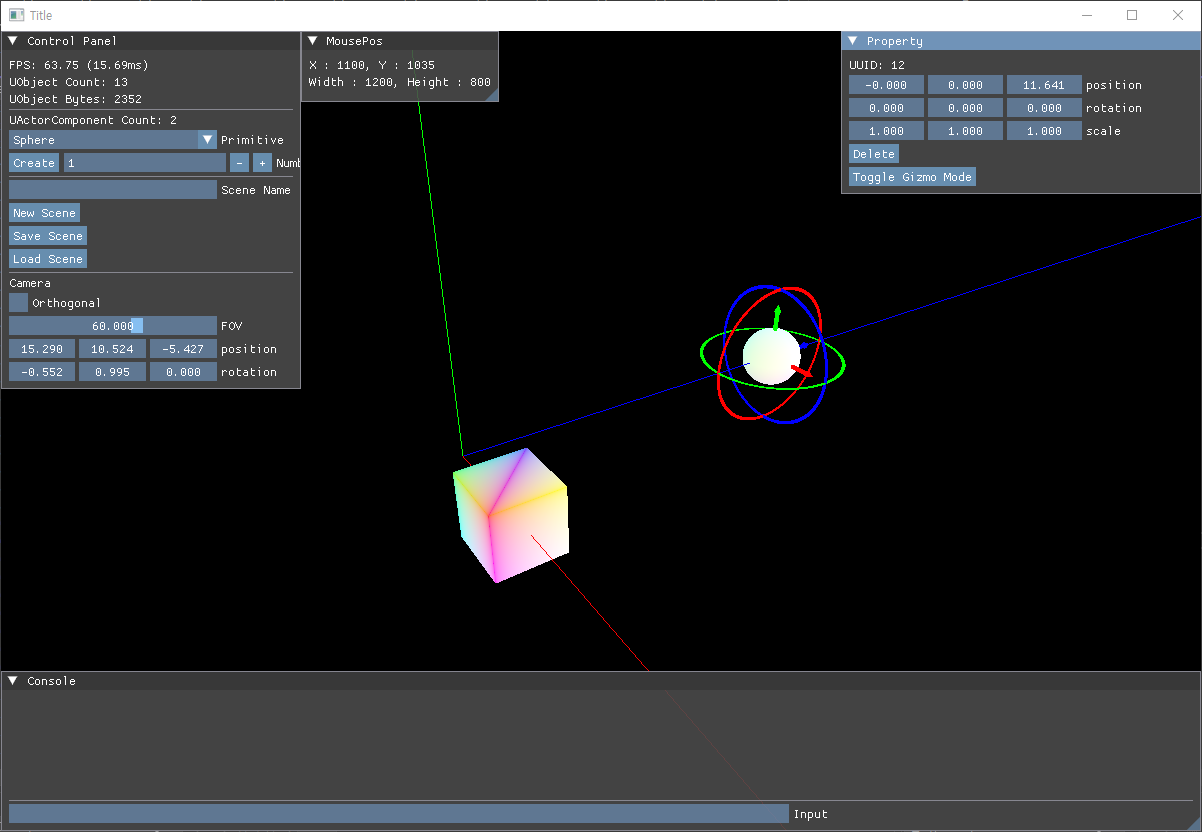
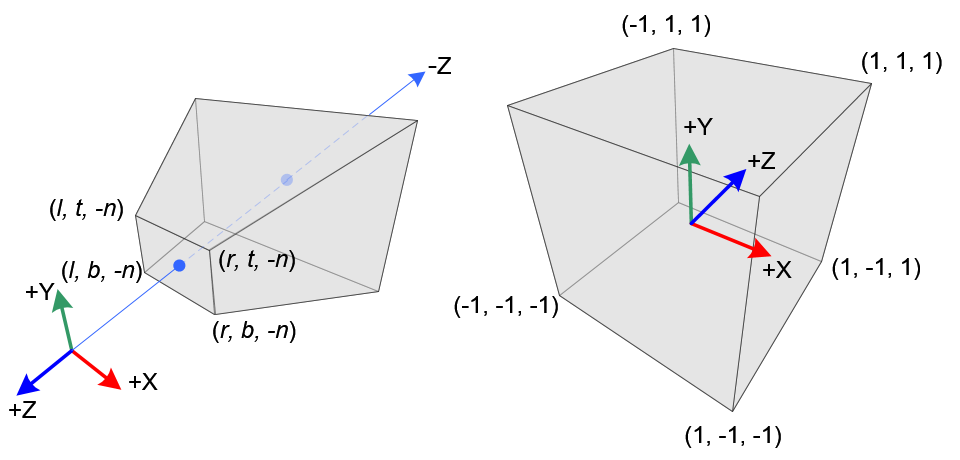
(사진은 OpenGL 기준. DirectX는 NDC 공간의 Z 범위가 이다. #)
원근감이 적용되어 멀리 있는게 더 작아보이는 Projection. 왼쪽에 있는 저 육면체를 절두체(Frustum)라고 부르곤 한다.
- DirectX 기준 (행우선, )
- OpenGL 기준 (열우선, )
이때 , 는 종횡비 이다.
코드는 DirectX 기준 각각 행우선/열우선 방식이다.
FMatrix UCameraComponent::PerspectiveProjection() {
	float yScale = 1.0f / tanf(degToRad(fieldOfView * 0.5f)); // cot(FOV/2)
	float xScale = yScale / aspectRatio;
	float zRange = farDistance - nearDistance;
#ifdef _ROW_MAJOR_SYSTEM
	return FMatrix({
		 xScale,  0.0f,   0.0f,                         0.0f,
		 0.0f,    yScale, 0.0f,                         0.0f,
		 0.0f,    0.0f,  farDistance / zRange,         1.0f,
		 0.0f,    0.0f,  -nearDistance * farDistance / zRange,	0.0f
	});
#else
	return FMatrix({
		 xScale,  0.0f,   0.0f,                         0.0f ,
		 0.0f,    yScale, 0.0f,                         0.0f,
		 0.0f,    0.0f,   farDistance / zRange,         -nearDistance * farDistance / zRange,
		 0.0f,    0.0f,  1.0f,							0.0f
	});
#endif //_ROW_MAJOR_SYSTEM
}
Orthogonal Projection
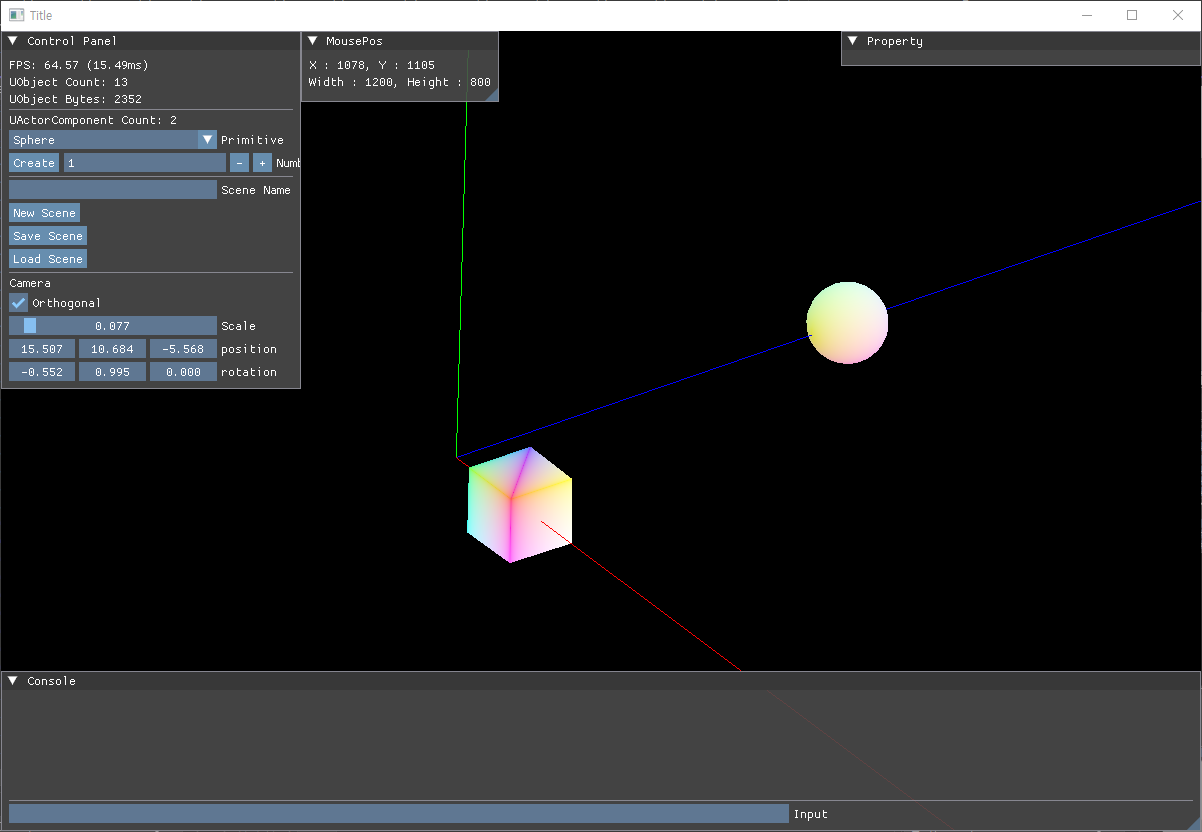
원근감이 적용되지 않아 멀리 있는 것과 가까이 있는 것의 크기가 같아 보이는 Projection.
- DirectX 기준 (행우선, )
- OpenGL 기준 (열우선, )
이때 는 임의의 계수, 는 종횡비이다.
코드는 마찬가지로 DirectX 기준 행우선/열우선 방식이다.
FMatrix UCameraComponent::OrthgonalProjection() {
	float zRange = farDistance - nearDistance;
	const float scale = orthoScale;
#ifdef _ROW_MAJOR_SYSTEM
	return FMatrix({
		scale / aspectRatio, 0.f, 0.f, 0.f,
		0.f, scale, 0.f, 0.f,
		0.f, 0.f, 1.f / zRange, 0.f,
		0.f, 0.f, -nearDistance / zRange, 1.f
	});
#else
	return FMatrix({
		scale / aspectRatio, 0.f, 0.f, 0.f,
		0.f, scale, 0.f, 0.f,
		0.f, 0.f, 1.f / zRange, -nearDistance / zRange,
		0.f, 0.f, 0.f, 1.f
	});
#endif //_ROW_MAJOR_SYSTEM
}
Viewport Transform
NDC 좌표계 -> 스크린 좌표계

(마찬가지로 사진은 OpenGL 기준)
RSSetViewport(...)를 통해서 DirectX 내부적으로 처리된다.
곱 순서
Model -> View -> Projection 순으로 곱해준다.
void CRenderer::SetTansformToConstantBuffer(FMatrix matrix) {

    FMatrix view = _instance->_mainCamera->Transformation().Inverse();
    FMatrix projection = _instance->_mainCamera->Projection();
#ifdef _ROW_MAJOR_SYSTEM
    matrix = matrix * view * projection;
#else
    matrix = projection * view * matrix;
#endif
    _instance->_constantBuffer->CopyData(matrix);
    ID3D11Buffer* constantBuffer = _instance->_constantBuffer->Get();
    _instance->_graphics->GetDeviceContext()->VSSetConstantBuffers(0, 1, &constantBuffer);
}
Math
FVector, FMatrix 등을 직접 작성하였다.
typedef template class
템플릿 클래스 typedef하는 방법 (C++ 11 이상)
template <typename T> using TArray = std::vector<T>;Memory Allocation
new, delete overloading
inline void* UObject::operator new(size_t size) {
	void* ptr = ::operator new(size);
	_allocationMap[ptr] = size;
	++_totalCount;
	_totalMemory += static_cast<uint32>(size);
	return ptr;
}

inline void UObject::operator delete(void* p) {
	--_totalCount;
	_totalMemory -= static_cast<uint32>(_allocationMap[p]);
	_allocationMap.erase(p);
	free(p);
}
참고: #
SafeRelease, SafeDelete
template <typename T> void SafeRelease(T** ppT) {
	if (*ppT) {
		(*ppT)->Release();
		*ppT = nullptr;
	}
}
참고: https://learn.microsoft.com/ko-kr/windows/win32/medfound/saferelease
TroubleShooting
백버퍼 빛 RTV 타입 지정
색깔이 적용되지 않는 문제가 있었다. 알고보니 백버퍼와 RTV의 형식을 UINT로 잡고 있었다.
void CGraphics::CreateRenderTargetView() {
	HRESULT hr;

	hr = _swapChain->GetBuffer(0, __uuidof(ID3D11Texture2D), (void**)&_backBuffer);
	assert(SUCCEEDED(hr));

	D3D11_RENDER_TARGET_VIEW_DESC desc = {};
    // desc.Format = DXGI_FORMAT_R8G8B8A8_UINT;		// 수정 전
	desc.Format = DXGI_FORMAT_R8G8B8A8_UNORM_SRGB;	// 수정 후
	desc.ViewDimension = D3D11_RTV_DIMENSION_TEXTURE2D;

	hr = _device->CreateRenderTargetView(_backBuffer, &desc, &_renderTargetView);
 	assert(SUCCEEDED(hr));
}RGBA는 자리만 나타내기 위한 네이밍일 뿐 실제 컬러를 의미하지 않으므로 유의하자.
ImGui InputText 오류
다른 키는 잘 먹히는데 Backspace, Enter가 안먹히는 문제가 있었다.
WinProc에서 WM_CHAR 케이스는 정의해 놓았는데 Backspace, Enter가 Char에 안 들어가는 게 원인인 듯 했다.
아래 코드를 WinProc 상단에 추가함으로써 해결하였다.
if ( ImGui_ImplWin32_WndProcHandler(hWnd, message, wParam, lParam) )
		return true;