
📌 Redux

-Redux- 리덕스는 오픈 소스 자바스크립트 라이브러리
-state를 이용해 웹 사이트 혹은 애플리케이션의 상태 관리 목적으로 사용
📗 사용 이유?
- 계속해서 바뀌는 상당한 양의 데이터가 있다.
- 상태를 위한 단 하나의 근원이 필요하다.
- 최상위 컴포넌트가 모든 상태를 가지고 있는 것은 더 이상 적절하지 않다.
- 자식이 많고 부모를 통해 상태를 주고 받으면서 상태관리가 복잡할 경우
- 상위 컴포넌트에서 계속 내려 받아야할 경우 props -> props -> props
📗 Redux 설치
npm install @reduxjs/toolkit📖 Store
- 상태과 관리되는 하나의 공간
- 컴포넌트들이 부모를 거치지 않아도 밖에서 상태를 관리하는 store에 접근하여 사용할 수 있다.
📖 Redux Toolkit
Redux Toolkit은 Redux에 대해 흔히 우려하는 세 가지를 해결하기 위해 만들어졌다고 합니다!
- "저장소를 설정하는 것이 너무 복잡하다"
- "쓸만하게 되려면 너무 많은 패키지들을 더 설치해야 한다"
- "보일러플레이트 코드를 너무 많이 필요로 한다"
📗 Redux Toolkit 및 React-redux 패키지 설치
📌Install Redux Toolkit and React-Redux
npm install @reduxjs/toolkit react-redux
📗 store 사용
✅ store.js 파일 생성
// src/store/store.js
import { configureStore } from '@reduxjs/toolkit'

export const store = configureStore({
  reducer: {},
})
✔️ Redux 저장소 생성
✅ React에서 Redux store를 사용할 수 있도록 src/index.js 수정
// src/index.js
import React from 'react';
import ReactDOM from 'react-dom/client';
import reportWebVitals from './reportWebVitals';
import App from './App';
import { Provider } from 'react-redux'; 👈
import { store } from './store/store'; 👈

const root = ReactDOM.createRoot(document.getElementById('root'));
root.render(
  <React.StrictMode>
    <Provider store={store}> 👈
      <App />
    </Provider>
  </React.StrictMode>
);
reportWebVitals();
✔️ index.js 수정 완료!
✔️ provider > App 에서 store에 접근하여 사용할 수 있습니다.
📗 store count 테스트
✅ store에서 count state 만들어 테스트
// /store/store.js
import { configureStore, createSlice } from '@reduxjs/toolkit'

// createSlice 스토어 state 생성
const storeCount = createSlice({
  name: "count",
  initialState: 0, // state 초깃값 : useState('초깃값');
  reducers: { // set 변경 함수
    countUp(state){ // ++
      console.log("countUp "+state)
      return state += 1
    },
    countDown: (state) => { // --
      console.log("countDown "+state)
      return state -= 1
    }
  }
})

export const store = configureStore({
  reducer: {
    storeCount : storeCount.reducer, // 위에 생성한 count state를 store 등록
  },
})

//
export const { countUp, countDown } = storeCount.actions;
📍 store
✅ createSlice / initialState / reducers
- createSlice: 초기 상태, redux 함수의 객체, "슬라이스 이름"을 받아들이고, 리듀서와 상태에 해당하는 액션 생성자와 액션 유형을 자동으로 생성하는 함수입니다.
- initialState: 상태 조각의 초기 상태 값입니다.
- reducers: "case Reducer"(특정 작업 유형을 처리하기 위한 함수) 함수를 포함하는 객체
✅ configureStore / reducer
- configureStore: Redux Store를 구성하는 메서드 / configureStore 함수로 스토어 생성 코드 자동 생성
- reducer: 리듀서를 정의 / s 구분 확인.
✅ actions : store state 변경함수들을 action
✅ 테스트를 위해 부모, 자식 컴포넌트를 만들고 store에 등록한 storeCount를 가져와 사용 테스트!!
// ReduxParent.jsx
import { useDispatch, useSelector } from "react-redux";
import ReduxChild from "./ReduxChild";
import { countDown, countUp } from "store/store";

function ReduxParent(){
  // useSelector hook : Redux store 가져오기
  let count = useSelector((state) => state.storeCount);
  const dispatch = useDispatch(); // store에 요청을 보내는 함수.

  return(
    <>
      <p>ReduxParent</p>
      <p>Parent: {count}</p>
      <button type="button" onClick={()=> dispatch(countUp())}>Parent Count ++</button>
      <button type="button" onClick={()=> dispatch(countDown()) }>Parent Count --</button>
      <hr />
      <ReduxChild />
    </>
  )
}
export default ReduxParent;

//ReduxChild.jsx
import { useDispatch, useSelector } from "react-redux";
import { countDown, countUp } from "store/store";

function ReduxChild(){
  // useSelector hook : Redux store 가져오기
  let childCount = useSelector((state) => state.storeCount);
  const dispatch = useDispatch();

  return(
    <div>
      <p>ReduxChild</p>
      <p>Child: {childCount}</p>
      <button type="button" onClick={()=> dispatch(countUp())}>Child Count ++</button>
      <button type="button" onClick={()=> dispatch(countDown()) }>Child Count --</button>
      <hr />
    </div>
  )
}
export default ReduxChild;
📍 store에 접근 사용할 컴포넌트에서 아래와 같은 hook을 사용.
✅ useSelector
import { useSelector } from 'react-redux';
const store = useSelector((state) => state.storeState)- store 상태값을 가져오기 위해 사용.
- useSelector(매개변수)에 state => state.등록한store명
✅ useDispatch
import { useSelector } from 'react-redux';
const dispatch = useDispatch();
dispatch(store변경함수명())- 스토어 상태를 변경하기 위해 사용
- 스토어에 등록한 변경 Action은 Dispatcher를 통해 실행한다.

👉 parent 컴포넌트에서 + - 버튼 클릭 시 storeCount 값이 변경되어
child에서도 변경되는 것을 알 수 있다.
반대로 child 컴포넌트에서 + - 버튼 클릭도 동일하게 작동하고 있습니다!
📗 store 배열 변경 테스트
📘Arr 텍스트 변경
EX)
📍 store.js 테스트 배열 생성 및 테스트 컴포넌트 생성
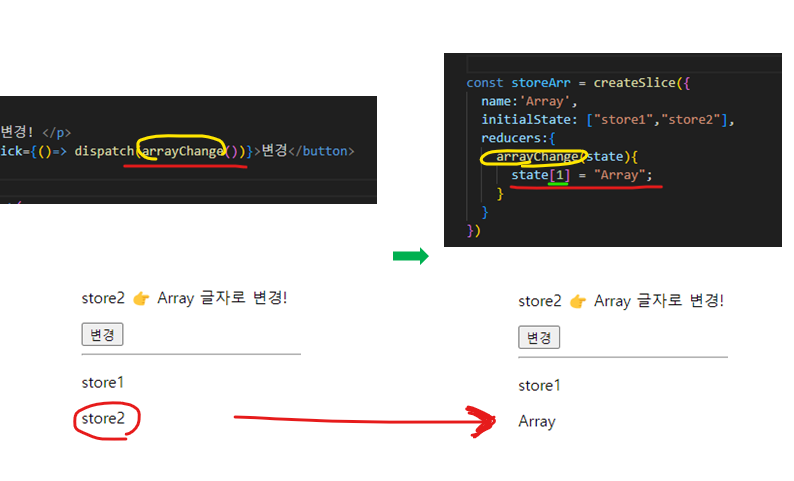
// ✅ store.js
import { configureStore, createSlice } from '@reduxjs/toolkit'

const storeArr = createSlice({
  name:'Array',
  initialState: ["store1","store2"],
  reducers:{
    arrayChange(state){
      state[1] = "Array";
    }
  }
})

export const store = configureStore({
  reducer: {
    storeCount : storeCount.reducer,
    storeArr : storeArr.reducer,
  },
})

export const { arrayChange } = storeArr.actions;

// ✅ arrChange 변경 Test 컴포넌트
import { useDispatch, useSelector } from "react-redux";
import { arrayChange } from "store/store";

function ReduxArrChange(){
  const storeArr = useSelector((state) => state.storeArr);
  const dispatch = useDispatch();
  console.log(storeArr) // ["store1","store2"]
  return (
    <>
      <p>store2 👉 Array 글자로 변경! </p>
      <button
    	type="button"
    	onClick={()=> dispatch(arrayChange())}>
    	변경
	  </button>
      <hr />
      {
        storeArr.map((item, idx)=>(
          <p key={idx}>{item}</p>
        ))
      }
    </>
  )
}
export default ReduxArrChange;
✅ 결과
📘Arr 숫자 증가
Ex)
📍숫자 증가
✔️ 텍스트 변경한 코드 기준 store.js 파일 내
아래와 같이 2군데 수정만 하여 테스트!
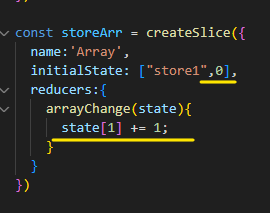
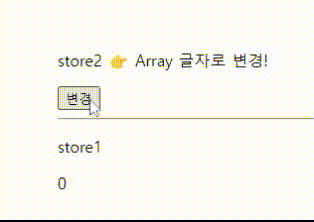
✔️ 숫자 변경 확인 object도 같은 방법으로 업데이트가 가능합니다.
📖
Redux Toolkit에서 Immer JS 라이브러리가 자동으로 설치되어
return 없이 간단하게 변경이 가능합니다.
배열, 객체를 업데이트해야 할 때 직접 수정하면 안 되고
불변성을 지켜주면서 ... 연산자를 사용해 새롭게 만들어서 수정, 업데이트를 해주어야 합니다
Immer.js 를 사용하여 불변성을 신경 쓰지 않아도 알아서 복사본을 만들어 리턴을 해주어 return을 입력하지 않고 바로 수정이 가능!!
📗 store Parameter 전달
- 원하는 값을 store 변경함수에 전달하여 등록된 store 값 변경.
EX)
//ReduxParameter.jsx
import { useState } from "react";
import { useDispatch, useSelector } from "react-redux";
import { parameterChange } from "store/store";

function ReduxParameter(){
  const storeVal = useSelector((state) => state.storeParameter);
  const dispatch = useDispatch(); // store에 요청을 보내는 함수.
  const [inputVal, setInputVal] = useState('');
  const inputChange = (e) => {
    setInputVal(e.target.value)
  }
  return (
    <>
      <input type="text" val={inputVal} onChange={(e)=>inputChange(e)}/>
      <button type="button" onClick={()=>dispatch(parameterChange(inputVal))}>
        변경!
      </button>
      <p>store 값 : {storeVal}</p>
    </>
  )
}
export default ReduxParameter;
✔️ input에 입력된 값을 클릭 시 store 변경!
// /store/store.js
import { configureStore, createSlice } from '@reduxjs/toolkit'

const storeParameter = createSlice({
  name: 'parameterTest',
  initialState: '',
  reducers:{
    parameterChange(state, action){ // 전달 받은 값 action에 담겨져 있습니다.
      console.log(action) // 👈 payload 전달 받은 value 값 확인
      return state = action.payload;
    }
  }
})

export const store = configureStore({
  reducer: {
    storeParameter:storeParameter.reducer,
  },
})

export const { parameterChange } = storeParameter.actions;- action.payload 변경 함수에 담겨 전달받은 파라미터 값 확인.
- arr와 object 값이 아니기에 변경된 store state 값을 return!!
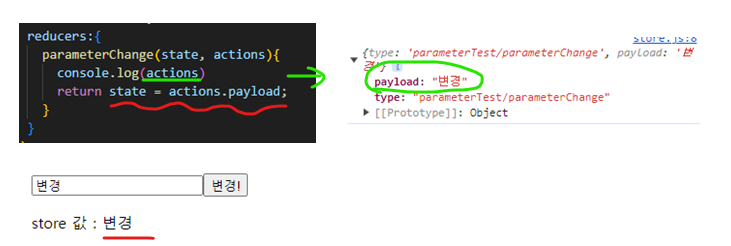
✅정상적으로 store 값이 변경된 것을 알 수 있습니다.
📗store 파일 분할 import export 사용
스토어 관련된 코드가 하나의 store 파일에 모두 담아져 있으면
코드도 길어지고 불편함이 있어서 분리를 합니다.
EX)
/store/store.js 에 입력한 createSlice와 actions를 분리
/store/reduxStudy.js
import { createSlice } from '@reduxjs/toolkit'

// createSlice 스토어 state 생성
export const storeCount = createSlice({
  name: "count",
  initialState: 0, // state 초깃값 : useState('초깃값');
  reducers: { // set 변경 함수
    countUp(state){ // ++
      console.log("countUp "+state)
      return state += 1
    },
    countDown: (state) => { // --
      console.log("countDown "+state)
      return state -= 1
    }
  }
})

// arr store 텍스트 변경 테스트
export const storeArr = createSlice({
  name:'Array',
  initialState: ["store1","store2"],
  reducers:{
    arrayChange(state){
      state[1] = "arr 변경";
    }
  }
})

// object num 증가 테스트
export const storeObjectNum = createSlice({
  name:'object Num Change',
  initialState: {title:"store1",number:0},
  reducers:{
    numChange(state){
      state.number += 1;
    }
  }
})
// Parameter 전달 store 값 수정
export const storeParameter = createSlice({
  name: 'parameterTest',
  initialState: '',
  reducers:{
    parameterChange(state, action){
      console.log(action)
      return state;
    }
  }
})
// actions
export const { countUp, countDown } = storeCount.actions;
export const { arrayChange } = storeArr.actions;
export const { numChange } = storeObjectNum.actions;
export const { parameterChange } = storeParameter.actions;
✅ 기존 스토어 파일도 수정을 해줍니다
/store/store.js
import { configureStore } from '@reduxjs/toolkit'
import { storeArr, storeCount, storeObjectNum, storeParameter } from './reduxStudy';
export const store = configureStore({
  reducer: {
    storeCount : storeCount.reducer,
    storeArr : storeArr.reducer,
    storeObjectNum : storeObjectNum.reducer,
    storeParameter:storeParameter.reducer,
  },
})
✅ 마지막으로 변경 함수를 사용한 컴포넌트에서 경로 수정을 해주면 끝!!
👉 간단하게 redux toolkit을 활용하여 store 등록, 수정, 삭제 완료
감사합니다. 😁