
pythonanywhere 변경 방법
다운받아 사용한 bootstrap 주소 : https://startbootstrap.com/theme/stylish-portfolio
📄 workshop
기존 temp를 복사하여 사용
project 명: myweb
app명 : web
bootstrap template를 선택하여 본인 PC에서 실행
이를 pythonanywhere에 전개
1. temp 복사해서 붙여넣기
1) temp 파일이 있는 위치대로 찾아 들어가기
2) temp 복사

✍ 'temp – 복사본' 이름을 ‘myweb’으로 바꿔주기
2. 파이썬에서 'myweb'프로젝트 수정
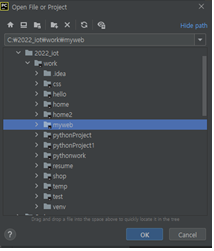
1) 파이썬에 들어가서 File > Open > myweb > OK
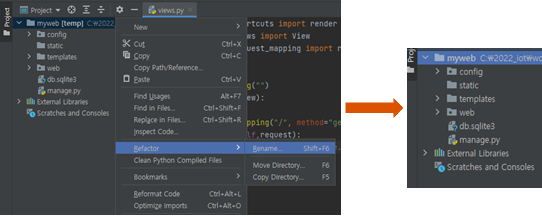
2) 파일 이름에 myweb[변경 전 파일의 이름]을 myweb으로 바꿔주기
✍ Refector > Rename > Rename Project > ‘myweb’ 입력 > OK
3) Terminal에서 Local 옆의 x를 눌러서 닫았다가 다시 Terminal을 눌러 열어주면,
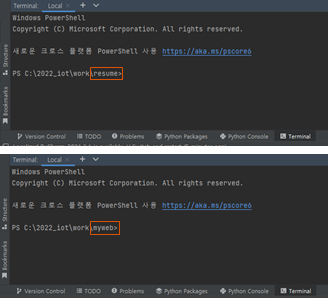
바뀐 것을 확인할 수 있다.
3. startbootstrap에서 원하는 거 선택
https://startbootstrap.com/ 에서 마음에 드는 것을 고른 후
Free Download 클릭
(자신이 고른 것이 어떻게 돌아가는지 보고 싶으면 Live Preview를 눌러서 보면 된다)
4. 다운받은 File 파이썬에서 수정
1) 다운로드 받은 File의 압축 풀기

2) 압축 푼 파일
- assets, css,js는 복사해서 static에 Paste!
- index.html은 복사해서 templates에 Paste!
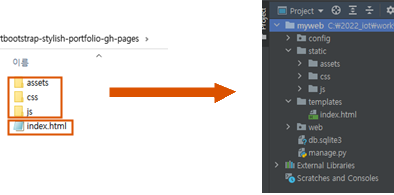
3) Files 수정
✍ web의 views.py 수정
# 수정 전
return render(request,'home.html');

# 수정 후
return render(request,'index.html');
✍ index.html 수정
- 연결된 파일 수정
# 수정 전
# 11
<link rel="icon" type="image/x-icon" href="assets/favicon.ico" />
# 19
<link href="css/styles.css" rel="stylesheet" />
# 195
<script src="js/scripts.js"></script>

# 수정 후
# 11
<link rel="icon" type="image/x-icon" href="{% static 'assets/favicon.ico'%}" />
# 19
<link href="{% static 'css/styles.css'%}" rel="stylesheet" />
# 195
<script src="{% static 'js/scripts.js'%}"></script>- img 파일은 모두 연결 수정
📌 상단에 {% load static %}를 꼭 입력!
# 수정 전
# 120
<img class="img-fluid" src="assets/img/portfolio-1.jpg" alt="..." />
# 131
<img class="img-fluid" src="assets/img/portfolio-2.jpg" alt="..." />
# 142
<img class="img-fluid" src="assets/img/portfolio-3.jpg" alt="..." />
# 153
<img class="img-fluid" src="assets/img/portfolio-4.jpg" alt="..." />

# 수정 후
# 120
<img class="img-fluid" src="{% static 'assets/img/portfolio-1.jpg'%}}" alt="..." />
# 131
<img class="img-fluid" src="{% static 'assets/img/portfolio-2.jpg'%}" alt="..." />
# 142
<img class="img-fluid" src="{% static 'assets/img/portfolio-3.jpg'%}" alt="..." />
# 153
<img class="img-fluid" src="{% static 'assets/img/portfolio-4.jpg'%}" alt="..." />- 나머지는 자신이 수정하고 싶은대로 하면 된다.
# 수정 전
# 37
<h3 class="mb-5"><em>Stylish Portfolio</em></h3>
# 38
<h3 class="mb-5"><em>A Free Bootstrap Theme By Start Bootstrap</em></h3>

# 수정 후
# 37
<h1 class="mb-1">(내이름) Portfolio</h1>
# 38
<h3 class="mb-5"><em>튼튼한 관절, 꼿꼿한 허리</em></h3>
✍ 적용됐는지 확인
Terminal에서 아래 명령어를 입력하고 브라우저에서 127.0.0.1 들어가서 확인
python manage.py runserver 80