7-2 상대 위치로 배치 - RelativeLayout
RelativeLayout 배치 규칙
RelativeLayout은 상대 뷰의 위치를 기준으로 정렬하는 레이아웃 클래스다.
즉, 화면에 이미 출력된 특정 뷰를 기준으로 방향을 지정하여 배치한다.
- android:layout_above: 기존 뷰의 위쪽에 배치
- android:layout_below: 기존 뷰의 아래쪽에 배치
- android:layout_toLeftOf: 기존 뷰의 왼쪽에 배치
- android:layout_toRightOf: 기존 뷰의 오른쪽에 배치
예제
<RelativeLayout xmlns:android="http://schemas.android.com/apk/res/android"
    android:layout_width="match_parent"
    android:layout_height="match_parent">

    <ImageView
        android:id="@+id/testImage"
        android:layout_width="wrap_content"
        android:layout_height="wrap_content"
        android:src="@mipmap/ic_launcher" />

    <Button
        android:layout_width="wrap_content"
        android:layout_height="wrap_content"
        android:layout_toRightOf="@id/testImage"
        android:text="HELLO" />
</RelativeLayout>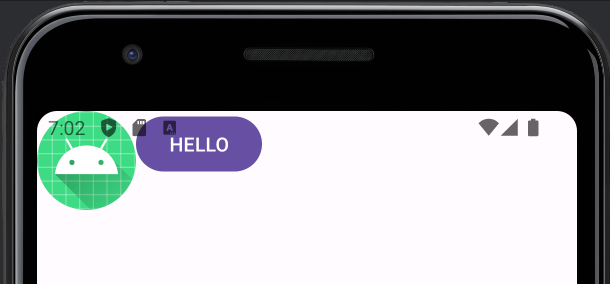
RelativeLayout으로 설정 후, testImage(안드로이드 사진)의 오른쪽에 배치하도록 하였다.
RelativeLayout은 LinearLayout처럼 자동으로 가로세로 방향으로 배치되지 않는다.
따라서 세부 속성으로 배치하지 않으면 이미지 뷰 위에 버튼이 겹쳐서 나올 것이다.
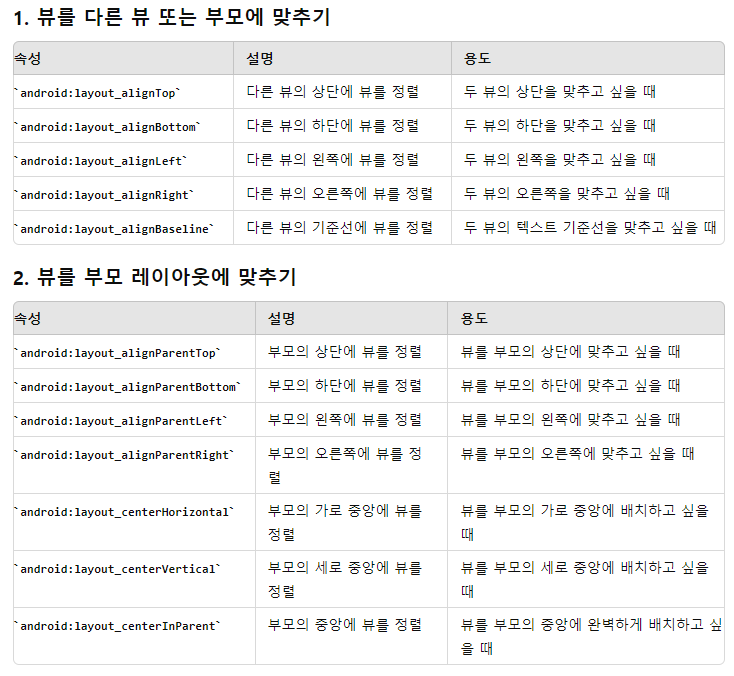
맞춤 정렬하는 align 속성
그런데 문제가 있다. 이미지의 세로 크기가 버튼보다 커서 버튼이 이미지의 위쪽에 맞춰졌다.
그런데 때로는 상대 뷰의 아래쪽에 맞춰야 할 수도 있다.
상대 뷰의 어느 쪽에 맞춰서 정렬할지 정하는 속성은 다음과 같다.
속성은 크게 일반적인 상대 뷰(부모 및 부모가 아닌 뷰에 맞춤)에 맞출지, 아니면 부모 뷰에 맞출지에 따라 나눌 수도 있다.
<RelativeLayout xmlns:android="http://schemas.android.com/apk/res/android"
    android:layout_width="match_parent"
    android:layout_height="match_parent">

    <ImageView
        android:id="@+id/testImage"
        android:layout_width="wrap_content"
        android:layout_height="wrap_content"
        android:src="@mipmap/ic_launcher" />

    <Button
        android:layout_width="wrap_content"
        android:layout_height="wrap_content"
        android:layout_alignBottom="@id/testImage"
        android:layout_toRightOf="@id/testImage"
        android:text="HELLO" />

</RelativeLayout>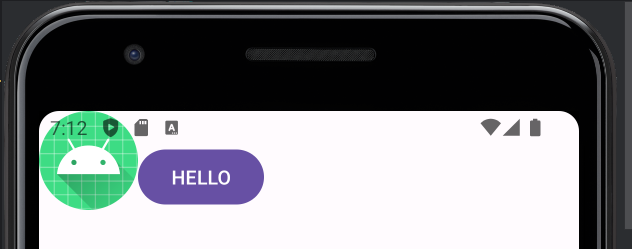
성공적으로 배치되었다.

화려한 외면이 아닌 단단한 내면