가상 환경
$ pip3 install virtualenv

$ mkdir ~/myproject				# 폴더 생성
$ cd ~/myproject
$ virtualenv aiffel				# aiffel 이라는 가상환경 생성
$ source aiffel/bin/activate	# 가상환경 aiffel 실행
$ (aiffel) pip list				# 외부 패키지 출력
$ (aiffel) pip install pandas	# pandas 설치
(aiffel)은 source aiffel/bin/activate를 정상적으로 실행되면 자동으로 생김

Flask
- Micro Web Framework
- Micro(마이크로) : 웹서비스를 구헝하는 최소한의 기능, 단순함, 확장 설계 가능
- Web(웹) : 인터넷 브라우저를 통해서 보고 있는 공간
- Framework(프레임워크) : 소프트웨어 개발에 있어 하나의 뼈대 역할
flask 시작하기
$ mkdir -p ~/aiffle/flask_app
$ pip install flask-ngrok- ngrok를 이용하여 공용 url을 할당받고 이를 통해 앱에 접속
$ vi ~/aiffel/flask_app/hello_flask.py- 텍스트 에디터를 해당 경로에 hello_flask.py 파일을 생성해라
<vi editor 내용>
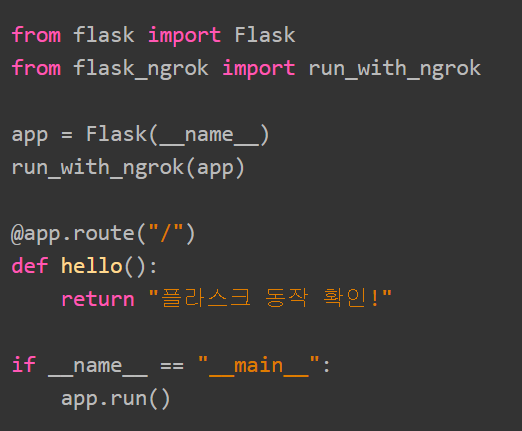
| vi editor 코드 | 해석 |
|---|---|
from flask import Flask | flask 패키지에서 Flask 모듈 가져오기 |
from flask_ngrok import run_with_ngrok | flask_ngrok 패키지에서 run_with_ngrok 모듈 가져오기 |
run_with_ngrok(app) | 앱이 실행될때 ngrok를 시작 |
app = Flask(__name__) | Flask 객체가 생성되어 app라는 변수에 저장 |
@app.route("/") | - 데코레이터(decorator) : 함수를 반환하는 함수 - hello()를 생행하게 설정 |
("/") | - root의 위치를 나타냄 - http://IP:(port number)/맨 뒤의 '/'를 의미 |
vi editor
- i : insert 모드 변환
- esc + :wq : 파일 저장 후 종료
(참고자료 : vim 단축키 정리)
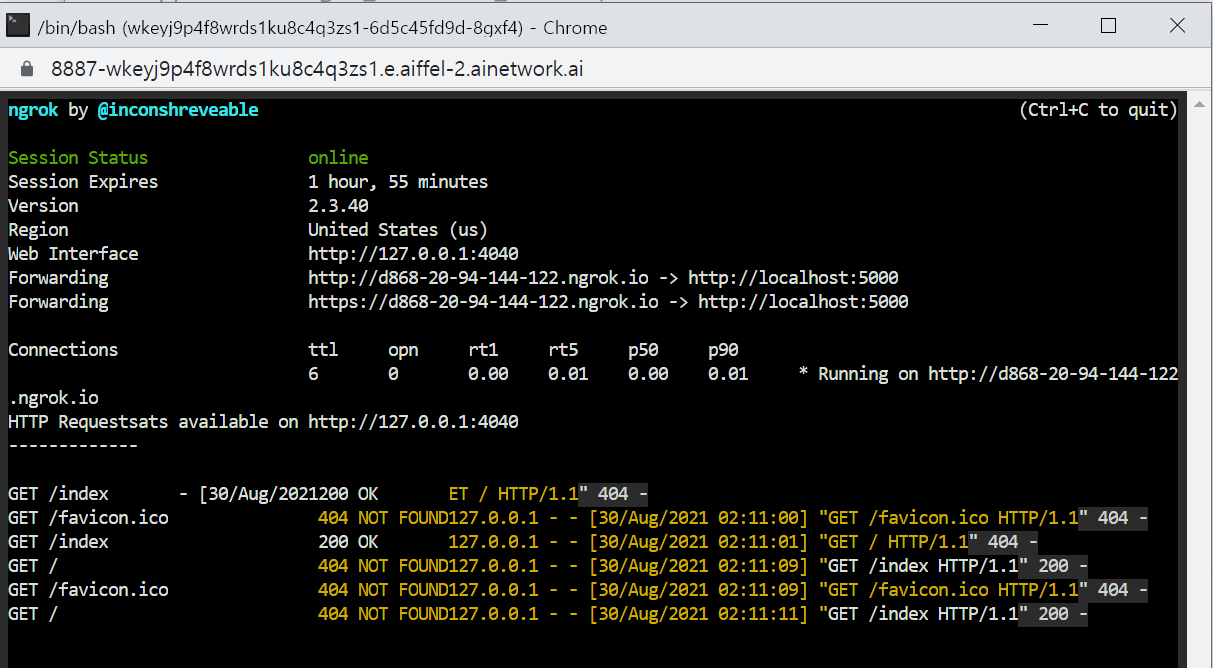
$ python ~/aiffel/flask_app/hello_flask.py- 생성한 파이썬 모듈 실행
<실행결과>

-
실행 때 마다 Forwarding이 주소가 바뀜
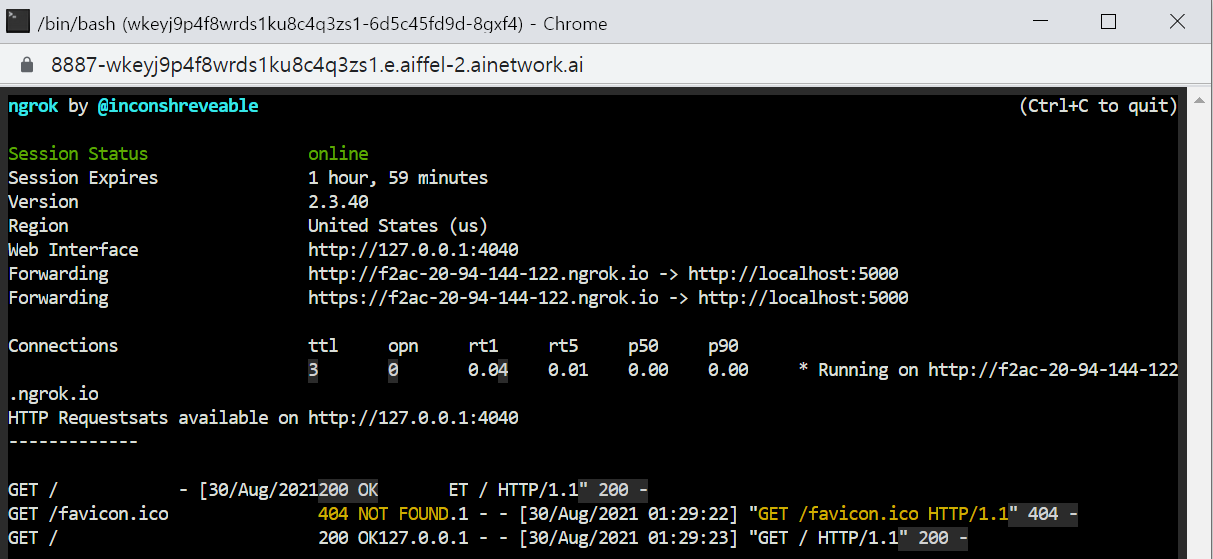
-
Forwarding의
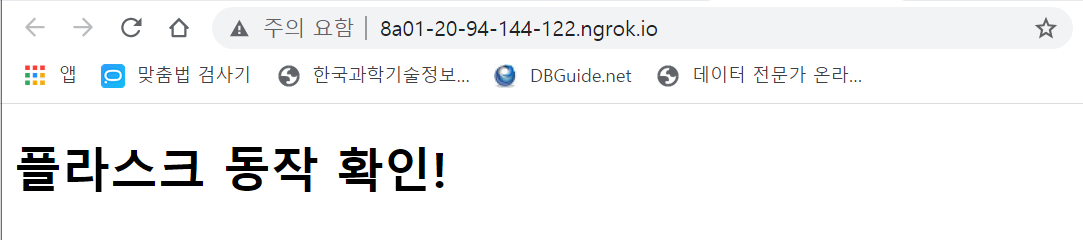
http://f2ac-20-94-144-122.ngrok.io를 클릭하면

-
HTML 문서 없이 파이썬으로만 웹 페이즈를 만들었으나 코드가 간단하여 가능했던 것.
-
실제로는 HTML을 활용하여 웹페이지 화면을 짜는 것이 효율적!!
플라스크(Flask) 프로젝트
-
프로젝트 = 하나의 웹 사이트
-
웹 페이지 = 앱(app)
-
위에서 root directory = flask_app
-
pyproject프로젝트 생성 후pyproject에 들어가기 -
static,templates폴더 생성
$ cd ~/aiffel/flask_app
$ mkdir pyproject		# 프로젝트 생성

$ cd ~/aiffel/flask_app/pyproject
$ mkdir static
$ mkdir templatestemplates폴더 내에 inde.html을 생성하기 위한 vi editor 실행 및 코드 입력
$ vi ~/aiffel/flask_app/pyproject/templates/index.html<!DOCTYPE HTML>
<html>
<head>
<title>Flask Project</title>
</head>
<body>
<h1>플라스크 동작 확인!</h1>
</body>
</html>index.html렌더링을 위한 app.py 생성 및 코드 입력
$ vi ~/aiffel/flask_app/pyproject/app.pyfrom flask import Flask, render_template
from flask_ngrok import run_with_ngrok
app = Flask(__name__)
run_with_ngrok(app)
@app.route('/')
def index():
return render_template('index.html') # index.html을 렌더링 해라!
# GET 방식
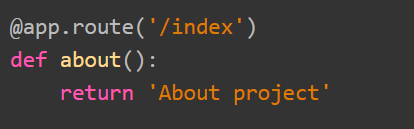
@app.route('/about')
def about():
return 'About project'
if __name__ == "__main__":
app.run()렌더링(Rendering)
- HTML, CSS 등을 브라우저에서 렌더링 엔진을 이용해서 그래픽 형태로 출력하는 과정
- app.py 실행
$ python ~/aiffel/flask_app/pyproject/app.py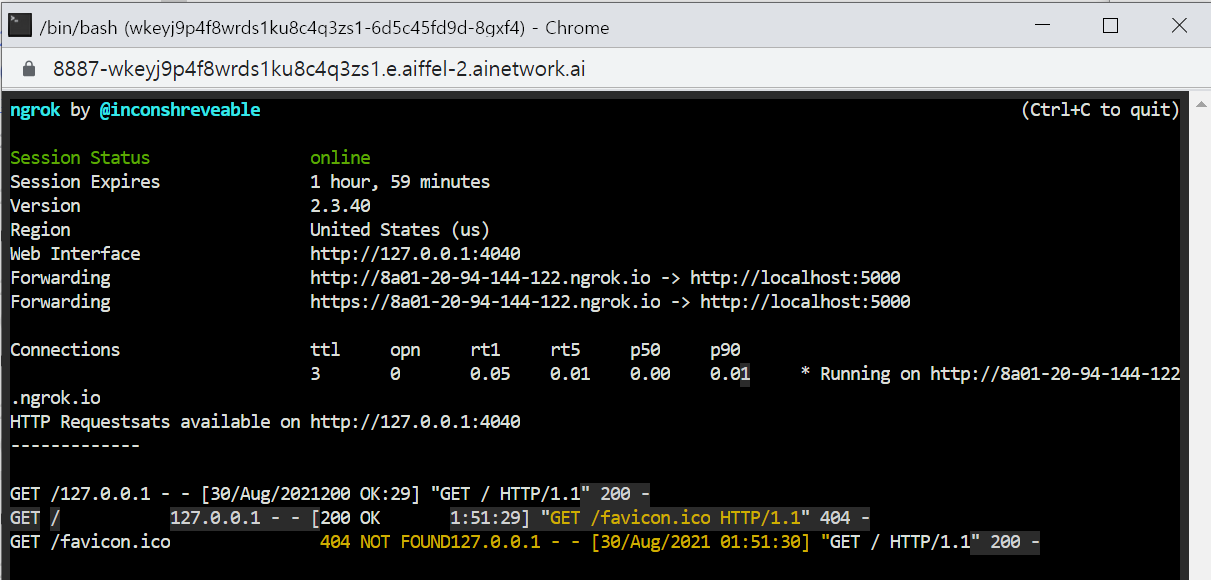
통신 규약
- 클라이언트에서 HTTP로 백 엔드와 통신하는 방법 : GET과 POST 방식
- GET : ex. 링크를 클릭할 때 사용
- POST : ex. 데이터가 있는 게시물을 올릴 때, 즉 이미지나 대량의 텍스트 데이터 같은 데이터를 담아 보낼 때 사용

| GET | POST |
|---|---|
 |  |
UI코드
- index.html 수정
- 삭제해서 새로 만들어도 됨
- 그러나 index2.html 만들려니까 권한 문제 발생함
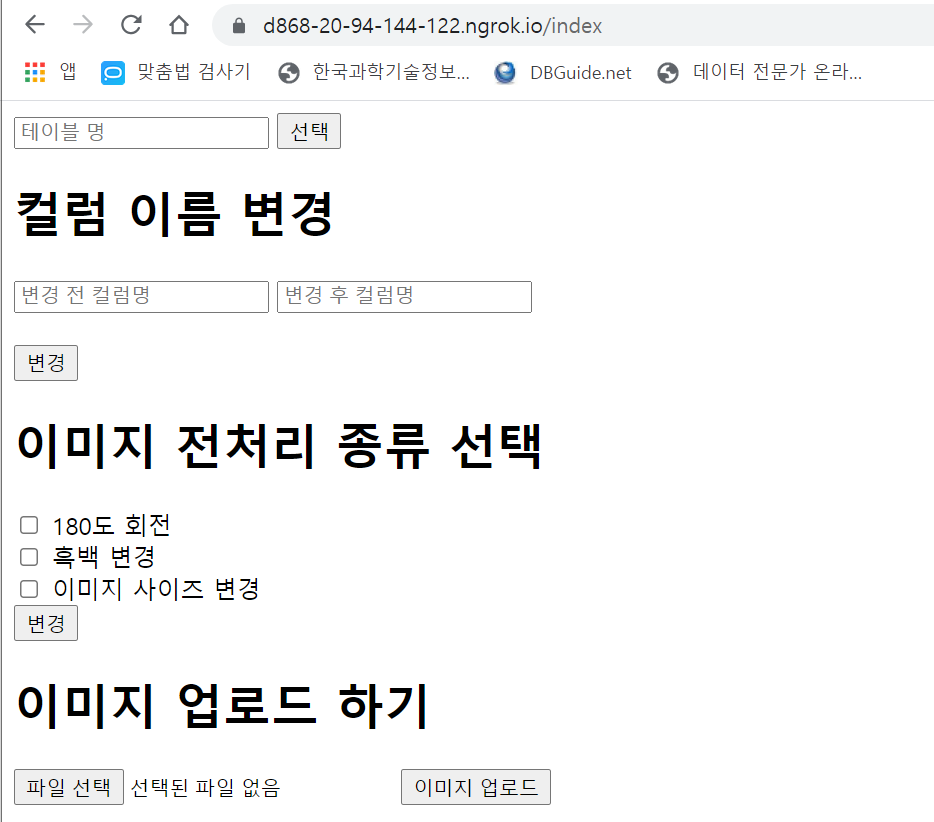
$ vi ~/aiffel/flask_app/pyproject/templates/index.htmltemplates 폴더에 있는 상태라고 vi index.html하여 내용을 수정해서 :wq를 하면 권한 문제 에러가 발생한다. (E212: Can't open file for writing - 권한 문제)
<html>

<head>
    <title>전처리 페이지 UI</title>
</head>

<body>

    <form action="/get_selected_table" method="POST" enctype="multipart/form-data">
        <input type="text" name="table_name" placeholder="테이블 명" required="required" />
        <button type="submit">선택</button>	# 선택 버튼을 구현
        {% if label %}
            <span>
                {{ label }}
            </span>
        {% endif %}

    </form>

  	# '컬럼 이름 변경' 부분
    <form action="/get_column_name_change" method="POST" enctype="multipart/form-data">
        <h1>컬럼 이름 변경</h1>
            <input type="text" name="before_column_name" placeholder="변경 전 컬럼명" required="required" />
            <input type="text" name="after_column_name" placeholder="변경 후 컬럼명"required="required" />
        <br>	# 줄 바꿈(= 엔터)
        <br>
        <button type="submit">변경</button>
    </form>		# form 블록의 끝을 의미

  	# 체크박스
    <form action="/get_image_pre_status" method="POST" enctype="multipart/form-data">
        <h1>이미지 전처리 종류 선택</h1>
        <input type="checkbox" name="pre_toggle_0">
        <span>180도 회전 </span>	# 레이아웃 나누기
        <br>
        <input type="checkbox" name="pre_toggle_1">
        <span>흑백 변경 </span>
        <br>
        <input type="checkbox" name="pre_toggle_2">
        <span>이미지 사이즈 변경 </span>
        <br>
        <button type="submit">변경</button>
    </form>

	# 이미지 파일 업로드
    <form action="/upload_image" method="POST" enctype="multipart/form-data">
        <h1>이미지 업로드 하기</h1>
        <input type="file" name="uploaded_image">
        <button>이미지 업로드</button>
        {% if label %}	# (JInja2 문법) label에 값이 들어오면 아래의 코드를 실행
            <span>
                {{ label }}
            </span>
        {% endif %}		# if문 종료
    </form>
</body>

</html>- app.py 수정(삭제해서 새로 만들어도 됨)
$ vi ~/aiffel/flask_app/pyproject/app.pyfrom flask import Flask, render_template, request
from flask_ngrok import run_with_ngrok
import os
app = Flask(__name__)
run_with_ngrok(app)
'''
File upload
'''
@app.route("/index")
def index():
return render_template('index.html')
# 컬럼명 바꾸기 Action
@app.route('/get_column_name_change', methods=['POST'])
def column_name_change():
# aft_column_name = request.form.values('after_column_name')
bef_column_name = request.form.get('before_column_name')
aft_column_name = request.form.get('after_column_name')
print(bef_column_name) # 콘솔창에 출력
print(aft_column_name)
return render_template('index.html') # render_template 안에 있는 'index.html'을 표시
# 체크박스 선택시 Action
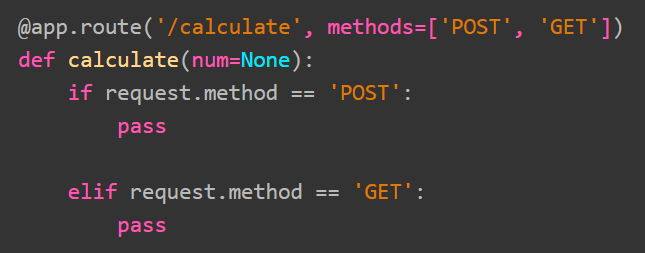
@app.route('/get_image_pre_status', methods=['POST'])
def image_preprocessing():
if request.method == 'POST': # HTML에서 POST전송이 오면 if문 실행
print("0 = ", request.form.get('pre_toggle_0'))
print("1 = ", request.form.get('pre_toggle_1'))
print("2 = ", request.form.get('pre_toggle_2'))
return render_template('index.html')
# 테이블 선택 button을 눌렀을 때 Action
@app.route('/get_selected_table', methods=["POST"])
def selected_table():
text = request.form.get('table_name') # HTML에서 table_name 이라는 name을 가진 UI 컴포넌트에 있는 데이터를 가져옴
print(text)
return render_template('index.html')
@app.route('/get_selected_table2', methods=["POST"])
def select_table2():
text = request.form.get('textbox')
return render_template('index.html', label=text)
# 이미지 파일 업로드
@app.route('/upload_image', methods=['POST'])
def upload_image_file():
if request.method == 'POST':
file = request.files['uploaded_image'] # HTML의 uploaded_image UI 컴포넌트에 파일을 가져옴
if not file: return render_template('index.html', label="No Files")
label = file
return render_template('index.html', label=label)
if __name__ == '__main__':
app.run()<실행 결과>
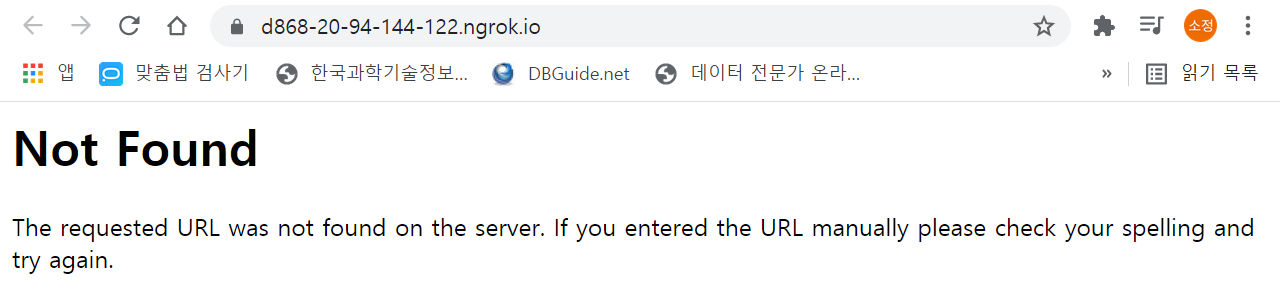
-
https://d868-20-94-144-122.ngrok.io/주소에 '/index' 추가
-
컴포넌트(Component) : 사용자가 재사용할 수 있는 구성요소
(참고자료 : UI 용어 컴포넌트 이름 소개)
HTML
- 태그(tag) :
<와>가 앞뒤로 있는 명령어- 시작 태크 :
<a>시작을 알림- ex)
<a href="http://naver.com"> - href : 속성
http://naver.com: 값
- ex)
- 종료 태그 :
</a>종료를 알림
- 시작 태크 :
- 엘리먼트(element) : HTML에서 시작 태그와 종료 태그로 이루어진 명령어들을 의미

버튼과 텍스트박스
버튼

-
HTML 코드 해석
-
<form action="/get_column_name_change" method="POST">코드 해석 action="/get_column_name_change"app.py에get_column_name_change라우팅 함수 실행method="POST"데이터 전달 방식 POST -
<input type="text" name="before_column_name" placeholder="변경 전 컬럼명" required="required" />코드 해석 name="before_column_name"파이썬에서 HTML의 UI 컴포넌트에 입력된 데이터를 가져올 때 사용하는 이름을 지정 placeholder="변경 전 컬럼명"입력 칸에 도움을 주는 텍스트를 넣음 -
<button type="submit">변경</button>코드 해석 button type="submitform 내부에서 일어난 내용의 전송 기능을 담당
-
-
FLASK 코드 해석
@app.route('/get_selected_table', methods=["POST"])
|코드|해석|
|---|---|
|'/get_selected_table'|HTML 코드에<form action="/get_selected_table" method="POST">부분이 FLASK에서 action="/get_selected_table" 을 라우팅하고 있는 파이썬 함수가 여기라는 것을 말함|
텍스트 입력

- HTML 코드 해석
|상위 CLASS|코드|해석|
|---|---|---|
|form|action="/get_column_name_change"|app.py에 get_column_name_change라고 라우팅 된 함수를 실행|
|input|name="before_column_name"|파이썬에서 HTML의 UI 컴포넌트에 입력된 데이터를 가져올 때 사용하는 이름을 지정|
|input|placeholder="변경 전 컬럼명"|입력 칸에 도움을 주는 텍스트를 넣음|
- FLASK 코드 해석
|코드|해석|
|---|---|
|'/get_column_name_change'|HTML 코드에서<form action="/get_column_name_change" method="POST">부분이 있습니다. 여기서action="/get_column_name_change"를 라우팅하고 있는 파이썬 함수가 여기라는 것을@app.route('/get_column_name_change', methods=["POST"])가 말하고 있는 것 입니다.|
체크박스

- HTML 코드 해석
|상위 CLASS|코드|해석|
|---|---|---|
|form|action="/get_image_pre_status"|app.py에 get_image_pre_status이라고 라우팅 된 함수를 실행|
|input|type="checkbox"|입력 타입을 체크 박스로 선택|
|input|name="pre_toggle_0"|파이썬에서 HTML의 UI 컴포넌트에 입력된 데이터를 가져올 때 사용하는 이름을 지정
-pre_toggle_0: 180도 회전
-pre_toggle_1: 흑백 변경
-pre_toggle_2: 이미지 사이즈 변경
- FLASK 코드 해석
|코드|해석|
|---|---|
|request.form.get('pre_toggle_0')|HTML에서 pre_toggle_0이라는 name을 가진 UI 컴포넌트에 있는 데이터를 가져옴|
이미지 파일 업로드

- HTML 코드 해석
|상위 CLASS|코드|해석|
|---|---|---|
|input|type="file"|입력 타입을 '파일(file)'로 지정|
|input|name="uploaded_image"|파이썬에서 HTML의 UI 컴포넌트에 입력된 데이터를 가져올 때 사용하는 이름을 지정|
||<span> {{ label }} </span>|label 값을 가져와서 span 안에 넣음|
- FLASK 코드 해석
|코드|해석|
|---|---|
|if not file: return render_template('index.html', label="No Files")|만약 파일이 선택되지 않았다면 'No Files'라는 텍스트를 return 값으로 label에 넣습니다|
|return render_template('index.html', label=file)|파일이 선택되었다면 return 값에 label 변수에 file을 넣어서 위 HTML 코드에서 {{ label }} 에 해당하는 코드에 자동으로 file에 대한 정보 텍스트가 들어가게 됩니다.|
이미지 전처리 페이지 만들기
$ vi ~/aiffel/flask_app/pyproject/templates/image.html- image.html
<html>

<head>
    <title>이미지 전처리 페이지</title>
</head>

    <body>

      	# 이미지 업로드 하기
        <form action="/image_preprocess" method="POST" enctype="multipart/form-data">
            <h1>이미지 업로드 하기</h1>
            <input type="file" name="uploaded_image">

            <h1>이미지 전처리 종류 선택</h1>
            <input type="checkbox" name="pre_toggle_0">
            <span>180도 회전 </span>
            <br>
            <input type="checkbox" name="pre_toggle_1">
            <span>흑백 변경 </span>
            <br>
            <input type="checkbox" name="pre_toggle_2" id="change_image_size_cb" onclick="setTextBoxShow()">
            <span>이미지 사이즈 변경 </span>

            <h1 id="size_header"style="display:none">이미지 사이즈 지정</h1>
                <input type="text" id="width_size" name="changed_width" placeholder="넓이(width)를 입력해주세요" onkeypress="onlyNumber()" style="display:none"/>
                <input type="text" id="height_size" name="changed_height" placeholder="높이(height)를 입력해주세요" onkeypress="onlyNumber()" style="display:none"/>
            <br>

            <script>	# HTRML 내에서 직접 정보를 처리하게 해줌
            function onlyNumber(){

                    if((event.keyCode<48)||(event.keyCode>57))

                       event.returnValue=false;

            }
            function setTextBoxShow() {
              var checkBox = document.getElementById("change_image_size_cb");
              if (checkBox.checked == true){
                width_size.style.display = "block";
                height_size.style.display = "block";
                size_header.style.display = "block";

              } else {
                width_size.style.display = "none";
                height_size.style.display = "none";
                size_header.style.display = "none";
              }
            }
            </script>	# HTRML 내에서 직접 정보를 처리 종료

            {% if label %}
                <span>
                    결과 저장 경로 :
                </span>
            <br>
                <span>
                    {{ label }}
                </span>
            <br>
            <br>
            {% endif %}
            <button type="submit">변경</button>
        </form>
    </body>
</html>
$ vi ~/aiffel/flask_app/pyproject/app_image.py- app_image.py
from flask import Flask, render_template, request
from flask_ngrok import run_with_ngrok
import os
from PIL import Image


app = Flask(__name__)
run_with_ngrok(app)


'''
이미지 처리 함수
'''
# 이미지 사이즈 변환 함수
def image_resize(image, width, height):
        return image.resize((int(width), int(height)))

# 이미지 180도 회전하는 함수
def image_rotate(image):
    return image.transpose(Image.ROTATE_180)

# 이미지 색공간을 흑백으로 변환
def image_change_bw(image):
    return image.convert('L')


'''
플라스크
'''
@app.route("/index")
def index():
    return render_template('image.html')

# 이미지 업로드 하기
@app.route('/image_preprocess', methods=['POST'])
def preprocessing():
    if request.method == 'POST':
        file = request.files['uploaded_image']
        if not file: return render_template('index.html', label="No Files")

        img = Image.open(file)	# PIL 패키지의 Image 모듈로 이미지 파일을 로드

        is_rotate_180 = request.form.get('pre_toggle_0')
        is_change_bw = request.form.get('pre_toggle_1')
        is_change_size = request.form.get('pre_toggle_2')

        if is_rotate_180 == 'on':	# chechbox가 'on'이면 이미지 회전함수 실행
            img = image_rotate(img)

        if is_change_bw == 'on':
            img = image_change_bw(img)

        if is_change_size == 'on':
            img = image_resize(img, request.form.get('changed_width'), request.form.get('changed_height'))

        img.save('result_image.png')	# 변환 결과 이미지 저장

        src_dir = os.path.dirname(os.path.abspath(__file__)) # 현재 실행 중인 파일이 있는 위치확인
        image_path = os.path.join(src_dir, 'result_image.png')	# 괄호 안의 두경로 합치기

        # 결과 리턴
        return render_template('image.html', label=image_path)


if __name__ == '__main__':
    app.run()
이미지 업로드

- HTML 코드 해석
|상위 CLASS|코드|해석|
|---|---|---|
|form|enctype=multipart/form-data|파일의 데이터를 전송하는 파일|
이미지 전처리 종류 선택

- HTML 코드 해석
|위치|코드|해석|
|---|---|---|
|fuction|onlyNumber()|이미지 width, height를 입력할 수 있는 text box에 숫자만 넣을 수 입력하게 해중|
|fuction|setTextBoxShow()|이미지 사이즈 변경' 체크박스에 체크가 되면 이미지 width, height를 입력할 수 있는 칸이 나오게 되는 코드|
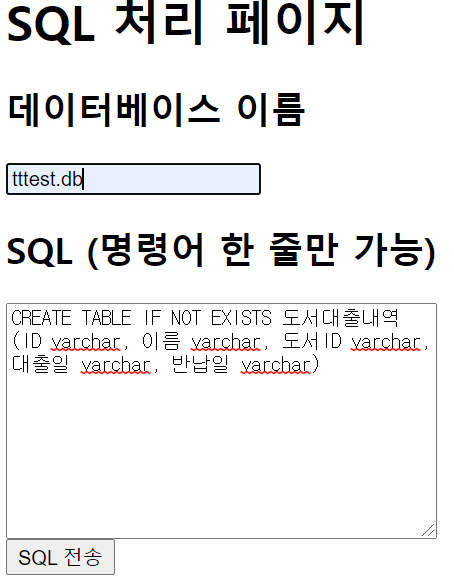
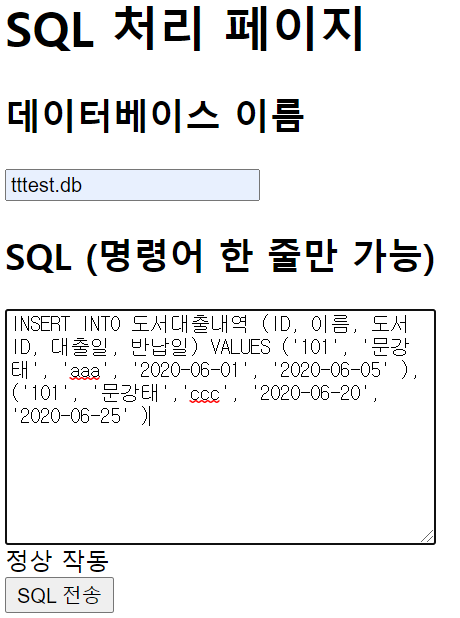
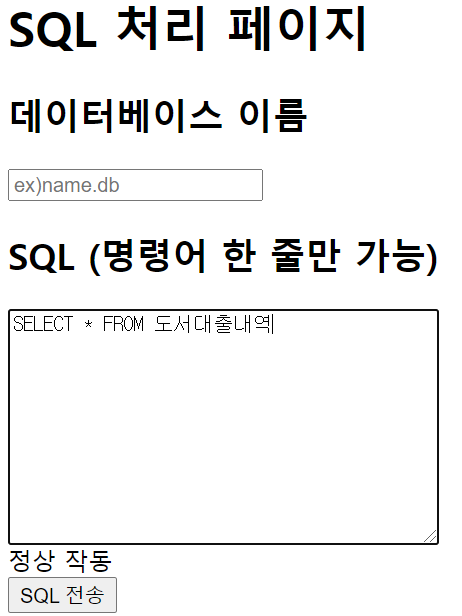
SQL 처리 페이지 만들기
$ vi ~/aiffel/flask_app/pyproject/templates/data.html	# data.html 생성
$ vi ~/aiffel/flask_app/pyproject/app_data.py 			# app_data.py 생성
$ python ~/aiffel/flask_app/pyproject/app_data.py # 앱실행<html>
<head>
<title>SQL 처리 페이지</title>
</head>
<body>
# 데이터 베이스 이름
<h1>SQL 처리 페이지</h1>
<form action="/dbsql" method="POST">
<h2>데이터베이스 이름</h2>
<span> <input type="text" name="db_name" placeholder="ex)name.db"> </span>
# SQL 입력
<h2>SQL (명령어 한 줄만 가능)</h2>
<textarea name="sql" cols="40" rows="10" placeholder="ex) SELECT * FROM table_name"></textarea>
<br>
{% if label %}
<span class="result_lable">
{% block content %}
{{ label }}
{% endblock %}
</span>
<br>
{% endif %}
<button type="submit">SQL 전송</button>
</form>
</body>
</html>from flask import Flask, render_template, request
from flask_ngrok import run_with_ngrok
import os
import sqlite3
import pandas as pd
app = Flask(__name__)
run_with_ngrok(app)
'''
DB 함수
'''
def get_db(db_name):
return sqlite3.connect(db_name) # sqlite3 연결
def sql_command(conn, command): # SQL을 이용하여 DB 명려을 내리는 함수
try :
conn.execute(command)
conn.commit()
command = command.lower() # 명령어를 소문자로 변환
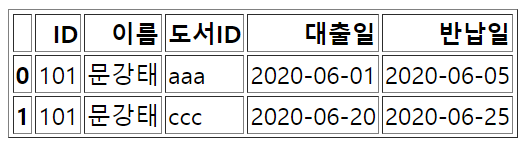
if "select" in command: # SQL쿼리에 select가 있다면 아래코드 실행
command_split = command.split(" ") # 빈칸 기준 split
select_command = "SELECT * FROM " + command_split[command_split.index("from")+1]
df = pd.read_sql(select_command, conn, index_col=None)
html = df.to_html() # dataframe을 HTML 형식으로 변환
conn.close()
return html, 1 # 표 모양의 HTML코드가 반환
conn.close()
return True, 1
except Exception as exception:
conn.close()
return False, exception
'''
File upload
'''
@app.route("/index")
def index():
return render_template('data.html')
# SQL 입력
@app.route('/dbsql', methods=['POST'])
def sql_processing():
if request.method == 'POST':
con = get_db('/' + request.form.get('db_name')) # con에 DB연결 객체 생성
sql = request.form.get('sql')
result_sql, excep = sql_command(con, sql)
if result_sql == False :
return render_template('data.html', label="비정상" + str(excep))
elif result_sql == True :
return render_template('data.html', label="정상 작동")
else :
result_sql = "<html><body> " + result_sql + "</body></html>"
return result_sql
if __name__ == '__main__':
app.run()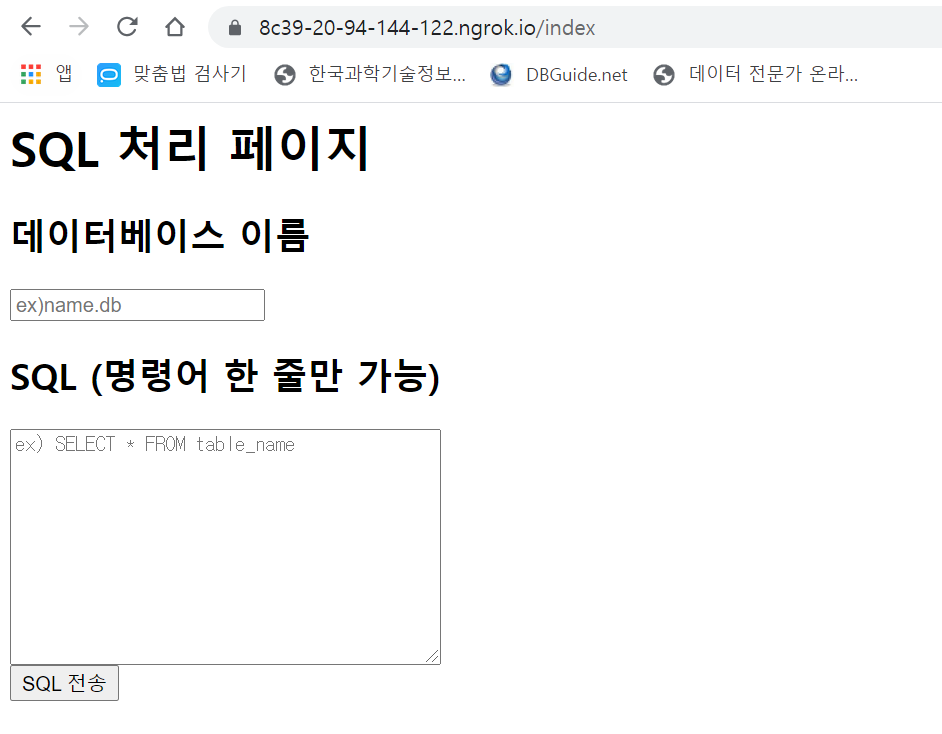
- FLASK 코드 해석
|코드|해석|
|---|---|
|command_split = command.split(" ")| 출력 :['SELECT', '', 'FROM', 'table']]
|select_command| "SELECT FROM " + "table" 이 되어 결과로 "SELECT FROM table"가 됨|
|df = pd.read_sql(select_command, conn, index_col=None)|- read_sql : select_command에 있는 SQL문을 DB에 넣음
- df에는 DB 결과값이 들어감|
데이터베이스 이름

SQL 입력
- HTML 코드 해석
|위치|코드|해석|
|---|---|---|
|textarea|name="sql"|flask에서 인식할 수 있는 이름|
|textarea|cols="40"|한 줄에 최대 40개가 가능|
|textarea|rows="10"|글자 줄은 10줄|
- FLASK 코드 해석
|코드|해석|
|---|---|
|result_sql = sql_command(con, sql)|HTML에서 textarea에 입력된 SQL문을 넣어 return값을 True/False로 반환|
|return render_template('data.html', label="비정상")|result_sql == False이면 HTML로 전달하는 label값을 "비정상"으로 반환|
결과물
- 이미지 전처리 페이지
-입력으로 사진 하나를 넣습니다.
-180도 회전과 이미지를 1920, 1080으로 resize 해봅니다.


하지만 cloud 내에 실제 결과물은 없었음
- SQL 처리 페이지
- 데이터베이스 이름을 지정합니다(자유).
- 테이블을 생성합니다(Column 5개, row 2개).