[1] 버튼
- state : 화면을 갱신해주는 특별한 친구로 제어하는 방법!!!
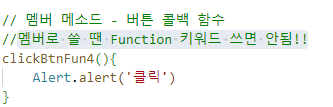
- 버튼 콜백용 메소드는 전역보다는 이 컴포넌트 클래스의 멤버로 존재하는 것을 권장
--> 멤버 함수로 만들어 제어함(멤버로 쓸 땐 Function 키워드 쓰면 안됨!!)
--> JS 클래스 안에서 멤버접근은 반드시 this. 키워드 필요!

메인
- 이미지응 state로 제어할 땐 주소만 쓰는게 아니고
require("./image/moana02.jpg")} 다 써줘야함!!!
//타입스크립
//javascript + static type
import React, {Component} from "react";
import {View, Text, Button, StyleSheet, Alert, Image} from "react-native";
class MainComponent extends Component {
//멤버변수 - 프로퍼티
// let, const등 멤버변수는 키워드 쓰면 안됨
// msg : string = "Hello RN"
//화면 갱신에 영향을 주는 아주 특별한 멤버변수
//state
//이 친구는 무조건 객체로 만든다
state : React.ComponentState = {
msg : "Hello RN",
img : require("./image/moana01.jpg"),
//이미지 변경할 땐 require 통으로 가지고 있어야함
}
render(): JSX.Element { //리턴 타입
return (
<View style={style.root}>
{/* clickBtnFun() 이렇게 쓰면 안됨 - 호출이라서
화면을 만들자마자 발동해버림*/}
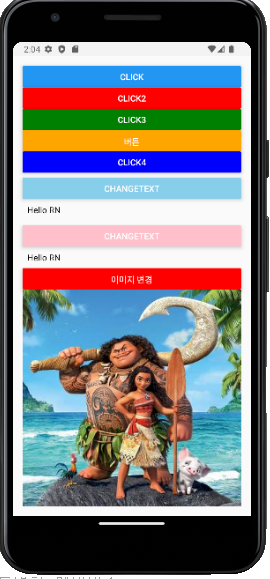
<Button title="click" onPress={clickBtnFun}></Button>
<Button title="click2" color='red' onPress={clickBtnFun2}></Button>
<Button title="click3" color='green' onPress={clickBtnFun3}></Button>
{/* 버튼 콜백용 함수를 변도의 위치에 작성하지 않고 바로 지정 가능 */}
<Button title="버튼" color='orange' onPress={ () => Alert.alert('클릭') }></Button>
{/* 버튼 콜백용 메소드는 전역보다는 이 컴포넌트 클래스의 멤버로 존재하는 것을 권장 */}
{/* JS 클래스 안에서 멤버접근은 반드시 this. 키워드 필요!!!! */}
<Button title="click4" color='blue' onPress={this.clickBtnFun4}></Button>
{/* 버튼 클릭 시에 텍스트 컴포넌트의 글씨 변경 */}
<View style={{marginTop:8}}>
<Button title="changeText" color='skyblue' onPress={this.changeText2}></Button>
{/* Text캄포넌트의 글씨가 변경되고자 한다면...
글씨가 별도의 변수로 저장되어 있어야함 : 멤버 변수로 */}
<Text style={style.text}>{this.state.msg}</Text>
</View>
<View style={{marginTop:8}}>
<Button title="changeText" color='pink' onPress={this.changeMsg}></Button>
{/* Text캄포넌트의 글씨가 변경되고자 한다면...
글씨가 별도의 변수로 저장되어 있어야함 : 멤버 변수로 */}
<Text style={style.text}>{this.state.msg}</Text>
</View>
{/* 이미지 변경 */}
<Button title="이미지 변경" color='red' onPress={this.changeImg}></Button>
<Image source={this.state.img} style={style.img}></Image>
</View>
)
}//
// 멤버 메소드 - 버튼 콜백 함수
//멤버로 쓸 땐 Function 키워드 쓰면 안됨!!
clickBtnFun4(){
Alert.alert('클릭')
}
changeText2 = () => {
this.state.msg = "안녕"
//변수 값이 변경되어도 화면 갱신이 이루어지지않음 -> 아무변수나 바꾸면 안되니까
//억지로 화면을 다시 그려내는 [render()를 재호출] 기능
this.forceUpdate() // 강제로 화면 갱신 - 권장히지않음, 화면 전체를 랜더링 하는거라서
//그래서 화면 갱신에 영향을 주는 아주 특별한 변수를 사용해야함
//그 변수는 모든 Component가 기본으로 가지고 있는 변수명
//state!
}
changeMsg = () => {
//화면에 영향을 미치는 아주 특별한 변수 state의 값 변경
// this.state.msg = "nice" //이렇게 변경하면 화면 갱신 안됨
//자동 화면 갱신이 되려면 반드시 setState() 메소드로 변경해야함
this.setState({msg : "hi"})
}
changeImg = () => {
this.setState({img : require("./image/moana02.jpg")})
}
}//
//전역의 위치
// 1) 선언적 함수
function clickBtnFun(){
//경고창 보여주기
Alert.alert('PESSED BUTTON')
}
// 2) 익명함수
let clickBtnFun2 = function(){
Alert.alert('PESSED BUTTON2')
}
// 3) 화살표 함수
let clickBtnFun3 = () => Alert.alert('PESSED BUTTON3')
const style = StyleSheet.create({
root : {
flex : 1,
padding : 16,
},
text : {
color : 'black',
padding : 8,
},
img : {
flex : 1,
width : '100%',
}
})
export default MainComponentindex.js
/**
 * @format
 */

import {AppRegistry} from 'react-native';
import App from './App';
import {name as appName} from './app.json';
import MainComponent from './MainComponent';

AppRegistry.registerComponent(appName, () => MainComponent);
[2] 텍스트 인풋
실습
-
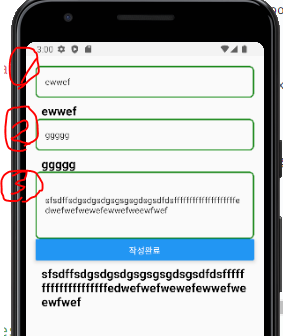
TextInput에 글씨를 작성할 때 마다 그 글씨를 보여주기
-
텍스트 인풋 입력에 사용한 소프트키보드 완료 버튼을 눌렀을 때 글씨 보여주기
-
버튼 클릭 시 써있는 글씨를 텍스트 뷰에 보여주기
editText에 값을 일반 변수에 넣고 버튼을 클릭하면 state 변수로 보내서 textView 갱신 해보기
🔨 이벤트들 확인하는 곳
https://reactnative.dev/docs/textinput
import React, {Component} from "react";
import {View, Button, Text, TextInput, StyleSheet, Alert} from 'react-native'

export default class MainComponent extends Component {

    //화면 갱신에 영향을 주는 특별한 멤버변수
    state: React.ComponentState = {
        message : "",
        msg : "",
        text : "",
    }

    //화면에 영향이 없는 일반 변수
    inputValue : String = ""

    render(): JSX.Element {

        return (

            <View style={style.root}>

                {/* 1) TextInput은 스타일이 없으면 아무것도 그리지않는다, 존재가 안보임 */}
                <TextInput onChangeText={this.changeText} style={style.textInput}></TextInput>

                {/* TextInput에 글씨를 작성할 때 마다 그 글씨를 보여주는 텍스트 뷰 */}
                <Text style={style.text}>{this.state.message}</Text>

                {/* 2) 텍스트 인풋 입력에 사용한 소프트키보드 완료 버튼을 눌렀을 때 글씨 보여주기 */}
                <TextInput onSubmitEditing={this.submitText} style={style.textInput}></TextInput>
                <Text style={style.text}>{this.state.msg}</Text>

                {/* 3) 버튼 클릭 시 써있는 글씨를 텍스트 뷰에 보여주기*/}
                {/* 기존 GUI와 방법론이 완전 다름 */}
                <TextInput multiline={true} numberOfLines={5} onChangeText={this.aaa} style={style.textInput}></TextInput>
                <Button onPress={this.clickBtn} title="작성완료"></Button>
                <Text style={style.text}>{this.state.text}</Text>


            </View>

        )

    }

    //멤버 메소드로
    //글씨 변경때마다 반응하는 콜백 메소드
    // => 파라미터로 서있는 글씨가 전달됨
    changeText = ( value:String ) => {
        //텍스트 컴포넌트가 보여주는 state 변수값을 변경
        // onSubmitEditing =콜백=> ({nativeEvent: {text, eventCount, target}}) => void
        this.setState({message : value})
    }

    //소프트 키보드 완료버튼 선택했을 때 반응하기
    submitText = (event : any) => { //파라미터로 스트링이 아니라 이벤트 객체가 온다
        //타입이 명시 된거 없으면 any 써라
        let value = event.nativeEvent.text
        this.setState({msg : value})
    }

    //3. 텍스트 인풋 컴포넌트의 글씨가 변경될 때 마다 그 값을 일반변수에 저장하는 메소드
    aaa = (value : String) => {
        //일반변수에 저장
        this.inputValue = value //일반 변수니까 set이런거 필요없이 저장
    }

    //버튼 클릭 이벤트 - 일반 변수값을 텍스트 뷰가 보여주는 특별한 변수에 대입
    clickBtn = () => this.setState({text : this.inputValue})

}


//스타일 객체 생성
const style = StyleSheet.create({
    root : {flex : 1, padding:16},
    textInput : {
        borderWidth : 2,
        borderColor : 'green',
        borderRadius : 8,
        paddingLeft : 16,
        paddingRight : 16,
    },
    text : {
        color : 'black',
        fontSize : 20,
        marginTop : 8,
        fontWeight : 'bold',
        paddingLeft : 10,
        paddingRight : 10,
    },
})
보조기억장치