참고블로그 http://kimjmin.net/2022/07/2022-07-seoul-metro-v3-1/
그전에 엘라스틱은 정상적으로 연결된것 같았지만 다음과 같이 키바나 연결이 불가했다. 띠용?
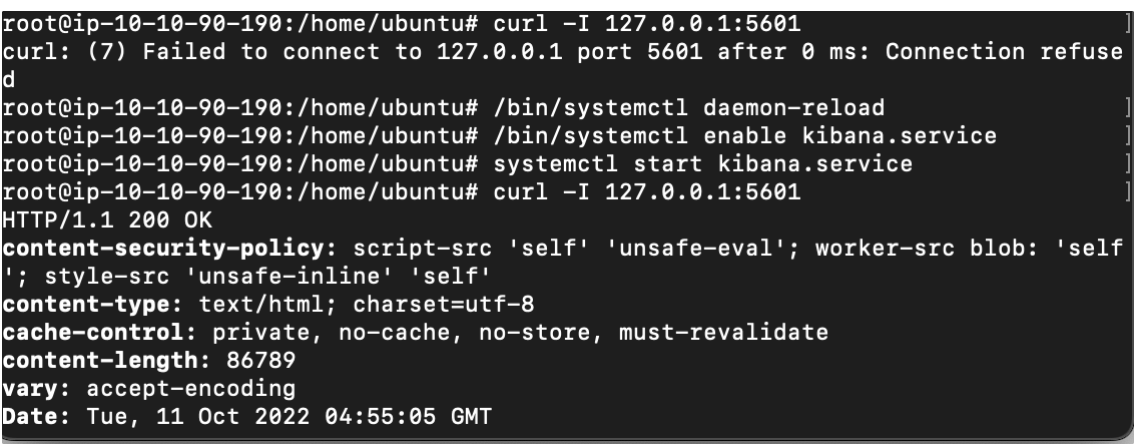

혹시나 해서 구글링하다 위 코드를 쳐보니 다시 정상적으로 접속할 수 있었다. 나이스.
주소 https://soyoung-new-challenge.tistory.com/56
csv파일 색인
1. 색인이란?
Kibana 의 Data Visualizer 의 파일 업로드 기능을 이용해서 색인을 해본다. 근데 색인이란 무엇인가?
[동사] 색인 (indexing) : 데이터가 검색될 수 있는 구조로 변경하기 위해 원본 문서를 검색어 토큰들으로 변환하여 저장하는 일련의 과정입니다. 이 책에서는 색인 또는 색인 과정이라고 표기합니다.
[명사] 인덱스 (index, indices) : 색인 과정을 거친 결과물, 또는 색인된 데이터가 저장되는 저장소입니다. 또한 Elasticsearch에서 도큐먼트들의 논리적인 집합을 표현하는 단위이기도 합니다. 이 책에서는 인덱스라고 표기합니다.
검색 (search) : 인덱스에 들어있는 검색어 토큰들을 포함하고 있는 문서를 찾아가는 과정입니다.
질의 (query) : 사용자가 원하는 문서를 찾거나 집계 결과를 출력하기 위해 검색 시 입력하는 검색어 또는 검색 조건입니다. 이 책에서는 질의 또는 쿼리라고 표현합니다.

키비나 공홈 : https://esbook.kimjmin.net/02-install/2.1
2. 색인해보기
Machine Learning 메뉴에서 File 을 선택


시간이 굉장히 많이 소요됨. 에러인가?
결국 새롭게 인스턴스를 파서 연결할 수 있었다.

Dev Tools 에서 데이터가 제대로 들어갔는지 확인?

똑같이 치니까 되긴 되는듯하다.
2-1 **seoul-metro-station-info 매핑 설정**
데이터는 잘 들어갔지만 매핑을 손보아야 합니다. seoul-metro-station-info 인덱스를 만들면서 매핑을 아래와 같이 추가한다.
근데 매핑이란??
PUT seoul-metro-station-info
{
  "mappings": {
    "properties": {
      "geo": {
        "properties": {
          "addres_road": { "type": "text" },
          "address_land": { "type": "text" },
          "latitude": { "type": "float" },
          "longitude": { "type": "float" },
          "phone": { "type": "text" },
          "sigungu_code": { "type": "keyword" },
          "sigungu_name": { "type": "keyword" },
          "location": { "type": "geo_point" }
        }
      },
      "line": {
        "properties": {
          "name": { "type": "keyword" },
          "name_sub": { "type": "keyword" },
          "num": { "type": "byte" },
          "station_seq": { "type": "byte" }
        }
      },
      "station": {
        "properties": {
          "code": { "type": "short" },
          "fr_code": { "type": "keyword" },
          "name": { "type": "keyword" },
          "name_chc": { "type": "keyword" },
          "name_chn": { "type": "keyword" },
          "name_en": { "type": "text" },
          "name_full": { "type": "keyword" },
          "name_jp": { "type": "keyword" }
        }
      }
    }
  }
}
필드 구조 정리를 위한 ingest pipeline
루트에 있는 필드들을 geo, line, station 필드의 하위 필드로 적절하게 나누어 저장을 할 것입니다. seoul-metro-station-info-temp 인덱스의 도큐먼트들을 seoul-metro-station-info 로 재색인 할 때 사용할 ingest pipeline 을 다음과 같이 입력합니다.
PUT _ingest/pipeline/seoul-metro-station-pipe
{
"processors": [
{ "set": { "field": "_id", "value": "{{station_code}}" } },
{ "set": { "field": "geo.location.lon", "value": "{{geo_longitude}}" } },
{ "set": { "field": "geo.location.lat", "value": "{{geo_latitude}}" } },
{ "convert": { "field": "geo.location.lon", "type": "float" } },
{ "convert": { "field": "geo.location.lat", "type": "float" } },
{ "split": { "field": "station_name", "separator": "\\|" } },
{ "split": { "field": "line_name_sub", "separator": "\\|" } },
{"rename": { "field": "geo_addres_road", "target_field": "geo.addres_road" } },
{"rename": { "field": "geo_address_land", "target_field": "geo.address_land" } },
{"rename": { "field": "geo_latitude", "target_field": "geo.latitude" } },
{"rename": { "field": "geo_longitude", "target_field": "geo.longitude" } },
{"rename": { "field": "geo_phone", "target_field": "geo.phone" } },
{"rename": { "field": "geo_sigungu_code", "target_field": "geo.sigungu_code" } },
{"rename": { "field": "geo_sigungu_name", "target_field": "geo.sigungu_name" } },
{"rename": { "field": "line_name", "target_field": "[line.name](http://line.name/)" } },
{"rename": { "field": "line_name_sub", "target_field": "line.name_sub" } },
{"rename": { "field": "line_num", "target_field": "line.num" } },
{"rename": { "field": "line_station_seq", "target_field": "line.station_seq" } },
{"rename": { "field": "station_code", "target_field": "station.code" } },
{"rename": { "field": "station_fr_code", "target_field": "station.fr_code" } },
{"rename": { "field": "station_name", "target_field": "[station.name](http://station.name/)" } },
{"rename": { "field": "station_name_chc", "target_field": "station.name_chc" } },
{"rename": { "field": "station_name_chn", "target_field": "station.name_chn" } },
{"rename": { "field": "station_name_en", "target_field": "station.name_en" } },
{"rename": { "field": "station_name_jp", "target_field": "station.name_jp" } },
{"rename": { "field": "station_name_full", "target_field": "station.name_full" } }
]
}
Reindex
POST _reindex
{
  "source": {
    "index": "seoul-metro-station-info-temp"
  },
  "dest": {
    "index": "seoul-metro-station-info",
    "pipeline": "seoul-metro-station-pipe"
  }
}**데이터 확장을 위한 스크립트 작업**

쿼리 시점에서 timestamp 필드값에서 요일과 시각 정보를 만드는 것 보다 미리 별도의 시각값과 요일값 필드를 만들어 각 도큐먼트에 넣어 두는 것이 성능이나 자원 활용 면에서 여러가지로 유용합니다. timestamp 필드로부터 요일과 시각 정보를 추출해서 저장하는 스크립트를 만들고 _scripts에 hour_and_week 라는 이름으로 미리 저장을 한다.
PUT _scripts/hour_and_week
{
  "script": {
    "lang": "painless",
    "source": """def ts=ctx[params['dateTimeField']];
def sdf=new SimpleDateFormat("yyyy-MM-dd'T'HH:mm:ss.SSS");
def date=sdf.parse(ts);
def cal=Calendar.getInstance();
cal.setTime(date);

ctx[params['hourOfDayField']]=cal.get(Calendar.HOUR_OF_DAY);

def dowNum=cal.get(Calendar.DAY_OF_WEEK)-1;
def dowEn=["Sun","Mon","Tue","Wed","Thu","Fri","Sat"][dowNum];
def dowKr=["일","월","화","수","목","금","토"][dowNum];

ctx[params['dayOfWeekField']]=["num":dowNum, "en":dowEn, "kr":dowKr];"""
  }
}
스크립트 테스트 파이프라인 만들기
PUT _ingest/pipeline/temp_hourAndWeek
{
  "processors": [
    {
      "script": {
        "id": "hour_and_week",
        "params": {
          "dateTimeField": "timestamp",
          "hourOfDayField": "hour_of_day",
          "dayOfWeekField": "day_of_week"
        }
      }
    }
  ]
}
Enrich 파이프라인
승하차인원 집계 로그 파일이 색인될 때 앞서 만든 seoul-metro-station-info인덱스의 정보를 가져와 조인 할 수 있도록 enrich 프로세서를 포함하는 인제스트 파이프라인을 만든다.
먼저 enrich policy 를 만들어야 합니다. seoul-metro-station-info 인덱스에서 station.code
필드와 일치하는 도큐먼트를 가져와 병합하는 seoul-metro-info_policy를 만들고 활성(_execute)
PUT /_enrich/policy/seoul-metro-info_policy
{
  "match": {
    "indices": "seoul-metro-station-info",
    "match_field": "station.code",
    "enrich_fields": [ "line", "station", "geo" ]
  }
}

POST /_enrich/policy/seoul-metro-info_policy/_execute
방금 만든 seoul-metro-info_policy 의 enrich 프로세서를 포함하는 인제스트 파이프라인을 만들고 문서를 테스트 해 봅니다.
PUT _ingest/pipeline/seoul-metro-logs-pipe
{
  "processors": [
    {
      "enrich": {
        "policy_name": "seoul-metro-info_policy",
        "field": "station_code",
        "target_field": "info"
      }
    }
  ]
}

POST _ingest/pipeline/seoul-metro-logs-pipe/_simulate
{
  "docs": [
    {
      "_source": {
        "@timestamp": "2015-01-01T05:00:00.000+09:00",
        "station_code": 150,
        "people_in": 441,
        "people_out": 392
      }
    }
]**enrich, hour_and_week, date 파이프라인**
이제 앞에서 만든 enrich 프로세서와 hour_and_week 스크립트, 그리고 그 외 필요한 프로세서들을 포함하는 seoul-metro-logs-pipe 파이프라인을 만듭니다. 앞에 만든 파이프라인과 이름이 중복되어도 덧씌워지기 때문에 상관 없습니다
PUT _ingest/pipeline/seoul-metro-logs-pipe
{
  "description": "Ingest pipeline for seoul-metro-logs-%{+YYYY} index",
  "processors": [
    {
      "enrich": {
        "policy_name": "seoul-metro-info_policy",
        "field": "station_code",
        "target_field": "info"
      }
    },
    {
      "script": {
        "id": "hour_and_week",
        "params": {
          "dateTimeField": "timestamp",
          "hourOfDayField": "hour_of_day",
          "dayOfWeekField": "day_of_week"
        }
      }
    },
    { "rename": { "field": "info.geo.sigungu_name", "target_field": "geo.sigungu_name" } },
    { "rename": { "field": "info.geo.sigungu_code", "target_field": "geo.sigungu_code" } },
    { "rename": { "field": "info.geo.location", "target_field": "geo.location" } },
    { "rename": { "field": "info.station", "target_field": "station" } },
    { "rename": { "field": "info.line", "target_field": "line" } },
    { "date": { "field": "timestamp", "formats": [ "ISO8601" ], "timezone" : "Asia/Seoul" } },
    { "remove": { "field": [ "info", "station_code", "timestamp" ] } }
  ]
}
에러발생…

해결,,
에러코드를 검색하니까 날짜와 관련된 것이더라… 생각해보니까 동영상에 @를 빼던데 따라하니까 해결됐다. 사실 @를 왜 넣는지도 모르겠다..그리고 자바코드와 상관은 없어보이지만,,그래도 했다.


**seoul-metro-%{+YYYY}.logs.csv 색인**
**seoul-metro-station-info 매핑 설정**
이제 seoul-metro-logs* 형식을 가진 인덱스가 색인될 때 자동으로 매핑을 적용할 인덱스 템플릿을 만들겠습니다.
노리설치 = 이것도 한참찾았다..
https://www.elastic.co/guide/en/elasticsearch/plugins/6.4/analysis-nori.html 공홈
https://anygyuuuu.tistory.com/m/13 블로그 ← 훨씬 자세히 설명됨.
curl -XPOST "3.34.20.151:9200/_analyze?pretty" -H 'Content-Type: application/json' -d' {"analyzer":"nori", "text":"우리는 차를 살 수 있을까"}’


야호!!! 성공적으로 나온다.

강의영상에서도 nori가 설치되지 않아 이렇게 에러가 났는데 설치 후에

정상적으로 된다!! ㅎㅎ

지정한 템플릿에서 매핑이 만들어잔다.
**logstash 필터 설정**
과거 데이터, 커스텀하게 만들 데이터는 로그스태시가 아직 편하다?
conf파일이란?

아무튼 그렇다. conf파일을 하나 만든다


역시 순순히 될리가 없다. 찾아보니까 vscode를 깐건가 설마?

—> 나는 aws로 es를 설치해서 저 사람과 동일한 환경이 아니여서 vscode로 어떻게 하는거지 한참고민했는데 같은 팀원이 도커로 깔아서 가능하단다,.,,그래서 결국 vim에디터를 이용해서 md파일을 만들기로 한다.
input {
  file {
    path => "/Users/kimjmin/elastic/source/seoul-metro/seoul-metro-*.logs.csv"
    start_position => "beginning"
    sincedb_path => "/dev/null"
  }
}

filter {
# csv 파싱
  csv {
    source => "message"
    skip_header => true
    columns => [ "timestamp", "station_code", "people_in", "people_out" ]
  }
# timestamp 필드로부터 year 값 추출.
  mutate {
    copy => { "timestamp" => "year" }
  }
  mutate {
    split => { "year" => "-" }
  }
  mutate {
    replace => { "year" => "%{[year][0]}" }
  }
# 숫자 필드 타입 변경
  mutate {
    convert => {
      "station_code" => "integer"
      "people_in" => "integer"
      "people_out" => "integer"
      "year" => "integer"
    }
  }
# 사용하지 않는 필드 삭제
  mutate {
    remove_field => ["@version", "event", "log", "host", "message"]
  }
}

output {
# stdout { }
  elasticsearch {
    cloud_id => "seoul-metro-test:YXNpYS1ub3J0aGVhc3QzLmdj..."
    cloud_auth => "ingest:password"
    index => "seoul-metro-logs-%{[year]}"
    pipeline => "seoul-metro-logs-pipe"
  }
}


권한 설정을 바꿔봤지만 안 된다.
/usr/share/elasticsearch/metro
명령어를 다르게 햇더니 된다..ㅜ

그 다음에엔
Conf 파일을 만들어야한다…
conf파일?config파일이 무엇이고 왜 안 만들어야하며, 어떤 기능을 하는지는 모르지만 일단 만들자.
강의영상에서는 vscode로 만들던데, 이해가 잘 안 되는 부분이다. 파일 만드는것은 vim으로 할 수 있으니까 만들어본다.
오류 해결 방법
- /home/ubuntu 에서 vim ~.conf를 생성한다.
- 해당 위치에 생성된 파일을 /usr/share/logstash/bin/로 옮긴다. = sudo mv 옮길파일 옮길위치
- /home에서 /usr/share/logstash/bin/logstash -f 생성한파일명.conf를 실행한다.
- conf파일에서 맨밑에 주석처리를 해제해야 보인다.

주석처리를 안 하면 위와 같이 과정을 확인할수있지만 데이터가 너무 많아서 터미널에 렉이 발생함..

count를 하면 실시간으로 색인되는 숫자를 확인할 수 있다.