
시작하며
안녕하세요.
저는 얼마전 전 직장 동료가 이직한 당근마켓에 초대를 받아 다녀왔습니다.
사무실이 흡사 카페라도 생각될 정도로 인테리어가 휼륭하더라구요.
사무실의 분위기와 직접 일하는 모습을 보니 왜 다들 당근마켓을 가고싶어하는 지 알게되었습니다.

한 눈에 봐도 인테리어가 이쁘다는 것을 알 수가 있습니다.
사무실 구경도하고 장비 구경도하고 구경만으로도 너무 재미있는 시간을 보냈습니다.
그리고 당근마켓이 현재 사용하고 있는 여러 기술들에 대해서도 소개를 받았는데 그 중 간단하게라도 사이드 프로젝트에 직접 사용해보면 좋겠다라고 생각한 것이 있습니다.
그것이 바로 이번 글의 주제인
가볍게 사용할 수 있으면서도 에러를 직관적으로 분석해주며, 쉬운 알림 설정을 통해서 문제가 생겼을 때 금방 파악하고 처리할 수 있는 Sentry입니다.
Sentry란?
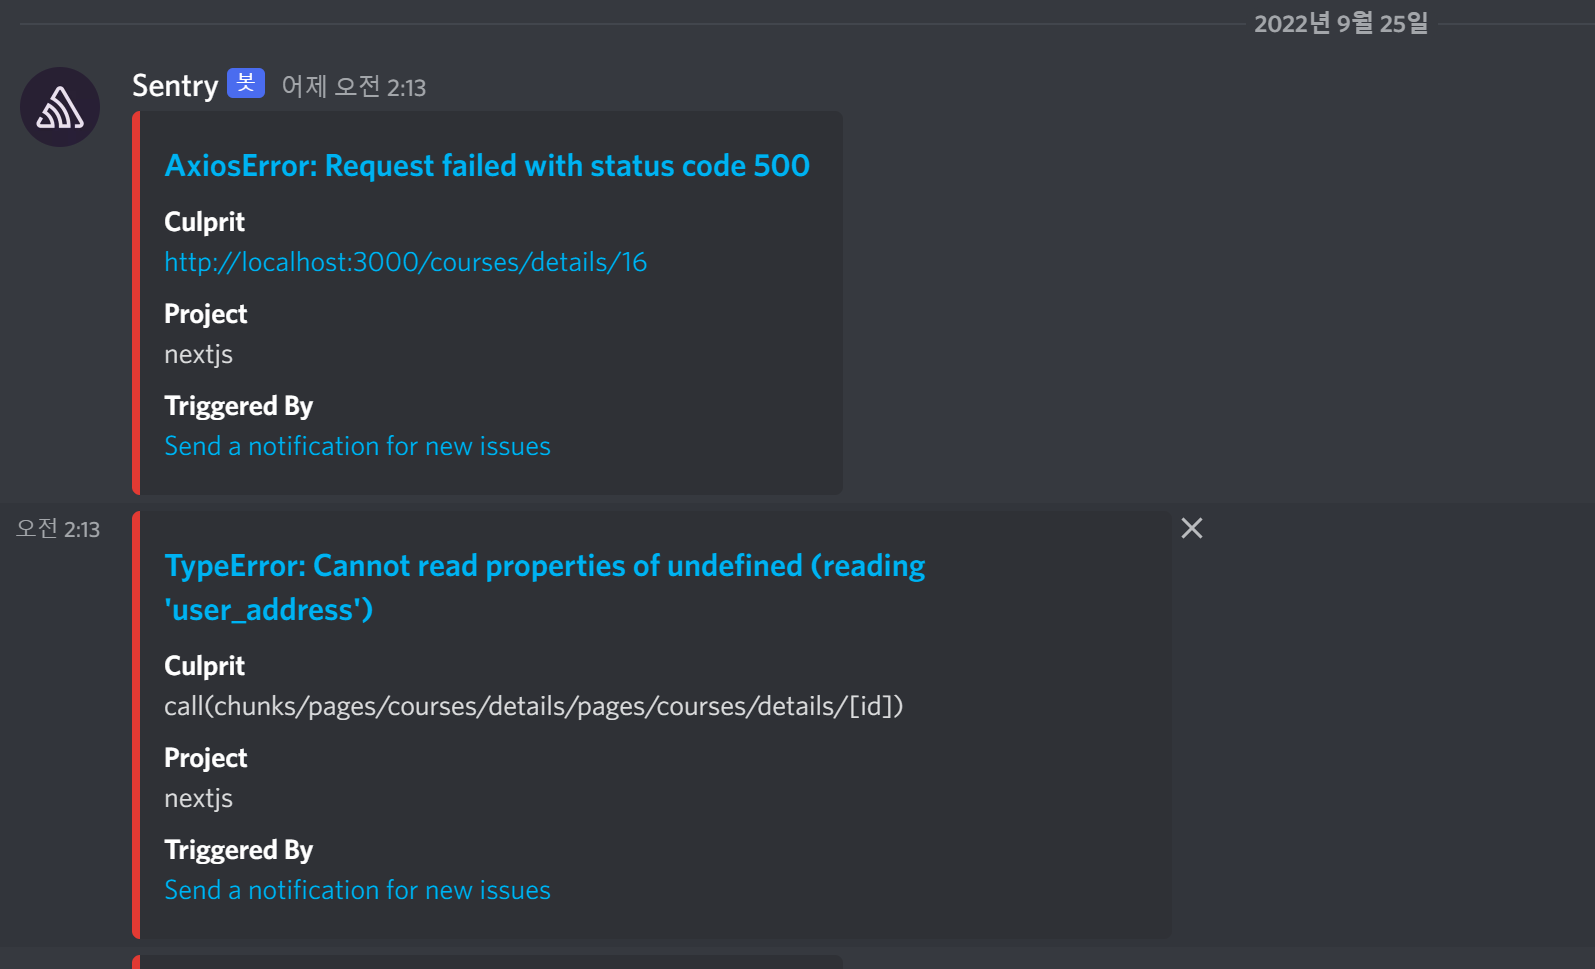
Sentry는 어플리케이션에서 오류가 발생하면 알려주는 에러 트래킹 서비스입니다. (무료 혹은 유료) 클라이언트의 오류 발생시 메일을 보내주고, 슬랙과 연동하면 슬랙 메시지를 통해 오류 발생과 해당 오류에 대한 정보 파악이 가능합니다. (저는 현재 디스코드에 연동하여 사용 중입니다.)
Javascript, vue.js, node.js, java, python 등의 다양한 언어, 프레임워크, 라이브러리를 지원하여 여러 프로젝트의 이슈를 한 곳에서 관리함으로써 에러 모니터링을 일원화 할 수 있습니다.
| 지원 언어 | 통합 환경 |
|---|---|
 |  |
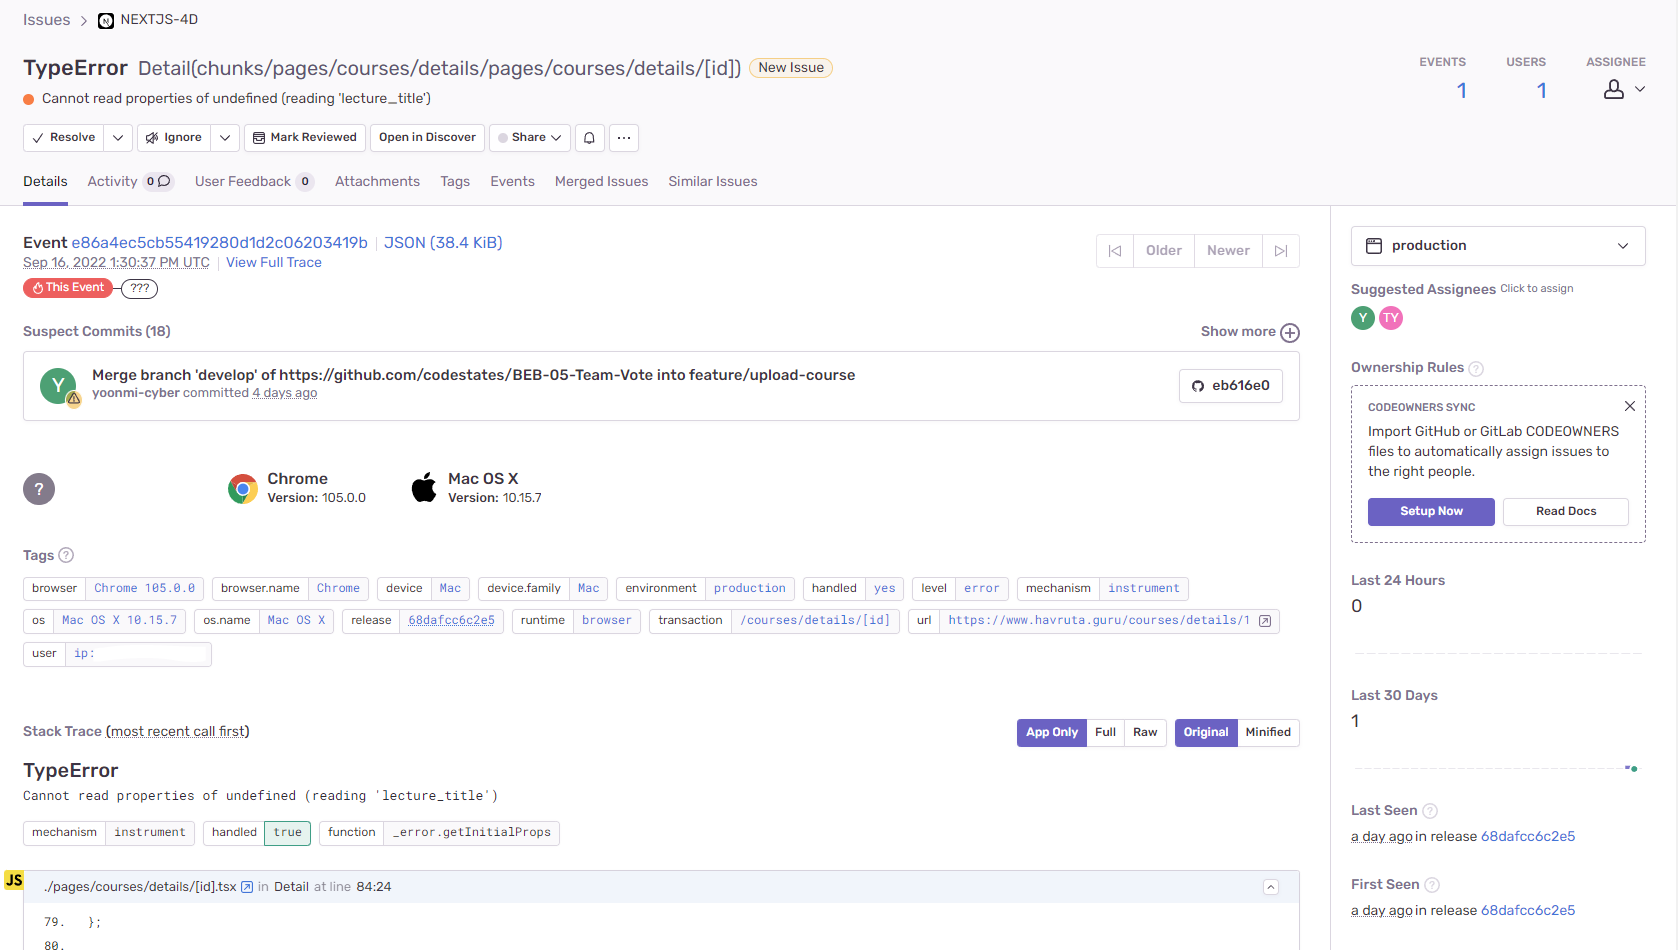
또한 오류를 파악할 수 있는 다양한 정보도 제공합니다.
오류에 대한 다양한 정보들
| 이름 | 설명 |
|---|---|
| Device | 오류가 발생한 장비 정보 (Family(Android, iOS … etc), Model, Architecture, Memory, Capacity, Simulator, BootTime, Timezone) |
| EXCEPTION | 에러가 발생한 코드 라인과 에러 메시지 |
| App | 오류가 발생한 어플리케이션 정보 (ID, Start Time, Device, Build Type, Bundle ID, Bundle Name, Version, Build) |
| Browser | 오류가 발생한 브라우저 정보 (Name, Version, Headers) |
| Operating System | 유저가 사용하는 OS (Name, Version, Kernel Version, Rooted) |
| BREADCRUMBS | 유저가 오류 발생시 거친 과정 및 경로 |
-
실제 Sentry에서 확인 할 수 있는 에러 화면
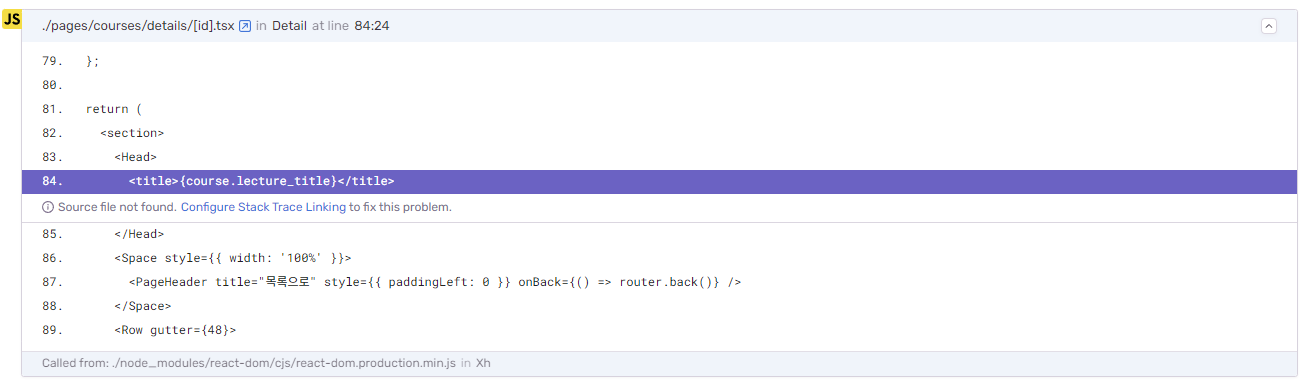
-
에러가 발생한 코드를 하이라이트
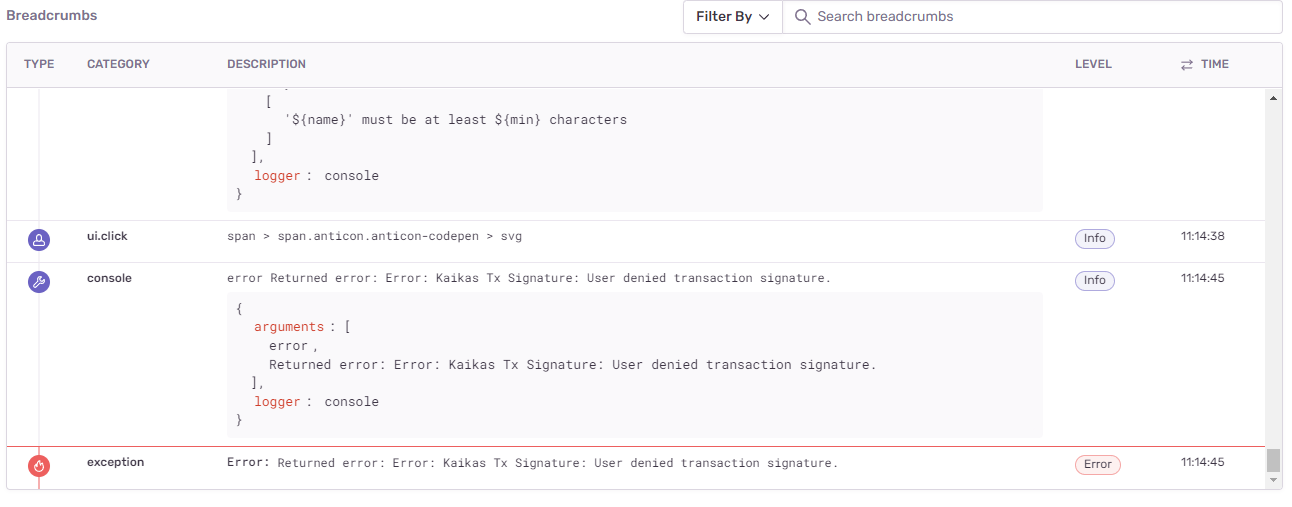
-
에러까지의 사용자 액션
Next.js 프로젝트에 도입하기
-
Sentry.io 사이트에서 회원가입하고 프로젝트 생성하여 DSN 키 발급받기

-
패키지 설치
yarn add @sentry/nextjs- sentry에서 발급받은
key를.env에 작성
NEXT_PUBLIC_SENTRY_DSN=여기에 key 값을 넣어주세요.- root 폴더에
sentry.client.config.ts파일 생성
import * as Sentry from '@sentry/nextjs';

const SENTRY_DSN: string = process.env.SENTRY_DSN || process.env.NEXT_PUBLIC_SENTRY_DSN;

Sentry.init({
  dsn: SENTRY_DSN || 'https://examplePublicKey@o0.ingest.sentry.io/0',
  // We recommend adjusting this value in production, or using tracesSampler
  // for finer control
  tracesSampleRate: 1.0,
  // ...
  // Note: if you want to override the automatic release value, do not set a
  // `release` value here - use the environment variable `SENTRY_RELEASE`, so
  // that it will also get attached to your source maps
});- root 폴더에
sentry.server.config.ts파일 생성
import * as Sentry from '@sentry/nextjs';

const SENTRY_DSN: string = process.env.SENTRY_DSN || process.env.NEXT_PUBLIC_SENTRY_DSN;

Sentry.init({
  dsn: SENTRY_DSN || 'https://examplePublicKey@o0.ingest.sentry.io/0',
  // We recommend adjusting this value in production, or using tracesSampler
  // for finer control
  tracesSampleRate: 1.0,
  // ...
  // Note: if you want to override the automatic release value, do not set a
  // `release` value here - use the environment variable `SENTRY_RELEASE`, so
  // that it will also get attached to your source maps
});- pages폴더에
_error.tsx파일 생성
/**
 * NOTE: This requires `@sentry/nextjs` version 7.3.0 or higher.
 *
 * This page is loaded by Nextjs:
 *  - on the server, when data-fetching methods throw or reject
 *  - on the client, when `getInitialProps` throws or rejects
 *  - on the client, when a React lifecycle method throws or rejects, and it's
 *    caught by the built-in Nextjs error boundary
 *
 * See:
 *  - https://nextjs.org/docs/basic-features/data-fetching/overview
 *  - https://nextjs.org/docs/api-reference/data-fetching/get-initial-props
 *  - https://reactjs.org/docs/error-boundaries.html
 */

import * as Sentry from '@sentry/nextjs';
import type { NextPage } from 'next';
import type { ErrorProps } from 'next/error';
import NextErrorComponent from 'next/error';

const CustomErrorComponent: NextPage<ErrorProps> = (props) => {
  // If you're using a Nextjs version prior to 12.2.1, uncomment this to
  // compensate for https://github.com/vercel/next.js/issues/8592
  // Sentry.captureUnderscoreErrorException(props);

  return <NextErrorComponent statusCode={props.statusCode} />;
};

CustomErrorComponent.getInitialProps = async (contextData) => {
  // In case this is running in a serverless function, await this in order to give Sentry
  // time to send the error before the lambda exits
  await Sentry.captureUnderscoreErrorException(contextData);

  // This will contain the status code of the response
  return NextErrorComponent.getInitialProps(contextData);
};

export default CustomErrorComponent;next.config.js설정
저는 이미 사용중인 플러그인이 있어서next-compose-plugins라이브러리로 플러그인을 묶어줬습니다.
const { withSentryConfig } = require('@sentry/nextjs');
const withPlugins = require('next-compose-plugins');
const withLess = require('next-with-less');
const path = require('path');

const customTheme = path.resolve('./styles/customTheme.less');

module.exports = withLess({
const SentryOptions = {
  sentry: {
    hideSourceMaps: true,
  },
};
const SentryWebpackPluginOptions = {
  silent: true,
};

const WithLessOptions = {
  lessLoaderOptions: {
    lessOptions: {
      additionalData: (content) => `${content}\n\n@import '${customTheme}';`,
    },
  },
};

const nextConfig = {
  future: {
    webpack5: true,
  },
  images: {
    domains: ['havruta.guru'],
  },
  compiler: {
    styledComponents: true,
  },
});
};

module.exports = withSentryConfig(
  withPlugins([[withLess, { WithLessOptions }]], nextConfig),
  SentryOptions,
  SentryWebpackPluginOptions
);
테스트
api test1
import { withSentry } from '@sentry/nextjs';

const doAsyncWork = () => Promise.reject(new Error('API Test 1'));
doAsyncWork();

async function handler(req: any, res: any) {
  res.status(200).json({ name: 'John Doe' });
}

export default withSentry(handler);
api test2
import { withSentry } from '@sentry/nextjs';

function work() {
  throw new Error('API Test 2');
}

work();

async function handler(req: any, res: any) {
  res.status(200).json({ name: 'John Doe' });
}

export default withSentry(handler);
api test3
import { withSentry } from '@sentry/nextjs';

function work() {
  throw new Error('API Test 3');
}

async function handler(req: any, res: any) {
  work();

  res.status(200).json({ name: 'John Doe' });
}

export default withSentry(handler);
api test4
import { withSentry } from '@sentry/nextjs';

function work() {
  throw new Error('API Test 5');
}

work();

async function handler(req: any, res: any) {
  res.status(200).json({ name: 'John Doe' });
}

export default withSentry(handler);
적용 예시
저는 사이드 프로젝트에서 에러 핸들링을 이런 식으로 하고 있습니다.
- SWR 에러 핸들링
//_app.tsx
<SWRConfig
	value={{
		fetcher: (url: string) => axios.get(url).then((res) => res.data),
        onError: (error) => {
          Sentry.captureException(error);
        },
  }}
  >
  <Component {...pageProps} />
</SWRConfig>- post 요청 에러 핸들링
  const saveSubscribeToDB = async () => {
    try {
      const res = await axios.post(`${process.env.NEXT_PUBLIC_ENDPOINT}/userlecture`, {
        user_id: loginInfo.user_id,
        lecture_id: course.lecture_id,
      });
      if (res.status === 201) {
        setIsLoading(false);
        setIsSubscribe(true);
      }
    } catch (error) {
      setIsLoading(false);
      Sentry.captureException(error);
    }
  };
마치며
현재 Sentry를 적용하여 사이드 프로젝트의 클라이언트 이슈 발생 시 메일 알림을 받고 있고, 디스코드 채널를 통해서도 에러 알림이 오도록 설정해 두었습니다.
처음 가입 시 14일 평가판을 이용해보고는 너무 만족하고 있고, 굳이 유료로 사용하지 않아도 사이드 프로젝트 같은 경우에는 무료로 제공되는 기능도 충분한 것 같습니다.
훗날 프로젝트의 트래픽이 많아지거나 개발자들이 더 많아진다면 유료 전환을 고려해볼 수도 있을 것 같습니다.
클라이언트 오류 발생시 지향하는 내부 오류 처리 프로세스는 다음과 같습니다.
(평가판 사용 중이라 평가판 기준)
- Sentry 프로젝트에 모든 팀원을 팀원으로 초대하여 Sentry에 접근 가능하도록 한다.
- 디스코드로 에러 발생 알림이 온 경우, Sentry를 통해 발생한 에러를 Task에 등록한다. ( Jira 사용 중이라면 Sentry 내에서 Jira연동이 가능)
- 등록된 이슈가 해결되면 담당자에게 알리고, 담당자는 해당 에러를 정리한다.(Sentry 내 관리)(Slack 연동 시 Slack에서 관리 가능)
저는 현재 사이드 프로젝트에서 이 정도로 사용하고 있고, 앞으로도 다른 프로젝트에도 적용해보면서 더 좋은 방법을 고민하고 연구할 생각입니다. 이렇게 발견된 에러를 줄여나가면 나갈수록 지급해야 하는 비용이 줄어든다는 점에서 관리자로서 매력적인 도구인 것 같습니다. 많은 프론트엔드 개발자분들이 Sentry 도입 예시를 참고하셔서, 예기치 못한 클라이언트 이슈 발생의 원인 파악과 해결을 빠르고 수월하게 하셨으면 좋겠습니다. 읽어주셔서 감사합니다.
참고
https://engineering.linecorp.com/ko/blog/log-collection-system-sentry-on-premise/
https://urbanbase.github.io/dev/2021/03/04/Sentry.html
https://teamdable.github.io/techblog/Sentry-Error-Tracking
