'정석준님 (https://github.com/sjjeong)'께서 주관하는 Kotlin Coroutine 스터디 진행 과정
코틀린 코루틴의 정석 책을 읽고 이해한 내용을 바탕으로 정리하여 글을 작성하였습니다. 부족한 부분이나, 틀린 부분이 있다면 반영할 수 있도록 하겠습니다.
7장 - 구조화된 동시성
비동기 작업을 구조화함으로써 비동기 프로그래밍을 보다 안정적이고 예측할 수 있게 만드는 원칙입니다.
코루틴은 구조화된 동시성의 원칙을 사용해 비동기 작업인 코루틴을 부모-자식 관계로 구조화함으로써 보다 안전하게 관리되고 제어 될 수 있습니다.
fun main() = runBlocking<Unit> {
    launch { // 부모 코루틴
        launch { // 자식 코루틴
            println("자식 코루틴 실행")
        }
    }
}
코루틴을 부모-자식 관계로 구조화 하는 방법은 간단합니다.
부모 코루틴을 만드는 코루틴 빌더의 람다식 속에서 새로운 코루틴 빌더를 호출하면 됩니다.
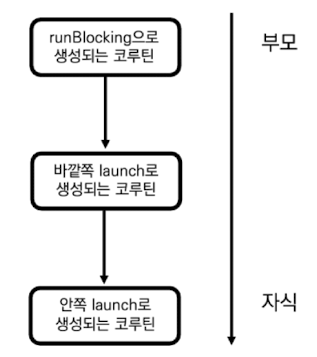
그림과 같이 안쪽의 launch 함수가 호출돼 생성되는 코루틴은 바깥쪽의 launch로 생성되는 코루틴의 자식 코루틴이 되며, 바깥쪽 launch 함수가 호출돼 생성되는 코루틴은 runBlocking으로 생성되는 코루틴의 자식 코루틴이 됩니다.
구조화된 코루틴은 여러 특징을 갖는데 그 대표적인 특징은 아래와 같습니다.
- 부모 코루틴의 실행 환경이 자식 코루틴에게 상속 된다.
- 작업을 제어하는 데 사용된다.
- 부모 코루틴은 자식 코루틴이 완료될 때까지 대기한다.
- CoroutineScope를 사용해 코루틴이 실행되는 범위를 제한할 수 있다.
7-1. 실행 환경 상속
부모 코루틴은 자식 코루틴에게 실행 환경을 상속합니다.
부모 코루틴이 자식 코루틴을 생성 하면 부모 코루틴의 CoroutineContext가 자식 코루틴에게 전달 됩니다.
fun main() = runBlocking<Unit> {
    val coroutineContext = newSingleThreadContext("MyThread") + CoroutineName("CoroutineA")

    launch(coroutineContext) {
        println("[${Thread.currentThread().name}] 부모 코루틴 실행")
        launch {
            println("[${Thread.currentThread().name}] 자식 코루틴 실행")
        }
    }
}


/** 결과:
	[MyThread @CoroutineA#2] 부모 코루틴 실행
    [MyThread @CoroutineA#3] 자식 코루틴 실행
*/
이 코드에서 정의된 coroutineContext를 표로 본다면 아래와 같습니다.
| 키 | 값 |
|---|---|
| CoroutineDispatcher 키 | newSingleThreadContext("MyThread") |
| CoroutineName 키 | CoroutineName("CoroutineA") |
이 coroutineContext로 launch 코루틴 빌더 함수를 호출하여 생성한 코루틴과 내부에서 한번 더 launch 코루틴 빌더 함수를 호출해서 생성한 자식 코루틴은 같은 Thread와 CoroutineName을 가지는 것을 확인할 수 있습니다.
자식 코루틴은 단순히 launch 함수를 호출 했을뿐인데 같은 CoroutineContext를 갖는 이유는 부모 코루틴의 실행 환경을 담는 CoroutineContext 객체가 자식 코루틴에게 상속되기 때문입니다.
1. 실행 환경 덮어씌우기
부모 코루틴의 모든 실행 환경이 항상 자식 코루틴에게 상속되지 않습니다.
만약 자식 코루틴을 생성하는 코루틴 빌더 함수로 새로운 CoroutineContext 객체가 전달 된다면 부모 코루틴에게서 전달 받은 CoroutineContext 구성 요소들은 자식 코루틴 빌더 함수로 전달된 CoroutineContext 객체의 구성 요소들로 덮어씌어집니다.
fun main() = runBlocking<Unit> {
    val coroutineContext = newSingleThreadContext("MyThread") + CoroutineName("ParentCoroutine")

    launch(coroutineContext) {
        println("[${Thread.currentThread().name}] 부모 코루틴 실행")
        launch(CoroutineName("ChildCoroutine")) {
            println("[${Thread.currentThread().name}] 자식 코루틴 실행")
        }
    }
}


/** 결과:
    [MyThread @ParentCoroutine#2] 부모 코루틴 실행
    [MyThread @ChildCoroutine#3] 자식 코루틴 실행
*/
이 코드에서 coroutineContext 객체는 newSingleThreadContext("MyThread") + CoroutineName("ParentCoroutine") 으로 구성 됩니다. 이때 바깥쪽 launch 코루틴 빌더 함수는 coroutineContext 객체를 사용해서 부모 코루틴을 생성하고, 안쪽 launch 코루틴 빌더 함수는 CoroutineName("ChildCoroutine")을 context 인자로 전달해 자식 코루틴을 생성합니다.
코드의 결과를 본다면 부모 코루틴과 자식 코루틴은 같은 CoroutineDispatcher 객체를 사용하지만 CoroutineName은 부모 코루틴은 ParentCoroutine이고, 자식 코루틴은 ChildCoroutine인 것을 확인할 수 있습니다. 자식 코루틴의 CoroutineContext 객체가 이렇게 만들어지는 이유를 알아보자!
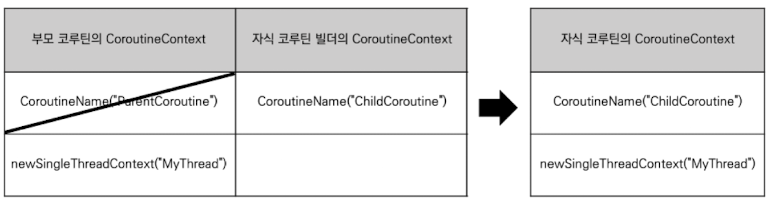
부모 코루틴이 자식 코루틴을 생성할 때 부모 CoroutineContext + 자식 CoroutineContext 연산을 하게 됩니다.
즉 부모 코루틴의 CoroutineContext 구성 요소에 자식 코루틴의 CoroutineContext 구성 요소를 덮어 씌우기를 하기 때문에 부모 코루틴에 이미 존재하는 CoroutineName("ParentCoroutine")을 자식 코루틴의 CoroutineName("ChildCoroutine")으로 대체한 CoroutineContext를 사용하여 자식 코루틴을 생성하기 때문입니다.
이처럼 자식 코루틴 빌더에 새로운 CoroutineContext 객체를 전달함으로써 부모 코루틴으로부터 전달된 CoroutineContext 객체의 구성요소를 재정의할 수 있습니다.
실행 환경 상속 중 주의할 점은 다른 CoroutineContext 구성 요소들과 다르게 Job 객체는 상속되지 않고 코루틴 빌더 함수가 호출되면 새롭게 생성된다는 것 입니다.
2. 상속되지 않는 Job
launch나 async를 포함한 모든 코루틴 빌더 함수는 호출 때마다 코루틴 추상체인 Job 객체를 새롭게 생성한다. 코루틴 제어에 Job 객체가 필요한데 Job 객체를 부모 코루틴으로부터 상속받게 되면 개별 코루틴 제어가 어려워지기 때문이다. 따라서 코루틴 빌더를 통해 생성된 코루틴들은 서로 다른 Job을 가진다.
fun main() = runBlocking<Uinit> { // 부모 코루틴 생성
 	/** 부모 코루틴의 CoroutineContext 부터 부모 코루틴의 Job 추출 */
	val runBlockingJob = coroutineContext[Job]

    launch { // 자식 코루틴 생성
    	/** 자식 코루틴의 CoroutineContext 부터 자식 코루틴의 Job 추출 */
    	val launchJob = coroutineContext[Job]

        if (runBlockingJob === launchJob) {
            println("runBlocking으로 생성된 Job과 launch로 생성된 Job이 동일합니다.")
        } else {
            println("runBlocking으로 생성된 Job과 launch로 생성된 Job이 다릅니다.")
        }
    }
}

/** 결과:
    runBlocking으로 생성된 Job과 launch로 생성된 Job이 다릅니다.
**/
코드의 실행 결과를 보면 runBlockingJob과 launchJob이 동일하지 않은 것을 확인할 수 있습니다. launch 코루틴이 runBlocking 코루틴으로부터 실행 환경을 상속받았음에도 서로 다른 Job 객체를 가집니다.
부모 코루틴의 Job 객체는 자식 코루틴의 Job 객체와 아무런 관계도 없는 것일까? 그렇지 않다.
자식 코루틴이 부모 코루틴으로 부터 전달 받은 Job 객체는 코루틴을 구조화하는 데 사용된다.
3. 구조화에 사용되는 Job
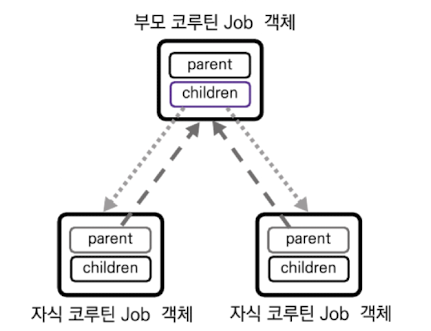
코루틴 빌더가 호출되면 Job 객체는 새롭게 생성되지만 생성된 Job 객체는 위 그림과 같이 내부에 정의된 parent 프로퍼티를 통해 부모 코루틴의 Job 객체에 대한 참조를 가지게 됩니다. 또한 부모 코루틴의 Job 객체는 Sequence 타입의 Children 프로퍼티를 통해 자식 코루틴의 Job에 대한 참조를 가져 자식 코루틴의 Job 객체와 부모 코루틴의 Job 객체는 양방향 참조를 가진다.
| Job 프로퍼티 | 타입 | 설명 |
|---|---|---|
| parent | Job? | 코루틴은 부모 코루틴이 없을 수 있고, 부모 코루틴이 있더라도 최대 하나이다. |
| children | Sequence<Job> | 하나의 코루틴이 복수의 자식 코루틴을 가질 수 있다. |
코루틴은 하나의 부모 코루틴만을 가질 수 있기 때문에 부모 코루틴의 Job 객체를 가리키는 parent 프로퍼티 타입은 Job? 입니다. 여기서 타입 뒤에 붙은 '?'에 주목해보자면 최상위에 있는 코루틴(루트 코루틴) 은 부모 코루틴이 없을 수 있기 때문에 parent 프로퍼티는 null이 될 수 있는 타입인 Job?가 됩니다.
parent 프로퍼티와 children 프로퍼티가 어떤 객체를 참조하는지 다음 코드를 통해 확인 해보자!
fun main() = runBlocking<Uinit> { // 부모 코루틴 생성
 	/** 부모 코루틴의 CoroutineContext 부터 부모 코루틴의 Job 추출 */
	val parentJob = coroutineContext[Job]

    launch { // 자식 코루틴 생성
    	/** 자식 코루틴의 CoroutineContext 부터 자식 코루틴의 Job 추출 */
    	val childJob = coroutineContext[Job]

        println("1. 부모 코루틴과 자식 코루틴의 Job은 같은가? ${parentJob === childJob}")
        println("2. 자식 코루틴의 Job이 가지고 있는 parent는 부모 코루틴의 Job인가? ${childJob?.parent === parentJob}")
        println("3. 부모 코루틴의 Job은 자식 코루틴의 Job에 대한 참조를 가지는가? ${parentJob?.children?.contains(childJob)}")
    }
}

/** 결과:
	1. 부모 코루틴과 자식 코루틴의 Job은 같은가? false
    2. 자식 코루틴의 Job이 가지고 있는 parent는 부모 코루틴의 Job인가? true
    3. 부모 코루틴의 Job은 자식 코루틴의 Job에 대한 참조를 가지는가? true
**/
이를 통해 부모 코루틴과 자식 코루틴은 서로 다른 Job 객체를 가지며, 코루틴 빌더가 호출될 때마다 Job 객체가 새롭게 생성돼 상속되지 않는 것을 확인할 수 있습니다. 또한 자식 코루틴의 Job 객체는 parent 프로퍼티를 통해 부모 코루틴의 Job 객체에 대한 참조를 갖고, 부모 코루틴의 Job 객체 또한 children 프로퍼티를 통해 자식 코루틴의 Job 객체에 대한 참조를 갖는 것을 확인할 수 있습니다.
7-2. 코루틴의 구조화와 작업 제어
코루틴의 구조화는 하나의 큰 비동기 작업을 작은 비동기 작업으로 나눌 때 일어납니다.
예를 들어 3개의 서버로부터 데이터를 다운로드하고, 그 후에 합쳐진 데이터를 변환하는 비동기 작업이 있다고 할 때
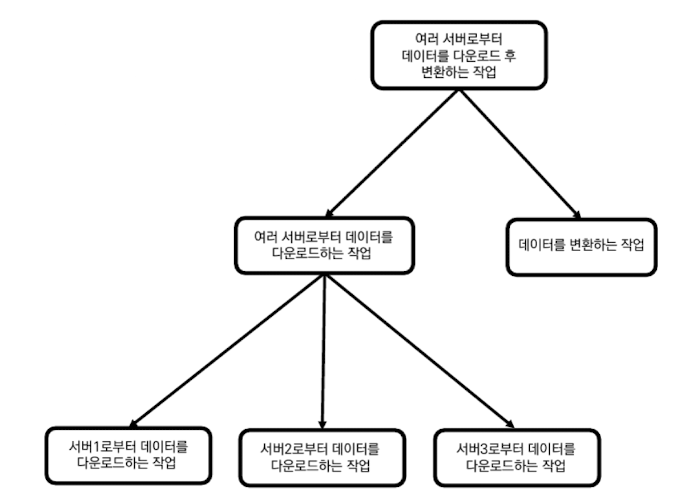
위 그림과 같이 작은 비동기 작업으로 분할할 수 있습니다.
여러 서버로부터 데이터를 다운로드 후 변환하는 작업은 그자체로 하나의 큰 작업이 되며,
하위에 여러 서버로부터 데이터를 다운로드 하는 작업과 데이터를 변환하는 작업을 포함하게 됩니다. 여기에서 '여러 서버로부터 데이터를 다운로드 하는 작업은 다시 각 서버로부터 데이터를 다운로드하는 작업들로 나뉘게 됩니다.
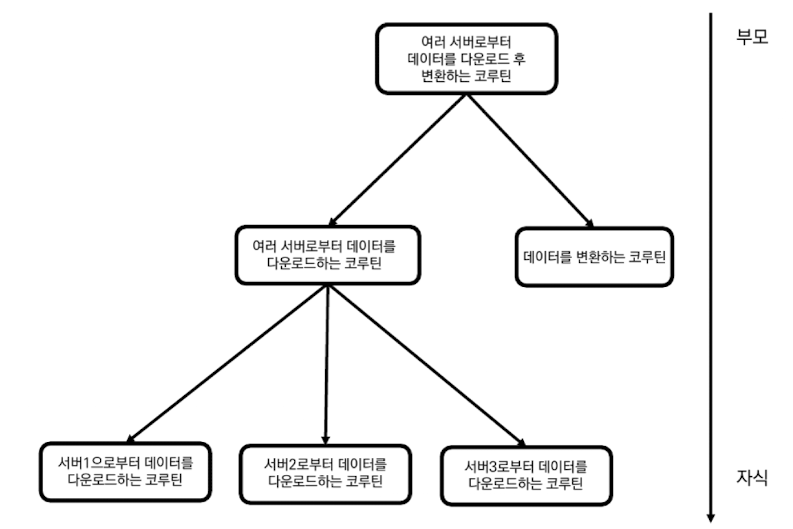
이러한 작업을 코루틴으로 바꾸면 코루틴의 구조화로 표현할 수 있습니다.
위 그림과 같이 코루틴의 구조화는 큰 작업을 연관된 작은 작업으로 분할하는 방식으로 이뤄집니다.
코루틴을 구조화 하는 가장 중요한 이유는 코루틴을 안전하게 관리하고 제어하기 위함입니다.
구조화된 코루틴은 안전하게 제어되기 위해 여러가지 특성을 갖는데 아래 두 가지 특성이 대표적입니다.
- 코루틴으로 취소가 요청되면 자식 코루틴으로 전파된다.
- 부모 코루틴은 모든 작식 코루틴이 실행 완료돼야 완료될 수 있다.
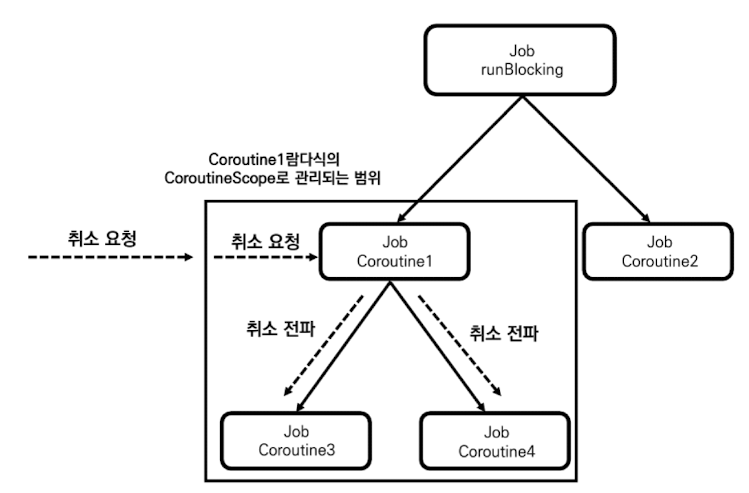
1. 취소의 전파
코루틴은 자식 코루틴으로 취소를 전파하는 특성을 갖기 때문에 특정 코루틴이 취소되면 하위의 모든 코루틴이 취소됩니다.
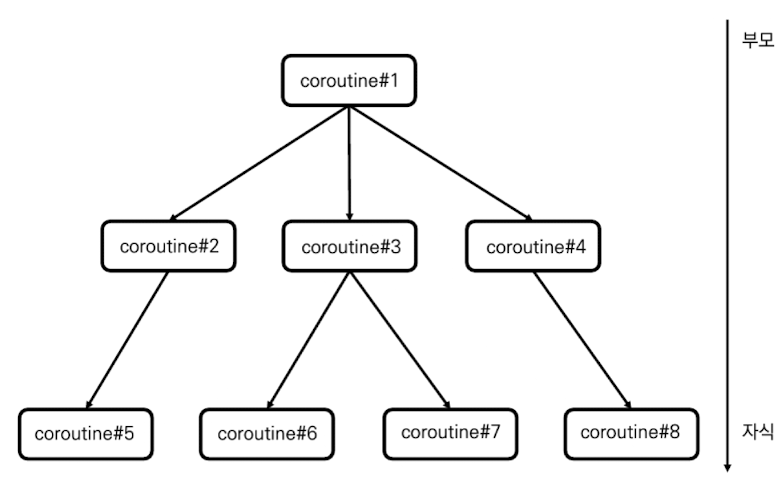
위 그림의 구조화된 코루틴을 설명하자면
- Coroutine#1
- Coroutine#2 :: (Coroutine#1 의 자식)
- Coroutine#5 :: (Coroutine#2 의 자식)
- Coroutine#3 :: (Coroutine#1 의 자식)
- Coroutine#6 :: (Coroutine#3 의 자식)
- Coroutine#7 :: (Coroutine#3 의 자식)
- Coroutine#4 (Coroutine#1 의 자식)
- Coroutine#8 :: (Coroutine#4 의 자식)
- Coroutine#2 :: (Coroutine#1 의 자식)
코루틴은 부모 코루틴에 취소가 요청될 경우 자식 코루틴에 자동으로 취소가 전파됩니다.
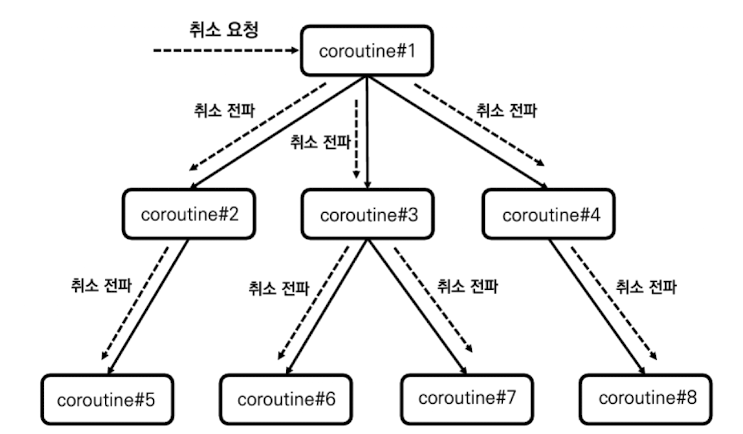
만약 Coroutin#1 에 취소가 요청 된다면 Coroutine#1은 자식 코루틴인 Coroutine#2, Coroutine#3, Coroutine#4 에 취소를 전파하게 되며 이 코루틴 또한 각 자식 코루틴들에게 취소를 전파하게 됩니다.
그렇다면 Coroutine#1이 아닌 Coroutine#2에 취소가 요청되면 어떻게 될까?

Coroutine#2는 Coroutine#5만 자식으로 가지므로 Coroutine#5로만 취소가 전파 됩니다.
특정 코루틴에 취소가 요청되면 취소는 자식 코루틴 방향으로만 전파되며, 부모 코루틴으로는 취소가 전파되지 않습니다. 자식 코루틴으로만 취소가 전파되는 이유는 자식 코루틴이 부모 코루틴 작업의 일부이기 때문입니다.
취소의 전파를 상황을 가정하여 설명 해보겠습니다.
화면에 표시를 위해 3개의 데이터베이스로부터 데이터를 가져와 합치는 작업을 하는 코루틴이 있다고 가정해보자.

위 그림과 같은 구조화된 코루틴을 작성할 수 있으며, 정상적으로 코루틴이 완료될 때와 작업 중간에 코루틴이 취소됐을 때를 코드로 표시하면 아래와 같습니다.
fun main() = runBlocking<Unit> {
    println("[3개의 데이터베이스로 부터 데이터를 가져와 실행]")
    searchDBJob().join()

    println("\n[3개의 데이터베이스로 부터 데이터를 가져와 실행중 취소]")
    searchDBJob().cancel()
}

fun CoroutineScope.searchDBJob(): Job = launch(Dispatchers.IO) {
    val dbResultDeferred: List<Deferred<String>> = listOf("db1", "db2", "db3").map {
        async {
            delay(1000L)
            println("${it}으로부터 데이터를 가져오는데 성공 했습니다.")
            return@async "[${it} data]"
        }
    }

    val dbResult: List<String> = dbResultDeferred.awaitAll()

    println(dbResult)
}

/** 결과:
    [3개의 데이터베이스로 부터 데이터를 가져와 실행]
    db2으로부터 데이터를 가져오는데 성공 했습니다.
    db1으로부터 데이터를 가져오는데 성공 했습니다.
    db3으로부터 데이터를 가져오는데 성공 했습니다.
    [[db1 data], [db2 data], [db3 data]]

    [3개의 데이터베이스로 부터 데이터를 가져와 실행중 취소]
*/
첫 번째 searchDBJob 의 경우 join()을 호출하여, 작업이 완료 될때까지 runBlocking 코루틴을 일시중지 하였고
두 번째 searchDBJob 의 경우 cacel()을 호출하여, 작업이 시작되고 취소를 요청 했습니다.
결과로는 첫 번째 코루틴의 경우 delay(1000L) 이후 데이터를 가져오는데 성공하며, 전체 데이터를 표시하는데 성공 하였습니다. 두 번쨰 코루틴의 경우 그 어떤 작업을 완료하지 못하고 아무런 데이터를 표시하지 못하고, 프로세스가 종료되는 것을 확인할 수 있습니다.
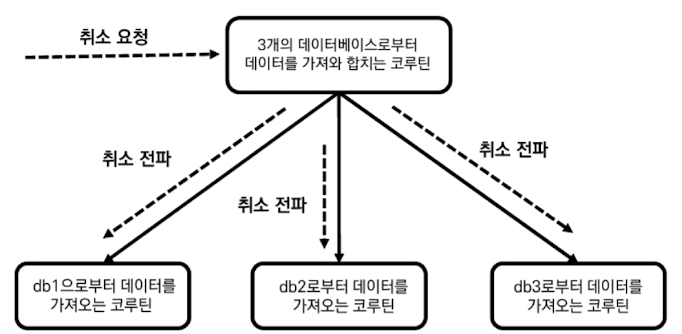
위 그림과 같이 부모 코루틴에 취소가 요청 되었고, 자식 코루틴에게 취소가 전파되는 결과를 확인할 수 있습니다.
2. 부모 코루틴의 자식 코루틴에 대한 완료 의존성
부모 코루틴은 모든 자식 코루틴이 실행 완료돼야 완료될 수 있습니다.
코루틴의 구조화는 큰 작업을 연관된 여러 작은 작업으로 나누는 방식으로 이뤄지는데 작은 작업이 모두 완료돼야 큰 작업이 완료 될 수 있기 때문입니다. 이를 부모 코루틴이 자식 코루틴에 대해 완료 의존성을 가진다고 합니다.
fun main() = runBlocking<Unit> {
    val startTime = System.currentTimeMillis()

    println("# [부모 코루틴의 자식 코루틴에 대한 완료 의존성] #")
    /** 부모 코루틴 실행 */
    val parentJob = launch {
        /** 자식 코루틴 실행 */
        launch {
            delay(1000L)
            println("[${getElapsedTime(startTime)}] 자식 코루틴 실행 완료")
        }

        println("[${getElapsedTime(startTime)}] 부모 코루틴이 실행하는 마지막 코드")
    }

    /** 부모 코루틴 실행 완료/취소 완료 콜백 등록 */
    parentJob.invokeOnCompletion {
        println("[${getElapsedTime(startTime)}] 부모 코루틴 실행 완료")
    }
}

/** 결과:
    # [부모 코루틴의 자식 코루틴에 대한 완료 의존성] #
    [지난 시간 : 7ms] 부모 코루틴이 실행하는 마지막 코드
    [지난 시간 : 1028ms] 자식 코루틴 실행 완료
    [지난 시간 : 1029ms] 부모 코루틴 실행 완료
*/
invokeOnCompletion 함수는 코루틴이 실행 완료되거나 취소 완료됐을 때 실행되는 콜백을 등록하는 함수로 여기에선 부모 코루틴이 완료되는 시간을 출력하는데 사용 됩니다.
코드의 실행 결과를 보면 부모 코루틴은 마지막 코드를 7ms 정도에 완료 했지만 실행 완료 시점은 1029ms 입니다. 부모 코루틴이 마지막 코드를 실행하고 나서 더이상 실행할 코드가 없음에도 즉시 실행 완료되지 않는 이유는 부모 코루틴은 자식 코루틴이 완료되는 시점까지 완료될 수 없는 특성을 갖고 있기 떄문입니다. 실제로 부모 코루틴의 실행 완료 시점인 1029ms는 자식 코루틴이 완료되는 1028ms 직후인 것을 확인할 수 있습니다.
1) 코루틴 실행 완료 중 상태
그렇다면 부모 코루틴은 마지막 코드를 실행한 시점으로 부터 자식 코루틴의 실행 완료를 기다릴 때까지 어떤 상태를 가질까? 바로 '실행 완료 중' 상태를 가지게 됩니다.
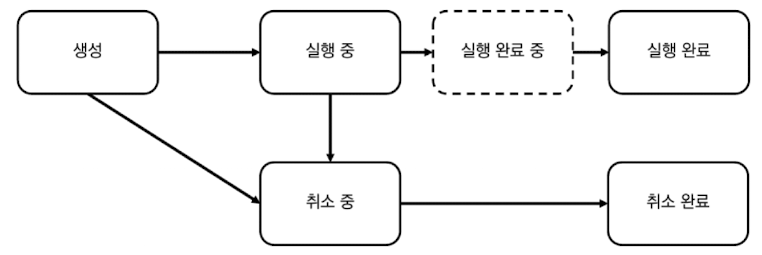
'실행 완료 중' 상태란 코루틴의 모든 코드가 실행됐지만 자식 코루틴이 실행중인 경우 코루틴이 갖는 상태를 말합니다. 코루틴은 더 이상 실행할 코드가 없더라도 자식 코루틴들이 모두 완료될 때까지 실행 완료될 수 없기에 '실행 완료 중' 상태에 머뭅니다. '실행 완료 중' 상태의 코루틴은 자식 코루틴이 모두 실행 완료되면 자동으로 '실행 완료' 상태로 바뀐다.
2) 코루틴 실행 완료 중 상태의 Job 상태 값
fun main() = runBlocking<Unit> {
    val startTime = System.currentTimeMillis()

    println("# [부모 코루틴의 자식 코루틴에 대한 완료 의존성] #")
    /** 부모 코루틴 실행 */
    val parentJob = launch {
        /** 자식 코루틴 실행 */
        launch {
            delay(1000L)
            println("[${getElapsedTime(startTime)}] 자식 코루틴 실행 완료")
        }

        println("[${getElapsedTime(startTime)}] 부모 코루틴이 실행하는 마지막 코드")
    }

    /** 부모 코루틴 실행 완료/취소 완료 콜백 등록 */
    parentJob.invokeOnCompletion {
        println("[${getElapsedTime(startTime)}] 부모 코루틴 실행 완료")
    }

    delay(500L)
    printJobState(parentJob)
}

/** 결과:
    # [부모 코루틴의 자식 코루틴에 대한 완료 의존성] #
    [지난 시간 : 7ms] 부모 코루틴이 실행하는 마지막 코드
    isActivity >> true
    isCancelled >> false
    isCompleted >> false
    [지난 시간 : 1028ms] 자식 코루틴 실행 완료
    [지난 시간 : 1029ms] 부모 코루틴 실행 완료
*/
부모 코루틴을 실행하고, 500ms 이후 부모 코루틴의 상태를 출력한다면
isActivity >> true
isCancelled >> false
isCompleted >> false
위와 같은 상태가 출력되는것을 확인할 수 있습니다.
| 코루틴 상태 | isActivity | isCancelled | isCompleted |
|---|---|---|---|
| 생성 | false | false | false |
| 실행 중 | true | false | false |
| 실행 완료 중 | true | false | false |
| 실행 완료 | false | false | true |
| 취소 중 | false | true | false |
| 취소 완료 | false | true | true |
Job 상태표를 본다면 '실행 중'과 '실행 완료 중'은 완전히 같은 Job 상태 값을 가집니다. 그래서 두개의 상태는 구분 없이 사용 됩니다.
'실행 중' 상태와 '실행 완료 중' 상태의 상태 값은 구분되지 않지만 코루틴의 실행 흐름을 이해하기 위해서는 자식 코루틴이 완료되지 않으면 부모 코루틴도 실행 완료될 수 없다는 점을 이해하는 것이 중요하다!
7-3. CoroutineScope 사용해 코루틴 관리하기
CoroutineScope 객체는 자신의 범위 내에서 생성된 코루틴들에게 실행 환경을 제공하고, 이들의 실행 범위를 관리하는 역할을 합니다.
1. CoroutineScope 생성하기
1) CoroutineScope 인터페이스 구현을 통한 생성
CoroutineScope 인터페이스는 다음과 같이 선언돼 있습니다.
public interface CoroutineScope {
    public val coroutineContext: CoroutineContext
}
CoroutineScope 인터페이스는 코루틴의 실행 환경인 CoroutineContext를 가진 단순한 인터페이스로 이 인터페이스를 구현한 구체적인 클래스는 다음과 같이 만들 수 있습니다.
class CustomCoroutineScope : CoroutineScope {
    override val coroutineContext: CoroutineContext =
    	Job() + newSingleThreadContext("CustomScopeThread")
}
위 CustomCoroutineScope는 다음과 같이 인스턴스화해 사용할 수 있습니다.
fun main() {
    /** 커스텀 CoroutineScope 사용하기 */
    println("# [커스텀 CoroutineScope 사용하기] #")
    val coroutineScope = CustomCoroutineScope()
    coroutineScope.launch {
        delay(100L)
        println("[${Thread.currentThread().name}] 코루틴 실행 완료")
    }
    Thread.sleep(200L)
 }

 /** 결과:
    # [커스텀 CoroutineScope 사용하기] #
    [CustomScopeThread @coroutine#1] 코루틴 실행 완료
**/
코드의 실행 결과를 보면 launch 코루틴이 CustoScopeThread 스레드를 사용해 실행되며, 이를 통해 CustomCoroutineScope 객체로부터 코루틴 실행 환경을 제공받는 것을 확인할 수 있습니다.
2) CoroutineScope 함수를 사용해 생성
CorotuineScope 객체를 생성하는 또 다른 방법은 CoroutineScope 함수를 사용하는 것입니다.
public fun CoroutineScope(context: CoroutineContext): CoroutineScope =
    ContextScope(if (context[Job] != null) context else context + Job())
Coroutine Api 에서 제공 되는 함수이며, CoroutineContext를 인자로 입력받아 CoroutineScope 객체를 생성하며, 인자로 입력된 CoroutineContext에 Job 객체가 포함돼 있지 않으면 새로운 Job 객체를 생성합니다.
fun main() {
    println("# [CoroutineScope 생성 함수 사용하기] #")
    val coroutineScope = CoroutineScope(Dispatchers.IO)
    coroutineScope.launch {
        delay(100L)
        println("[${Thread.currentThread().name}] 코루틴 실행 완료")
    }
    Thread.sleep(200L)
}

/** 결과:
    # [CoroutineScope 생성 함수 사용하기] #
    [DefaultDispatcher-worker-1 @coroutine#1] 코루틴 실행 완료
*/
CoroutineScope 함수의 인자에 Dispatchers.IO 를 전달하여 CoroutineScope를 생성한 뒤 launch 코루틴 빌더를 생성하여 실행하면 백그라운드 스레드인 DefaultDispatcher-worker-1으로 보내져 실행되는 것을 확인할 수 있습니다.
2. 코루틴에게 실행 환경을 제공하는 CoroutineScope
1) CoroutineScope가 코루틴에게 실행 환경을 제공하는 방식
먼저 CoroutineScope 객체가 어떻게 코루틴에게 실행 환경을 제공하는지 알아보자! 이를 살펴보기에 앞서 다음 코드를 통해 Coroutine Api의 launch 코루틴 빌더 함수가 어떻게 선언 되어있는지 알아보자!
public fun CoroutineScope.launch(
context: CoroutineContext = EmptyCoroutineContext,
start: CoroutineStart = CoroutineStart.DEFAULT,
block: suspend CoroutineScope.() -> Unit
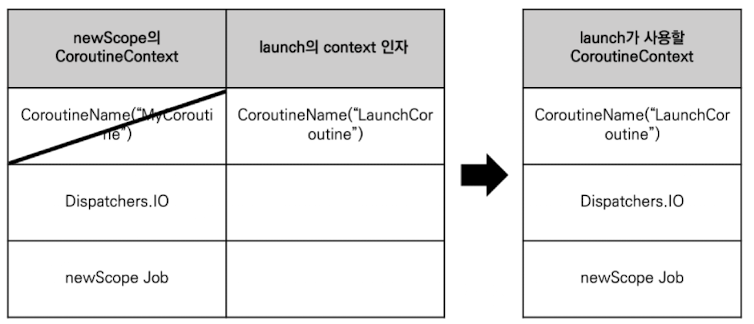
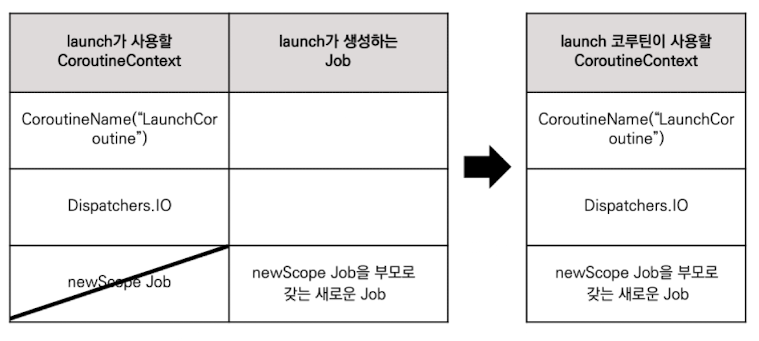
): Job이 코드에서 launch 코루틴 빌더 함수는 CoroutineScope의 확장 함수로 선언돼 있어며, launch 함수가 호출되면 다음 과정을 통해 CoroutineScope 객체로부터 실행 환경을 제공 받아 코루틴의 실행 환경을 설정 합니다.
- 수신 객체인 CoroutineScope로부터 CoroutineContext 객체를 제공 받는다.
- 제공받은 CoroutineContext 객체에 launch 함수의 context 인자로 넘어온 CoroutineContext를 더한다.
- 생성된 CoroutineContext에 코루틴 빌더 함수가 호출돼 새로 생성되는 Job을 더한다. 이때 CoroutineContext를 통해 전달되는 Job 객체는 새로 생성되는 Job 객체의 부모 Job 객체가 된다.
fun main() {
    val newScope = CoroutineScope(CoroutineName("MyCoroutine") + Dispatchers.IO)
    newScope.launch(CoroutineName("LaunchCoroutine")) ChildLaunch1@ {
        println(this.coroutineContext[CoroutineName])
        println(this.coroutineContext[CoroutineDispatcher])

        val launchJob = this@ChildLaunch1.coroutineContext[Job]
        val newScopeJob = newScope.coroutineContext[Job]
        println("launchJob?.parent === newScopeJob >> ${launchJob?.parent === newScopeJob}")
    }
    Thread.sleep(1000L)
}

/** 결과:
    CoroutineName(LaunchCoroutine)
    Dispatchers.IO
    launchJob?.parent === newScopeJob >> true
**/
이 코드에서 위에 설명한 CoroutineScope 객체로부터 실행 환경을 제공 받아 코루틴 실행 환경을 설정하는 과정을 본다면 아래 표와 같습니다.
2) CoroutineScope로부터 실행 환경 상속받기
launch 함수가 호출돼 생성되는 코루틴의 CoroutineContext 객체는 launch 함수의 람다식에서 수신 객체인 CoroutineScope를 통해 제공됩니다.
3. CoroutineScope에 속한 코루틴의 범위
1) CoroutineScope에 속한 코루틴의 범위
각 코루틴 빌더의 람다식은 CoroutineScope 객체를 수신 객체로 가집니다. CoroutineScope 객체는 기본적으로 특정 범위의 코루틴들을 제어하는역할을 합니다. 이번에는 CoroutineScope 객체에 속하는 코루틴의 범위에 대해 알아보자!
fun main() = runBlocking<Unit> {
    launch(CoroutineName("Coroutine1")) Coroutine1@ {
        launch(CoroutineName("Coroutine3")) {
            delay(100L)
            println("[${Thread.currentThread().name}] 코루틴 실행 완료")
        }

        launch(CoroutineName("Coroutine4")) {
            delay(100L)
            println("[${Thread.currentThread().name}] 코루틴 실행 완료")
        }
    }

    launch(CoroutineName("Coroutine2")) {
        delay(100L)
        println("[${Thread.currentThread().name}] 코루틴 실행 완료")
    }
}

/** 결과
	[main @Coroutine2#3] 코루틴 실행 완료
	[main @Coroutine3#4] 코루틴 실행 완료
	[main @Coroutine4#5] 코루틴 실행 완료
**/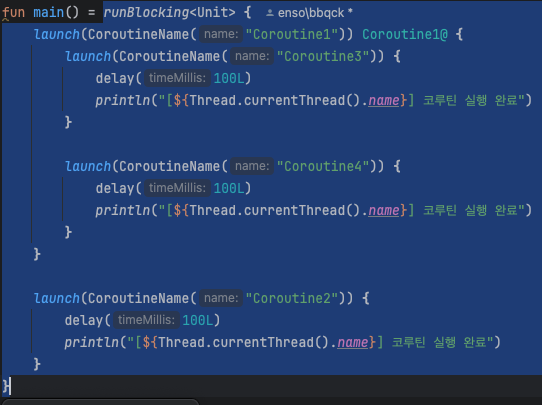
위 코드에서 runBlocking의 CoroutineScope 객체의 코루틴 범위는 위 이미지와 같다.
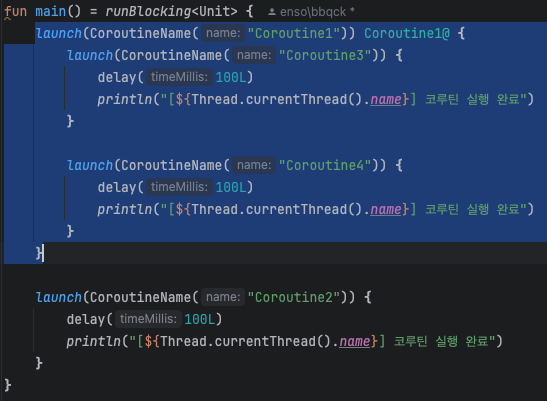
Coroutine1 람다식의 CoroutineScope 객채의 코루틴 범위는 위 이미지와 같다.
즉 코루틴 빌더 람다식에서 수신 객체로 제공되는 CoroutineScope 객체는 코루틴 빌더로 생성되는 코루틴과 람다식 내에서 CoroutineScope 객체를 사용해 실행되는 모든 코루틴을 포함한다.
2) CoroutineScope를 새로 생성해 기존 CoroutineScope 범위에서 벗어나기
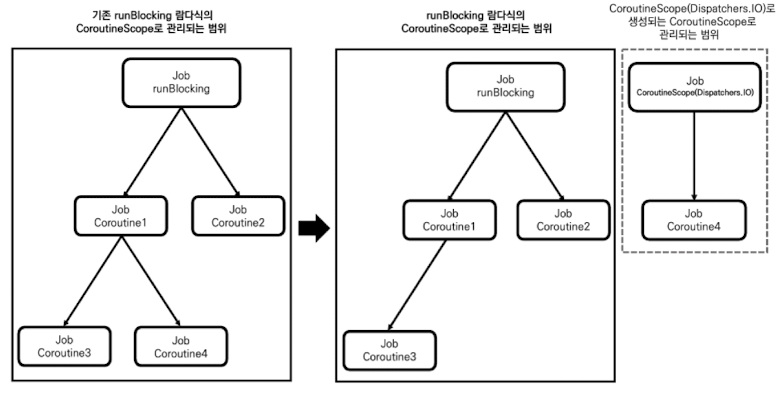
만약 위 코드에서 Coroutine4 코루틴이 runBlocking 람다식의 CoroutineScope 객체의 범위에서 벗어나야 한다고 해보자. 특정 코루틴만 기존에 존재하면 CoroutineScope 객체의 범위에서 벗어나게 만들려면 새로운 CoroutineScope 객체를 사용해 코루틴을 실행하면 됩니다.
fun main() = runBlocking<Unit> {
    launch(CoroutineName("Coroutine1")) Coroutine1@ {
        launch(CoroutineName("Coroutine3")) {
            delay(100L)
            println("[${Thread.currentThread().name}] 코루틴 실행 완료")
        }

        CoroutineScope(Dispatchers.IO).launch(CoroutineName("Coroutine4")) {
            delay(100L)
            println("[${Thread.currentThread().name}] 코루틴 실행 완료")
        }
    }

    launch(CoroutineName("Coroutine2")) {
        delay(100L)
        println("[${Thread.currentThread().name}] 코루틴 실행 완료")
    }
}

/** 결과:
	[main @Coroutine2#3] 코루틴 실행 완료
	[DefaultDispatcher-worker-1 @Coroutine4#5] 코루틴 실행 완료
	[main @Coroutine3#4] 코루틴 실행 완료
**/
위 코드와 같이 새로운 CoroutineScope(DIspatchers.IO) 함수를 통해 CoroutineScope를 생성하면 runBlokcing 람다식의 CoroutineScope 객체의 범위에서 벗어나 새로운 CoroutineScope 객체의 범위에 속하게 됩니다.
그렇다면 어떻게 Coroutine4 코루틴이 기존 CoroutineScope 객체의 범위에서 벗어날 수 있는 것일까요? 정답은 CoroutineScope 함수가 호출되면 생성되는 새로운 Job 객체에 있습니다.
코루틴은 Job 객체를 사용해 구조화되는데 CoroutineScope 함수를 사용해 새로운 CoroutineScope 객체를 생성하면 기존 계층 구조를 따르지 않은 새로운 Job 객체가 생성됩니다.
4. CoroutineScope 취소하기
CoroutineScope 인터페이스는 확장 함수로 cancel 함수를 지원합니다. CoroutineScope 인터페스의 cancel 함수는 CoroutineScope 객체의 범위에 속한 모든 코루틴을 취소하는 함수로 CoroutineScope 객체에 cancel 함수가 호출되면 범위에서 실행 중인 모든 코루틴에 취소가 요청됩니다.
fun main() = runBlocking<Unit> {
    launch(CoroutineName("Coroutine1")) Coroutine1@ {
        launch(CoroutineName("Coroutine3")) {
            delay(100L)
            println("[${Thread.currentThread().name}] 코루틴 실행 완료")
        }

        launch(CoroutineName("Coroutine4")) {
            delay(100L)
            println("[${Thread.currentThread().name}] 코루틴 실행 완료")
        }

        this@Coroutine1.cancel()
    }

    launch(CoroutineName("Coroutine2")) {
        delay(100L)
        println("[${Thread.currentThread().name}] 코루틴 실행 완료")
    }
}

/** 결과:
    [main @Coroutine2#3] 코루틴 실행 완료
*/
결과를 본다면 Coroutine1의 CoroutineScope 에 cancel 함수를 호출하게 되면 Coroutine3과 Coroutine4의 코루틴이 취소 되며 실행 완료가 되지 않은것을 볼 수 있습니다.
public fun CoroutineScope.cancel(cause: CancellationException? = null) {
    val job = coroutineContext[Job] ?: error("Scope cannot be cancelled because it does not have a job: $this")
    job.cancel(cause)
}
Coroutine 객체에 cancel 함수가 호출되면 CoroutineScope 객체는 자신의 coroutineContext 프로퍼티를 통해 Job 객체에 접근한 후 cancel 함수를 호출합니다. 즉 자신의 코루틴 Job 객체에 접근해 취소를 요청하며, 이 취소 요청은 자식 코루틴에게 전파돼 부모 코루틴과 자식 코루틴 모두를 취소하게 됩니다.
5. CoroutineScope 활성화 상태 확인하기
CoroutineScope 객체는 CoroutineScope 객체가 현재 활성화돼 있는지 확인하는 isAcitive 확장 프로퍼티를 제공합니다.
public val CoroutineScope.isActive: Boolean
    get() = coroutineContext[Job]?.isActive ?: true
앞서 알아본 cancel 확장 함수와 같이 coroutineContext 프로퍼티를 통해 Job 객체에 접근한 후 isAcitive 프로퍼티를 확인합니다.
7-4. 구조화와 Job
CoroutineScope 객체를 조작하는 것이 실제로는 CoroutineContext 객체 속의 Job 객체를 조작하는 것이라는 사실을 확인했습니다. 코루틴 구조화의 중심에는 Job 객체가 있습니다.
1. runBlocking과 루트 Job
fun main() = runBlocking<Unit> { // 루트 Job 생성
    println("[${Thread.currentThread().name} 코루틴 실행")
}

/** 결과:
	[main @coroutine#1 코루틴 실행
**/
위와 같이 runBlocking 함수를 호출해 코루틴이 생성될 경우 부모 Job이 없는 Job 객체를 생성합니다. 부모 Job 객체가 없는 구조화의 시작점 역할을 하는 Job 객체를 루트 Job이라고 하고, 이 Job 객체에 의해 제어되는 코루틴을 루트 코루틴이라고 합니다.
fun main() = runBlocking<Unit> {
    launch(CoroutineName("Coroutine1")) {
        launch(CoroutineName("Coroutine3")) {
            delay(100L)
            println("[${Thread.currentThread().name}] 코루틴 실행 완료")
        }

        launch(CoroutineName("Coroutine4")) {
            delay(100L)
            println("[${Thread.currentThread().name}] 코루틴 실행 완료")
        }
    }

    launch(CoroutineName("Coroutine2")) {
        launch(CoroutineName("Coroutine5")) {
            delay(100L)
            println("[${Thread.currentThread().name}] 코루틴 실행 완료")
        }
    }
}
위 코드에서는 runBlocking을 통해 루트 코루틴이 생성된다. runBlocking 람다식 내부에서는 launch 함수가 호출돼 Coroutine1과 Coroutine2가 실행되는데 Coroutine1 내부에서는 다시 Coroutine3, Coroutine4가 실행되고, Coroutine2 내부에서는 Coroutine5가 실행된다.
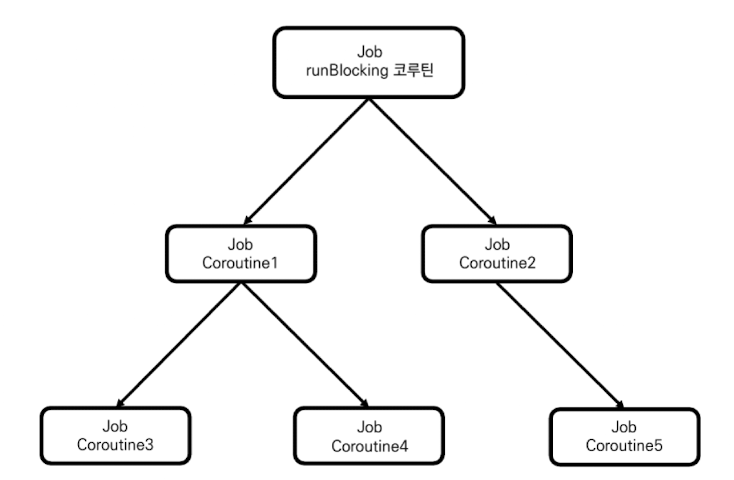
위 그림과 같이 runBlocking 코루틴을 루트 코루틴으로 해서 하위에 모든 코루틴들이 구조화되는 것을 볼 수 있습니다.
2. Job 구조화 깨기
1) CoroutineScope를 사용해 구조화 깨기
CoroutineScope 함수를 통해 CoroutineScope 객체가 생성되면 새로운 루트 Job이 생성되며, 이를 사용해 코루틴의 구조화를 깰 수 있습니다.
fun main() = runBlocking<Unit> {
    val newScope = CoroutineScope(Dispatchers.IO)
    newScope.launch(CoroutineName("Coroutine1")) {
        launch(CoroutineName("Coroutine3")) {
            delay(100L)
            println("[${Thread.currentThread().name}] 코루틴 실행 완료")
        }

        launch(CoroutineName("Coroutine4")) {
            delay(100L)
            println("[${Thread.currentThread().name}] 코루틴 실행 완료")
        }
    }

    newScope.launch(CoroutineName("Coroutine2")) {
    	launch(CoroutineName("Coroutine5")) {
        	delay(100L)
        	println("[${Thread.currentThread().name}] 코루틴 실행 완료")
        }
    }
}

/** 결과:
	종료 코드 0(으)로 완료된 프로세스
**/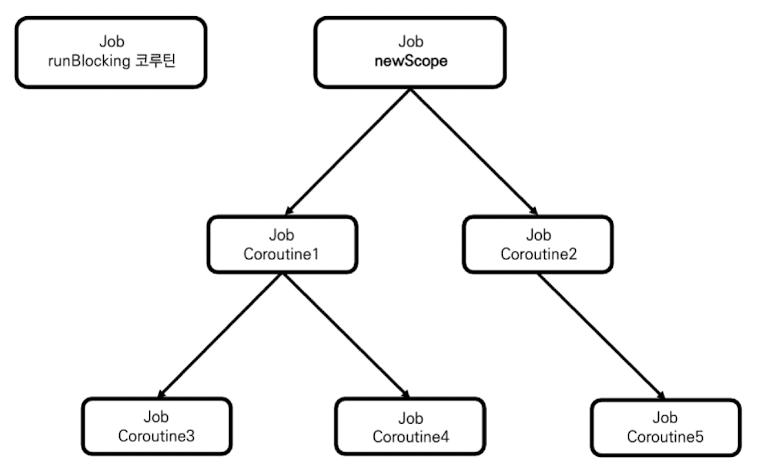
위 그림과 같이 구조화 된것을 확인할 수 있습니다.
실행 결과 또한 아무런 코루틴이 실행되지 않고 프로세스가 종료된 것을 볼 수 있습니다.
이유는 runBlocking이 실행 되었을 때 내부에서는 CoroutineScope를 사용해 구조화가 깨졌기 때문에 자식 코루틴으로 구조화되지 않았고, runBlocking 종료로 인하여 프로세스가 종료되기 때문입니다.
2) Job 사용해 구조화 깨기
CoroutineScope 생성 함수 말고 Job을 직접 사용할 수도 있다.
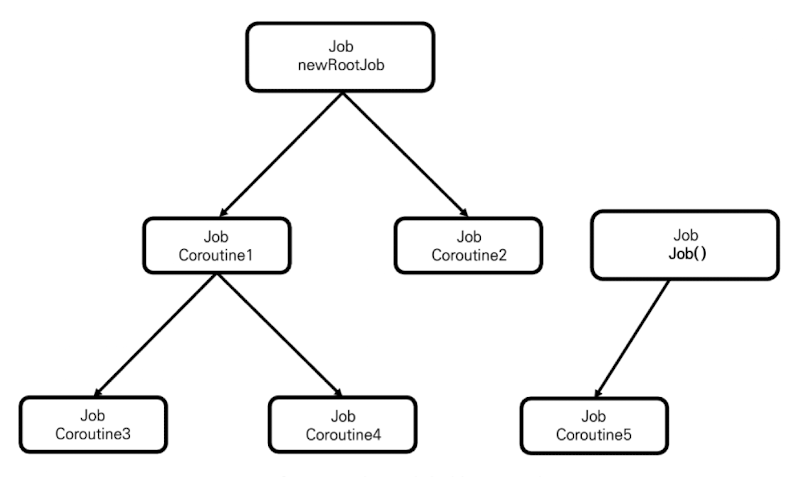
루트 Job은 부모가 없는 Job 객체로 Job()을 통해 생성할 수 있습니다.
fun main() = runBlocking<Unit> {
    val newRootJob = Job()
    launch(CoroutineName("Coroutine1") + newRootJob) {
        launch(CoroutineName("Coroutine3")) {
            delay(100L)
            println("[${Thread.currentThread().name}] 코루틴 실행 완료")
        }

        launch(CoroutineName("Coroutine4")) {
            delay(100L)
            println("[${Thread.currentThread().name}] 코루틴 실행 완료")
        }
    }

    launch(CoroutineName("Coroutine2") + newRootJob) {
    	launch(CoroutineName("Coroutine5") {
        	delay(100L)
        	println("[${Thread.currentThread().name}] 코루틴 실행 완료")
        }
    }
}

/** 결과:
	종료 코드 0(으)로 완료된 프로세스
**/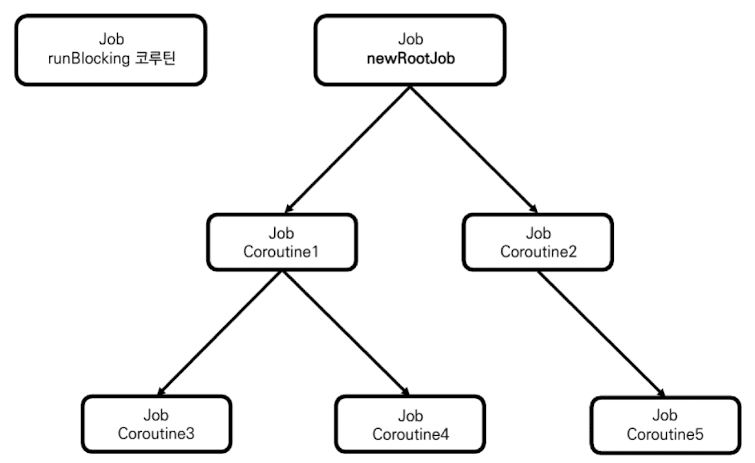
위 그림과 같이 구조화 된것을 확인할 수 있습니다.
CoroutineScope를 사용한 구조화와 매우 유사한 것을 알 수 있습니다. CoroutineScope를 사용한 구조에서는 newScope가 루트 Job을 포함했지만 여기에서는 newRootJob 자체가 루트 Job이 된다는 것 입니다.
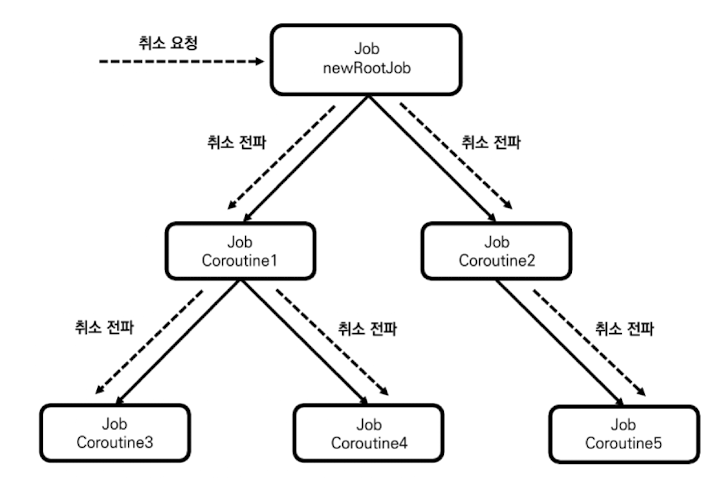
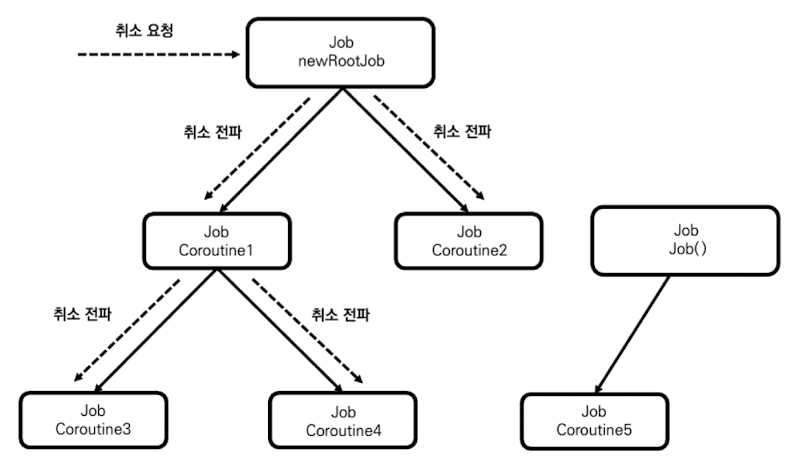
따라서 newRootJob.cancel()이 호출된다면 위 그림과 같이 하위 모든 Job 객체에 취소가 전파돼 자식 코루틴 모두가 취소 됩니다.
3. Job 사용해 일부 코루틴만 취소되지 않게 만들기
새로 Job 객체를 생성해 계층 구조를 끊음으로써 일부 코루틴만 취소되지 않도록 설정할 수 있습니다. 앞의 코드에서 Coroutine5의 계층 구조를 끊어 취소되지 않도록 만들어보자!
fun main() = runBlocking<Unit> {
    val newRootJob = Job()
    launch(CoroutineName("Coroutine1") + newRootJob) {
        launch(CoroutineName("Coroutine3")) {
            delay(100L)
            println("[${Thread.currentThread().name}] 코루틴 실행 완료")
        }

        launch(CoroutineName("Coroutine4")) {
            delay(100L)
            println("[${Thread.currentThread().name}] 코루틴 실행 완료")
        }
    }

    launch(CoroutineName("Coroutine2") + newRootJob) {
        launch(CoroutineName("Coroutine5") + Job()) {
            delay(100L)
            println("[${Thread.currentThread().name}] 코루틴 실행 완료")
        }
    }

    delay(50L)
    newRootJob.cancel()
    delay(1000L)
}

/** 결과:
	[main @Coroutine5#6] 코루틴 실행 완료
**/
이 경우 Coroutine5는 newRootJob과 계층 구조가 끊어지기 때문에 newRootJob.cancel()이 호출돼도 정상적으로 실행되는 것을 볼 수 있습니다.
위 코드에서 생성되는 코루틴의 계층 구조는 위와 같은 그림으로 표현할 수 있습니다.
따라서 newRootJob에 취소가 요청되더라도 위 그림과 같이 새로운 루트 Job의 자식이 돼 버린 Coroutine5에는 취소가 전파되지 않는다.
4. 생성된 Job의 부모를 명시적으로 설정하기
지금까지 Job 객체 생성을 위해 Job()을 사용했습니다. 이제부터는 Job 생성 함수가 어떻게 구현돼 있는지 살펴봄으로써 Job 생성 함수를 좀 더 깊게 알아보도록 하겠습니다.
/** Coroutine Api 내부 함수 **/
public fun Job(parent: Job? = null): CompletableJob = JobImpl(parent)
Job()을 통해서 Job 객체를 생성할 경우 parent 프로퍼티가 null이 돼 부모가 없는 루트 Job이 생성됩니다. 따라서 만약 Job 생성 함수의 parent 인자로 Job 객체를 넘기면 해당 Job을 부모로 하는 새로운 Job 객체를 생성할 수 있습니다.
fun main() = runBlocking<Unit> {
    launch(CoroutineName("Coroutine1")) {
        val newJob = Job()

        launch(CoroutineName("Coroutine2") + newJob) {
            delay(100L)
            println("[${Thread.currentThread().name}] 코루틴 실행")
        }
    }

    delay(1000L)
}

/** 결과:
    [main @Coroutine2#3] 코루틴 실행
 **/
Job 객체를 생성하여, launch 코루틴 빌더 함수의 context 프로퍼티 인자로 넘겨 구조화가 깨지는 코드입니다.
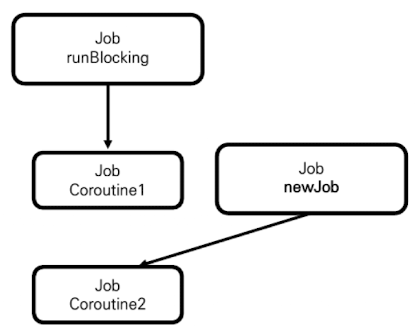
이 코드에서는 Job()을 통해 생성되는 새로운 Job 객체인 newJob을 사용해 Coroutine1과 Coroutine2의 구조화를 끊어 위 그림과 같은 계층 구조를 만들었습니다.
이번에는 Job 객체를 생성하여, launch 코루틴 빌더 함수의 context 프로퍼티 인자로 넘겨도 구조화 깨지지 않도록 만들어 보도록 하겠습니다.
fun main() = runBlocking<Unit> {
    launch(CoroutineName("Coroutine1")) {
        val coroutine1Job = this.coroutineContext[Job]
        val newJob = Job(coroutine1Job)

        launch(CoroutineName("Coroutine2") + newJob) {
            delay(100L)
            println("[${Thread.currentThread().name}] 코루틴 실행")
        }
    }
}

/** 결과:
	[main @Coroutine2#3] 코루틴 실행
    ...
    프로세스 종료가 되지 않음
**/
위와 같이 Job 생성 함수의 인자로 부모 코루틴의 Job 객체를 넘기면 됩니다.
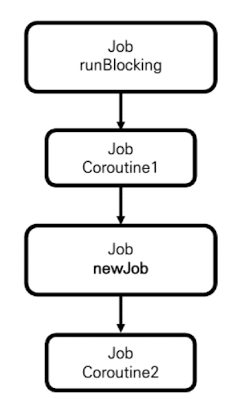
위 그림과 같이 Coroutine1의 Job 객체가 새로 생성된 Job 객체의 부모가 돼 코루틴의 구조화가 깨지지 않습니다.
하지만 이렇게 Job()을 통해서 생성한 객체를 사용해서 코루틴을 생성할 경우 문제가 생길 수 있습니다. 자세한 내용은 바로 아래에서 설명 하겠습니다.
5. 생성된 Job은 자동으로 실행 완료되지 않는다.
launch 함수를 통해 생성된 Job 객체는 더 이상 실행할 코드가 없고, 모든 자식 코루틴들이 실행 완료되면 자동으로 실행 완료된다. 하지만 Job 생성 함수를 통해 생성된 Job 객체는 자식 코루틴들이 모두 실행 완료되더라도 자동으로 실행 완료되지 않으며, 명시적으로 완료 함수인 complete()를 호출해야 완료 된다.
fun main() = runBlocking<Unit> {
    launch(CoroutineName("Coroutine1")) {
        val coroutine1Job = this.coroutineContext[Job]
        val newJob = Job(coroutine1Job)

        launch(CoroutineName("Coroutine2") + newJob) {
            delay(100L)
            println("[${Thread.currentThread().name}] 코루틴 실행")
        }
    }
}

/** 결과:
	[main @Coroutine2#3] 코루틴 실행
    ...
    프로세스 종료가 되지 않음
**/
이 코드가 실행되면 프로세스가 종료되지 않고 계속해서 실행된다.
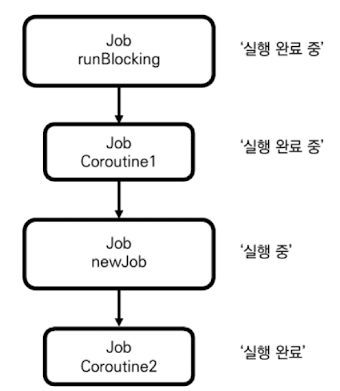
프로세스가 종료되지 않은 이유는 Job(parent = coroutine1Job)을 통해 생성된 newJob이 자동으로 실행 완료 처리되지 않기 때문입니다. 자식 코루틴이 실행 완료되지 않으면 부모 코루틴도 실행 완료될 수 없으므로 위 그림과 같이 부모 코루틴들이 실행 완료 중 상태에서 대기하게 됩니다.
이 문제를 해결하기 위해서는 다음과 같이 Job 객체의 complete 함수를 명시적으로 호출해 newJob의 실행이 완료될 수 있도록 해야합니다.
fun main() = runBlocking<Unit> {
    launch(CoroutineName("Coroutine1")) {
        val coroutine1Job = this.coroutineContext[Job]
        val newJob = Job(coroutine1Job)

        launch(CoroutineName("Coroutine2") + newJob) {
            delay(100L)
            println("[${Thread.currentThread().name}] 코루틴 실행")
        }

        /** 명시적으로 완료 호출 */
        newJob.complete()
    }
}

/** 결과:
	[main @Coroutine2#3] 코루틴 실행
    ...
    프로세스 종료
**/
newJob.complete() 호출하면 newJob은 '실행 완료 중' 상태로 바뀌며, 자식 코루틴인 Coroutine2가 실행 완료되면 자동으로 '실행 완료' 상태로 바뀌게 됩니다. 이에 따라 연쇄적으로 Coroutine1과 runBlocking 코루틴도 실행 완료 상태로 변경 됩니다. 위 코드를 실행하면 정상적으로 프로세스가 종료되는 것을 확인할 수 있습니다.