API 문서를 자동화 도구로는 대표적으로 Spring REST Docs와 Swagger가 있다. 흔히 두 가지를 두고 무엇을 사용할까 고민하실 것이다. 이번 글에서는 Spring REST Docs를 왜 사용하고, 어떻게 사용하는지 알아볼 것이다. Swagger는 다음 글에서...
왜 사용할까?
Spring REST Docs의 대표적인 장점은 다음과 같다.
-
테스트가 성공해야 문서 작성된다.
- Spring REST Docs는 테스트가 성공하지 않으면 문서를 만들 수 없다. 따라서 Spring REST Docs로 문서를 만든다는 것은 API의 신뢰도를 높이고 더불어 테스트 코드의 검증을 강제로 하게 만드는 좋은 문서화 도구이다.😂😂
-
실제 코드에 추가되는 코드가 없다.
- 프로덕션 코드와 분리되어있기 때문에 Swagger같이 Config 설정 코드나 어노테이션이 우리의 프로덕션 코드를 더럽힐 일이 없다.😊😊
단점으로는 적용하기 어렵다...
어떻게 사용할까?
작업 환경
- Spring Boot - 2.3.3
- Gradle - 6.4.1
- MockMvc
build.gradle 설정
먼저 Spring REST Docs를 사용하기 위해 build.gradle에 아래 설정을 추가한다.
plugins {
	id "org.asciidoctor.convert" version "1.5.9.2"
}

dependencies {
	asciidoctor 'org.springframework.restdocs:spring-restdocs-asciidoctor'
	testImplementation 'org.springframework.restdocs:spring-restdocs-mockmvc'
}

ext {
	snippetsDir = file('build/generated-snippets')
}

test {
	outputs.dir snippetsDir
}

asciidoctor {
	inputs.dir snippetsDir
	dependsOn test
}

bootJar {
	dependsOn asciidoctor
	from ("${asciidoctor.outputDir}/html5") {
		into 'static/docs'
	}
}
잠깐!!!
bootJar {
	dependsOn asciidoctor
	from ("${asciidoctor.outputDir}/html5") {
		into 'static/docs'
	}
}
이 설정은 생성된 문서를 jar파일에 패키징하는 설정이다.
You may want to package the generated documentation in your project’s jar file ... - Spring REST Docs의 Packaging the Documentation
만약 build/asciidoc/html5/에 html파일을 src/main/resources/static/doc 복사해주고 싶다면 아래 설정을 추가해 주시면 된다.
task copyDocument(type: Copy) {
    dependsOn asciidoctor

    from file("build/asciidoc/html5/")
    into file("src/main/resources/static/docs")
}

build {
    dependsOn copyDocument
}
프로덕션 코드 작성
먼저 Spring REST Docs를 사용하기 위해 다음과 같이 Controller와 Entity를 작성했다.
@RequestMapping("/posts")
@RestController
public class PostController {

    private final PostService postService;

    public PostController(final PostService postService) {
        this.postService = postService;
    }

    @PostMapping
    public ResponseEntity<PostResponse> create(@RequestBody final PostRequest postRequest) {
        final PostResponse postResponse = postService.create(postRequest);
        return ResponseEntity.created(URI.create("/posts/" + postResponse.getId())).build());
    }

    @GetMapping
    public ResponseEntity<List<PostResponse>> findAll() {
        return ResponseEntity.ok(postService.findAll());
    }

    @GetMapping("/{postId}")
    public ResponseEntity<PostResponse> findById(@PathVariable final Long postId) {
        return ResponseEntity.ok(postService.findById(postId));
    }

    @PutMapping("/{postId}")
    public ResponseEntity<Void> update(@PathVariable final Long postId, @RequestBody PostRequest postRequest) {
        postService.update(postId, postRequest);
        return ResponseEntity.ok().build();
    }

    @DeleteMapping("/{postId}")
    public ResponseEntity<Void> delete(@PathVariable final Long postId) {
        postService.delete(postId);
        return ResponseEntity.noContent().build();
    }
}
@Entity
public class Post {
@Id
@GeneratedValue(strategy = GenerationType.IDENTITY)
private Long id;
@Column(nullable = false)
private String title;
@Column
private String content;
// ...
}테스트 코드 작성
테스트 코드의 초기 setting을 해보겠다.
@ExtendWith(RestDocumentationExtension.class) // When using JUnit5
@SpringBootTest
public class PostControllerTest {

    private MockMvc mockMvc;

    @BeforeEach
    public void setUp(WebApplicationContext webApplicationContext,
            RestDocumentationContextProvider restDocumentation) {
        this.mockMvc = MockMvcBuilders.webAppContextSetup(webApplicationContext)
                .apply(documentationConfiguration(restDocumentation))
                .build();
    }

}webAppContextSetup()만 쓴다면 여러분들이 아시는 Mock을 사용하기 위한 일반적인 MockMvc의 setting이지만 apply(documentationConfiguration(restDocumentation))를 추가함으로써 문서화를 할 수 있는 것이다.
아!! 너무 복잡한가???
@AutoConfigureMockMvc // -> webAppContextSetup(webApplicationContext)
@AutoConfigureRestDocs // -> apply(documentationConfiguration(restDocumentation))
@SpringBootTest
public class PostControllerTest {

    @Autowired
    private MockMvc mockMvc;

}
이렇게 해주시면 위의 복잡한 설정을 대신 해줄 수 있다. 자세히 알고 싶으신 분들은 @AutoConfigureMockMvc와 @AutoConfigureRestDocs를 참고해보자.😊😊 절대 다룰 게 많아서 링크 첨부한 거 아니다...큽
setting이 끝났으니 create의 테스트 코드 작성 및 설명을 하겠다.
@MockBean
private PostService postService;

// ...

@Test
void create() throws Exception {
    final PostResponse postResponse = new PostResponse(1L, "title", "content");
    when(postService.create(any())).thenReturn(postResponse);

    this.mockMvc.perform(post("/posts") // 1
            .content("{\"title\": \"title\", \n\"content\": \"content\"}") // 2
            .contentType(MediaType.APPLICATION_JSON)) // 3
            .andExpect(status().isCreated()) // 4
            .andDo(document("post-create", // 5
                    requestFields( // 6
                            fieldWithPath("title").description("Post 제목"), // 7
                            fieldWithPath("content").description("Post 내용").optional() // 8
                    )
            ));
}-
요청 방식(get, post 등)은 post를 선택하고
/posts를 호출하겠다는 의미다. -
create는 RequestBody를 받기 때문에 값을 보내줘야 한다. content 안에 보낼 데이터를 입력해주시면 된다.
  {
    "title": "title",
    "content": "content"
}-
create는 application/json 형식으로 요청을 받는다는 의미다.
-
정상적으로 동작 시
isCreated상태 코드로 응답한다는 의미다. -
이 documentation의 이름을 "post-create"로 하겠다는 의미다.
-
create는 requestFields를 받기 때문에 문서에 requestFields을 명시하겠다는 의미다.
-
fieldWithPath는 key 값을,description는fieldWithPath에 대한 설명을 쓰면 된다. -
Test를 할 때 만약
content의 값이 없다면 테스트는 실패할 것이다. 따라서content와 같이null일 수 있다면optional()을 붙여주면 된다.
다음으로 findAll과 findById 이다. (중복되는 설명은 생략하겠다.😂😂)
@Test
void findAll() throws Exception {
    List<PostResponse> postResponses = Lists.newArrayList(
        new PostResponse(1L, "title1", "content1"),
        new PostResponse(2L, "title2", "content2")
    );

    when(postService.findAll()).thenReturn(postResponses);

    this.mockMvc.perform(get("/posts")
            .accept(MediaType.APPLICATION_JSON)) // 1
            .andExpect(status().isOk())
            .andDo(document("post-get-all",
                    responseFields( // 2
                            fieldWithPath("[].id").description("Post Id"), // 3
                            fieldWithPath("[].title").description("Post 제목"),
                            fieldWithPath("[].content").description("Post 내용")
                    )
            ));
}

@Test
void findById() throws Exception {
    final PostResponse postResponse = new PostResponse(1L, "title", "content");
    when(postService.findById(anyLong())).thenReturn(postResponse);

    this.mockMvc.perform(get("/post/{postId}", postResponse.getId()) // 4
            .accept(MediaType.APPLICATION_JSON))
        	.andExpect(status().isOk())
        	.andDo(document("post-get-one",
                    pathParameters( // 5
                            parameterWithName("postId").description("Post Id") // 6
                    ),
                    responseFields(
                            fieldWithPath("id").description("Post Id"),
                            fieldWithPath("title").description("Post 제목"),
                            fieldWithPath("content").description("Post 내용")
                    )
            ));
}-
findAll는 application/json 형식으로 응답을 보내겠다는 의미다.
-
findAll는 responseFields 보내기 때문에 responseFields를 명시하겠다는 의미다.
-
설명은 create의 7번과 같고, List형식은
[].id처럼 앞에[]를 해야 한다. - 참고 -
PathVariable로 받는 값(ex.
postResponse.getId())은 위와 같이 넣을 수 있다. -
findById는 PathVariable을 받기 때문에 PathVariable를 문서에 명시한다는 의미다.
-
pathParameters는 parameterWithName를 사용하여 PathVariable의 Name(postId)을 명시할 수 있고 description은 설명을 적어주시면 된다.
이제 이전 설명을 바탕으로 update와 delete를 작성할 수 있다.
@Test
void update() throws Exception {
    this.mockMvc.perform(put("/post/{postId}", 1L)
            .content("{\"title\": \"turtle\", \n\"content\": \"context\"}")
            .contentType(MediaType.APPLICATION_JSON))
            .andExpect(status().isOk())
            .andDo(document("post-update",
                    pathParameters(
                            parameterWithName("postId").description("Post Id")
                    ),
                    requestFields(
                            fieldWithPath("title").description("Post 제목"),
                            fieldWithPath("content").description("Post 내용")
                    )
            ));
}

@Test
void remove() throws Exception {
    this.mockMvc.perform(delete("/post/{postId}", 1L))
            .andExpect(status().isNoContent())
            .andDo(document("post-delete",
                    pathParameters(
                            parameterWithName("postId").description("Post Id")
                    )
            ));
}
문서화
build를 하면 build/generated-snippets에 다음과 같이 생길 것이다.

src/docs/asciidoc와 같이 디렉토리를 만들고 *.adoc파일을 작성해준다. (Asciidoctor User Manual 참고)
Asciidoctor는 일반 텍스트를 처리하고 필요에 맞게 스타일 및 레이아웃 된 HTML을 생성합니다.
= Spring REST Docs
:toc: left
:toclevels: 2
:sectlinks:

[[resources-post]]
== Post

[[resources-post-create]]
=== Post 생성

==== HTTP request

include::{snippets}/post-create/http-request.adoc[]

==== HTTP response

include::{snippets}/post-create/http-response.adoc[]
IntelliJ를 사용한다면 AsciiDoc plugin을 설치하길바란다. 미리 보기가 가능해진다. (사용하는 것을 추천한다.👍)

코드 작성을 완료했다면 다시 한 번 build 한다. 그러면 build/asciidoc/html5와 src/main/resources/static/docs에 html 파일이 생길 것이다.
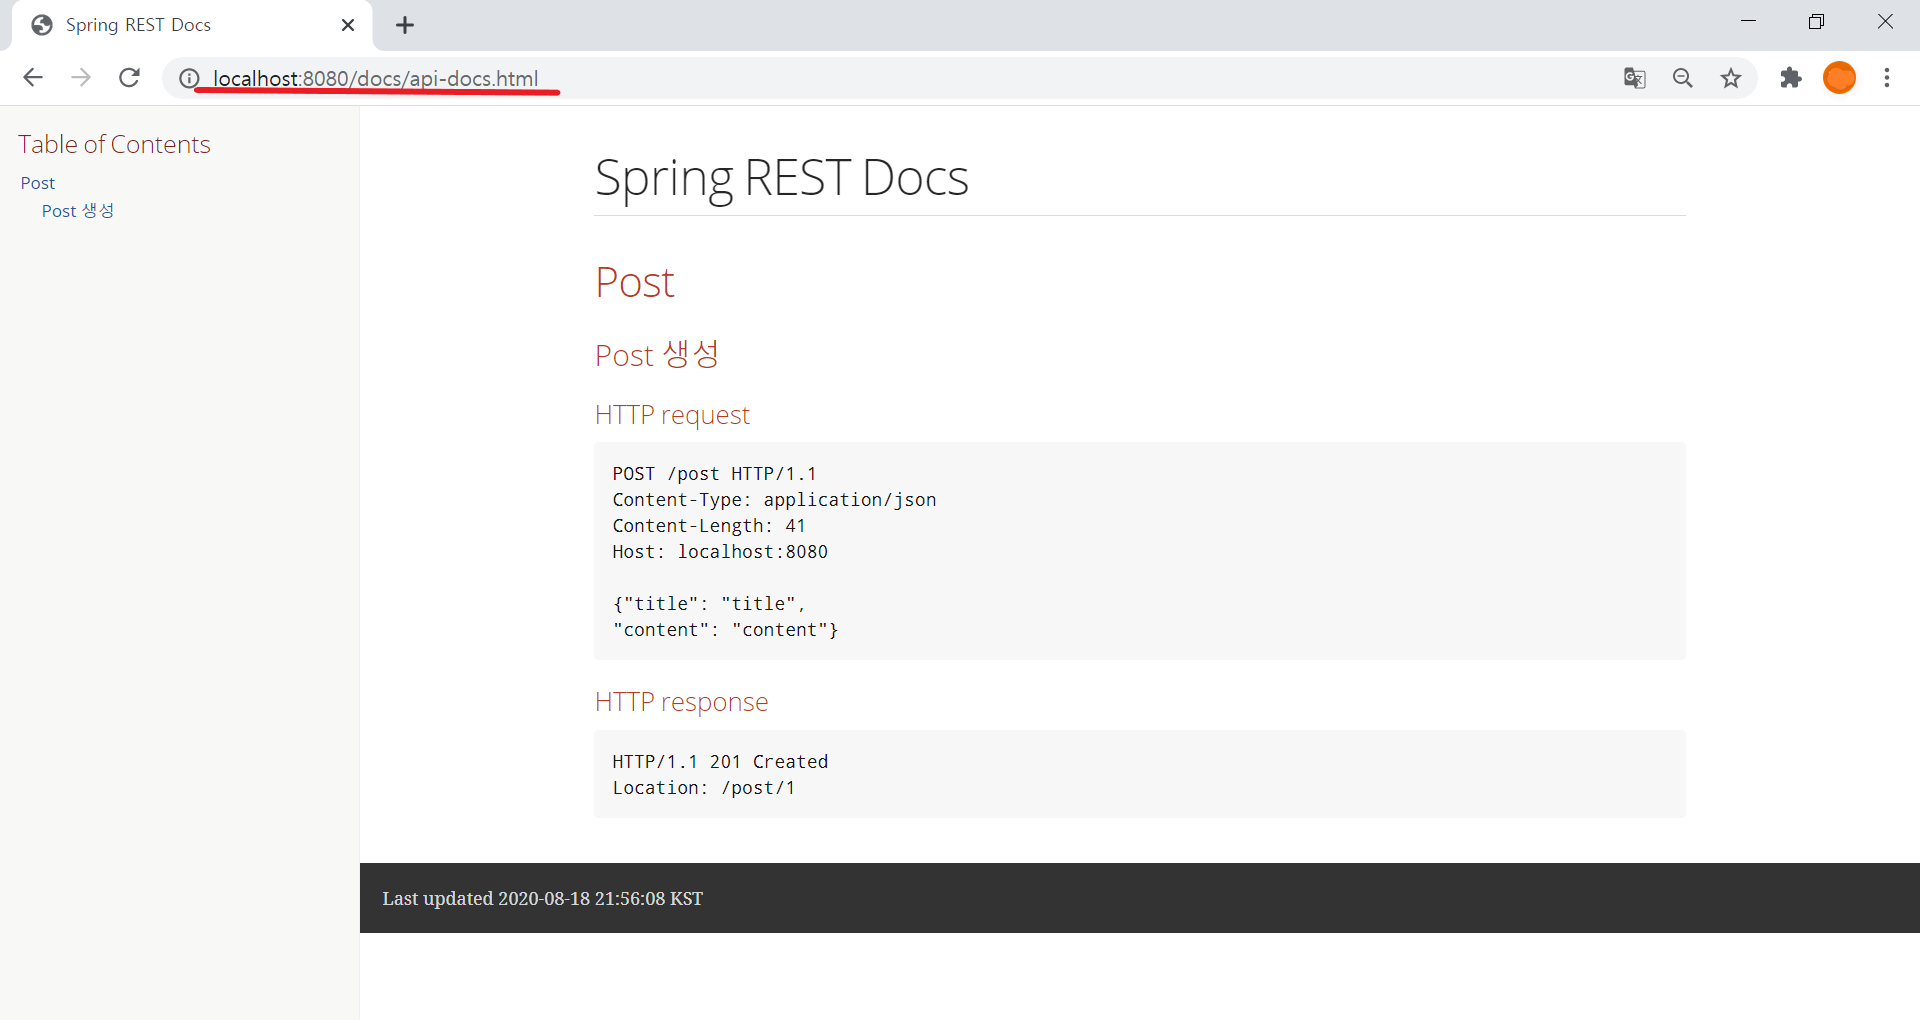
마지막으로 서버를 실행 시키고 http://localhost:8080/docs/api-docs.html로 이동하면 문서가 잘 나오는 것을 확인할 수 있다. 👏👏
잠깐!!!
만약 아래와 같이 나온다면
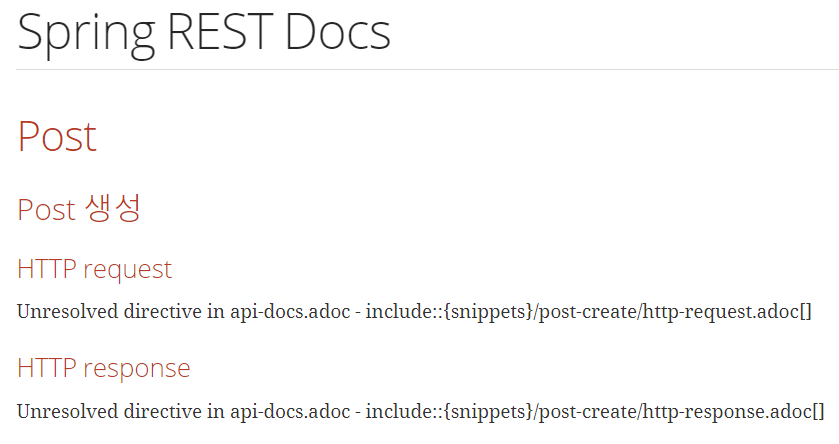
아래 코드를 src/main/docs/asciidoc있는 *.adoc 코드의 최상단에 넣어준다.
ifndef::snippets[]
:snippets: ../../../build/generated-snippets
endif::[]
아까 작성한 *.adoc에 적용하면 다음과 같다.
ifndef::snippets[]
:snippets: ../../../build/generated-snippets
endif::[]
= Spring REST Docs
:toc: left
:toclevels: 2
:sectlinks:

[[resources-post]]
== Post

[[resources-post-create]]
=== Post 생성

==== HTTP request

include::{snippets}/post-create/http-request.adoc[]

==== HTTP response

include::{snippets}/post-create/http-response.adoc[]
사용하면 내가 테스트 코드를 작성하는지 문서를 만들고 있는지 모르게 하지만 Swagger보다 안전한 API 문서를 만들 수 있게 하는 문서 자동화 도구 Spring REST Docs... 지금 당장 사용하길 바란다.😊😊
참고자료
