학습시킨 모델은 맛집 블로그 리뷰 텍스트가 광고인지 아닌지 classify해주는 것이다. 이 모델을 Python FastAPI를 이용하여 REST API로 배포하고자 한다.
https://fastapi.tiangolo.com/tutorial/
Fast API는 공식 문서가 굉장히 잘 되어 있다. 해당 tutorial을 참고하여 application을 작성하였다!
github repository
https://github.com/timointhebush/real-good-restaurant-classifier
구현하고자 하는 API의 형태
개발 중인 서비스의 흐름은 다음과 같다.
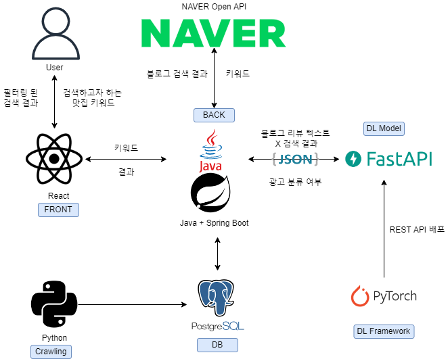
사용자가 '홍대 맛집'이라는 키워드를 검색하면 Spring Boot Application이 네이버의 블로그 검색 Open API를 호출한다. response로 얻은 JSON을 body로 지금 개발하는 FastAPI application에 요청을 보낸다.
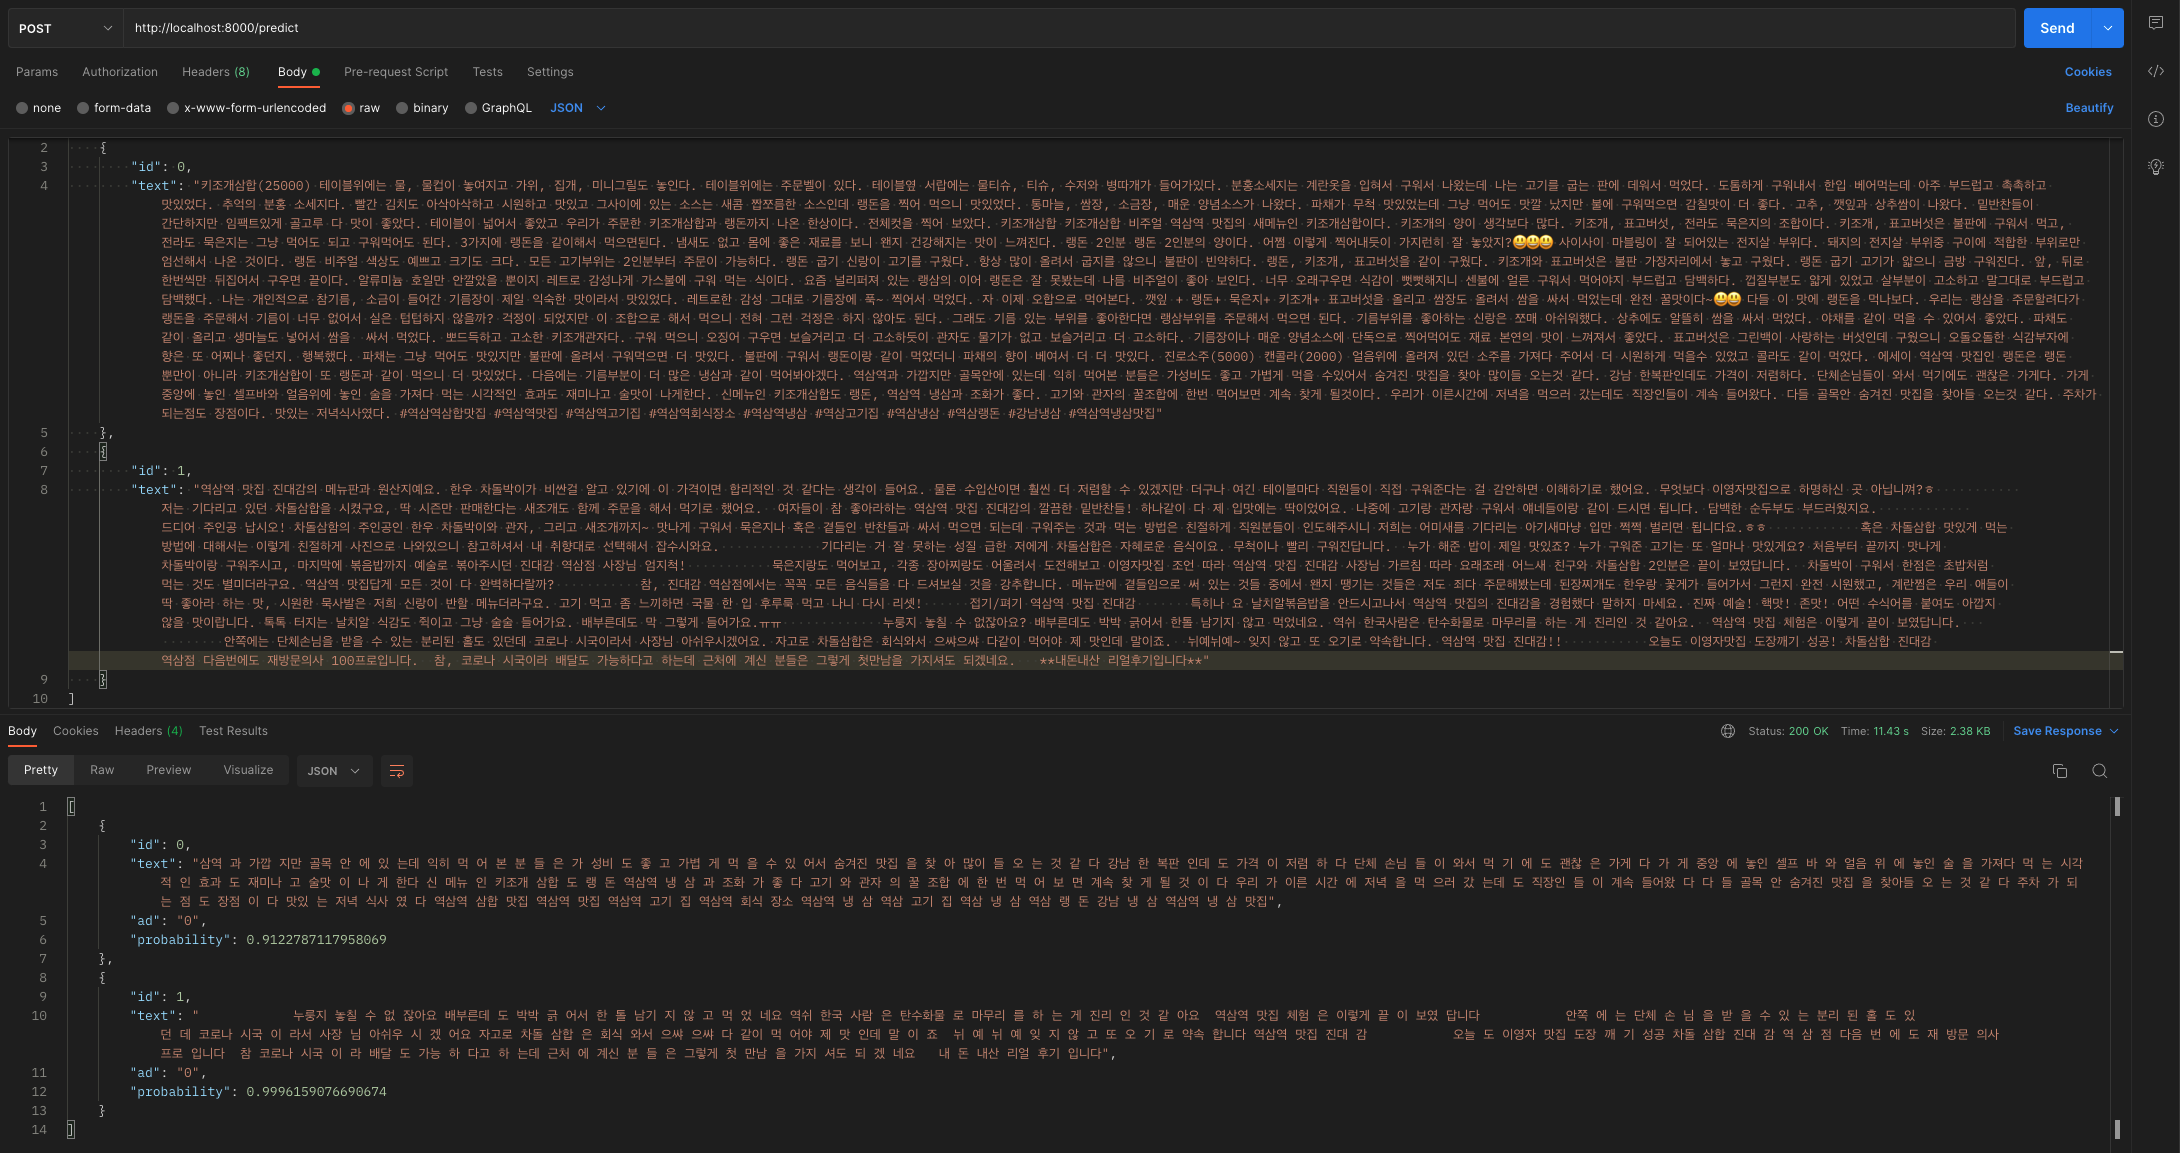
Request Body
[
    {
        "id": 0,
        "text": "...토요일 오후 2시 반쯤? 근데도 앞에 웨이팅이 24팀....... 어마어마합니다...."
    },
    {
        "id": 1,
        "text": "...여기는 분위기도 힙하고 가게의 음식 맛도 좋아서 조만간 또 방문할 것 같은 그런 곳이에요..."
    }
]
각 블로그 링크에 대한 광고 여부(ad), classification probability(probability)가 추가되었다. 만약 블로그에서 텍스트를 추출하지 못했다면 text가 공백으로 반환되어진다.
Response Body
[
    {
        "id": 0,
        "text": "...토요일 오후 2시 반쯤? 근데도 앞에 웨이팅이 24팀....... 어마어마합니다....",
        "ad": 0,
        "probability": 0.8768
    },
    {
        "id": 1,
        "text": "...여기는 분위기도 힙하고 가게의 음식 맛도 좋아서 조만간 또 방문할 것 같은 그런 곳이에요...",
        "ad": 1,
        "probability": 0.976357
    }
]
디렉토리
.
├── README.md
├── app.py
├── classifier.py
├── config.py
├── models
│   └── blogText.py
├── preprocessor.py
└── trained_model
    └── bert_clean.tok.slice.pth
PyTorch model 부분
preprocessor.py
텍스트를 딥러닝 모델에 넣어 분류하기 이전, 전처리를 위한 함수들이다.
from konlpy.tag import Mecab
import re

mecab = Mecab()


def mecab_tokenize(text):
    """
    Mecab을 사용하여 tokenized text 반환
    """
    return " ".join(mecab.morphs(text))


def clean_etc_reg_ex(title):
    """
    정규식을 통해 기타 공백과 기호, 숫자등을 제거
    """
    title = re.sub(
        r"[@%\\*=()/~#&\+á?\xc3\xa1\-\|\.\:\;\!\-\,\_\~\$\'\"]", "", title
    )  # remove punctuation
    title = re.sub(r"[∼%①②⑤⑪…→·]", "", title)
    title = re.sub(r"\d+", "", title)  # remove number
    title = re.sub(r"\s+", " ", title)  # remove extra space
    title = re.sub(r"<[^>]+>", "", title)  # remove Html tags
    title = re.sub(r"\s+", " ", title)  # remove spaces
    title = re.sub(r"^\s+", "", title)  # remove space from start
    title = re.sub(r"\s+$", "", title)  # remove space from the end
    title = re.sub("[一-龥]", "", title)
    return title


def slice_from_behind(text, num_of_chars):
	"""
    BERT의 최대 token 기준에 맞추기 위해, text를 slice
    """
    return text[-num_of_chars:]


def preprocess(text):
    text = clean_etc_reg_ex(text)
    text = mecab_tokenize(text)
    return slice_from_behind(text, num_of_chars=500)
Config.py
Config class는 text classification에 필요한 것들을 담아 넘겨줄 때 사용한다.
class Config:

    def __init__(self, model_fn, gpu_id, batch_size, lines):
    	# model full name. 모델 저장 경로
        self.model_fn = model_fn
        # cuda 사용 시, gpu id
        self.gpu_id = gpu_id
        self.batch_size = batch_size
        # 분류하고자 하는 블로그 text들
        self.lines = lines
        # probability 상위 몇 개를 출력할 것인지
        self.top_k = 1
classifier.py
Config객체에 분류할 text, 저장 경로 등 각종 정보를 담아 classifier.py의 classify를 호출하면 분류 결과를 얻을 수 있다.
import torch
import torch.nn.functional as F

from transformers import BertTokenizerFast
from transformers import BertForSequenceClassification, AlbertForSequenceClassification


def classify(config) -> list:
    saved_data = torch.load(
        config.model_fn,
        map_location='cpu' if config.gpu_id < 0 else 'cuda:%d' % config.gpu_id
    )
    train_config = saved_data['config']
    bert_best = saved_data['bert']
    index_to_label = saved_data['classes']

    lines = config.lines

    with torch.no_grad():
        # Declare model and load pre-trained weights.
        tokenizer = BertTokenizerFast.from_pretrained(train_config.pretrained_model_name)
        model_loader = AlbertForSequenceClassification if train_config.use_albert else BertForSequenceClassification
        model = model_loader.from_pretrained(
            train_config.pretrained_model_name,
            num_labels=len(index_to_label)
        )
        model.load_state_dict(bert_best)

        if config.gpu_id >= 0:
            model.cuda(config.gpu_id)
        device = next(model.parameters()).device

        model.eval()

        y_hats = []
        for idx in range(0, len(lines), config.batch_size):
            mini_batch = tokenizer(
                lines[idx:idx + config.batch_size],
                padding=True,
                truncation=True,
                return_tensors="pt",
            )

            x = mini_batch['input_ids']
            x = x.to(device)
            mask = mini_batch['attention_mask']
            mask = mask.to(device)

            # Take feed-forward
            y_hat = F.softmax(model(x, attention_mask=mask).logits, dim=-1)

            y_hats += [y_hat]
        # Concatenate the mini-batch wise result
        y_hats = torch.cat(y_hats, dim=0)
        # |y_hats| = (len(lines), n_classes)

        probs, indice = y_hats.cpu().topk(config.top_k)
        # |indice| = (len(lines), top_k)

        result = []
        for i, line in enumerate(lines):
        	# classification probability, 광고 여부, 분류한 텍스트를 담아 반환.
            row = [float(probs[i][0]), index_to_label[int(indice[i][0])], line]
            result.append(row)
        return result
Fast API 부분
패키지 설치
해당 커맨드를 입력하면, fast API 뿐만 아니라 웹 서버인 uvicorn도 함께 설치된다.
pip install "fastapi[all]"blogText.py
FastAPI는 pydantic을 이용하여 Type Hinting을 제공한다. 간단한 형태의 application이기 때문에 JSON을 dictionary로 변환하여 처리할 수 있지만, 코드의 가독성을 위해 class를 만들어 주었다.
request body의 json과 같은 형태이다.
from pydantic import BaseModel
from typing import Union


class BlogText(BaseModel):
    id: int
    text: str
    ad: Union[int, None] = None
    probability: Union[float, None] = None
app.py
from fastapi import FastAPI
from typing import List
from config import Config
from classifier import classify
from models.blogText import BlogText
from preprocessor import preprocess

app = FastAPI()


@app.post("/predict")
async def classify_blog_text(blog_text_list: List[BlogText]):
    """
        네이버 블로그 맛집 리뷰 텍스트의 광고 여부를 predict
    """
    blog_text_list = sorted(blog_text_list, key=lambda blog_text: blog_text.id)
    lines_for_predict = []
    for blog_text in blog_text_list:
        lines_for_predict.append(preprocess(blog_text.text))
    config = Config(model_fn="./trained_model/bert_clean.tok.slice.pth", gpu_id=-1, batch_size=8,
                    lines=lines_for_predict)
    classified_lines = classify(config)
    classification_result = []
    for i, classified_line in enumerate(classified_lines):
        blog_text = BlogText(
            id=blog_text_list[i].id,
            text=classified_line[2]
        )
        blog_text.probability = classified_line[0]
        blog_text.ad = classified_line[1]
        classification_result.append(blog_text)
    return classification_result
FastAPI app 실행하기
개발 중
uvicorn app:app --reload

INFO:     Uvicorn running on http://127.0.0.1:8000 (Press CTRL+C to quit)
INFO:     Started reloader process [28720]
INFO:     Started server process [28722]
INFO:     Waiting for application startup.
INFO:     Application startup complete.
커맨드의 각 부분의 의미는 다음과 같다.
- uvicorn app:app --reload:
app.py파일을 의미한다. 공식문서 튜토리얼에서는main.py에 작성했기 때문에uvicorn main:app --reload의 형태로 명령어를 실행한다. - uvicorn app:app --reload:
app.py에 FastAPI객체 변수의 이름. 즉app = FastAPI()부분을 의미한다. - uvicorn app:app --reload: 해당 옵션을 넣으면 코드가 변경되었을 떄, 서버가 자동으로 재시작된다.
배포
배포할 땐 nohup과 &를 사용하여 app을 실행했다.
nohup uvicorn app:app > {log경로} 2>&1 &TEST
Postman test 결과