
상황
- 온라인 동물병원 프로젝트
- 예약서는 동물을 갖고 있는 고객만이 들어갈 수 있도록 한다.
- 동물을 갖고 있지 않던가, 의사인 사람은 Security filter에서 우선 처리된다.
- 매번 검사할 수 있지만, 너무 중복이 많다.
- 공통처리. 그중 Interceptor를 사용해보자!.
사전 지식
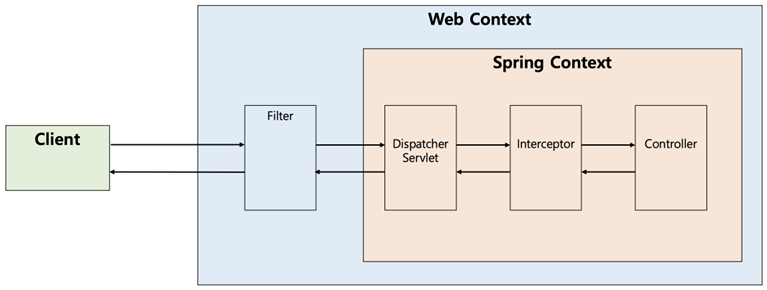
Interceptor
-
컨트롤러로 들어오는 요청, 컨트롤러에서 응답하는 요청을 가로채 공통 로직을 수행할 수 있도록 합니다.
-
스프링 컨텍스트 내부에서 실행
-
스프링의 모든 빈 객체에 접근 가능
-
메서드
preHandler() : 컨트롤러 메서드가 실행되기 전. false이면 작업 중단.
postHandler() : 컨트롤러 메시지 실행직후 View 페이지 렌더링 전.
afterCompletion() : view 페이지가 렌더링 되고 난 후, 모든 작업 완료된 후!
@Component
-
개발자가 직접 작성한 클래스를 Bean Configuration파일에 Bean을 따로 등록하지 않고 사용하게 해준다.
-
@ComponentsScan에 의해 Bean을 등록한다. @SpringBootApplication 내부에 설정되어 있음.
-
흔히 사용하는 @Controller, @Service, @Repository들이 @Component의 구체화된 형태이다.
실습
HasAnimalsInterceptor.java
@Component // bean 등록
@RequiredArgsConstructor
public class HasAnimalsInterceptor implements HandlerInterceptor {
    private final AnimalService animalService; // DI

    @Override
    public boolean preHandle(HttpServletRequest request, HttpServletResponse response, Object handler)
            throws Exception {
        // security를 통해 email 받아옴.
        Authentication authentication = SecurityContextHolder.getContext().getAuthentication();
        String email = authentication.getName();

        // 해당 email을 주인으로 하는 동물의 수 구하기.
        List<Animal> animalList = animalService.findByMemberEmail(email);

        // 동물이 없으면 false and redirect.
        if(animalList.size() == 0){
            response.sendRedirect("/error/not-animals");
            return false;
        }

        return true;
    }
}- interceptor는 controller 전에 생성됨
- true를 반환 시 그대로 진행
- false를 반환 시 멈춘다.
- service를 사용하여 사용자의 동물 수를 구하고, 한마리도 존재하지 않는다면 false, 존재한다면 true를 반환한다.
- 이때, 동물이 없으면 response.sendRedirect를 통해 에러 페이지를 보낸다.
MvcConfig.java
@Configuration
@RequiredArgsConstructor
public class MvcConfig implements WebMvcConfigurer {
    private final HasAnimalsInterceptor hasAnimalsInterceptor; // DI

    @Override
    public void addInterceptors(InterceptorRegistry registry){
        registry.addInterceptor(hasAnimalsInterceptor) // 인터셉터 추가
                .addPathPatterns("/usr/member/appointment");
    }
}- WebMvcConfigurer를 인터페이스로 받고, addInterceptors를 오버라이딩 한다.
- 해당 경로에 hasAnimalsInterceptor를 추가한다.
- 꼭 DI로 받자. 새로운 인스턴스(new)로 삽입하면 spring이 인식을 못한다.
결과
/usr/member/appointment로 들어오는 모든 경로에 정상적으로 인터셉터가 작동한다.
고객이 동물을 갖고 있지 않다면, response.sendRedirect("/error/not-animals"); 에 의해 error/not-animals로 리다이렉트 한다.

차곡차곡 쌓아보자