
🤔 왜 테스트를 해야하는가?
- 안정적인 어플리케이션을 위해 !
- 디버깅 시간을 단축
-> 자동화 된 유닛 테스팅으로 특정 버그를 쉽게 찾아 낼 수 있음
💫 TDD (Test Driven Development)
테스트 주도 개발(Test Driven Development)
실제 코드를 작성하기 전에 테스트 코드를 먼저 작성
과정
테스트 코드 작성 -> 테스트 실패 -> 코드 작성 -> 테스트 성공
장점
- 소스 코드에 안정감
- 디버깅 시간, 실제 개발 시간 절약
- 깨끗한코드 나올 확률 높음
📚 React Testing Library
에어비앤비에서 만든 Enzyme을 대처하는 솔루션
- 행위 주도 테스트 (Behavior Driven Test)
-> 이벤트를 발생시켰을때 화면이 어떻게 변화가 되는지 같은 테스트 중심
설치
Create React App 로 리액트 앱을 생성하면 기본적으로 생성됨
추가도 가능
$ npm install --save-dev @testing-library/react명령어 설정
📃 package.json
{
  ...
  "scripts": {
    "test": "jest", // or "jest --watchAll
  },
	...
}
공식 문서
react-testing-library 를 사용한 리액트 컴포넌트 테스트 - velopert님 블로그
👢 Jest !
FaceBook에 의해서 만들어진 테스팅 프레임 워크
단위(Unit)테스트를 위해서 이용
시작하기 & 린트 설정
// 설치
$ npm install jest --save-dev
// ESLint Testing Plugins 설치
$ npm install eslint-plugin-testing-library eslint-plugin-jest-dom> package.json에 eslintConfig 삭제📃 .eslintrc.json
{
    "plugins": [
        "testing-library",
        "jest-dom"
    ],
    "extends": [
        "react-app",
        "react-app/jest",
        "plugin:testing-library/react",
        "plugin:jest-dom/recommended"
    ]
}
test 파일로 인식하는 경우
1.{filename}.test.js
2.{filename}.spec.js
3. All files inside "tests" folders
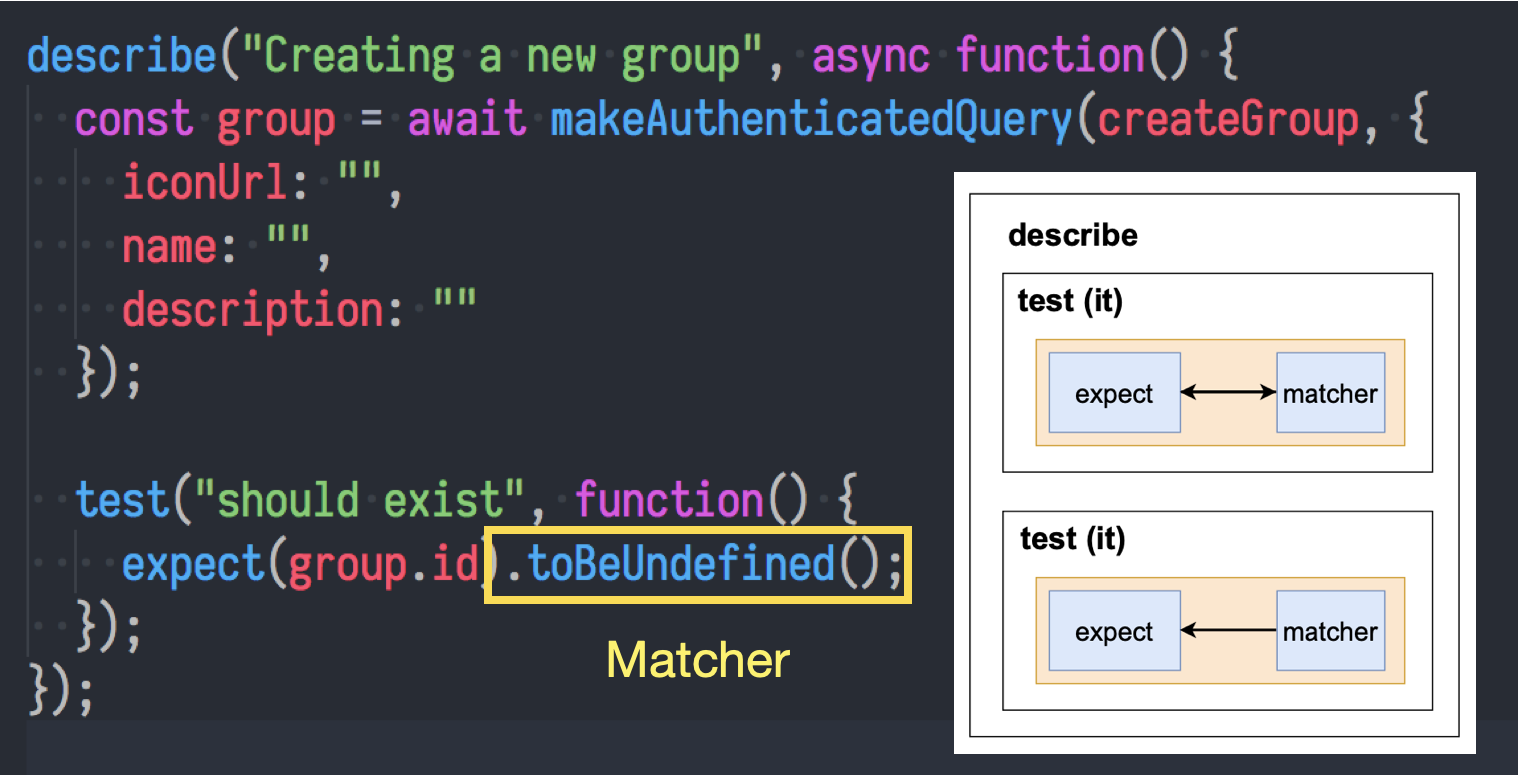
파일구조
describe ( name, fn )
여러 관련 테스트를 그룹화하는 블록 생성
test(if) ( name, fn, timeout )
개별 테스트를 수행하는 곳. 각 테스트를 작은 문장처럼 설명
expect
값을 테스트할 때마다 주로 matcher와 함께 사용
matcher
다른 방법으로 값을 테스트 하도록 사용
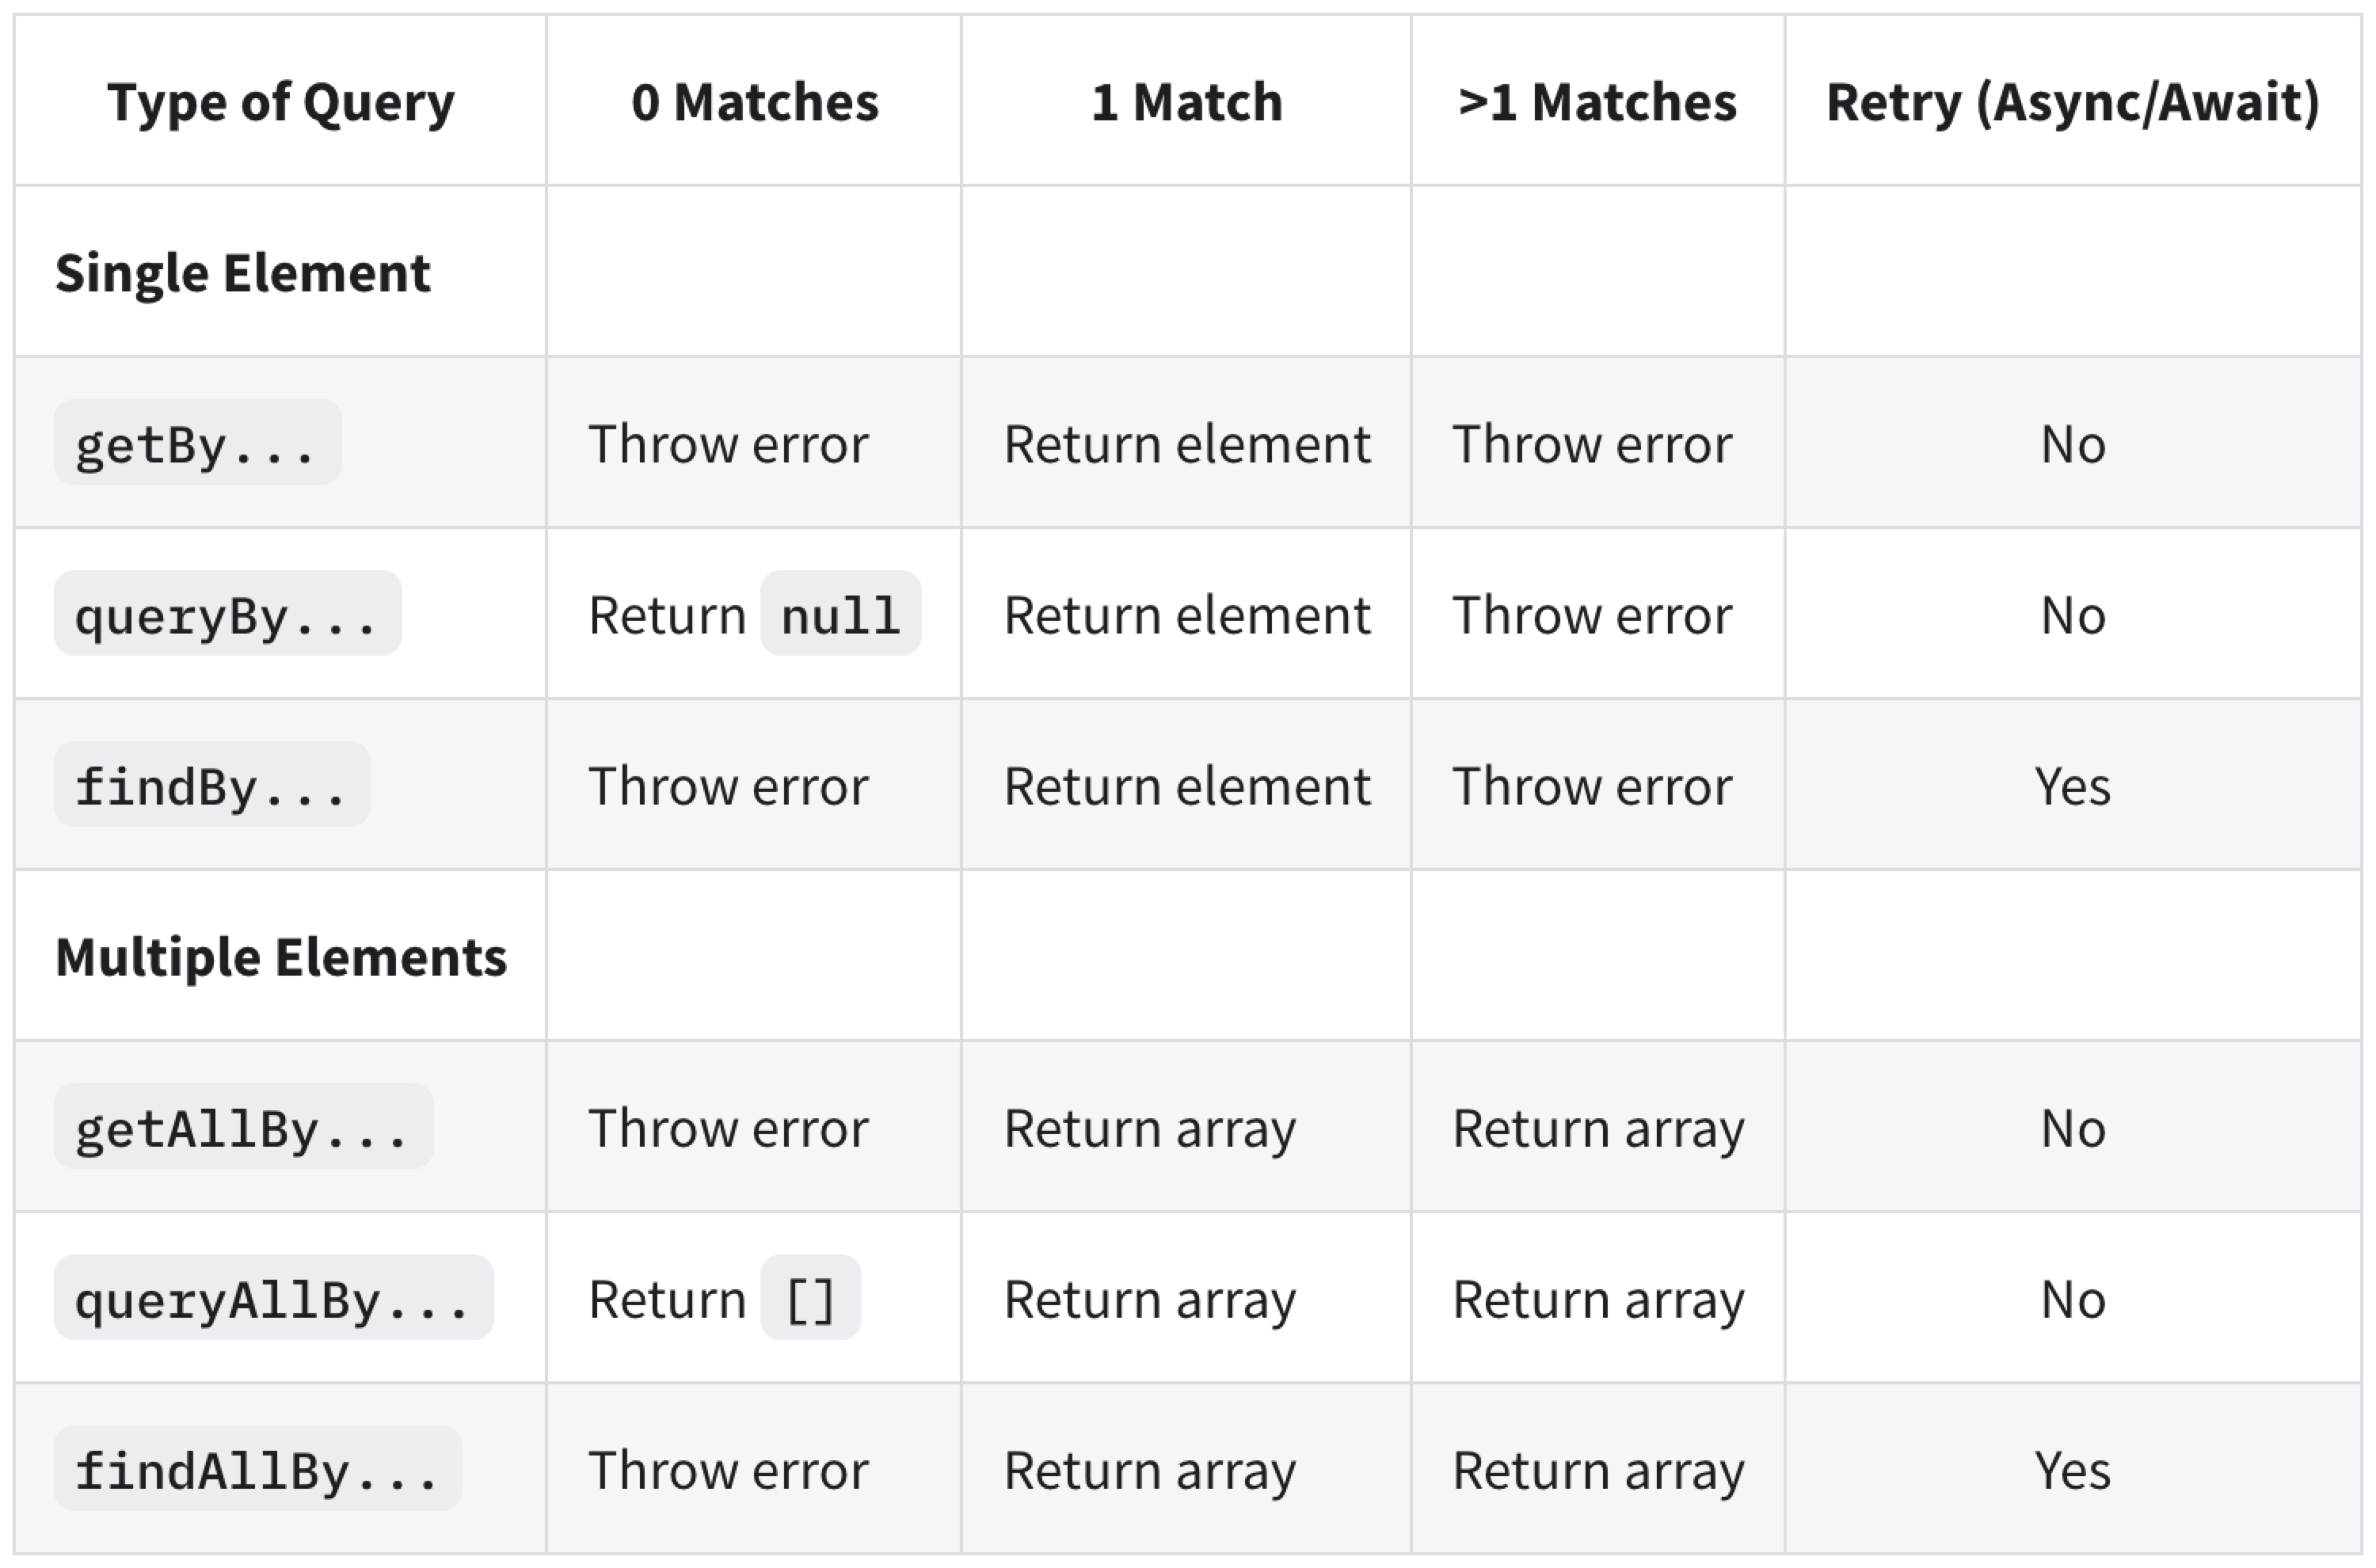
쿼리함수
주로 getByRole 권장
getBy
쿼리에 대해 일치하는 노드를 반환
실패시 오류 발생
둘 이상의 요소가 예상되는 경우 getAllBy 사용
queryBy
쿼리에 대해 일치하는 노드를 반환
요소가 없으면 null 을 반환
둘 이상의 요소가 예상되는 경우 queryAllBy 사용
findBy (getBy + waitFor)
주어진 쿼리와 일치하는 요소가 발 견되면 Promise를 반환
기본 제한 시간이내에 발견하지 못하면 약속 거부(reject)
둘 이상의 요소를 찾아야 하는 경우 findAllBy
waitFor
일정 기간 동안 기다려야 할 때 waitFor를 사용하여 기대가 통과할 때까지 기다림
[ ➕ 참고 - 쿼리 우선순위 ]
- getByLabelText
- getByPlaceholderText
- getByText
- getByDisplayValue
- getByAltText
- getByTitle
- getByRole
- getByTestId
❗️ userEvent > fireEvent
userEvent가 그 엘리먼트 타입에 맞는 더욱 적절한 반응을 보여줌.
예를 들어서 fireEvent 로 버튼을 클릭하면 focus 되지 않고
userEvent로 클릭하면 focus됨
실제 버튼을 클릭하는 행위가 더 잘 표현되기에 userEvent를 사용하는 게 더 추천되는 방법
💻 예제 코드
🧚 간단한 count App
getByTestId 사용
📃 Count.test.js
// toHaveTextContent로 요소 텍스트 확인
test("counter는 0에서 시작", () => {
  render(<Count />);
  //screen object를 이용해서 원하는 element 접근
  const counterElement = screen.getByTestId("counter");
  // 텍스트가 0인지 테스트
  expect(counterElement).toHaveTextContent(0);
});
// click이벤트 발생 후 값 확인
test("- button 눌리면 the counter -1로 변화", () => {
render(<App />);
const buttonElement = screen.getByTestId("minus-button");
fireEvent.click(buttonElement);
const counterElement = screen.getByTestId("counter");
expect(counterElement).toHaveTextContent(-1);
});// toHaveStyle로 style 확인
test("on/off button는 파란색", () => {
render(<App />);
const buttonElement = screen.getByTestId("on/off-button");
expect(buttonElement).toHaveStyle({ backgroundColor: "blue" });
});// toBeDisabled로 disable 여부 확인
test("on/off button 클릭시 -,+ button 비활성화", () => {
render(<App />);
const onOffButtonElement = screen.getByTestId("on/off-button");
fireEvent.click(onOffButtonElement);
const plusButtonElement = screen.getByTestId("plus-button");
expect(plusButtonElement).toBeDisabled();
});🧚 주문 App
-
❗️ API fetch 후 상품, 옵션 목록을 불러오므로
findByRole사용, post도 마찬가지
-> promise를 반환하기 때문에async,await사용 -
❗️ 일반 케이스는
getByRolegetByText사용 -
반환값이 없어야 할때
queryBy사용으로 null 반환 -
userEvent로 이벤트 fire - (click,clear,type) -
toBeInTheDocumentmatcher 사용
📃 App.test.js
// 코드를 입력하세요
test("정상적으로 주문되는지 확인", async () => {
  render(<App />);

  // 여행상품 갯수 선택 - API get
  const americaInput = await screen.findByRole("spinbutton", {
    name: "America",
  });
  userEvent.clear(americaInput);
  userEvent.type(americaInput, "2"); // 여행 상품 -> 0 + 2000

  const englandInput = await screen.findByRole("spinbutton", {
    name: "England",
  });
  userEvent.clear(englandInput); // clear 후 이벤트 설정 하는 것이 좋음
  userEvent.type(englandInput, "3"); // 여행 -> 2000 + 3000

  // 옵션 설정
  const insuranceCheckbox = await screen.findByRole("checkbox", {
    name: "Insurance", // total -> 500
  });
  userEvent.click(insuranceCheckbox);


  ////////////////////   주문 확인 페이지   //////////////////

  // 가격 정상적으로 설정 되었는지 확인
  const productsHeading = screen.getByRole("heading", {
    name: "여행 상품: 5000",
  });
  expect(productsHeading).toBeInTheDocument();

  const optionsHeading = screen.getByRole("heading", {
    name: "옵션: 500",
  });
  expect(optionsHeading).toBeInTheDocument();

  // 선택된 상품 목록 확인
  expect(screen.getByText("2 America")).toBeInTheDocument();
  expect(screen.getByText("3 England")).toBeInTheDocument();
  expect(screen.getByText("Insurance")).toBeInTheDocument();

  // 주문 확인 check
  const confirmCheckbox = screen.getByRole("checkbox", {
    name: "주문 하시겠습니까?",
  });
  userEvent.click(confirmCheckbox);

  // 주문
  const confirmOrderButton = screen.getByRole("button", {
    name: "주문 하기",
  });
  userEvent.click(confirmOrderButton);

  ////////////////////   주문 완료 페이지   //////////////////

  // 로딩바 생성 확인
  const loading = screen.getByText(/loading/i);
  expect(loading).toBeInTheDocument();

  // 주문 성공 확인 - API post
  const completeHeader = await screen.findByRole("heading", {
    name: "주문이 성공했습니다.",
  });
  expect(completeHeader).toBeInTheDocument();

  // 로딩바 제거 확인 - 없는 경우 null이 필요하므로 queryBy
  const loadingDisappeared = screen.queryByText("loading");
  expect(loadingDisappeared).not.toBeInTheDocument();

  // 첫 페이지로 이동
  const firstPageButton = screen.getByRole("button", {
    name: "첫페이지로",
  });
  userEvent.click(firstPageButton);

  ////////////////////   다시 첫 페이지로   //////////////////

  // 첫페이지 등장 후 요소가 등장할때까지 기다림
  await waitFor(() => {
    screen.getByRole("spinbutton", { name: "America" });
  });

  // 초기화 확인
  const productsTotal = screen.getByText("상품 총 가격: 0");
  expect(productsTotal).toBeInTheDocument();

  const optionsTotal = screen.getByText("옵션 총 가격: 0");
  expect(optionsTotal).toBeInTheDocument();


});