Customizing the Transition Animations
1. The Transition Animation Sequence
- 두 유형의 transition 이 존재
- presentations
: VC 계층에 새로운 VC 를 더함 - dismissals
: VC 계층에서 하나 이상의 VC 를 제거함
- presentations
1.1 The Transitioning Delegate
custom transition 을 구현하고자 할 때 가장 먼저 해야 하는 단계
- Transitioning Delegate
- custom transition animations, custom presentations 의 시작 지점
UIViewControllerTransitioningDelegate프로토콜을 채택
- UIKit 에게 아래 3개의 객체를 제공하는 역할을 함
- Animator 객체들 // transition 과정에 사용될 애니메이션을 담당하는 객체 (가장 중요)
- Interactive animator 객체들 // Animator 객체의 타이밍을 인터렉티브하게 조절할 수 있게 해주는 객체
- Presentation controller (다음 파트에서 다룸)
extension FirstViewController: UIViewControllerTransitioningDelegate {

    // present 시 Animator 객체 반환
    func animationController(forPresented presented: UIViewController, presenting: UIViewController, source: UIViewController) -> UIViewControllerAnimatedTransitioning? {
    	// ... 설정 생략

        // UIViewControllerAnimatedTransitioning 을 채택한 Animator 객체 반환
        return Animator()
    }

    // dismiss 시 Animator 객체 반환
    func animationController(forDismissed dismissed: UIViewController) -> UIViewControllerAnimatedTransitioning? {
    	// ... 설정 생략

        // UIViewControllerAnimatedTransitioning 을 채택한 Animator 객체 반환
        return Animator()
    }

   // present 시 Interactive Animator 객체 반환
   func interactionControllerForPresentation(using animator: UIViewControllerAnimatedTransitioning) -> UIViewControllerInteractiveTransitioning? {
        return nil
   }

    // dismiss 시 Interactive Animator 객체 반환
    func interactionControllerForDismissal(using animator: UIViewControllerAnimatedTransitioning) -> UIViewControllerInteractiveTransitioning? {
        // ... 설정 생략

        // UIPercentDrivenInteractiveTransition 을 상속 받은 Interactive Animator 객체 반환
        // UIPercentDrivenInteractiveTransition 는 UIViewControllerInteractiveTransitioning 을 채택
        return interactionController
    }

}- custom transition 으로 present 하고 싶은 VC의 transitioningDelegate 프로퍼티에 UIViewControllerTransitioningDelegate 채택 객체 할당
// FirstViewController

func presentVC() {
    guard let secondVC = storyboard?.instantiateViewController(withIdentifier: "SecondViewController") as? SecondViewController else {
        return
    }

    secondVC.modalPresentationStyle = .fullScreen
    secondVC.transitioningDelegate = self // <- FirstViewController

    present(secondVC, animated: true)
}
이제 transition 에서 핵심적인 역할을 하는 Animator 객체를 UIKit 에게 제공할 준비가 완료됨
- transitioning delegate 와 Animator, Interactive Animator 객체들과의 관계
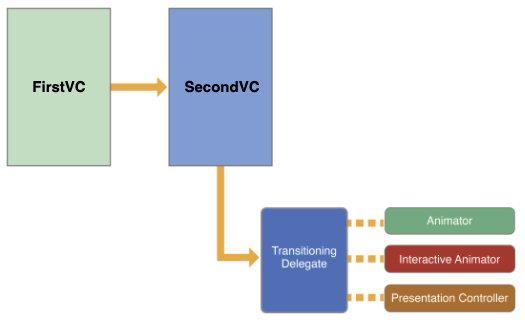
presented VC 인 SecondVC 가 transitioning delegate(예제 코드에서는 FirstVC가 됨) 에게 animator, interactive animator, presentation controller 를 요청하는 구조
1.2 The Custom Animation Sequence
- presented VC 의 transitioningDelegate 프로퍼티가 유효한 객체를 가지고 있을 때, UIKit 은 사용자가 제공한 Custom Animator 객체들을 사용하여 해당 VC를 present 한다.
- presentation 을 준비할 때 UIKit 은 Custom animator 객체를 얻기 위해 transitioning delegate 의 animationController(forPresented:presenting:source:)을 호출한다.
extension FirstViewController: UIViewControllerTransitioningDelegate {

    func animationController(forPresented presented: UIViewController, presenting: UIViewController, source: UIViewController) -> UIViewControllerAnimatedTransitioning? {
    	// ... 설정 생략

        // UIViewControllerAnimatedTransitioning 을 채택한 Animator 객체 반환
        return Animator()
    }

// ... 생략- 만약 해당 객체가 사용 가능한 경우, UIKit 은 다음의 단계를 수행한다.
📌 VC를 present 할 때
1. interactive animator 객체가 사용 가능한지 확인하기 위해 transitioning delegate 의 interactionControllerForPresentation(using:)
을 호출한다. 만약 이 메서드가 nil 을 반환할 경우 UIKit 은 user interaction 없이 animation 을 수행한다.
2. UIKit 은 animation duration 을 얻기 위해 animator 객체의 transitionDuration 을 호출한다.
3. UIKit 은 animation 을 시작하기 위한 적절한 메서드를 호출한다.
- UIKit은 non-interactive animations 에 대해 animator 객체의 animateTransition: 을 호출한다.
- UIKit은 interactive animations 에 대해 animator 객체의 startInteractiveTransition 을 호출한다.
4. UIKit 은 animator 객체가 context transitioning 객체의 completeTransition 를 호출하기를 기다린다.
- completeTransition
- custom animator 는 animation 이 끝난 후에 이 메서드를 호출
- 이 메서드를 호출하면 transition 이 끝나고 present(_:animated:completion:)
의 completion handler 및 animator 객체의 animationEnded 를 호출할 수 있음을 알리는 것과 같다.
📌 VC를 dismiss 할 때는
animationController(forDismissed:),
interactionControllerForDismissal(using:)
을 호출 한다는 점에서만 차이가 있음
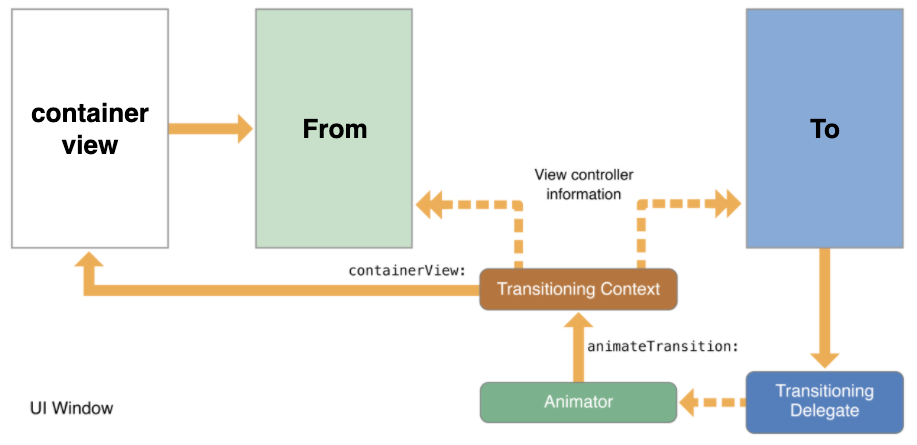
1.3 The Transitioning Context Object
Animator 객체에서 transition 과 관련된 주요 작업들을 수행하는데,
이 때 transition 과 관련된 VC 및 View 에 대한 참조를 제공하는 객체가 바로 transitioning context 객체
transitioningContext 객체의 주요 프로퍼티 및 메서드
animateTransition(using:) 에서 파라미터를 통해 사용할 수 있으며 📌 모든 animation 은 transitioningContext 객체의 container view 에서 일어나야 한다.
(transition 과정에서 superView 역할을 하는 view 로서 transition 과정에 참여시키고 싶은 view 들을 addSubview 해주면 됩니다)
// Animator 객체

func animateTransition(using transitionContext: UIViewControllerContextTransitioning) {
        transitionContext.containerView

        // present 시: from 은 First VC, to 는 Second VC
        // dismiss 시: from 은 Second VC, to 는 First VC
        transitionContext.viewController(forKey: .to)
        transitionContext.viewController(forKey: .from)

        transitionContext.view(forKey: .to)
        transitionContext.view(forKey: .from)

        transitionContext.completeTransition(true)
}
custom animation 을 설정할 때 직접 관리하는 캐시된 정보보다는 항상 transitioning context 객체에 있는 객체들 그리고 data 를 이용해야 한다. transition context 객체는 animation 을 수행하는 데 필요한 올바른 정보들을 보장하는 반면, 캐시 된 정보는 animator 의 메서드가 호출 될 떄 오래된 정보일 수 있다.
(transitioning context 객체를 통해 접근할 수 있는 값들은 외부로부터 주입받지 말라는 뜻인 것 같습니다. 예를 들어 init 으로 to VC 를 주입 받을 수도 있겠지만 transitionContext.viewController(forKey: .to) 로 접근할 수 있습니다)
2. Presenting a View Controller Using Custom Animations
아래의 방법을 이용하여 custom animation 을 사용하여 VC 를 present 할 수 있다.
- present 하고 싶은 VC 생성
- custom transitioning delegate 객체를 생성하고 VC의 transitionDelegate 프로퍼티에 할당한다. transitioning delegate 의 메소드는 요청 시 custom animator 객체들을 만들고 반환해야 한다.
- present(_:animated:completion:) 를 호출하여 VC 를 present 한다
// FirstViewController

func presentVC() {
    guard let secondVC = storyboard?.instantiateViewController(withIdentifier: "SecondViewController") as? SecondViewController else {
        return
    }

    secondVC.modalPresentationStyle = .fullScreen
    secondVC.transitioningDelegate = self // <- FirstViewController

    present(secondVC, animated: true)
}
present(_:animated:completion:) 를 호출하면 UIKit 이 presentation process 를 시작한다. presentation 은 다음 run loop 에 시작되고 custom animator 객체가 completeTransition 를 호출할 때까지 계속된다.
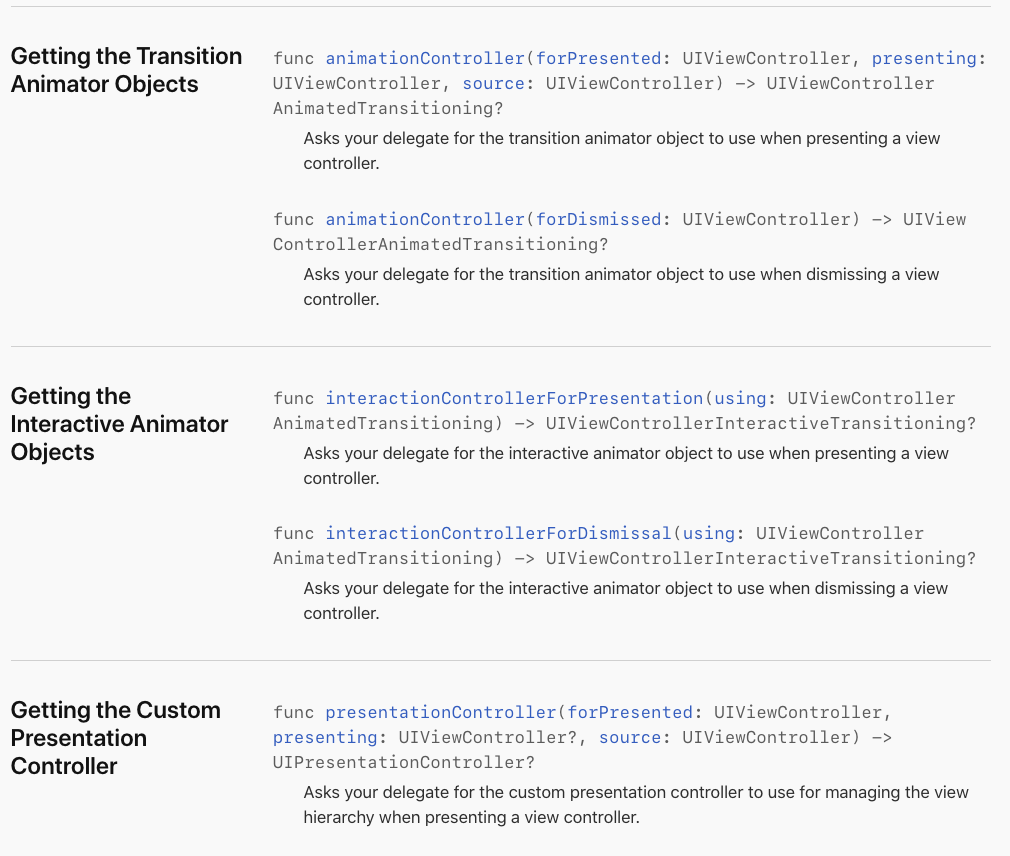
3. Implementing the Transitioning Delegate
transitioning delegate 의 목적은 custom animator 객체들을 만들고 반환하는 것이다. 대부분의 실제 작업은 이 animator 객체에 의해 처리된다.
4. Implementing Your Animator Objects
animator 객체는 UIViewControllerAnimatedTransitioning 프로토콜을 채택하는 모든 객체이다.
animator 객체는 정해진 기간 동안 실행되는 animation 을 만든다.
animator 객체는 핵심은 실제 animation을 만드는데 사용하는 animateTransition(using:) 에 있다.
func animateTransition(using transitionContext: UIViewControllerContextTransitioning)animation prcoess
- animation 파라미터를 받는다.
- Core Animation 혹은 UIView Animation 메서드를 이용하여 animation 을 만든다.
- transition 을 정리하고 완료한다.
4.1 Getting the Animation Parameters
animationTransition(using:) 메서드에 전달 된 context transition 객체에는 애니메이션을 수행할 때 사용할 데이터가 포함된다.
viewController(forKey:)
: 추가(To VC) 또는 제거(from VC) 할 VC 를 가져오기 위해 호출// func viewController(forKey key: UITransitionContextViewControllerKey) -> UIViewController? func animateTransition(using transitionContext: UIViewControllerContextTransitioning) { let fromVC = transitionContext.viewController(forKey: .from) let toVC = transitionContext.viewController(forKey: .to) }
view(forKey:)
: 추가(toView) 또는 제거(fromView) 할 View 를 가져오기 위해 호출// func view(forKey key: UITransitionContextViewKey) -> UIView? func animateTransition(using transitionContext: UIViewControllerContextTransitioning) { let fromView = transitionContext.view(forKey: .from) let toView = transitionContext.view(forKey: .to) }

containerView
transition 과 관련된 view 들의 super view 역할을 하는 view.
to View 를 프로그래머가 명시적으로 추가해줘야 함
finalFrame(for:)
: 추가 또는 제거할 View 의 최종 frame rect 를 얻기 위해 호출func finalFrame(for vc: UIViewController) -> CGRect
4.2 Creating the Transition Animations
Presentation animation 을 위한 절차
- viewController(forKey:), view(forKey:) 를 이용하여 transition 과 관련된 VC, view 를 얻는다.
- to View 의 시작 위치를 설정한다.
- (애니메이션 block 에서 사용할) to View 의 마지막 위치를 얻는다.
- To View 를 container view 에 addSubview
- 애니메이션 구현 (UIView Animation or Core Animation)
-> completion block 에서 completeTransition 을 꼭 호출해줘야 한다.
Dismissal animation 을 위한 절차
1, viewController(forKey:), view(forKey:) 를 이용하여 transition 과 관련된 VC, view 를 얻는다.
2. from view 의 마지막 위치를 계산
3. to view 를 container view 에 add subview
4. 애니메이션 구현
- 문서에서는 절차를 이와 같이 기술하고 있긴 하지만, 실제 custom transition 을 만들 때는 상황에 따라 유연하게 구현하면 됩니다.
- viewController(forKey:), view(forKey:)를 통해서 VC, view 를 얻는 것, to view 를 container view 에 addSubview 하는 것, 시작 위치를 설정하고 마지막 위치값은 미리 계산해서 저장해두었다가 animation 블럭에서 사용하는 것만 숙지하고 잘 활용하면 될 것 같습니다.
4.3 Cleaning Up After the Animations
transition animation 이 끝난 후에는 꼭 completeTransition: 을 호출해줘야 한다.
그렇지 않으면 UIKit이 transition prcoess 를 끝내지 않아 사용자가 presented VC 를 사용할 수 없다.
이 메서드를 호출하면
present(_:animated:completion:) 의 completion 및 animator 객체의 animationEnded 을 호출한다.
5. Adding Interactivity to Your Transitions
animation 을 Interactive 하게 만드는 가장 쉬운 방법은 UIPercentDrivenInteractiveTransition 객체를 만드는 것
class UIPercentDrivenInteractiveTransition: NSObject, UIViewControllerInteractiveTransitioningUIPercentDrivenInteractiveTransition 객체는 animator 객체의 animation 타이밍을 제어할 수 있게 해준다. 프로그래머가 해야 할 것은 이벤트 핸들링 코드를 통해 completion percentage 값을 계산하고 업데이트하는 것 뿐이다.
startInteractiveTransition는 맨 처음 호출되는 메서드로 한 번만 설정하면 되는 것들을 수행한다.
(init 으로 대체 가능)
- 주요 메서드
func update(_ percentComplete: CGFloat)
func finish()
func cancel()