- Presentation Styles
- Segues
1. Presentation Styles
public enum UIModalPresentationStyle : Int {
    case fullScreen = 0

    @available(iOS 3.2, *)
    case pageSheet = 1

    @available(iOS 3.2, *)
    case formSheet = 2

    @available(iOS 3.2, *)
    case currentContext = 3

    @available(iOS 7.0, *)
    case custom = 4

    @available(iOS 8.0, *)
    case overFullScreen = 5

    @available(iOS 8.0, *)
    case overCurrentContext = 6

    @available(iOS 8.0, *)
    case popover = 7

    @available(iOS 7.0, *)
    case none = -1

    @available(iOS 13.0, *)
    case automatic = -2
}
기본 제공 Presentation Style (<-위주로 설명)
: fullScreen, currentContext, formsheet ...Custom Presentation Style (다음 파트에서 다룰 예정)
1-1. FullScreen vs PageSheet, FormSheet
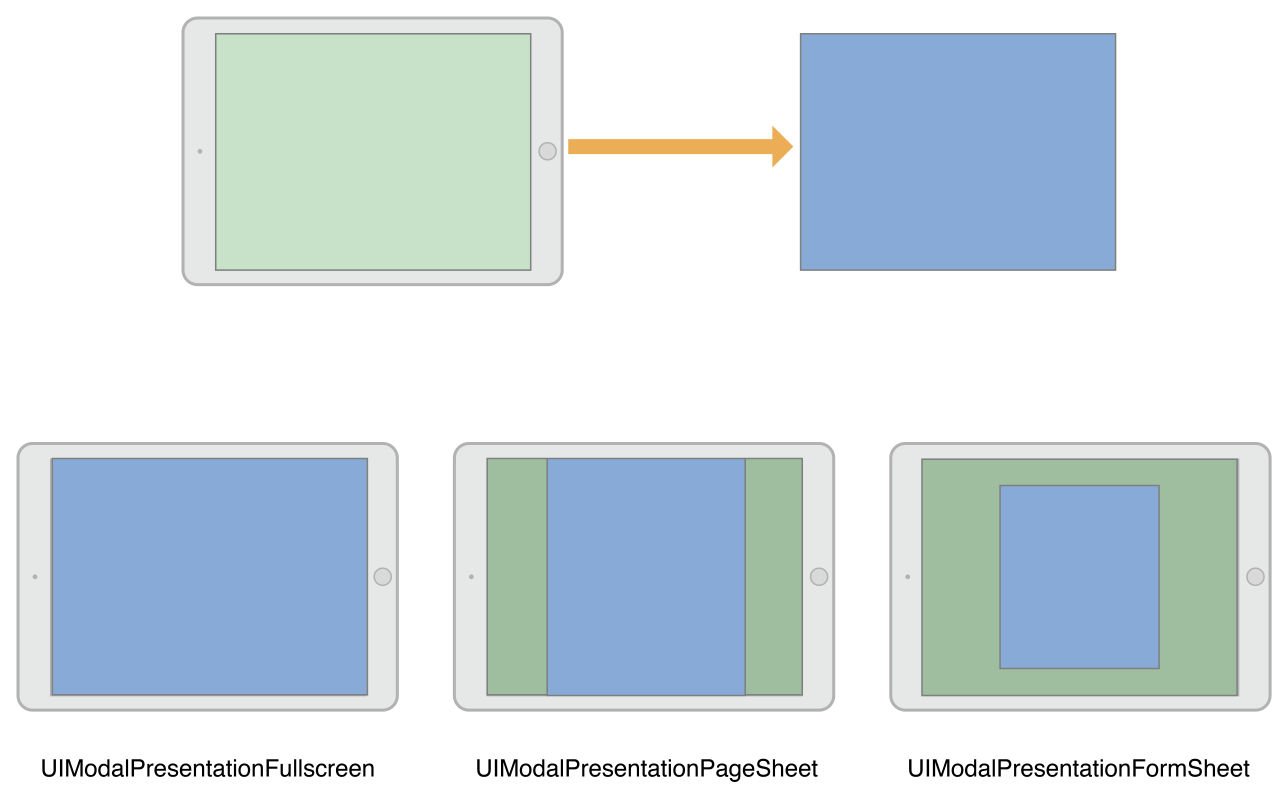
- FullScreen 은 화면을 모두 덮는 반면
- PageSheet, FormSheet 는 dimming view 를 이용하여 Presenting VC 의 컨텐츠가 표시
1-2. FullScreen vs OverFullScreen


좌) .fullScreen
우) .overFullScreen
- FullScreen: Present 를 하면 Transition Animation 이 끝난 후 아래에 있는 VC 의 view 를 제거
- OverFullScreen: Transition Animation 이 끝난 이후에도 아래 있는 VC의 view가 제거되지 않음
- 이 밖에도 **overCurrentContext, pageSheet, formSheet** 를 이용하면 Presenting VC의 view가 제거되지 않으므로 Presenting VC의 Appearance method(viewWill, viewDid)는 호출되지 않는다.1-3. Fullscreen vs currentContext


좌).fullScreen
우) .currentContext
SplitVC 의 Master VC 에서 present 한 경우,
-
Fullscreen 은 화면을 다 덮지만,
-
CurrentContext는 Presenting VC인 MasterVC의 컨텐츠만 덮는다.
override func tableView(_ tableView: UITableView, didSelectRowAt indexPath: IndexPath) {
    let vc = PresentedVC()
    vc.modalPresentationStyle = .currentContext
    present(vc, animated: true)
}
currentContext 에서 NavigationBar 는 덮고 싶지 않다면 ❓
currentContext 일 때 present 할 view 를 찾는 과정
1. definesPresentationContext 프로퍼티가 true인 VC의 View 를 찾을 때 까지 상위 VC 방향으로 탐색
2. 끝까지 찾지 못할 경우 Window의 root VC의 View
-
definesPresentationContext
- 일반 VC: false 가 default
- TabBar, Navigation Controller: true 가 default
-
1. false 일 때
: 위 경우는 Presenting VC 의 definesPresentationContext 가 false 이므로 다시 VC 계층을 순회한다. 그러다가 true 인 Nav Controller 를 만나 Nav Controller 의 view 가 present 될 view 로 선정된다.

-
2. true 인 경우
: 따라서 present 를 지시한 VC 의 definesPresentationContext를 true 로 만들어주면 PresentingVC 가 present 할 view 로 선정되어 Navigation bar를 덮지 않을 수 있다.
// MasterVC

override func tableView(_ tableView: UITableView, didSelectRowAt indexPath: IndexPath) {
    definesPresentationContext = true

    let vc = PresentedVC()
    vc.modalPresentationStyle = .currentContext
    present(vc, animated: true)
}
-
showDetailViewController(vc, sender: nil)
1. 기존의 VC 위로 올라가는게 아니라 VC 자체가 교체되어 기존의 VC는 메모리에서 제거
2. Master VC 에서 수행해도 DetailVC 가 교체된다.```swift // MasterVC override func tableView(_ tableView: UITableView, didSelectRowAt indexPath: IndexPath) { let vc = PresentedVC() showDetailViewController(vc, sender: nil) } ```
1-4. PopOver
PopOver 는 compact 환경에서는 formSheet 으로 작동
regular 환경에서는 아래와 같은 모양으로 동작

Displaying Transient Content in a Popover

-
사용법
-
(선택) preferredContentSize 를 원하는 크기로 설정하고,
-
(필수) popoverPresentationController 를 이용하여 앵커 포인트(Anchor point) 설정
-
1번 혹은 2번 방법 중 하나만 선택하여 사용
-
barButtonItem
@IBAction func displayPopover(_ sender: UIBarButtonItem) {
    guard let vc = storyboard?.instantiateViewController(withIdentifier: "PopoverViewController")
    else {
        return
    }
    vc.modalPresentationStyle = .popover

    vc.popoverPresentationController?.barButtonItem = sender

    present(vc, animated: true, completion:nil)
}
-
sourceView, sourceRect
@objc
func tapped() {
      let vc = PopoverViewController()
      vc.view.alpha = 0.5
      vc.view.backgroundColor = .white

      vc.modalPresentationStyle = .popover

      vc.preferredContentSize = CGSize(width: 300, height: 500)

      vc.popoverPresentationController?.permittedArrowDirections = .up
      vc.popoverPresentationController?.sourceView = view
      vc.popoverPresentationController?.sourceRect = button.frame

      present(vc, animated: true)
}
-
-
-
-
애플의 가이드라인
-
PopOver 된 view 의 외부를 클릭하면 자동으로 닫히지만, compact 환경에서는 formSheet 형태로 나타나기 때문에 닫기 or 취소 버튼을 만들어주는게 좋음
-
아래로 내리면 닫을 순 있지만 그래도 사용자가 알아볼 수 있도록 명시적으로 닫는 버튼을 만들어주는 것이 좋다고 생각됨

-
-
PopOver 사용 시 compact 환경에서도 regular 환경 같이 보이게 하는 방법
-
Returning UIModalPresentationNone tells the presentation controller to ignore the compact environment and continue using the previous presentation style. In the case of a popover, ignoring the change gives you the same iPad-like popover behavior on all devices.
-
.none 반환 시 compact 환경을 무시하고 아이패드와 같이 regular 환경과 동일한 PopOver 사용 가능
UIAdaptivePresentationControllerDelegate 의 메소드로,
UIAdaptivePresentationControllerDelegate 를 채택한 Presenting VC 에서 구현
// 예제의 경우에는 UIAdaptivePresentationControllerDelegate 를 채택한
// UIPopoverPresentationControllerDelegate 를 채택

// 또한 popoverPresentationController 의 delegate 로 선정해주어야 함

class ViewController: UIViewController {

  // 생략 ...

	@objc
	func tapped() {
	      let vc = PopoverViewController()
	      vc.view.alpha = 0.5
	      vc.view.backgroundColor = .white

	      vc.modalPresentationStyle = .popover

	      vc.preferredContentSize = CGSize(width: 300, height: 500)

	      vc.popoverPresentationController?.permittedArrowDirections = .up
	      vc.popoverPresentationController?.sourceView = view
	      vc.popoverPresentationController?.sourceRect = button.frame

	      vc.popoverPresentationController?.delegate = self // 1번

	      present(vc, animated: true)
	}
}

extension ViewController: UIPopoverPresentationControllerDelegate { // 2번

    func adaptivePresentationStyle(for controller: UIPresentationController) -> UIModalPresentationStyle {
        return .none
    }
}
-

2. Segues
segue 는 스토리보드에서 두 개의 VC 사이의 Transition 을 정의
이 때 segue 의 시작점은 시작하는 버튼, 테이블 row, gesture recognizer 가 된다.
2-1. Segue 의 종류
- show: navigation controller 가 있을 경우 push
- show Detail: Split View Controller 가 있을 경우 Detail VC를 교체
- present Modally: 모달로 보여준다.
- present as Popover: compact size 에서는 form sheet, regular size 에서는 popover
- identifier 를 설정하여 performSegue, prepare 에서 어떤 segue인지 식별할 수 있다.
2-2. Segue 의 LifeCycle

-
Life Cycle
- presented VC 가 만들어짐(init)
- segue 오브젝트가 만들어짐(init)
- presenting VC 의 prepare for segue 호출
- segue 오브젝트의 perform 수행
- segue 오브젝트 release
-
Method
override func shouldPerformSegue(withIdentifier identifier: String, sender: Any?) -> Bool {
       false
}
: false 반환 시 segue 가 일어나지 않도록 함
override func prepare(for segue: UIStoryboardSegue, sender: Any?) {
    switch segue.identifier {
    case "SecondVC":
        let vc = segue.destination as? SecondVC
        vc?.id = (sender as? Item)?.id
    default:
        break
    }
}
: source VC 의 데이터를 destination VC 로 넘겨줄 수 있음
2-3. Creating an Unwind Segue
: 한 VC에서 다른 VC로 한 번에 이동
-
이동할 VC에서 @IBAction func myUnwindAction(unwindSegue: UIStoryboardSegue) 정의
(이 작업을 먼저 해야 아래 2단계에서 Exit 로 드래그 가능) -
해제 작업을 시작할 VC로 이동해서 Exit 로 드래그

-
dismiss button 에 IBAction 을 달고 performSegue 실행
2-4. Custom Segue
- Custom Segue
class CustomSegue: UIStoryboardSegue {
    override init(identifier: String?, source: UIViewController, destination: UIViewController) {
        super.init(identifier: identifier, source: source, destination: destination)
    }

    override func perform() {
        super.perform()
				// transition 애니메이션 코드 작성 후 present 혹은 dismiss
    }
}