※ Linux
1. 도커에서 우분투 이미지로 우분투 컨테이너 생성 및 실행
PS C:\Users\Playdata> docker run -it --name ubuntu-container ubuntu /bin/bash
root@923d89f9730b:/#- docker run: 도커 이미지를 기반으로 컨테이너를 생성하고 실행하는 명령어입니다.
- -it: 두 가지 옵션을 결합한 것입니다.
- -i: 컨테이너가 입력을 계속해서 받을 수 있게 합니다. 표준 입력을 계속 유지합니다.
- -t: 가상 터미널을 할당하여 컨테이너 내에서 인터랙티브 세션을 시작할 수 있게 합니다.
- --name ubuntu-container: 생성되는 컨테이너에 이름을 지정하는 옵션입니다. 여기서는
ubuntu-container라는 이름을 할당했습니다. - ubuntu: 사용할 도커 이미지를 지정하는 부분입니다.
ubuntu는 우분투 운영체제를 기반으로 한 도커 이미지입니다. - /bin/bash: 컨테이너 내에서 실행할 명령어입니다. 이 경우,
bash셸을 실행하여 우분투 컨테이너 안으로 들어가게 됩니다.
2. 우분투에서 접속한 계정 확인
root@923d89f9730b:/# whoami
root
root@923d89f9730b:/#- whoami: 현재 로그인한 사용자의 이름을 출력하는 명령어입니다. 이 명령어는 시스템에서 사용자의 계정 이름을 반환합니다.
3. 업데이트와 업그레이드 진행
root@923d89f9730b:/# apt-get update
...
root@923d89f9730b:/# apt-get upgrade
...- apt-get update: 우분투의 패키지 목록을 최신 상태로 업데이트합니다. 이 명령어는 설치된 패키지들의 정보만을 최신으로 가져오며, 실제로 패키지의 버전은 업그레이드하지 않습니다.
- apt-get upgrade: 설치된 패키지를 최신 버전으로 업그레이드하는 명령어입니다. 패키지의 업그레이드가 필요한 경우, 이 명령어를 사용하여 최신 버전으로 갱신합니다.
4. 의존성 라이브러리들 업그레이드
root@923d89f9730b:/# apt-get dist-upgrade
...- apt-get dist-upgrade:
apt-get upgrade와 비슷하지만, 이 명령어는 패키지 업그레이드뿐만 아니라, 패키지 간의 의존성 문제를 해결하고 새로 추가되는 패키지나 제거되는 패키지가 있을 경우 이를 처리합니다. 즉, 시스템에 필요한 라이브러리나 패키지를 최신 상태로 유지하며, 더 깊은 수준에서의 업그레이드를 진행합니다.
5. 필요한 라이브러리들 설치
root@923d89f9730b:/# apt-get install -y sudo vim nano
...- apt-get install: 패키지를 설치하는 명령어입니다.
- -y: 설치 과정에서 발생할 수 있는 모든 질문에 대해 자동으로 'yes'라고 답하는 옵션입니다. 즉, 사용자의 확인 없이 자동으로 설치가 진행됩니다.
- sudo: 우분투에서
sudo는 다른 사용자의 권한(보통은 root)으로 명령을 실행할 수 있게 해주는 프로그램입니다. - vim:
vim은 우분투에서 사용하는 고급 텍스트 편집기입니다. - nano:
nano는 또 다른 텍스트 편집기로, 사용하기 쉬운 인터페이스를 제공합니다.
6. 경로 확인
root@923d89f9730b:/# pwd
/
root@923d89f9730b:/#- pwd: 현재 작업 중인 디렉토리의 경로를 출력하는 명령어입니다.
pwd는 "print working directory"의 약자입니다.
7. 현재 폴더 안의 내용들 확인
root@923d89f9730b:/# ls
bin  boot  dev  etc  home  lib  lib64  media  mnt  opt  proc  root  run  sbin  srv  sys  tmp  usr  var
root@923d89f9730b:/#- ls: 현재 디렉토리 안에 있는 파일과 폴더들을 나열하는 명령어입니다.
- -l:
ls명령어에-l옵션을 추가하면 파일들의 권한, 소유자, 크기, 수정 시간 등과 같은 추가적인 정보를 함께 출력합니다.
8. 경로 이동
root@923d89f9730b:/# cd /usr/
root@923d89f9730b:/usr# ls
bin  games  include  lib  lib64  libexec  local  sbin  share  src
root@923d89f9730b:/usr#- cd: 디렉토리 변경 명령어입니다. 주어진 경로로 작업 디렉토리를 변경합니다.
- ls:
cd명령어로 디렉토리 변경 후, 변경된 디렉토리의 내용을 확인하기 위해ls명령어를 사용합니다.
9. 루트 디렉토리로 이동
root@923d89f9730b:/usr/bin# cd /
root@923d89f9730b:/# pwd
/
root@923d89f9730b:/#- cd /: 루트 디렉토리로 이동하는 명령어입니다.
/는 최상위 디렉토리를 의미합니다. - pwd: 현재 경로를 출력하는 명령어입니다. 루트 디렉토리로 이동한 후,
pwd를 실행하면/가 출력됩니다.
10. 리스트를 목록형태로 자세히 보기 (ls -l 명령어의 출력 설명)
root@923d89f9730b:/# ls -l
total 60
lrwxrwxrwx   1 root root    7 Apr 22  2024 bin -> usr/bin
drwxr-xr-x   2 root root 4096 Apr 22  2024 boot
drwxr-xr-x   5 root root  360 Apr 18 09:42 dev
drwxr-xr-x   1 root root 4096 Apr 18 09:48 etc
drwxr-xr-x   3 root root 4096 Apr  4 11:09 home
lrwxrwxrwx   1 root root    7 Apr 22  2024 lib -> usr/lib
lrwxrwxrwx   1 root root    9 Apr 22  2024 lib64 -> usr/lib64
drwxr-xr-x   2 root root 4096 Apr  4 11:03 media
drwxr-xr-x   2 root root 4096 Apr  4 11:03 mnt
drwxr-xr-x   2 root root 4096 Apr  4 11:03 opt
dr-xr-xr-x 307 root root    0 Apr 18 09:42 proc
drwx------   2 root root 4096 Apr  4 11:09 root
drwxr-xr-x   4 root root 4096 Apr  4 11:09 run
lrwxrwxrwx   1 root root    8 Apr 22  2024 sbin -> usr/sbin
drwxr-xr-x   2 root root 4096 Apr  4 11:03 srv
dr-xr-xr-x  11 root root    0 Apr 18 09:42 sys
drwxrwxrwt   1 root root 4096 Apr 18 09:47 tmp
drwxr-xr-x   1 root root 4096 Apr  4 11:03 usr
drwxr-xr-x   1 root root 4096 Apr  4 11:09 var
root@923d89f9730b:/#
ls -l 명령어는 파일과 디렉토리의 상세 정보를 출력합니다. 각 열이 나타내는 의미는 다음과 같습니다:
1. 파일 타입과 권한
lrwxrwxrwx- 파일 타입: 첫 번째 문자(
l,d,-등)는 파일의 타입을 나타냅니다.l: 심볼릭 링크 (link)d: 디렉토리 (directory)-: 일반 파일 (regular file)
- 권한: 나머지 9문자는 파일의 권한을 나타냅니다.
- r: 읽기 권한 (read)
- w: 쓰기 권한 (write)
- x: 실행 권한 (execute)
- 권한은 3개의 그룹으로 나뉘어 있으며, 각각 소유자(owner), 그룹(group), 기타 사용자(others)에게 부여된 권한을 나타냅니다.
2. 링크 수
1- 파일이나 디렉토리의 링크 수를 나타냅니다. 링크는 파일이나 디렉토리가 다른 곳에서 참조되는 횟수를 나타냅니다.
3. 소유자
root- 파일의 소유자를 나타냅니다. 이 경우,
root사용자입니다.
4. 그룹
root- 파일을 소유한 그룹을 나타냅니다. 이 경우, 그룹은
root입니다.
5. 파일 크기
4096- 파일의 크기를 나타냅니다. 크기는 바이트 단위로 표시되며, 디렉토리는 대개 4096 바이트입니다.
6. 최종 수정 시간
Apr 22 2024- 최종 수정 시간을 나타냅니다. 이 정보는 파일이나 디렉토리가 마지막으로 수정된 날짜와 시간을 제공합니다.
7. 파일 이름
bin -> usr/bin- 파일 이름 또는 디렉토리 이름을 나타냅니다. 만약 해당 항목이 심볼릭 링크라면,
->뒤에 링크가 가리키는 대상이 표시됩니다.bin -> usr/bin:bin디렉토리는usr/bin을 가리키는 심볼릭 링크입니다.
예시 해석
lrwxrwxrwx 1 root root 7 Apr 22 2024 bin -> usr/bin- 파일 타입:
l-> 심볼릭 링크 - 권한:
rwxrwxrwx-> 모든 사용자에게 읽기, 쓰기, 실행 권한이 있음 - 링크 수:
1-> 이 파일을 참조하는 링크가 1개 있음 - 소유자:
root-> 이 파일의 소유자는root사용자 - 그룹:
root-> 이 파일의 그룹은root그룹 - 파일 크기:
7-> 파일 크기는 7바이트 - 최종 수정 시간:
Apr 22 2024-> 마지막 수정일은 2024년 4월 22일 - 파일 이름:
bin -> usr/bin->bin디렉토리는usr/bin을 가리키는 심볼릭 링크입니다.
위와 같은 방식으로 ls -l 명령어는 디렉토리나 파일의 다양한 속성들을 상세하게 보여줍니다.
11. 숨긴 항목 조회
root@923d89f9730b:/# ls -a
.  ..  .dockerenv  bin  boot  dev  etc  home  lib  lib64  media  mnt  opt  proc  root  run  sbin  srv  sys  tmp  usr  var
root@923d89f9730b:/# ls
bin  boot  dev  etc  home  lib  lib64  media  mnt  opt  proc  root  run  sbin  srv  sys  tmp  usr  var
root@923d89f9730b:/#- ls -a:
ls명령어에-a옵션을 추가하면, 숨김 파일과 디렉토리도 함께 나열됩니다. 숨김 파일은 이름이.으로 시작하는 파일입니다.
12. 홈 디렉토리로 이동
root@923d89f9730b:/usr/bin# cd ~
root@923d89f9730b:~# pwd
/root
root@923d89f9730b:~#- cd ~:
~는 현재 사용자의 홈 디렉토리를 의미합니다. 이 명령어를 실행하면 홈 디렉토리로 이동합니다. - pwd: 현재 경로를 출력하는 명령어로, 홈 디렉토리로 이동 후
/root가 출력됩니다.
13. 특정 파일의 내용 보기
root@923d89f9730b:~# cat .profile
# ~/.profile: executed by Bourne-compatible login shells.

if [ "$BASH" ]; then
  if [ -f ~/.bashrc ]; then
    . ~/.bashrc
  fi
fi

mesg n 2> /dev/null || true
root@923d89f9730b:~#- cat: 특정 파일의 내용을 출력하는 명령어입니다. 여기서는
.profile파일의 내용을 출력하고 있습니다.
14. 다른 폴더에 있는 특정 파일의 내용 확인
root@923d89f9730b:/usr/bin# cat ~/.profile
# ~/.profile: executed by Bourne-compatible login shells.

if [ "$BASH" ]; then
  if [ -f ~/.bashrc ]; then
    . ~/.bashrc
  fi
fi

mesg n 2> /dev/null || true
root@923d89f9730b:/usr/bin#- cat: 특정 파일의 내용을 출력하는 명령어입니다. 여기서는 사용자의 홈 디렉토리(
~)에 있는.profile파일을 출력합니다. - ~/.profile: 사용자 홈 디렉토리에서 로그인 시 실행되는 설정 파일입니다. 로그인 셸에서 실행되는 명령을 포함합니다.
- if [ "$BASH" ]; then ... fi:
BASH가 활성화된 경우에.bashrc파일을 실행하는 조건문입니다.~/.bashrc는 Bash 셸 환경 설정 파일입니다. - mesg n: 사용자가 메시지를 받을 수 없도록 설정하는 명령어입니다.
n은 "no"를 의미하며, 메시지 수신을 비활성화합니다. - 2> /dev/null: 표준 오류 출력을
/dev/null로 리디렉션하여 오류 메시지를 표시하지 않도록 합니다. - || true: 명령어가 실패해도 후속 명령이 실행되도록 합니다. 여기서는
mesg n명령이 실패해도 이후의 명령을 계속 실행하도록 보장합니다.
15. 폴더 만들기
root@923d89f9730b:~# ls
root@923d89f9730b:~# mkdir sample
root@923d89f9730b:~# ls
sample
root@923d89f9730b:~#- mkdir sample:
sample이라는 폴더를 생성하는 명령어입니다. 새로 생성된 폴더는 파란색으로 표시됩니다. (디폴트 설정에서 폴더는 파란색으로 표시됩니다.) - ls:
sample폴더가 생성된 후ls명령어를 통해 현재 디렉토리 안에 있는 폴더들을 확인합니다. 생성된sample폴더가 나열됩니다.
16. 한번에 여러 하위 폴더를 생성하기 1
root@923d89f9730b:~# mkdir test/tutorial/sample
mkdir: cannot create directory 'test/tutorial/sample': No such file or directory
root@923d89f9730b:~#- mkdir test/tutorial/sample: 이 명령어는
test/tutorial/sample이라는 경로에 폴더를 만들려고 시도하지만,test폴더가 존재하지 않으면 에러가 발생합니다.mkdir는 한 번에 여러 하위 폴더를 만들 수 없고, 상위 폴더가 먼저 존재해야 합니다.
해결 방법:
root@923d89f9730b:~# mkdir test
root@923d89f9730b:~# cd test
root@923d89f9730b:~/test# mkdir tutorial
root@923d89f9730b:~/test# cd tutorial/
root@923d89f9730b:~/test/tutorial# mkdir sample
root@923d89f9730b:~/test/tutorial# cd sample/
root@923d89f9730b:~/test/tutorial/sample# pwd
/root/test/tutorial/sample
root@923d89f9730b:~/test/tutorial/sample#- mkdir test:
test폴더를 생성합니다. - cd test:
test폴더로 이동합니다. - mkdir tutorial:
test폴더 안에 `
tutorial` 폴더를 생성합니다.
- cd tutorial:
tutorial폴더로 이동합니다. - mkdir sample:
tutorial폴더 안에sample폴더를 생성합니다. - cd sample:
sample폴더로 이동합니다. - pwd: 현재 디렉토리의 경로를 출력합니다.
/root/test/tutorial/sample이 출력됩니다.
17. 한번에 여러 하위 폴더를 생성하기 2
root@923d89f9730b:~# mkdir -p test1/tutorial1/sample1
root@923d89f9730b:~# cd /test1/tutorial1/sample1
root@923d89f9730b:~# cd test1/tutorial1/sample1/
root@923d89f9730b:~/test1/tutorial1/sample1# pwd
/root/test1/tutorial1/sample1
root@923d89f9730b:~/test1/tutorial1/sample1#- mkdir -p test1/tutorial1/sample1:
-p옵션은 부모 디렉토리가 없으면 부모 디렉토리까지 한 번에 생성해 주는 옵션입니다. 따라서test1/tutorial1/sample1경로에 필요한 모든 폴더를 한번에 생성합니다. - cd test1/tutorial1/sample1: 생성된
sample1폴더로 이동합니다. - pwd: 현재 경로를 출력합니다.
/root/test1/tutorial1/sample1이 출력됩니다.
18. 파일 생성
root@923d89f9730b:~# touch test.txt
root@923d89f9730b:~# ls
sample  test  test.txt  test1
root@923d89f9730b:~#- touch test.txt:
test.txt라는 파일을 생성하는 명령어입니다.touch명령어는 파일을 새로 만들거나 기존 파일의 수정 시간을 변경하는 데 사용됩니다. - ls:
test.txt파일이 생성된 후,ls명령어를 통해 현재 디렉토리의 내용물을 확인합니다.test.txt파일이 목록에 나타납니다.
19. 이름 변경 및 이동
파일 이동
root@923d89f9730b:~# ls
sample  test  test.txt  test1
root@923d89f9730b:~# ls sample/
root@923d89f9730b:~# mv test.txt sample/test.txt
root@923d89f9730b:~# ls sample/
test.txt
root@923d89f9730b:~# ls
sample  test  test1
root@923d89f9730b:~#- mv test.txt sample/test.txt:
test.txt파일을sample폴더로 이동시키는 명령어입니다. 파일이 이동되면sample폴더 내에test.txt파일이 생성됩니다. - ls sample/:
sample폴더 내에test.txt파일이 있는지 확인합니다. - ls: 현재 디렉토리에서
test.txt파일이 이동된 후,test.txt파일이test폴더에서 사라지고sample폴더로 이동했음을 확인할 수 있습니다.
파일 이름 변경
root@923d89f9730b:~# ls sample/
test.txt
root@923d89f9730b:~# mv sample/test.txt sample/sample.txt
root@923d89f9730b:~# ls sample/
sample.txt
root@923d89f9730b:~#- mv sample/test.txt sample/sample.txt:
test.txt파일의 이름을sample.txt로 변경하는 명령어입니다.mv는 파일이나 디렉토리의 이름을 변경하거나 위치를 이동시키는 명령어입니다. - ls sample/: 이름이 변경된 파일이
sample.txt로 나타납니다.
20. 파일 복사
root@923d89f9730b:~# cp ./sample/sample.txt ./
root@923d89f9730b:~# ls
sample  sample.txt  test  test1
root@923d89f9730b:~# ls ./sample
sample.txt
root@923d89f9730b:~#

root@923d89f9730b:~# ls
sample  sample.txt  test  test1
root@923d89f9730b:~# cp ./sample.txt  ./test/tutorial/sample/
root@923d89f9730b:~# ls ./test/tutorial/sample/
sample.txt
root@923d89f9730b:~#- cp:
cp명령어는 파일을 복사하는 명령어입니다. - 옵션:
-r(재귀적 복사) 옵션은 디렉토리와 그 안의 내용을 복사할 때 사용됩니다. 이 명령어에서 복사된 파일은 지정된 경로로 복사됩니다.
21. 폴더 복사
root@923d89f9730b:~# cp -r ./test/tutorial ./test2
root@923d89f9730b:~# ls ./test2
tutorial
root@923d89f9730b:~# ls ./test2/tutorial/sample/
sample.txt
root@923d89f9730b:~#- cp -r:
-r옵션을 사용하여 디렉토리와 그 안의 내용을 재귀적으로 복사합니다. cp명령어를 사용하여./test/tutorial폴더를./test2로 복사하였습니다.
22. 파일 삭제
root@923d89f9730b:~# ls
sample  sample.txt  test  test1  test2
root@923d89f9730b:~# rm sample.txt
root@923d89f9730b:~# ls
sample  test  test1  test2
root@923d89f9730b:~#- rm:
rm명령어는 파일을 삭제하는 명령어입니다. - 삭제한 파일은 영구적으로 삭제되며, 복구할 수 없습니다.
23. 폴더 삭제
- 내용이 비어있지 않은 경우 삭제 시 에러 발생
root@923d89f9730b:~# ls
sample  test  test1  test2
root@923d89f9730b:~# ls sample/
sample.txt
root@923d89f9730b:~# rm sample
rm: cannot remove 'sample': Is a directory
root@923d89f9730b:~#-
rm 명령어로 디렉토리를 삭제할 때
Is a directory오류가 발생하는 이유는rm명령어가 기본적으로 디렉토리를 삭제하지 않기 때문입니다. -
내용을 비우지 않은 상태에서 삭제하려면
-r옵션을 사용
root@923d89f9730b:~# rm -r ./sample/
root@923d89f9730b:~# ls sample/
ls: cannot access 'sample/': No such file or directory
root@923d89f9730b:~#- rm -r:
-r옵션은 디렉토리와 그 안의 내용을 모두 삭제하는 옵션입니다. 디렉토리 안에 파일이 있더라도 모두 삭제됩니다.
24. 권한 부여
- 글자로 부여
root@923d89f9730b:~# chmod a+rw test.txt
root@923d89f9730b:~# ls -l
total 0
-rw-rw-rw- 1 root root 0 Apr 18 11:38 test.txt
root@923d89f9730b:~#- chmod a+rw test.txt:
chmod는 파일이나 디렉토리의 권한을 변경하는 명령어입니다.a: 모든 사용자 (user, group, others)에게 권한을 부여+rw: 읽기(r)와 쓰기(w) 권한을 추가
- 숫자로 부여
root@923d89f9730b:~# touch test.txt
root@923d89f9730b:~# ls -l
total 0
-rw-r--r-- 1 root root 0 Apr 18 11:40 test.txt
root@923d89f9730b:~# chmod 777 test.txt
root@923d89f9730b:~# ls -l
total 0
-rwxrwxrwx 1 root root 0 Apr 18 11:40 test.txt
root@923d89f9730b:~#- chmod 777 test.txt:
chmod명령어에서 숫자는 파일의 권한을 설정할 때 사용됩니다.7: 읽기(4), 쓰기(2), 실행(1) 권한이 모두 부여된 상태입니다.7은 이 세 가지 권한을 모두 부여하는 값입니다.777: 소유자, 그룹, 다른 사용자 모두에게 읽기, 쓰기, 실행 권한을 부여합니다.
25. 권한 제거
- 글자로 제거
root@923d89f9730b:~# touch test.txt
root@923d89f9730b:~# ls -l
total 0
-rw-r--r-- 1 root root 0 Apr 18 11:38 test.txt
root@923d89f9730b:~# chmod go-rw test.txt
root@923d89f9730b:~# ls -l
total 0
-rw------- 1 root root 0 Apr 18 11:38 test.txt
root@923d89f9730b:~#- chmod go-rw test.txt:
g는 그룹,o는 다른 사용자(others)를 의미합니다.-rw는 읽기와 쓰기 권한을 제거한다는 의미입니다.g: 그룹o: 다른 사용자-rw: 읽기 및 쓰기 권한 제거
- 숫자로 제거
root@923d89f9730b:~# touch test.txt
root@923d89f9730b:~# ls -l
total 0
-rw-r--r-- 1 root root 0 Apr 18 11:40 test.txt
root@923d89f9730b:~# chmod 644 test.txt
root@923d89f9730b:~# ls -l
total 0
-rw-r--r-- 1 root root 0 Apr 18 11:40 test.txt
root@923d89f9730b:~#- chmod 644 test.txt:
644는 소유자에게 읽기와 쓰기 권한을 부여하고, 그룹과 다른 사용자에게는 읽기 권한만 부여하는 설정입니다.6: 소유자에게 읽기(4)와 쓰기(2) 권한을 부여4: 그룹과 다른 사용자에게 읽기(4) 권한만 부여
26. root 계정 비밀번호 설정
root@923d89f9730b:~# sudo passwd root
New password:
Retype new password:
passwd: password updated successfully
root@923d89f9730b:~#- passwd:
passwd명령어는 사용자의 비밀번호를 변경하는 명령어입니다.sudo를 사용하면root계정의 비밀번호를 설정할 수 있습니다.
27. 계정 생성
- adduser 명령어는 설치하지 않았기에 에러 발생
root@923d89f9730b:~# adduser student
bash: adduser: command not found
root@923d89f9730b:~#- adduser 설치 후 계정 생성
root@923d89f9730b:~# apt-get install -y adduser
...
root@923d89f9730b:~# sudo adduser student
info: Adding user `student' ...
info: Selecting UID/GID from range 1000 to 59999 ...
info: Adding new group `student' (1001) ...
info: Adding new user `student' (1001) with group `student (1001)' ...
info: Creating home directory `/home/student' ...
...
passwd: password updated successfully- adduser: 사용자 계정을 추가하는 명령어입니다.
student라는 새 사용자 계정을 추가하고, 비밀번호를 설정하였습니다.
- root 계정이 아닌 계정에서 계정 추가 시도 시 에러 발생
student@923d89f9730b:~$ adduser tutorial
fatal: Only root may add a user or group to the system.
student@923d89f9730b:~$adduser명령어는root권한을 가진 사용자만 실행할 수 있습니다.
28. 생성한 계정으로 로그인
root@923d89f9730b:~# su - student
Password:
student@923d89f9730b:~$ whoami
student
student@923d89f9730b:~$ pwd
/home/student
student@923d89f9730b:~$- su - student:
su명령어는 다른 사용자로 전환하는 명령어입니다.-옵션은 해당 사용자의 환경으로 전환하는 옵션입니다.
29. 비어있는 파일에 글자 넣기 (에디터 사용 X)
student@923d89f9730b:~$ echo "hello world" > test.txt
student@923d89f9730b:~$ cat test.txt
hello world
student@923d89f9730b:~$- echo:
echo명령어는 문자열을 출력하거나 파일에 입력을 쓰는 명령어입니다.>기호는 출력을 파일에 저장합니다. - cat:
cat명령어는 파일의 내용을 출력합니다.
30. tutorial 계정이 student에게 접근하려고 하면 에러 발생
tutorial@923d89f9730b:~$ pwd
/home/tutorial
tutorial@923d89f9730b:~$ cd /home/student/
-bash: cd: /home/student/: Permission denied
tutorial@923d89f9730b:~$ cat /home/student
cat: /home/student: Permission denied
tutorial@923d89f9730b:~$ ls /home/student
ls: cannot open directory '/home/student': Permission denied
tutorial@923d89f9730b:~$ cat /home/student/test.txt
cat: /home/student/test.txt: Permission denied
Permission denied: 해당 디렉토리나 파일에 대한 접근 권한이 부족하여 발생하는 에러입니다.
- 권한 수정 후 접근 가능
student@923d89f9730b:~$ chmod 755 .
student@923d89f9730b:~$ su - tutorial
Password:
tutorial@923d89f9730b:~$ ls -al /home/student
total 20
drwxr-xr-x 2 student student 4096 Apr 18 12:24 .
drwxr-xr-x 1 root    root    4096 Apr 18 12:23 ..
-rw-r--r-- 1 student student  220 Apr 18 12:23 .bash_logout
-rw-r--r-- 1 student student 3771 Apr 18 12:23 .bashrc
-rw-r--r-- 1 student student  807 Apr 18 12:23 .profile
-rw-rw-r-- 1 student student    0 Apr 18 12:24 test.txt
tutorial@923d89f9730b:~$- chmod 755 .: 디렉토리의 권한을 변경하여 다른 사용자가 읽고 실행할 수 있도록 허용합니다.
31. 현재 사용 중인 셸 확인
root@923d89f9730b:~# echo $SHELL
/bin/bash
root@923d89f9730b:~#- echo $SHELL:
$SHELL환경 변수는 현재 사용 중인 셸 프로그램의 경로를 출력합니다. 이 명령어를 실행하면, 현재 로그인한 사용자에 대한 기본 셸 프로그램이 무엇인지 알 수 있습니다.- 예시 출력:
/bin/bash는bash셸이 사용 중임을 의미합니다. 이는 대부분의 리눅스 시스템에서 기본 셸로 설정되어 있습니다.
- 예시 출력:
- /bin/bash: 이 경로는
bash셸이 시스템에서 설치된 경로를 나타냅니다.bash는 기본적으로 리눅스에서 많이 사용되는 셸 중 하나입니다.
31. 변수 선언
root@923d89f9730b:~# username=tom
root@923d89f9730b:~# lastname = good
bash: lastname: command not found
root@923d89f9730b:~#- username=tom: 변수
username에 값tom을 할당하는 명령어입니다. 쉘에서 변수를 선언할 때는=기호를 사용하며, 변수명과=사이에 공백이 없어야 합니다. - lastname = good: 변수
lastname을 선언하려고 했지만,=앞뒤에 공백이 있어서 오류가 발생했습니다. 변수명과=사이에는 공백을 넣지 말아야 합니다.
32. 변수값 출력
root@923d89f9730b:~# echo $username
tom
root@923d89f9730b:~#- echo $username: 변수
username의 값을 출력하는 명령어입니다.$기호를 사용하여 변수의 값을 참조할 수 있습니다. 이 명령어는tom을 출력합니다.
33. 선언하지 않은 변수값 출력
root@923d89f9730b:~# echo $lastname

root@923d89f9730b:~#- echo $lastname: 선언되지 않은 변수
lastname을 출력하려고 하면 아무 것도 출력되지 않습니다. 이는 해당 변수가 선언되지 않았기 때문입니다.
34. 현재 저장되어 있는 변수들 조회
root@923d89f9730b:~# set
BASH=/bin/bash
BASHOPTS=checkwinsize:cmdhist:complete_fullquote:expand_aliases:extquote:force_fignore:globasciiranges:globskipdots:histappend:hostcomplete:interactive_comments:patsub_replacement:progcomp:promptvars:sourcepath
BASH_ALIASES=()
BASH_ARGC=([0]="0")
BASH_ARGV=()
BASH_CMDS=()
BASH_LINENO=()
BASH_LOADABLES_PATH=/usr/local/lib/bash:/usr/lib/bash:/opt/local/lib/bash:/usr/pkg/lib/bash:/opt/pkg/lib/bash:.
BASH_SOURCE=()
BASH_VERSINFO=([0]="5" [1]="2" [2]="21" [3]="1" [4]="release" [5]="x86_64-pc-linux-gnu")
BASH_VERSION='5.2.21(1)-release'
COLUMNS=144
DIRSTACK=()
EUID=0
GROUPS=()
HISTCONTROL=ignoredups:ignorespace
HISTFILE=/root/.bash_history
HISTFILESIZE=2000
HISTSIZE=1000
HOME=/root
HOSTNAME=923d89f9730b
HOSTTYPE=x86_64
IFS=$' \t\n'
LINES=31
LS_COLORS='rs=0:di=01;34:ln=01;36:mh=00:pi=40;33:so=01;35:do=01;35:bd=40;33;01:cd=40;33;01:or=40;31;01:mi=00:su=37;41:sg=30;43:ca=00;tw=30;42:ow=34;42:st=37;44:ex=01;32:*.tar=01;31:*.tgz=01;31:*.arc=01;31:*.arj=01;31:*.taz=01;31:*.lha=01;31:*.lz4=01;31:*.lzh=01;31:*.lzma=01;31:*.tlz=01;31:*.txz=01;31:*.tzo=01;31:*.t7z=01;31:*.zip=01;31:*.z=01;31:*.dz=01;31:*.gz=01;31:*.lrz=01;31:*.lz=01;31:*.lzo=01;31:*.xz=01;31:*.zst=01;31:*.tzst=01;31:*.bz2=01;31:*.bz=01;31:*.tbz=01;31:*.tbz2=01;31:*.tz=01;31:*.deb=01;31:*.rpm=01;31:*.jar=01;31:*.war=01;31:*.ear=01;31:*.sar=01;31:*.rar=01;31:*.alz=01;31:*.ace=01;31:*.zoo=01;31:*.cpio=01;31:*.7z=01;31:*.rz=01;31:*.cab=01;31:*.wim=01;31:*.swm=01;31:*.dwm=01;31:*.esd=01;31:*.avif=01;35:*.jpg=01;35:*.jpeg=01;35:*.mjpg=01;35:*.mjpeg=01;35:*.gif=01;35:*.bmp=01;35:*.pbm=01;35:*.pgm=01;35:*.ppm=01;35:*.tga=01;35:*.xbm=01;35:*.xpm=01;35:*.tif=01;35:*.tiff=01;35:*.png=01;35:*.svg=01;35:*.svgz=01;35:*.mng=01;35:*.pcx=01;35:*.mov=01;35:*.mpg=01;35:*.mpeg=01;35:*.m2v=01;35:*.mkv=01;35:*.webm=01;35:*.webp=01;35:*.ogm=01;35:*.mp4=01;35:*.m4v=01;35:*.mp4v=01;35:*.vob=01;35:*.qt=01;35:*.nuv=01;35:*.wmv=01;35:*.asf=01;35:*.rm=01;35:*.rmvb=01;35:*.flc=01;35:*.avi=01;35:*.fli=01;35:*.flv=01;35:*.gl=01;35:*.dl=01;35:*.xcf=01;35:*.xwd=01;35:*.yuv=01;35:*.cgm=01;35:*.emf=01;35:*.ogv=01;35:*.ogx=01;35:*.aac=00;36:*.au=00;36:*.flac=00;36:*.m4a=00;36:*.mid=00;36:*.midi=00;36:*.mka=00;36:*.mp3=00;36:*.mpc=00;36:*.ogg=00;36:*.ra=00;36:*.wav=00;36:*.oga=00;36:*.opus=00;36:*.spx=00;36:*.xspf=00;36:*~=00;90:*#=00;90:*.bak=00;90:*.crdownload=00;90:*.dpkg-dist=00;90:*.dpkg-new=00;90:*.dpkg-old=00;90:*.dpkg-tmp=00;90:*.old=00;90:*.orig=00;90:*.part=00;90:*.rej=00;90:*.rpmnew=00;90:*.rpmorig=00;90:*.rpmsave=00;90:*.swp=00;90:*.tmp=00;90:*.ucf-dist=00;90:*.ucf-new=00;90:*.ucf-old=00;90:
TERM=xterm
SHLVL=1
PATH=/usr/local/sbin:/usr/local/bin:/usr/sbin:/usr/bin:/sbin:/bin
OLDPWD=/usr
_=/usr/bin/env
root@923d89f9730b:~#- set: 현재 세션에 설정된 모든 환경 변수와 셸 변수들을 출력하는 명령어입니다.
- 이 명령어는 현재 설정된 다양한 변수들을 모두 확인할 수 있습니다.
35. 파이프를 사용해서 코드로 특정 변수가 있는지 조회
root@923d89f9730b:~# set | grep username
username=tom
root@923d89f9730b:~# set | grep aaaaa
root@923d89f9730b:~#- set | grep username:
set명령어로 출력되는 많은 변수들 중에서username변수만 필터링하여 확인할 수 있습니다. 파이프(|)와grep을 사용하면 출력된 결과에서 원하는 정보를 찾을 수 있습니다. grep aaaaa는aaaaa라는 변수나 내용이 없으므로 아무 것도 출력되지 않습니다.
36. 변수 삭제
root@923d89f9730b:~# set | grep username
username=tom
root@923d89f9730b:~# unset username
root@923d89f9730b:~# echo $username

root@923d89f9730b:~#- unset:
unset명령어는 변수를 삭제하는 명령어입니다.username변수를 삭제한 후, 다시echo $username을 실행하면 출력되지 않음을 확인할 수 있습니다.
37. 환경변수 선언
root@923d89f9730b:~# export NAME=tom
root@923d89f9730b:~# echo $NAME
tom
root@923d89f9730b:~#- export:
export명령어는 환경 변수를 선언하는 명령어입니다. 여기서는NAME이라는 환경 변수를 선언하고tom이라는 값을 할당하였습니다. - echo $NAME: 환경 변수가 제대로 설정되었는지 확인하기 위해 해당 변수의 값을 출력합니다.
38. 환경변수 조회
root@923d89f9730b:~# echo $NAME
tom
root@923d89f9730b:~# env
HOSTNAME=923d89f9730b
NAME=tom
PWD=/root
HOME=/root
LS_COLORS=rs=0:di=01;34:ln=01;36:mh=00:pi=40;33:so=01;35:do=01;35:bd=40;33;01:cd=40;33;01:or=40;31;01:mi=00:su=37;41:sg=30;43:ca=00;tw=30;42:ow=34;42:st=37;44:ex=01;32:*.tar=01;31:*.tgz=01;31:*.arc=01;31:*.arj=01;31:*.taz=01;31:*.lha=01;31:*.lz4=01;31:*.lzh=01;31:*.lzma=01;31:*.tlz=01;31:*.txz=01;31:*.tzo=01;31:*.t7z=01;31:*.zip=01;31:*.z=01;31:*.dz=01;31:*.gz=01;31:*.lrz=01;31:*.lz=01;31:*.lzo=01;31:*.xz=01;31:*.zst=01;31:*.tzst=01;31:*.bz2=01;31:*.bz=01;31:*.tbz=01;31:*.tbz2=01;31:*.tz=01;31:*.deb=01;31:*.rpm=01;31:*.jar=01;31:*.war=01;31:*.ear=01;31:*.sar=01;31:*.rar=01;31:*.alz=01;31:*.ace=01;31:*.zoo=01;31:*.cpio=01;31:*.7z=01;31:*.rz=01;31:*.cab=01;31:*.wim=01;31:*.swm=01;31:*.dwm=01;31:*.esd=01;31:*.avif=01;35:*.jpg=01;35:*.jpeg=01;35:*.mjpg=01;35:*.mjpeg=01;35:*.gif=01;35:*.bmp=01;35:*.pbm=01;35:*.pgm=01;35:*.ppm=01;35:*.tga=01;35:*.xbm=01;35:*.xpm=01;35:*.tif=01;35:*.tiff=01;35:*.png=01;35:*.svg=01;35:*.svgz=01;35:*.mng=01;35:*.pcx=01;35:*.mov=01;35:*.mpg=01;35:*.mpeg=01;35:*.m2v=01;35:*.mkv=01;35:*.webm=01;35:*.webp=01;35:*.ogm=01;35:*.mp4=01;35:*.m4v=01;35:*.mp4v=01;35:*.vob=01;35:*.qt=01;35:*.nuv=01;35:*.wmv=01;35:*.asf=01;35:*.rm=01;35:*.rmvb=01;35:*.flc=01;35:*.avi=01;35:*.fli=01;35:*.flv=01;35:*.gl=01;35:*.dl=01;35:*.xcf=01;35:*.xwd=01;35:*.yuv=01;35:*.cgm=01;35:*.emf=01;35:*.ogv=01;35:*.ogx=01;35:*.aac=00;36:*.au=00;36:*.flac=00;36:*.m4a=00;36:*.mid=00;36:*.midi=00;36:*.mka=00;36:*.mp3=00;36:*.mpc=00;36:*.ogg=00;36:*.ra=00;36:*.wav=00;36:*.oga=00;36:*.opus=00;36:*.spx=00;36:*.xspf=00;36:*~=00;90:*#=00;90:*.bak=00;90:*.crdownload=00;90:*.dpkg-dist=00;90:*.dpkg-new=00;90:*.dpkg-old=00;90:*.dpkg-tmp=00;90:*.old=00;90:*.orig=00;90:*.part=00;90:*.rej=00;90:*.rpmnew=00;90:*.rpmorig=00;90:*.rpmsave=00;90:*.swp=00;90:*.tmp=00;90:*.ucf-dist=00;90:*.ucf-new=00;90:*.ucf-old=00;90:
TERM=xterm
SHLVL=1
PATH=/usr/local/sbin:/usr/local/bin:/usr/sbin:/usr/bin:/sbin:/bin
OLDPWD=/usr
_=/usr/bin/env
root@923d89f9730b:~#- echo $NAME:
NAME환경 변수를 출력합니다.tom이 출력됩니다. - env: 시스템 환경 변수를 출력하는 명령어로, 현재 환경에 설정된 모든 환경 변수들이 나열됩니다.
39. 파이프를 사용해서 코드로 특정 환경변수가 있는지 조회
root@923d89f9730b:~# env | grep NAME
HOSTNAME=923d89f9730b
NAME=tom
root@923d89f9730b:~#- env | grep NAME:
env명령어로 출력된 모든 환경 변수 중NAME변수만 필터링하여 확인합니다. 파이프(|)와grep을 사용하여 특정 환경 변수를 찾을 수 있습니다.
40. 새로운 파일들을 생성하고 특정 조건의 파일들 조회
- test1로 시작하는 파일 조회
root@923d89f9730b:~/meta# ls -al
total 8
drwxr-xr-x 2 root root 4096 Apr 18 15:31 .
drwx------ 1 root root 4096 Apr 18 15:26 ..
-rw-r--r-- 1 root root    0 Apr 18 15:31 test1
-rw-r--r-- 1 root root    0 Apr 18 15:31 test11
-rw-r--r-- 1 root root    0 Apr 18 15:31 test12
-rw-r--r-- 1 root root    0 Apr 18 15:31 test13
-rw-r--r-- 1 root root    0 Apr 18 15:31 test2
-rw-r--r-- 1 root root    0 Apr 18 15:31 test3
root@923d89f9730b:~/meta# ls test1*
test1  test11  test12  test13
root@923d89f9730b:~/meta#- ls test1*:
test1로 시작하는 파일들을 조회하는 명령어입니다.test1,test11,test12,test13파일들이 나열됩니다.
- test 뒤에 한 글자인 파일 조회
root@923d89f9730b:~/meta# ls test?
test1  test2  test3
root@923d89f9730b:~/meta#- ls test?:
test뒤에 한 글자가 있는 파일들을 조회합니다.test1,test2,test3파일들이 나열됩니다.
- test1, test2, test3 파일 조회
root@923d89f9730b:~/meta# ls test{1,21,3}
test1  test21  test3
root@923d89f9730b:~/meta#- ls test{1,21,3}: 중괄호를 사용하여 여러 파일을 조회할 수 있습니다. 이 경우
test1,test21,test3파일들이 나열됩니다.
- test11과 test22를 조회
root@923d89f9730b:~/meta# ls test{11,22}
test11  test22
root@923d89f9730b:~/meta#- ls test{11,22}: 중괄호를 사용하여
test11과test22를 동시에 조회할 수 있습니다.
- test 뒤에 1 또는 2로 되어 있는 파일들만 조회
root@923d89f9730b:~/meta# ls test[12]
test1  test2
root@923d89f9730b:~/meta#- ls test[12]: 대괄호를 사용하여
test1또는test2파일을 조회합니다.
- test1, test21, test3 조회
root@923d89f9730b:~/meta# ls test{1,21,3}
test1  test21  test3
root@923d89f9730b:~/meta#- ls test{1,21,3}:
test1,test21,test3파일들을 조회합니다.
41. date 함수
root@923d89f9730b:~/meta# date
Fri Apr 18 15:40:34 KST 2025
root@923d89f9730b:~/meta#- date: 현재 시스템의 날짜와 시간을 출력하는 명령어입니다.
42. date 함수의 결과값을 변수에 넣기
- 벡틱 사용을 기억하기
root@923d89f9730b:~/meta# dt=`date`
root@923d89f9730b:~/meta# echo $dt
Fri Apr 18 15:41:59 KST 2025
root@923d89f9730b:~/meta# - dt=`date`:
date명령어의 결과를dt변수에 저장합니다. - echo $dt: 저장된
dt변수를 출력하여 날짜와 시간이 출력됩니다.
43. 특수문자를 가지고 파일 만들기
- 역슬래시를 사용해야 함.
root@923d89f9730b:~/meta# touch \*
root@923d89f9730b:~/meta# ls
'*'   test1   test11   test12   test13   test2   test21   test22   test23   test3
root@923d89f9730b:~/meta#- touch *: 특수문자(
*)를 포함한 파일을 생성하려면 역슬래시(\)를 사용하여 이스케이프 처리합니다.
44. echo와 date 함수의 활용
- 함수 결과 출력 방법에 주의
root@923d89f9730b:~/meta# echo "today is `date`"
today is Fri Apr 18 15:46:09 KST 2025
root@923d89f9730b:~/meta# echo "today is $(date)"
today is Fri Apr 18 15:47:05 KST 2025
root@923d89f9730b:~/meta# - echo "today is
date": 백틱(`)을 사용하여 명령어를 실행하고 결과를 출력합니다. - echo "today is $(date)":
$()를 사용하여 명령어를 실행하고 결과를 출력하는 방법입니다. 두 방식은 동일한 결과를 출력합니다.
45. 작은따옴표를 사용하면 무조건 문자열로 출력
root@923d89f9730b:~/meta# echo 'today is $(date)'
today is $(date)
root@923d89f9730b:~/meta# echo 'today is `date`'
today is `date`
root@923d89f9730b:~/meta# - 작은따옴표(
')를 사용하면 문자열로 취급되어 명령어가 실행되지 않고, 그대로 출력됩니다.
46. 여러 명령어를 한번에 실행1
AND 조건
root@923d89f9730b:~/meta# date && pwd
Fri Apr 18 16:05:43 KST 2025
/root/meta
root@923d89f9730b:~/meta# date && pwd && ls
Fri Apr 18 16:06:06 KST 2025
/root/meta
'*'   test1   test11   test12   test13   test2   test21   test22   test23   test3
root@923d89f9730b:~/meta# - &&:
&&연산자는 여러 명령어를 연결할 때 사용됩니다. 앞의 명령어가 성공적으로 실행되었을 때만 뒤의 명령어가 실행됩니다. 예를 들어,date && pwd && ls는date명령어가 성공적으로 실행되면pwd를 실행하고,pwd가 성공적으로 실행되면ls를 실행합니다.
47. 여러 명령어를 한번에 실행2
root@923d89f9730b:~/meta# date; pwd; ls
Fri Apr 18 16:06:57 KST 2025
/root/meta
'*'   test1   test11   test12   test13   test2   test21   test22   test23   test3
root@923d89f9730b:~/meta# - ;:
;콜론은 여러 명령어를 하나의 줄에서 실행할 때 사용됩니다.;를 사용하면 각 명령어는 순차적으로 실행되며, 앞의 명령어가 실패하더라도 나머지 명령어는 계속 실행됩니다. 예를 들어,date; pwd; ls는date명령어가 실패하더라도pwd와ls가 계속 실행됩니다.
48. 여러 명령어를 한번에 실행3
OR 조건
root@923d89f9730b:~/meta# data || pwd
bash: data: command not found
/root/meta
root@923d89f9730b:~/meta# pwd || data
/root/meta
root@923d89f9730b:~/meta# - ||:
||연산자는 앞의 명령어가 실패하면 뒤의 명령어가 실행되도록 합니다. 앞의 명령어가 성공적으로 실행되면 뒤의 명령어는 실행되지 않습니다. 예를 들어,data || pwd에서data명령어가 실패하면pwd가 실행되고,pwd || data에서는pwd가 성공적으로 실행되면data명령어는 실행되지 않습니다.
50. 파이프를 활용하여 wc 명령어 실행하기
root@923d89f9730b:~/meta# set | grep OP | wc -l
4
root@923d89f9730b:~/meta# - wc -l:
wc는 "word count"의 약자로, 파일이나 입력된 데이터의 단어 수, 줄 수, 문자 수 등을 세는 명령어입니다.-l옵션은 줄 수를 셉니다.set | grep OP | wc -l명령어는set명령어의 출력에서OP라는 문자열을 포함하는 줄을 찾고, 그 줄의 개수를 출력합니다.
51. echo 를 사용하면 덮어쓰기가 되므로 기존의 내용을 유지하며 내용을 추가
root@923d89f9730b:~/meta# cat test1
hello world
root@923d89f9730b:~/meta# echo "good job" >> test1
root@923d89f9730b:~/meta# cat test1
hello world
good job
root@923d89f9730b:~/meta# >>:echo명령어에서>>연산자는 파일에 내용을 추가하는 데 사용됩니다. 이 경우, 기존의 내용은 유지되고, 새로 입력한 내용이 그 뒤에 추가됩니다.>를 사용하면 기존 내용을 덮어쓰게 됩니다.
52. bash 실행 파일
- 실행 파일들은 보통 bin 파일에 있음
root@923d89f9730b:~# mkdir bin
root@923d89f9730b:~# ls
bin  meta
root@923d89f9730b:~# cd bin
root@923d89f9730b:~/bin# - mkdir bin:
bin디렉토리를 생성합니다. 실행 파일은 일반적으로/bin,/usr/bin과 같은 디렉토리에 저장됩니다.
- 실행 파일 작성 (hello.sh)
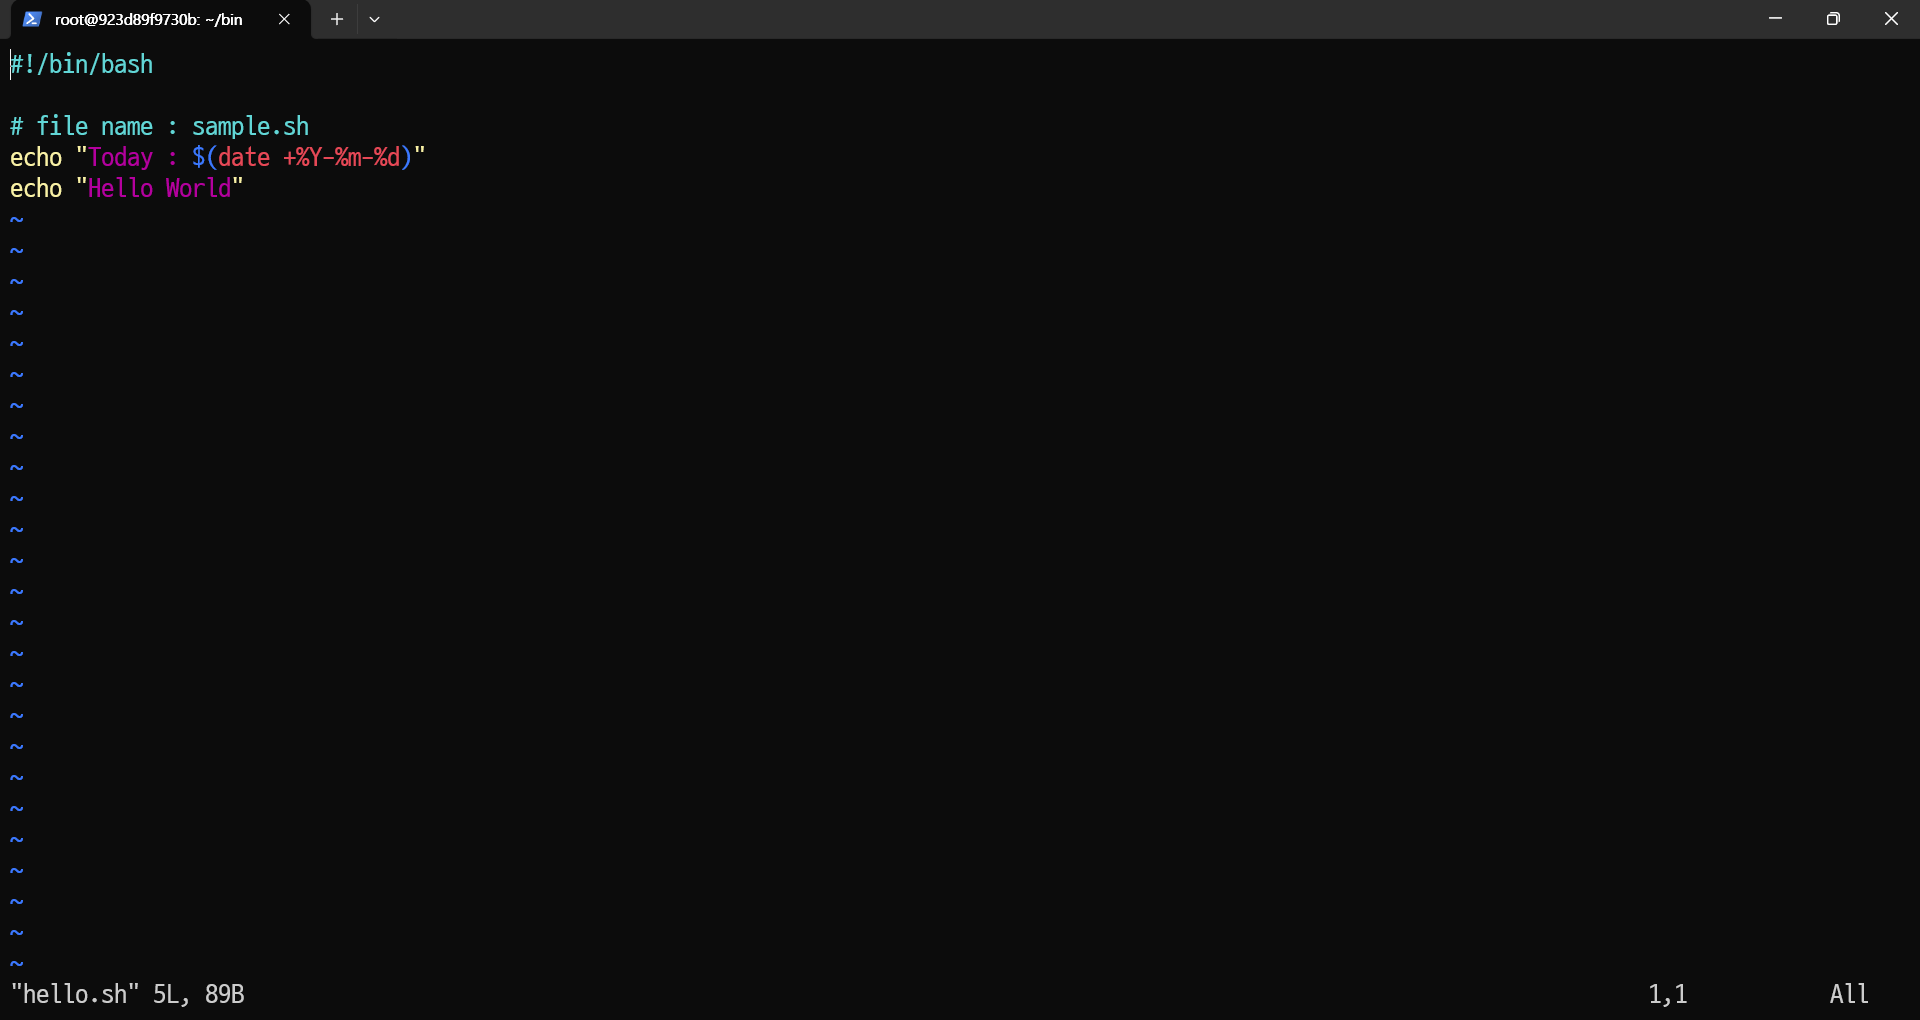- 위 이미지는
hello.sh라는 스크립트 파일의 내용 예시입니다. 이 파일은 현재 날짜를 출력하고 "Hello World" 메시지를 표시하는 간단한 스크립트입니다.
- 실행 파일 실행
root@923d89f9730b:~/bin# ls -l
total 4
-rw-r--r-- 1 root root 89 Apr 18 16:32 hello.sh
root@923d89f9730b:~/bin# chmod 744 hello.sh
root@923d89f9730b:~/bin# ls -l
total 4
-rwxr--r-- 1 root root 89 Apr 18 16:32 hello.sh
root@923d89f9730b:~/bin# ./hello.sh
Today : 2025-04-18
Hello World
root@923d89f9730b:~/bin# - chmod 744 hello.sh:
chmod명령어로 파일에 실행 권한을 부여합니다.744는 소유자에게 읽기, 쓰기, 실행 권한을 부여하고, 그룹과 다른 사용자에게는 읽기 권한만 부여합니다. - ./hello.sh:
hello.sh스크립트를 실행합니다. 현재 디렉토리에서./를 사용하여 실행 파일을 실행합니다.
- 시스템 환경변수에 방금 만든 실행 파일을 저장
root@923d89f9730b:~/bin# set | grep PATH
BASH_LOADABLES_PATH=/usr/local/lib/bash:/usr/lib/bash:/opt/local/lib/bash:/usr/pkg/lib/bash:/opt/pkg/lib/bash:.
PATH=/usr/local/sbin:/usr/local/bin:/usr/sbin:/usr/bin:/sbin:/bin
root@923d89f9730b:~# PATH=$PATH:~/bin
root@923d89f9730b:~# echo $PATH
/usr/local/sbin:/usr/local/bin:/usr/sbin:/usr/bin:/sbin:/bin:/root/bin
root@923d89f9730b:~# - PATH=$PATH:~/bin:
PATH환경 변수에~/bin디렉토리를 추가하여, 이 디렉토리 내의 실행 파일들을 시스템 어디서나 사용할 수 있도록 설정합니다. - echo $PATH: 환경 변수
PATH에~/bin디렉토리가 정상적으로 추가되었는지 확인합니다.
- 이제 어느 위치에서나 ~/bin 폴더에 있는 실행 파일들을 실행 권한만 있다면 실행 가능
root@923d89f9730b:~# hello.sh
Today : 2025-04-18
Hello World
root@923d89f9730b:~# - hello.sh: 이제
hello.sh를 시스템 내 어느 위치에서나 실행할 수 있습니다.~/bin디렉토리를PATH에 추가했기 때문에,hello.sh는 전체 시스템 경로에서 실행할 수 있습니다.
53. 파라미터를 입력받는 shell 스크립트 실행 파일 만들기1
- 외부에서 파라미터를 입력받아 출력하는 실행 파일 예시:
root@923d89f9730b:~/bin# vim hello.sh
root@923d89f9730b:~/bin# ls -l
total 4
-rwxr--r-- 1 root root 286 Apr 18 17:09 hello.sh
root@923d89f9730b:~/bin# cat hello.sh
#!/bin/bash

# file name : sample.sh
echo "Today : $(date +%Y-%m-%d)"
echo "Hello World"

##### Arguments #####
echo "Total Arguments count: " $#
echo "All Arguments print: " $@

echo "First: " $1
echo "Second: " $2

args=("$@")
echo "First -> " ${args[0]}
echo "Second -> " ${args[1]}
root@923d89f9730b:~/bin#$#: 전체 파라미터의 개수를 출력합니다.$@: 전체 파라미터를 출력합니다.args=("$@"): 전체 파라미터를args배열 변수에 저장합니다.${args[0]}:args배열에서 첫 번째 인덱스의 값을 꺼냅니다.
root@923d89f9730b:~/bin# hello.sh a1 a2
Today : 2025-04-18
Hello World
Total Arguments count:  2
All Arguments print:  a1 a2
First:  a1
Second:  a2
First ->  a1
Second ->  a2
root@923d89f9730b:~/bin# hello.sh a1 a2 a3 a4 a5
Today : 2025-04-18
Hello World
Total Arguments count:  5
All Arguments print:  a1 a2 a3 a4 a5
First:  a1
Second:  a2
First ->  a1
Second ->  a2
root@923d89f9730b:~/bin#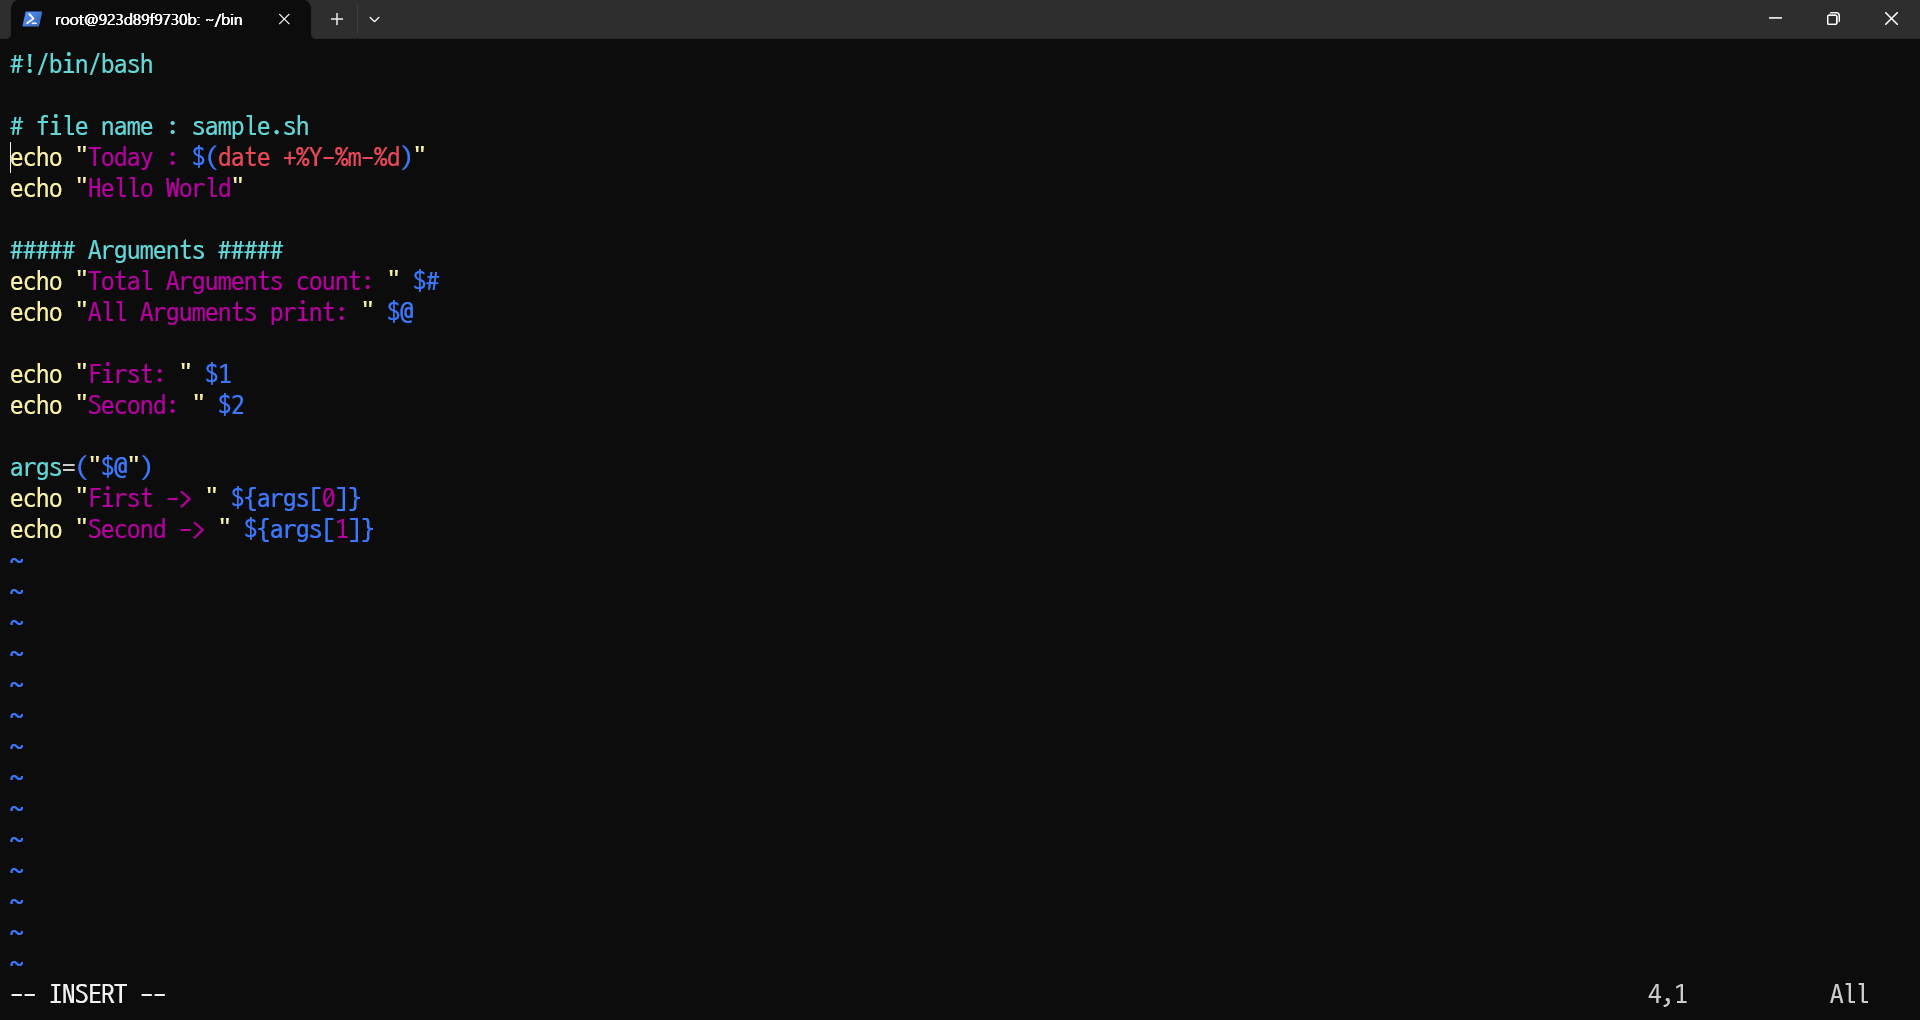
- 위 스크립트는 실행 시, 입력한 파라미터의 개수와 값을 출력합니다.
54. 파라미터를 입력받는 shell 스크립트 실행 파일 만들기2
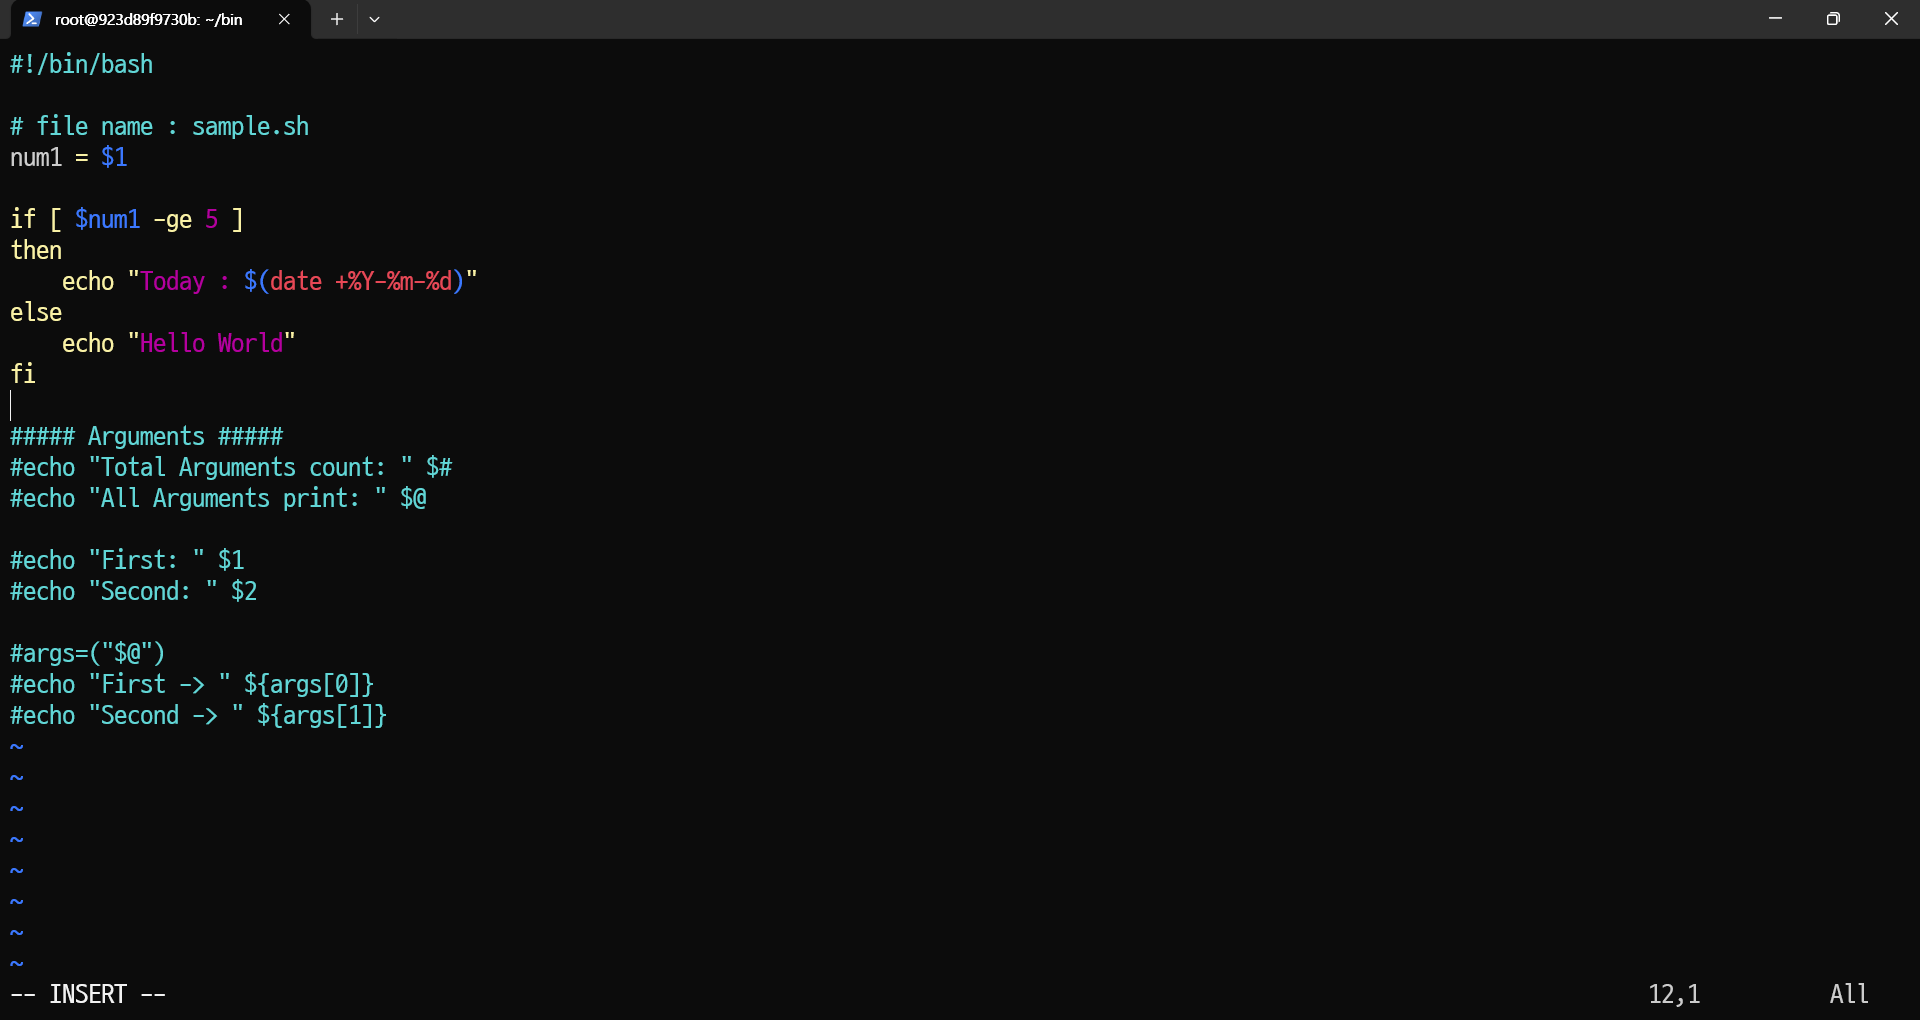
- 첫 번째 파라미터에 따라 서로 다른 출력문을 실행하는 예시:
root@923d89f9730b:~/bin# cat hello.sh
#!/bin/bash

# file name : sample.sh
num1=$1

if [ $num1 -ge 5 ]
then
    echo "Today : $(date +%Y-%m-%d)"
else
    echo "Hello World"
fi

##### Arguments #####
#echo "Total Arguments count: " $#
#echo "All Arguments print: " $@

#echo "First: " $1
#echo "Second: " $2

#args=("$@")
#echo "First -> " ${args[0]}
#echo "Second -> " ${args[1]}
root@923d89f9730b:~/bin#$1: 첫 번째 파라미터를 변수num1에 저장합니다.if [ $num1 -ge 5 ]: 첫 번째 파라미터가 5 이상일 때 "Today" 날짜를 출력하고, 그렇지 않으면 "Hello World"를 출력합니다.
root@923d89f9730b:~/bin# hello.sh 5
Today : 2025-04-18
root@923d89f9730b:~/bin# hello.sh 3
Hello World
root@923d89f9730b:~/bin#- hello.sh 5: 첫 번째 파라미터가 5이므로 "Today" 날짜가 출력됩니다.
- hello.sh 3: 첫 번째 파라미터가 5보다 작으므로 "Hello World"가 출력됩니다.
※ Linux에서 권한 관련 설명
권한 설정과 관련된 숫자(chmod 명령어에서 사용하는 3자리 숫자)는 각 사용자 유형에 대해 읽기(r), 쓰기(w), 실행(x) 권한을 어떻게 부여할지를 나타내는 방식입니다. 각 숫자는 이 권한들을 3개의 부분으로 나누어 나타냅니다.
숫자와 권한의 관계
각 자리의 숫자는 다음과 같이 매핑됩니다:
r(읽기 권한) = 4w(쓰기 권한) = 2x(실행 권한) = 1
각 사용자의 권한은 이 값들의 합으로 계산됩니다. 따라서 권한을 숫자로 표현하는 방식은 각 사용자 유형에 대해 3자리 숫자를 사용합니다.
사용자 유형
각각의 숫자는 세 그룹에 해당하며, 권한은 다음과 같이 구분됩니다:
- 소유자 (Owner): 파일이나 디렉토리의 소유자
- 그룹 (Group): 파일이나 디렉토리의 소유자가 속한 그룹
- 기타 사용자 (Others): 소유자나 그룹에 속하지 않은 모든 사용자
각 자리 숫자 설명
- 첫 번째 자리는 소유자(Owner)의 권한
- 두 번째 자리는 그룹(Group)의 권한
- 세 번째 자리는 기타 사용자(Others)의 권한
권한 계산
각 사용자에 대해 읽기(r), 쓰기(w), 실행(x) 권한을 설정하고 그 값을 더하여 해당 자리에 들어갈 숫자를 결정합니다.
- 읽기(r)는 4
- 쓰기(w)는 2
- 실행(x)은 1
- 권한 없음(-)은 0
따라서, 각 권한의 숫자는 다음과 같은 방식으로 계산됩니다:
- 읽기 권한만 있을 때:
r--→4 + 0 + 0 = 4 - 쓰기 권한만 있을 때:
-w-→0 + 2 + 0 = 2 - 실행 권한만 있을 때:
--x→0 + 0 + 1 = 1 - 읽기와 쓰기 권한이 있을 때:
rw-→4 + 2 + 0 = 6 - 읽기와 실행 권한이 있을 때:
r-x→4 + 0 + 1 = 5 - 쓰기와 실행 권한이 있을 때:
wx-→0 + 2 + 1 = 3 - 읽기, 쓰기, 실행 권한이 모두 있을 때:
rwx→4 + 2 + 1 = 7
예시
예시 1: chmod 777 test.txt
root@923d89f9730b:~# chmod 777 test.txt
root@923d89f9730b:~# ls -l
total 0
-rwxrwxrwx 1 root root 0 Apr 18 11:40 test.txt
root@923d89f9730b:~#- 777은
rwx권한을 소유자, 그룹, 기타 사용자에게 모두 부여하는 것입니다.- 첫 번째
7: 소유자에 대해rwx(읽기, 쓰기, 실행) 권한을 부여. - 두 번째
7: 그룹에 대해rwx권한을 부여. - 세 번째
7: 기타 사용자에 대해rwx권한을 부여.
- 첫 번째
각각의 숫자는 다음과 같이 계산됩니다:
- 소유자:
rwx→4 + 2 + 1 = 7 - 그룹:
rwx→4 + 2 + 1 = 7 - 기타 사용자:
rwx→4 + 2 + 1 = 7
예시 2: chmod 644 test.txt
root@923d89f9730b:~# chmod 644 test.txt
root@923d89f9730b:~# ls -l
total 0
-rw-r--r-- 1 root root 0 Apr 18 11:40 test.txt
root@923d89f9730b:~#- 644는 다음과 같은 권한을 설정합니다:
- 첫 번째
6: 소유자에 대해rw-(읽기, 쓰기) 권한을 부여. - 두 번째
4: 그룹에 대해r--(읽기만) 권한을 부여. - 세 번째
4: 기타 사용자에 대해r--(읽기만) 권한을 부여.
- 첫 번째
각각의 숫자는 다음과 같이 계산됩니다:
- 소유자:
rw-→4 + 2 + 0 = 6 - 그룹:
r--→4 + 0 + 0 = 4 - 기타 사용자:
r--→4 + 0 + 0 = 4
예시 3: chmod 755 test.txt
root@923d89f9730b:~# chmod 755 test.txt
root@923d89f9730b:~# ls -l
total 0
-rwxr-xr-x 1 root root 0 Apr 18 11:40 test.txt
root@923d89f9730b:~#- 755는 다음과 같은 권한을 설정합니다:
- 첫 번째
7: 소유자에 대해rwx(읽기, 쓰기, 실행) 권한을 부여. - 두 번째
5: 그룹에 대해r-x(읽기, 실행) 권한을 부여. - 세 번째
5: 기타 사용자에 대해r-x(읽기, 실행) 권한을 부여.
- 첫 번째
각각의 숫자는 다음과 같이 계산됩니다:
- 소유자:
rwx→4 + 2 + 1 = 7 - 그룹:
r-x→4 + 0 + 1 = 5 - 기타 사용자:
r-x→4 + 0 + 1 = 5
예시 4: chmod 700 test.txt
root@923d89f9730b:~# chmod 700 test.txt
root@923d89f9730b:~# ls -l
total 0
-rwx------ 1 root root 0 Apr 18 11:40 test.txt
root@923d89f9730b:~#- 700은 다음과 같은 권한을 설정합니다:
- 첫 번째
7: 소유자에 대해rwx(읽기, 쓰기, 실행) 권한을 부여. - 두 번째
0: 그룹에 대해 권한을 부여하지 않음. - 세 번째
0: 기타 사용자에 대해 권한을 부여하지 않음.
- 첫 번째
각각의 숫자는 다음과 같이 계산됩니다:
- 소유자:
rwx→4 + 2 + 1 = 7 - 그룹:
---→0 + 0 + 0 = 0 - 기타 사용자:
---→0 + 0 + 0 = 0
이와 같이 숫자 chmod 명령어에서 사용되는 각 숫자는 해당 사용자가 가진 권한을 계산하여 부여합니다.
권한 부여와 제거 (글자를 이용한 방법)
권한 부여 (글자로)
chmod 명령어에서 글자를 사용하여 권한을 부여할 수 있습니다. 권한 부여에서 자주 사용되는 기호는 다음과 같습니다:
- r: 읽기 권한
- w: 쓰기 권한
- x: 실행 권한
- +: 권한을 추가하는 연산자
- -: 권한을 제거하는 연산자
- a: 모든 사용자 (소유자, 그룹, 기타 사용자)
예시 1: chmod a+rw test.txt
root@923d89f9730b:~# chmod a+rw test.txt
root@923d89f9730b:~# ls -l
total 0
-rw-rw-rw- 1 root root 0 Apr 18 11:38 test.txt
root@923d89f9730b:~#- a+rw: 모든 사용자에게 읽기(
r)와 쓰기(w) 권한을 추가합니다. - a: 소유자, 그룹, 기타 사용자 모두를 의미합니다.
- +rw: 읽기와 쓰기 권한을 추가합니다.
예시 2: chmod u+x test.txt
root@923d89f9730b:~# chmod u+x test.txt
root@923d89f9730b:~# ls -l
total 0
-rwxrw-rw- 1 root root 0 Apr 18 11:38 test.txt
root@923d89f9730b:~#- u+x: 소유자에게 실행(
x) 권한을 추가합니다. - u: 소유자(Owner)를 의미합니다.
- +x: 실행 권한을 추가합니다.
권한 제거 (글자로)
chmod 명령어에서 글자를 사용하여 권한을 제거할 수 있습니다. 권한을 제거할 때는 - 기호를 사용합니다.
예시 1: chmod go-rw test.txt
root@923d89f9730b:~# chmod go-rw test.txt
root@923d89f9730b:~# ls -l
total 0
-rw------- 1 root root 0 Apr 18 11:38 test.txt
root@923d89f9730b:~#- go-rw: 그룹(
g)과 기타 사용자(o)에게 읽기(r)와 쓰기(w) 권한을 제거합니다. - g: 그룹을 의미합니다.
- o: 기타 사용자를 의미합니다.
- -rw: 읽기와 쓰기 권한을 제거합니다.
예시 2: chmod u-x test.txt
root@923d89f9730b:~# chmod u-x test.txt
root@923d89f9730b:~# ls -l
total 0
-rw------- 1 root root 0 Apr 18 11:38 test.txt
root@923d89f9730b:~#- u-x: 소유자에게 실행(
x) 권한을 제거합니다. - u: 소유자를 의미합니다.
- -x: 실행 권한을 제거합니다.
위와 같은 방식으로 chmod 명령어를 사용하여 파일 및 디렉토리의 권한을 부여하고 제거할 수 있습니다.
※ Vim 에디터
1. Vim 설정 파일 만들기
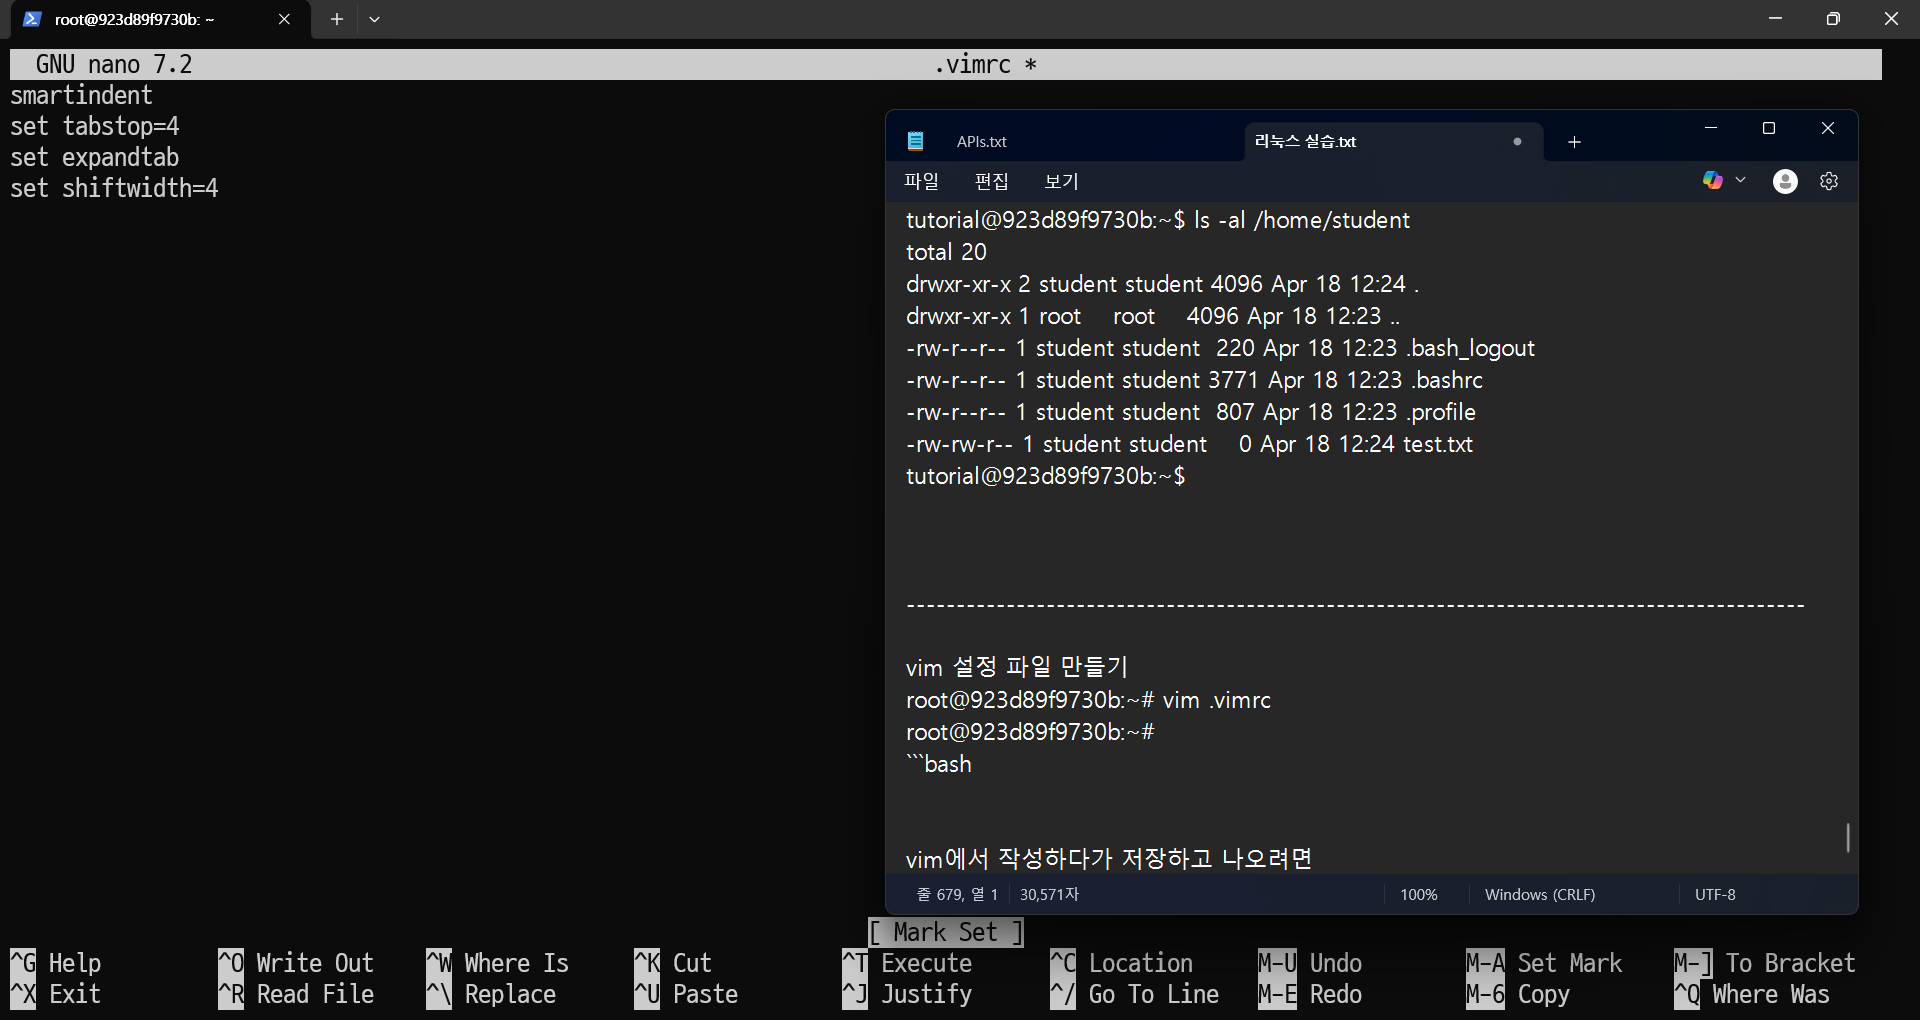
Vim 설정 파일(.vimrc)을 만들려면, 아래 명령어로 파일을 생성하고 편집할 수 있습니다:
root@923d89f9730b:~# vim .vimrc이 명령어를 실행하면 .vimrc 파일이 열리고, 그 안에 원하는 Vim 설정을 추가할 수 있습니다.
2. Vim에서 작성하다가 저장하고 나오려면
-
먼저 편집을 완료한 후,
Esc키를 눌러 입력 모드에서 빠져나옵니다. -
그 후,
:wq!를 입력하고 엔터를 눌러서 파일을 저장하고 종료할 수 있습니다.:wq!: 파일 저장 후 종료
3. Vim에서 저장하지 않고 나가려면
저장하지 않고 Vim에서 나가려면 다음 명령어를 사용합니다:
:q!:q!: 저장하지 않고 종료
4. Vim에서 첫 번째 행과 마지막 행으로 이동하기
Vim에서 특정 행으로 빠르게 이동할 수 있는 명령어는 다음과 같습니다:
- 첫 번째 행으로 이동:
gg - 마지막 행으로 이동:
G - 마지막 행으로 이동하는 또 다른 방법:
:$
:$ 명령어는 마지막 행으로 직접 이동하는 또 다른 방법입니다.
5. Vim에서 검색하기
Vim에서 텍스트를 검색하려면 아래와 같이 / 명령어를 사용합니다:
-
/를 입력하고 찾고 싶은 문자열을 입력한 후 엔터를 누르면, 아래로 검색이 시작됩니다.- 예:
/검색어
- 예:
-
검색 후,
n을 눌러 다음 검색 결과로 이동하고,N을 눌러 이전 검색 결과로 돌아갈 수 있습니다./검색어 n # 다음 검색 결과로 이동 N # 이전 검색 결과로 이동
따라서 /만 입력하면 바로 검색이 시작됩니다.
6. 줄 번호 표시하기
Vim에서 줄 번호를 표시하려면 다음 명령어를 입력합니다:
:set nu명령어를 사용하여 줄 번호를 표시할 수 있습니다::set nu
- 줄 번호 표시를 끄려면,
:set nonumber명령어를 입력합니다::set nonu
줄 번호가 표시되면 코드나 텍스트 편집 시 특정 위치를 쉽게 찾을 수 있습니다.