앞에서 스트림 영상을 검출하기까지 완료했다.
stream 영상을 검출하게 되면 영상을 저장하게 되는데,
detect.py 수정하여 멧돼지가 검출됐을 때 이미지로 저장하도록 한다.
detect.py 수정
먼저 188줄에서 결과를 저장하는 if save_img: 구문으로 이동한다.
# Save results (image with detections)
            if save_img:
                if dataset.mode == 'image':
                    cv2.imwrite(save_path, im0)
                else:  # 'video' or 'stream'
                    if vid_path[i] != save_path:  # new video
                        vid_path[i] = save_path
                        if isinstance(vid_writer[i], cv2.VideoWriter):
                            vid_writer[i].release()  # release previous video writer
                        if vid_cap:  # video
                            fps = vid_cap.get(cv2.CAP_PROP_FPS)
                            w = int(vid_cap.get(cv2.CAP_PROP_FRAME_WIDTH))
                            h = int(vid_cap.get(cv2.CAP_PROP_FRAME_HEIGHT))
                        else:  # stream
                            fps, w, h = 30, im0.shape[1], im0.shape[0]
                        save_path = str(Path(save_path).with_suffix('.mp4'))  # force *.mp4 suffix on results videos
                        vid_writer[i] = cv2.VideoWriter(save_path, cv2.VideoWriter_fourcc(*'mp4v'), fps, (w, h))
                    vid_writer[i].write(im0)
stream 저장하는 부분을 주석 처리하고, 이미지를 저장하기 위해 cv2.imwrite(save_path, im0) 추가한다.
save_path는 저장경로, im0은 최종 이미지 결과물이다.
						else:  # stream
                            fps, w, h = 30, im0.shape[1], im0.shape[0]
                    #     save_path = str(Path(save_path).with_suffix('.mp4'))  # force *.mp4 suffix on results videos
                    #     vid_writer[i] = cv2.VideoWriter(save_path, cv2.VideoWriter_fourcc(*'mp4v'), fps, (w, h))
                    # vid_writer[i].write(im0)
                    cv2.imwrite(save_path, im0)
이미지 바운딩 박스
감지된 객체의 정보를 기록하는 163줄로 이동한다.
여기서 im0에 전달할 이미지 결과물을 작성한다.
det에 객체의 경계 상자 좌표, 신뢰도(confidence), class 인덱스 정보가 있다.
# Write results
                for *xyxy, conf, cls in reversed(det):
                    if save_txt:  # Write to file
                        xywh = (xyxy2xywh(torch.tensor(xyxy).view(1, 4)) / gn).view(-1).tolist()  # normalized xywh
                        line = (cls, *xywh, conf) if save_conf else (cls, *xywh)  # label format
                        with open(f'{txt_path}.txt', 'a') as f:
                            f.write(('%g ' * len(line)).rstrip() % line + '\n')

                    if save_img or save_crop or view_img:  # Add bbox to image
                        c = int(cls)  # integer class
                        label = None if hide_labels else (names[c] if hide_conf else f'{names[c]} {conf:.2f}')
                        annotator.box_label(xyxy, label, color=colors(c, True))
                    if save_crop:
                        save_one_box(xyxy, imc, file=save_dir / 'crops' / names[c] / f'{p.stem}.jpg', BGR=True)
텍스트는 필요가 없기 때문에 주석처리 해줬다.
					if save_txt:  # Write to file
                        xywh = (xyxy2xywh(torch.tensor(xyxy).view(1, 4)) / gn).view(-1).tolist()  # normalized xywh
                        line = (cls, *xywh, conf) if save_conf else (cls, *xywh)  # label format
                        # with open(f'{txt_path}.txt', 'a') as f:
                        #     f.write(('%g ' * len(line)).rstrip() % line + '\n')
이미지에 bbox를 추가하는 if save_img or save_crop or view_img: 구문을 수정한다.
 					#if save_img or save_crop or view_img:  # Add bbox to image
                    if cls == 0 or cls == 1:
                        save_boar = True
                        c = int(cls)  # integer class
                        label = None if hide_labels else (names[c] if hide_conf else f'{names[c]}')
                        annotator.box_label(xyxy, label, color=colors(c, True))
det에서 class 정보가 0 새끼 멧돼지거나, 1 멧돼지일 때 save_boar = True 값을 줬다.
label에서 정확도는 필요 없기 때문에 {conf:.2f} 지워줬다.
Annotator 클래스의 box_label 메소드를 사용하여
annotator 객체에 박스 좌표, 라벨, 박스 색상을 전달하여 이미지에 추가한다.
detect.py 옵션 --hide-conf를 사용해도 정확도를 제거해 줄 수 있다.
나는 앞에서 라벨링 할 때 class를 baby_boar, wild_boar 두 가지로 했기 때문에 0과 1이다.
147줄 save_path = str(save_dir / p.name)으로 이동
save_boar = False
save_path = str(save_dir / p.name)  # im.jpg
save_boar를 사용하기 위해 save_boar = False 생성해 줬다.
im0 = annotator.result()최종 결과 이미지가 im0에 전달되었다.
이제 save_boar = True 일 때만 이미지를 저장할 수 있도록
다시 결과를 저장하는 if save_img: 구문으로 이동하여 if save_boar:로 수정해 준다.
이미지 이름
148줄 save_path로 이동하여 저장할 이미지의 이름을 정해준다.
import datetime

timestamp = datetime.datetime.now().strftime('%Y-%m-%d_%H:%M:%S')
save_path = str(save_dir / f'boar_{timestamp}.jpg')
# txt_path = str(save_dir / 'labels' / p.stem) + ('' if dataset.mode == 'image' else f'_{frame}')  # im.txt
txt_path는 필요가 없기 때문에 주석처리 해줬다.
이미지를 현재 시각으로 초까지만 나오도록 저장하게 했다.
1초에 1장보다 더 찍게 되면 중복이 발생하므로 %f로 밀리초까지 줘야 한다.93줄 폴더를 생성하는 save_dir로 이동한다.
# Directories
save_dir = increment_path(Path(project) / name, exist_ok=exist_ok)  # increment run
(save_dir / 'labels' if save_txt else save_dir).mkdir(parents=True, exist_ok=True)  # make dir
save_dir 변수에 increment_path()를 사용하여 이미 경로에 폴더가 존재하는 경우 숫자를 추가하여 중복을 피하고 default가 runs/detect인 project 경로에, default가 exp인 name을 추가하여 runs/detect/exp를 준다.이미지만 저장하면 돼서 labels 폴더 생성하는 부분을 주석처리 하고 save_dir 폴더만 생성했다.
# Directories
save_dir = increment_path(Path(project) / name, exist_ok=exist_ok)  # increment run
Path(save_dir).mkdir(exist_ok=True)
# (save_dir / 'labels' if save_txt else save_dir).mkdir(parents=True, exist_ok=True)  # make dir
결과 확인
이제 스트림 영상에서 cls 0과 1이 검출 되었을 때, 이미지가 저장되는지 확인해 본다.
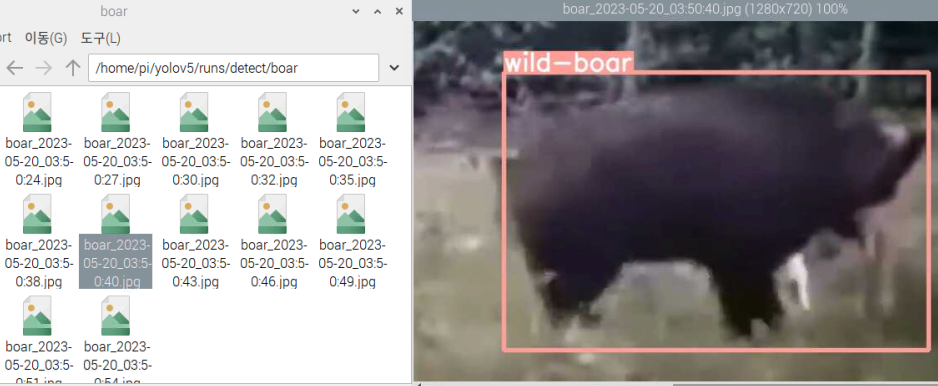
runs/detect/ 경로에 폴더가 생성되고 현재 시각이 이름인 정확도가 제거된 바운딩 박스가 적용된 이미지가 저장되었다.
이제 이미지가 저장되면 Firebase Storage에 업로드하고
Firebase Cloud Messaging으로 푸시 알림을 보내는 기능을 추가하도록 한다.

안녕하세요 올리신 글 잘 보고 있습니다. 궁금한 것이 있는데, 실시간으로 객체 검출이 확인 되었을 때 휴대폰으로 메세지나 메일을 받는 방법이 있을까요? 예를 들어 멧돼지가 검출이 되면 메세지로 "멧돼지가 검출되었습니다." 이런식으로요 감사합니다.