앱을 이용하다 보면 Tab Bar를 이용해 화면을 이동시키는 경우가 있습니다.
오늘은 CollectionView를 이용해 Tab Bar를 구현하고 화면의 속성을 변경하는 방법에 대해 알아보겠습니다.
먼저 동작하는 화면을 보면서 어떻게 구현해야 하는지 알아보겠습니다.
동작 화면
화면 상단에 Tab Bar를 클릭할 때마다 화면의 색깔이 변하는 간단한 앱입니다.
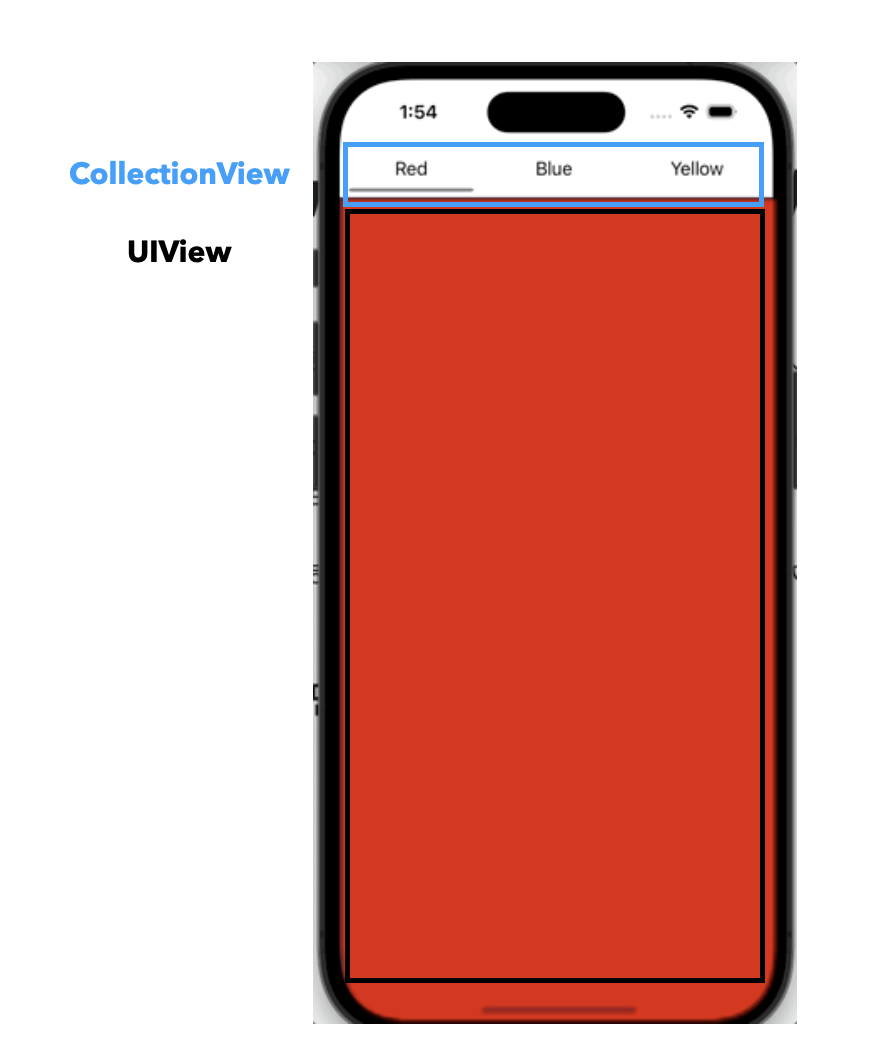
화면 구조를 보면 상단의 Tab Bar는 CollectionView를 이용해 구현하고 아래의 화면은 UIView를 사용했습니다.
위에서 말했다 싶이 화면의 속성을 바꾸는 방법이기 때문에 UIView를 상속받는 모든 View를 사용해도 무방합니다.
예를 들어 사진 앱을 보면 선택에 따라 다른 레이아웃을 가지는 화면을 확인할 수 있습니다. 간단히 생각해 보자면 CollectionView의 Layout을 선택된 Tab에 따라 변경시키면 구현이 가능합니다.
그럼 먼저 Tab Bar를 구현한 코드부터 확인해 보겠습니다.
Tab bar
class TabCollectionView: UIView {
    lazy var collectionView: UICollectionView = {
        let collectionView = UICollectionView(frame: .zero, collectionViewLayout: setLayout())
        collectionView.translatesAutoresizingMaskIntoConstraints = false

        return collectionView
    }()

    override init(frame: CGRect) {
        super.init(frame: frame)

        self.translatesAutoresizingMaskIntoConstraints = false
        addSubview(collectionView)

        NSLayoutConstraint.activate([
            collectionView.topAnchor.constraint(equalTo: topAnchor),
            collectionView.bottomAnchor.constraint(equalTo: bottomAnchor),
            collectionView.leadingAnchor.constraint(equalTo: leadingAnchor),
            collectionView.trailingAnchor.constraint(equalTo: trailingAnchor)
        ])
    }

    required init?(coder: NSCoder) {
        fatalError("init(coder:) has not been implemented")
    }

        private func setLayout() -> UICollectionViewLayout {
        let itemSize = NSCollectionLayoutSize(widthDimension: .fractionalWidth(1.0), heightDimension: .fractionalHeight(1.0))
        let item = NSCollectionLayoutItem(layoutSize: itemSize)

        let groupSize = NSCollectionLayoutSize(widthDimension: .fractionalWidth(0.33), heightDimension: .fractionalHeight(1.0))
        let group = NSCollectionLayoutGroup.horizontal(layoutSize: groupSize, subitems: [item])

        let section = NSCollectionLayoutSection(group: group)
        section.orthogonalScrollingBehavior = .continuous

        return UICollectionViewCompositionalLayout(section: section)
    }
}
collectionView Layout을 설정해 보이는 Cell의 개수를 조절할 수 있습니다.
중요한 점은 section의 스크롤 동작을 설정해 주어야 합니다. 설정해 주지 않는다면 스크롤이 안되기 때문에 최초로 보이는 Tab을 제외하고는 이동이 불가능합니다.
다음은 Cell 코드를 확인해 보겠습니다.
class TabLabelCell: UICollectionViewCell {
    private let label: UILabel = {
        let label = UILabel()
        label.font = UIFont.preferredFont(forTextStyle: .body)
        label.translatesAutoresizingMaskIntoConstraints = false

        return label
    }()

    // Cell Highlight를 위한 View 입니다.
    private let indicatorView: UIView = {
        let view = UIView()
        view.layer.cornerRadius = 5
        view.translatesAutoresizingMaskIntoConstraints = false

        return view
    }()

    override var isSelected: Bool {
        didSet {
            if isSelected {
                indicatorView.backgroundColor = .gray
            } else {
                indicatorView.backgroundColor = .white
            }
        }
    }

    override init(frame: CGRect) {
        super.init(frame: frame)

        setView()
    }

    required init?(coder: NSCoder) {
        fatalError("init(coder:) has not been implemented")
    }

    private func setView() {
        contentView.addSubview(label)
        contentView.addSubview(indicatorView)

        NSLayoutConstraint.activate([
            self.label.centerXAnchor.constraint(equalTo: contentView.centerXAnchor),
            self.label.centerYAnchor.constraint(equalTo: contentView.centerYAnchor)
        ])

        NSLayoutConstraint.activate([
            self.indicatorView.centerXAnchor.constraint(equalTo: contentView.centerXAnchor),
            self.indicatorView.widthAnchor.constraint(equalTo: contentView.widthAnchor, multiplier: 0.9),
            self.indicatorView.heightAnchor.constraint(equalToConstant: 3),
            self.indicatorView.bottomAnchor.constraint(equalTo: contentView.bottomAnchor)
        ])
    }

    func setTitle(_ title: String) {
        self.label.text = title
    }
}
여기서 isSelected를 재정의 해 Cell이 선택되었을 때 하이라이트 효과를 줘야 합니다.
코드에서는 UIView를 이용해 Cell 하단에 Indicator를 표시하도록 코드를 구현했습니다.
ViewController
선택된 Tab에 따라 View의 속성을 바꾸기 위해서는 Cell의 IndexPath를 추적해야 합니다.
각각의 Cell에도 Index가 존재하기 때문에 Index가 변할 때마다 원하는 로직을 실행시키면 됩니다.
그럼 코드를 확인해 보겠습니다.
class ViewController: UIViewController {
    typealias DataSource = UICollectionViewDiffableDataSource<TabBarSection, String>

    enum TabBarSection {
        case main
    }

    private let topTabBar = TabCollectionView()
    private var dataSource: DataSource! = nil

    var currentIndexPath = IndexPath() {
        didSet {
            if currentIndexPath.row == 0 {
                basicView.backgroundColor = .red
            } else if currentIndexPath.row == 1 {
                basicView.backgroundColor = .blue
            } else if currentIndexPath.row == 2 {
                basicView.backgroundColor = .yellow
            }
        }
    }

    let basicView: UIView = {
        let view = UIView()
        view.translatesAutoresizingMaskIntoConstraints = false

        return view
    }()

    override func viewDidLoad() {
        super.viewDidLoad()

        topTabBar.collectionView.delegate = self
        view.addSubview(topTabBar)
        view.addSubview(basicView)

        NSLayoutConstraint.activate([
            self.basicView.topAnchor.constraint(equalTo: topTabBar.bottomAnchor, constant: 5),
            self.basicView.leadingAnchor.constraint(equalTo: view.leadingAnchor),
            self.basicView.trailingAnchor.constraint(equalTo: view.trailingAnchor),
            self.basicView.bottomAnchor.constraint(equalTo: view.bottomAnchor)
        ])

        NSLayoutConstraint.activate([
            self.topTabBar.topAnchor.constraint(equalTo: view.safeAreaLayoutGuide.topAnchor),
            self.topTabBar.leadingAnchor.constraint(equalTo: view.safeAreaLayoutGuide.leadingAnchor),
            self.topTabBar.trailingAnchor.constraint(equalTo: view.safeAreaLayoutGuide.trailingAnchor),
            self.topTabBar.heightAnchor.constraint(equalTo: view.heightAnchor, multiplier: 0.05)
        ])

        configureDataSource()

        var initalSnapshot = NSDiffableDataSourceSnapshot<TabBarSection, String>()
        initalSnapshot.appendSections([.main])
        initalSnapshot.appendItems(["Red", "Blue", "Yellow", "Green", "Pink"], toSection: .main)
        self.dataSource.apply(initalSnapshot)

        let startIndexPath = IndexPath(row: 0, section: 0)
        self.topTabBar.collectionView.selectItem(at: startIndexPath, animated: false, scrollPosition: .init())
        self.currentIndexPath = startIndexPath
    }

    func configureDataSource() {
        let cellRegistration = UICollectionView.CellRegistration<TabLabelCell, String> { cell, indexPath, itemIdentifier in
            cell.setTitle(itemIdentifier)
        }

        self.dataSource = DataSource(collectionView: topTabBar.collectionView) { collectionView, indexPath, itemIdentifier in
            return collectionView.dequeueConfiguredReusableCell(using: cellRegistration, for: indexPath, item: itemIdentifier)
        }
    }
}

extension ViewController: UICollectionViewDelegate {
    func collectionView(_ collectionView: UICollectionView, didSelectItemAt indexPath: IndexPath) {
        self.currentIndexPath = indexPath
    }
}
저는 Observer Property를 이용해 IndexPath가 변할 때마다 View의 backgroundColor를 변경시키고 있습니다.
처음 화면이 Load되고 최초 Tab을 설정하기 위해 collectionView.selectItem(at:, animated:, scrollPosition:) 함수를 사용했습니다.
그렇게 되면 화면이 Load 되고 난 뒤 빨간색 화면이 보이는 것을 확인할 수 있었습니다.
오늘은 CollectionView를 활용해 Tab Bar를 구현하는 방법에 대해 알아봤습니다.
CollectionView를 이용한 Tab Bar 구현의 핵심은 Cell의 IndexPath를 추적하고 선택된 Cell의 IndexPath에 따라 로직을 실행시키면 다양한 방식으로 View를 업데이트하고 변경시킬 수 있습니다.
혹시 IndexPath를 Observer Property를 이용해 추적하는 방법 말고 다른 방법이 있다면 댓글 달아주세요.....