
1. 서비스
1-1. 서비스란?
앱을 실행할 때 항상 화면에 보이지 않습니다.
예를 들어 카카오톡처럼 앱이 실행되지 않아도 다른 사람이 보낸 메시지를 받을 수 있는데,
이것은 화면 없이 백그라운드에서 실행되는 서비스(service)가 있기 때문입니다.
서비스는 백그라운드에서 실행되는 프로세스를 의미합니다.
1-2. 서비스와 기존 액티비티의 차이
지금까지 사용한 액티비티와 다른 점은 화면이 없다는 것인데 이 점을 제외하면 하나의 어플리케이션 구성요소와 동일합니다.
서비스도 어플리케이션의 구성요소이므로 시스템에서 관리합니다.
따라서 새로 만든 서비스는 항상 매니페스트 파일에 등록해야합니다.
서비스를 실행시키고 싶다면 메인 액티비티에서 startService() 메서드를 호출합니다.
서비스가 한 번 실행된 후 종료되지 않고 게속 실행 중인 상태라면 startService() 메서드를 여러 번 호출 하더라도 서비스의 상태에는 변화가 없습니다.
따라서 startService()는 서비스를 시작하는 목적보다는 인텐트를 전달하는 목적으로 더 많이 사용됩니다.
예를 들어, 액티비티에서 서비스 쪽으로 데이터를 전달하고 싶은 경우 인텐트 객체를 만들고 부가 데이터를 넣은 후 startService() 메서드를 호출하면서 전달하면 됩니다.
이때 서비스 객체가 메모리에 만들어져 있으면 onCreate() 메서드가 호출되지 않으므로 onStartCommand()메서드를 사용해 전달 받은 인텐트를 처리하게 됩니다.
1-3 서비스 구현
[ activity_main.xml ]
<?xml version="1.0" encoding="utf-8"?>
<LinearLayout xmlns:android="http://schemas.android.com/apk/res/android"
    xmlns:app="http://schemas.android.com/apk/res-auto"
    xmlns:tools="http://schemas.android.com/tools"
    android:layout_width="match_parent"
    android:layout_height="match_parent"
    android:orientation="vertical"
    android:gravity="center"
    tools:context=".MainActivity">

    <LinearLayout
        android:layout_width="wrap_content"
        android:layout_height="wrap_content"
        android:orientation="vertical"
        android:layout_gravity="center"
        android:layout_marginBottom="300dp">
        <EditText
            android:id="@+id/edtContent"
            android:layout_width="150dp"
            android:layout_height="wrap_content"
            android:padding="20dp"
            android:layout_gravity="center"
            android:hint="저장할 내용"/>

        <Button
            android:id="@+id/btnSend"
            android:layout_width="wrap_content"
            android:layout_height="wrap_content"
            android:layout_margin="30dp"
            android:layout_gravity="center"
            android:text="서비스로 보내기" />

    </LinearLayout>
</LinearLayout>
[ MainActivity.java ]
package com.study.doit;

import androidx.appcompat.app.AppCompatActivity;

import android.app.Activity;
import android.content.Intent;
import android.content.SharedPreferences;
import android.os.Bundle;
import android.view.View;
import android.widget.Button;
import android.widget.EditText;
import android.widget.Toast;

public class MainActivity extends AppCompatActivity {
    private static final String TAG = "MainActivity";

    EditText edtContent;
    Button btnSend;

    @Override
    protected void onCreate(Bundle savedInstanceState) {
        super.onCreate(savedInstanceState);
        setContentView(R.layout.activity_main);

        edtContent = (EditText) findViewById(R.id.edtContent);
        btnSend = (Button) findViewById(R.id.btnSend);

        Intent passedIntent = getIntent();
        processIntent(passedIntent);

        btnSend.setOnClickListener(new View.OnClickListener() {
            @Override
            public void onClick(View view) {
                onButtonClicked(view);
            }
        });
    }

    @Override
    protected void onNewIntent(Intent intent) {
        processIntent(intent);

        super.onNewIntent(intent);
    }

    private void processIntent(Intent intent) {
        if(intent != null) {
            String command = intent.getStringExtra("command");
            String name = intent.getStringExtra("name");

            Toast.makeText(this, "command : " + command  + ", name " + name, Toast.LENGTH_SHORT).show();

        }
    }

    public void onButtonClicked(View v){
        String name = edtContent.getText().toString();

        Intent intent = new Intent(this, MyService.class);
        intent.putExtra("command", "show");
        intent.putExtra("name", name);
        startService(intent);

    }

}
[ MyService.java ]
( New - Service - Service 생성 )
package com.study.doit;

import android.app.Service;
import android.content.Intent;
import android.os.IBinder;
import android.util.Log;

public class MyService extends Service {

    private static final String TAG = "MyService";

    public MyService() {
    }

    @Override
    public void onCreate() {
        super.onCreate();
        Log.d(TAG, "onCrate() 호출됨.");
    }

    @Override
    public int onStartCommand(Intent intent, int flags, int startId) {
        Log.d(TAG, "onStartCommand() 호출됨");

        if(intent == null){
            return Service.START_STICKY;
        }
        else {
            processCommand(intent);
        }
        return super.onStartCommand(intent, flags, startId);
    }

    private void processCommand(Intent intent) {
        String command = intent.getStringExtra("command");
        String name = intent.getStringExtra("name");

        Log.d(TAG, "command : " + command + " , name : " + name);

        for(int i=0; i<5; i++){
            try{
                Thread.sleep(1000);
            }
            catch(Exception e) {

            }
            Log.d(TAG, "Waiting " + i + " seconds.");
        }
        Intent showIntent = new Intent(getApplicationContext(), MainActivity.class);
        showIntent.addFlags(Intent.FLAG_ACTIVITY_NEW_TASK | Intent.FLAG_ACTIVITY_SINGLE_TOP | Intent.FLAG_ACTIVITY_CLEAR_TOP);
        showIntent.putExtra("command", "show");
        showIntent.putExtra("name", name + " from service.");
        startActivity(showIntent);
    }

    @Override
    public IBinder onBind(Intent intent) {
        // TODO: Return the communication channel to the service.
        throw new UnsupportedOperationException("Not yet implemented");
    }

    @Override
    public void onDestroy() {
        super.onDestroy();
    }
}
서비스는 Service 클래스를 상속합니다.
서비스에 추가한 세 개 메서드(onCreate() onDestroy() onstartCommand()) 중에서 onStartCommand() 메서드가 인텐트 객체를 전달 받으므로 중요한 역할을 합니다.
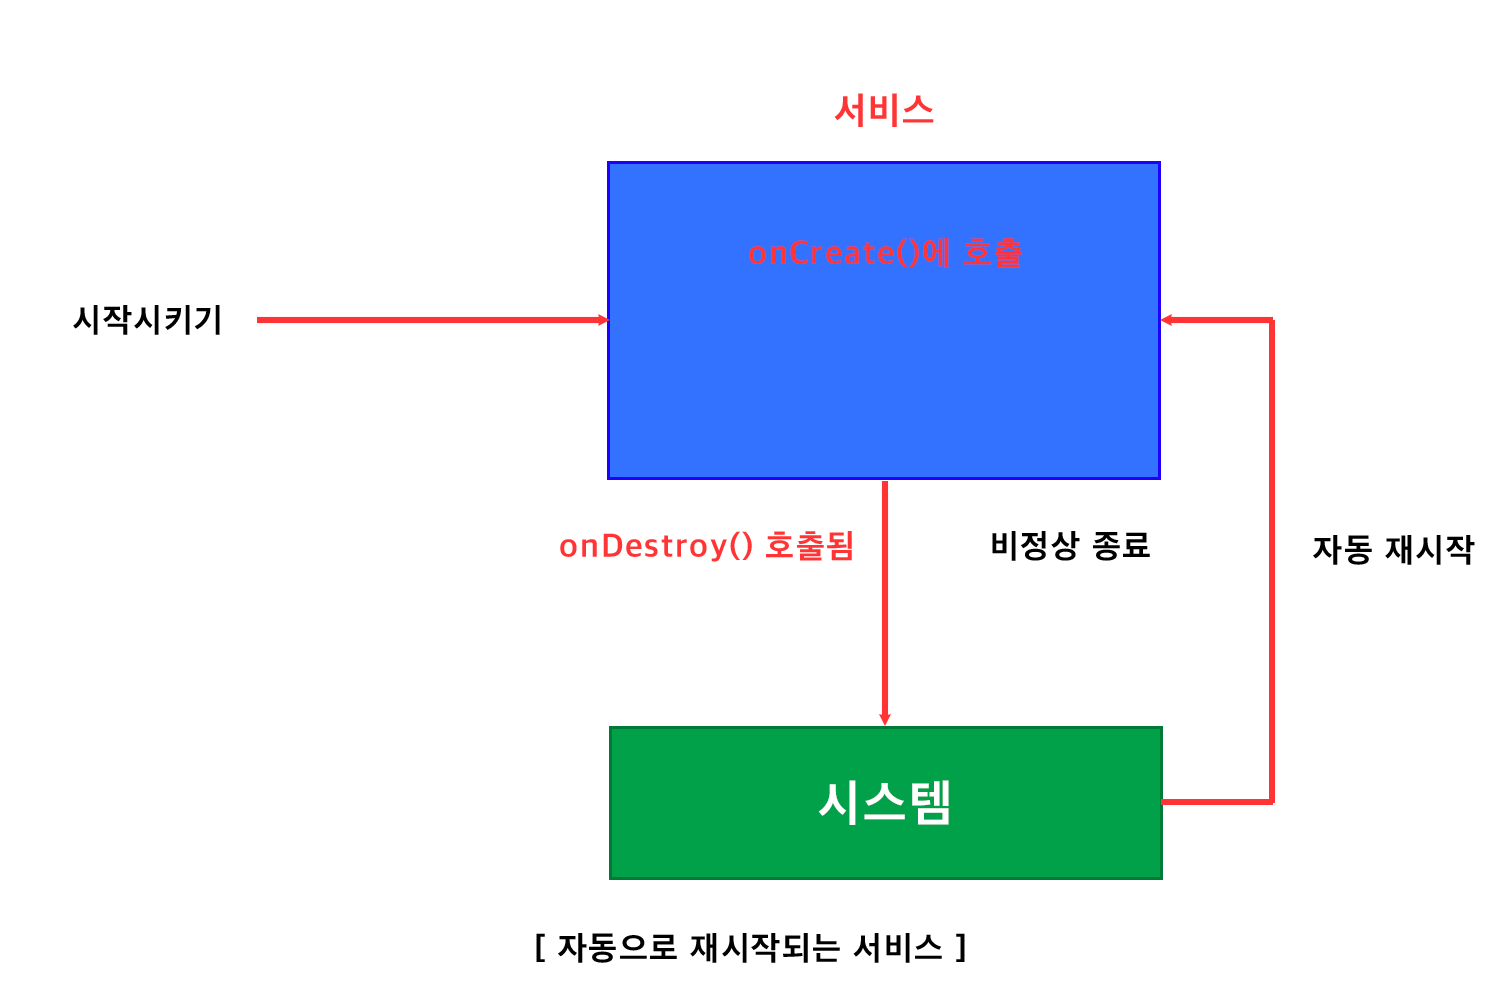
서비스는 시스템에 의해 자동으로 다시 시작될 수 있으므로 onStartCommand() 메서드로 전달되는 인텐트 객체는 null일 수도 있습니다. 따라서 인텐트 객체가 null인지 먼저 체크합니다.
null일 경우 반환하는 값은 Service.START_STICKY입니다.
이 값을 반환하면 서비스가 종료되었을 때 시스템이 자동으로 재시작합니다.
서비스 클래스는 다른 구성 요소와의 유기적으로 연결되도록 바인딩될 수 있는데 이를 위해 onBind()메서드를 재정의합니다.
액티비티에서 인텐트에 넣어 전달한 데이터는 서비스에 그대로 출력됩니다.
그런데 이렇게 액티비티에서 서비스로 데이터를 전달할 수 있는 것처럼 서비스에서 액티비티 데이터를 전달할 수 있어야합니다. 이를 위해 startActivity() 메서드를 사용합니다.

서비스에서 startAcitivy() 메서드를 호출할 때는 새로운 태스크(Task)를 생성하도록
FLAG_ACTIVITY_NEW_TASK 플래그를 추가해야 합니다.
서비스는 화면이 없기 때문에 화면이 없는 서비스에서 화면이 있는 액티비티를 띄우려면 새로운 태스크를 만들어야 합니다.
그리고 MainActivity 객체가 이미 만들어져 있을 때 재사용하도록FLAG_ACTIVITY_SINGLE_TOP과 FLAG_ACTIVITY_CLEAR_TOP플래그도 추가합니다.
2. 브로드캐스트 수신자
2-1. 브로드캐스트 수신자
브로드캐스팅이란 메시지를 여러 객체에게 전달하는 것을 말합니다.
안드로이드는 여러 어플리케이션 구성 요소에게 메시지를 전달하고 싶은 경우 브로드캐스팅을 사용합니다.
이런 메시지 전달 방식은 단말 전체에 적용될 수 있는데, '글로벌 이벤트(Global Event)'라고 부릅니다.
이러한 글로벌 이벤트의 대표적인 예로는 [ "전화가 왔습니다" / "문자 메시지가 도착했습니다." ]
브로드캐스트 수신자도 어플리케이션 구성 요소이므로 새로운 브로드캐스트 수신자를 만들게 되면 매니페스트에 등록해야 시스템이 알 수 있습니다.
서비스처럼 화면이 없으며, 매니페스트 파일에 등록할 수도 있지만 예외적으로 자바 코드에서 registerReceiver() 메서드를 사용해 등록할 수 있습니다.
onReceive() 메서드를 정의해야 하는데 이 메서드는 원하는 브로드캐스트 메시지가 도착하면 자동으로 호출됩니다.
메시지는 인텐트 안에 넣어 전달되므로 수신하고 싶은 메시지가 있다면 그 메시지는 인텐트 필터를 이용해 등록합니다.
2-2. 브로드캐스트 구현
[ AndroidManifest.xml ]

매니페스트 receiver안에 intent-filter에 위 사진에 써 있는 action값을 적어줍니다.
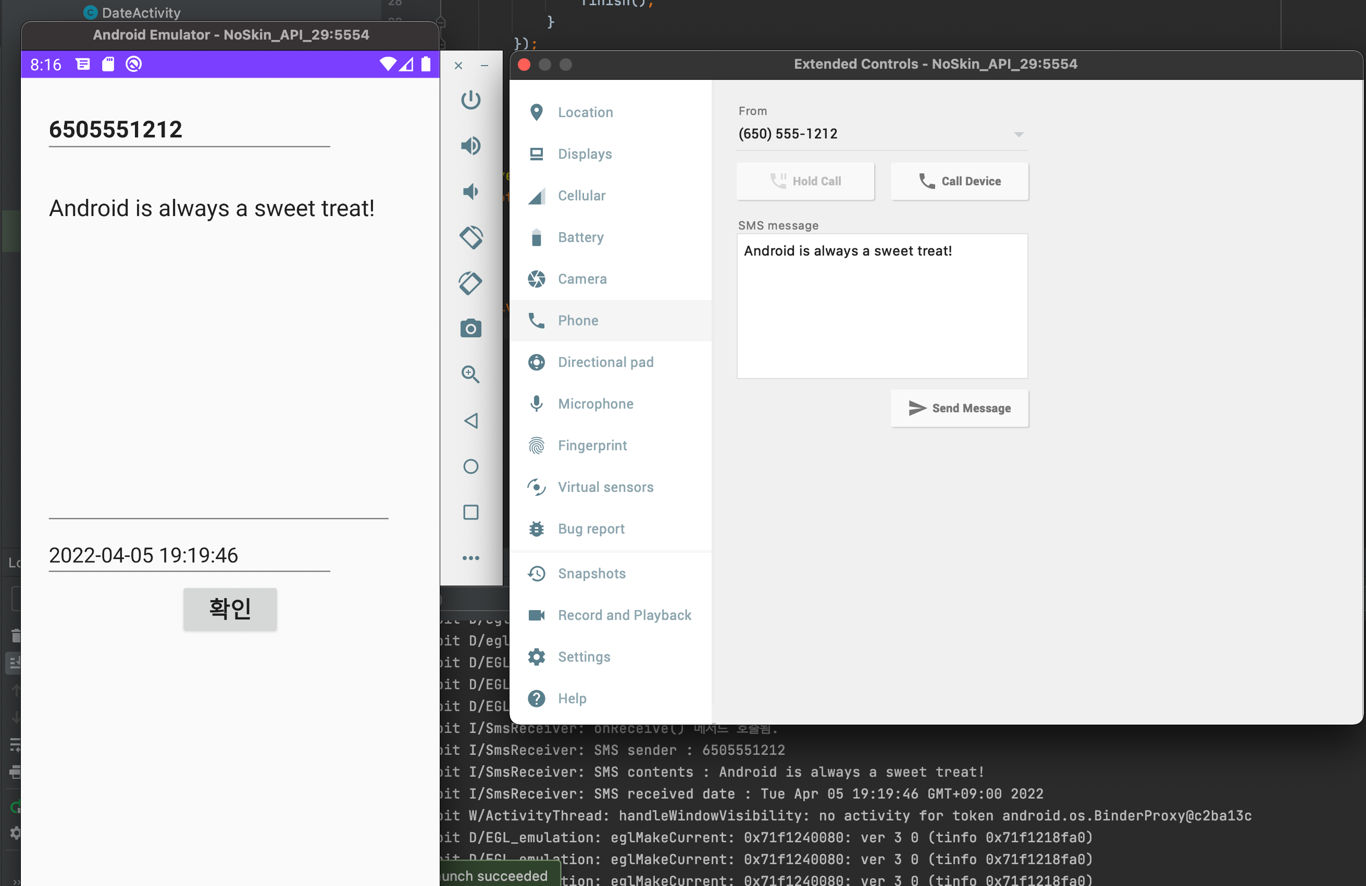
<action android:name="android.provider.Telephony.SMS_RECEIVED"/>[ SmsReceiver.java ]
package com.study.doit;

import android.content.BroadcastReceiver;
import android.content.Context;
import android.content.Intent;
import android.os.Build;
import android.os.Bundle;
import android.telephony.SmsMessage;
import android.util.Log;

import java.util.Date;

public class SmsReceiver extends BroadcastReceiver {
    private static final String TAG = "SmsReceiver";

    @Override
    public void onReceive(Context context, Intent intent) {
        Log.i(TAG, "onReceive() 메서드 호출됨.");

        //인텐트 안에 들어 있는 SMS 메시지를 파싱합니다.
        Bundle bundle = intent.getExtras();
        SmsMessage[] messages = parseSmsMessage(bundle);

        if(messages != null && messages.length>0) {
            String sender = messages[0].getOriginatingAddress();
            Log.i(TAG,"SMS sender : " + sender);

            //SMS 발신 확인
            String contents = messages[0].getMessageBody().toString();
            Log.i(TAG, "SMS contents : " + contents);

            // SMS 수신 시간 확인
            Date receivedDate = new Date(messages[0].getTimestampMillis());
            Log.i(TAG, "SMS received date : " + receivedDate.toString());
        }
    }

    private SmsMessage[] parseSmsMessage(Bundle bundle) {
        Object[] objs = (Object[]) bundle.get("pdus");
        SmsMessage[] messages = new SmsMessage[objs.length];

        int smsCount = objs.length;
        for (int i=0; i<smsCount; i++){
            //PDU 포맷으로 되어 있는 메시지를 복원합니다.
            if(Build.VERSION.SDK_INT >= Build.VERSION_CODES.M) { // API 23 이상
                String format = bundle.getString("format");
                messages[i] = SmsMessage.createFromPdu((byte[]) objs[i], format);
            }
            else {
                messages[i] = SmsMessage.createFromPdu((byte[]) objs[i]);
            }
        }
        return messages;
    }
}
SMS를 받으면 onReceive() 메서드가 호출됩니다. 그리고 파라미터로 전달되는 Intent 객체 안에 SMS 데이터가 들어 있습니다.
parseSmsMessage() 메서드는 한 번 입력해 놓으면 다른 앱을 만들 때도 재사용할 수 있습니다.
왜냐하면 SMS 데이터를 확인할 수 있도록 만드는 안드로이드 API에 정해둔 코드이기 때문입니다.
따라서 이 코드 그대로 입력하면 SmsMessage 객체로 변환한 후 SMS 데이터를 확인할 수 있습니다.
- 발신자 번호를 확인하려면
getOriginatingAddress() - 문자 내용을 확인하려면
getMessageBody().toString()
이 앱은 SMS를 수신해야 하는데 SMS를 수신하려면 권한이 있어야 합니다.
SMS를 수신할 때 필요한 권한은 RECEIVE_SMS 입니다.
//AndroidManifest.xml
<manifest xmlns:android:=...>
  <uses-permission android:name="android.permission.RECEIVE_SMS" />
2-3 브로드캐스트값 넘겨주기
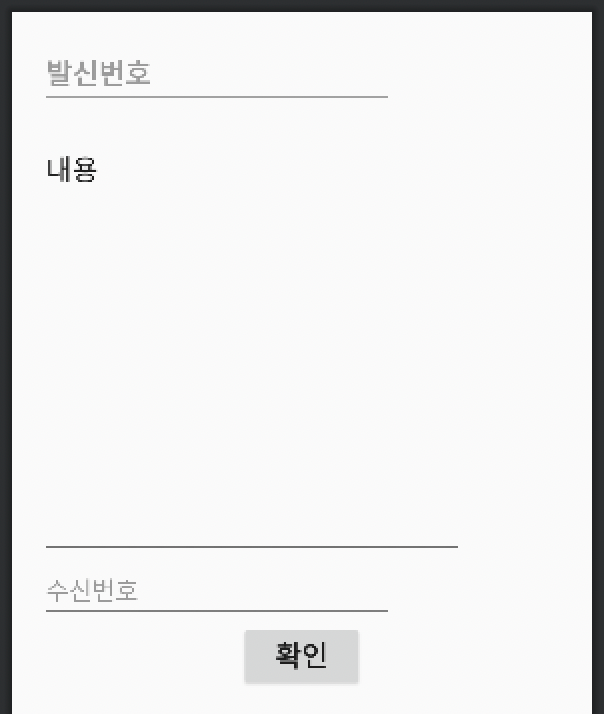
[ activity_sms.xml ]
<?xml version="1.0" encoding="utf-8"?>
<LinearLayout xmlns:android="http://schemas.android.com/apk/res/android"
    xmlns:app="http://schemas.android.com/apk/res-auto"
    xmlns:tools="http://schemas.android.com/tools"
    android:layout_width="match_parent"
    android:layout_height="match_parent"
    android:orientation="vertical"
    android:layout_margin="20dp"
    tools:context=".SmsActivity">

    <EditText
        android:id="@+id/edtCaller"
        android:layout_width="250dp"
        android:layout_height="wrap_content"
        android:hint="발신번호"
        android:textSize="20sp"
        android:textStyle="bold"/>
    <EditText
        android:id="@+id/edtMessage"
        android:layout_width="300dp"
        android:layout_height="300dp"
        android:layout_marginTop="20dp"
        android:text="내용"
        android:textSize="20sp"
        android:gravity="start"/>
    <EditText
        android:id="@+id/edtReceiver"
        android:layout_width="250dp"
        android:layout_height="wrap_content"
        android:hint="수신번호"/>
    <Button
        android:id="@+id/btnOK"
        android:layout_width="wrap_content"
        android:layout_height="wrap_content"
        android:text="확인"
        android:layout_gravity="center"
        android:textSize="20sp"
        android:textStyle="bold"/>
</LinearLayout>
[ SmsActivity.java ]
package com.study.doit;

import androidx.appcompat.app.AppCompatActivity;

import android.content.Intent;
import android.os.Bundle;
import android.view.View;
import android.widget.Button;
import android.widget.EditText;

public class SmsActivity extends AppCompatActivity {

    EditText edtCaller, edtMessage, edtReceiver;
    Button btnOK;
    @Override
    protected void onCreate(Bundle savedInstanceState) {
        super.onCreate(savedInstanceState);
        setContentView(R.layout.activity_sms);

        edtCaller = findViewById(R.id.edtCaller);
        edtMessage = findViewById(R.id.edtMessage);
        edtReceiver = findViewById(R.id.edtReceiver);
        btnOK = findViewById(R.id.btnOK);

        btnOK.setOnClickListener(new View.OnClickListener() {
            @Override
            public void onClick(View view) {
                finish();
            }
        });

        Intent passedIntent = getIntent();
        processIntent(passedIntent);
    }

    @Override
    protected void onNewIntent(Intent intent) {
        processIntent(intent);
        super.onNewIntent(intent);
    }

    private void processIntent(Intent intent) {
        if(intent != null){
            String sender = intent.getStringExtra("sender");
            String contents = intent.getStringExtra("contents");
            String receivedDate = intent.getStringExtra("receivedDate");

            edtCaller.setText(sender);
            edtMessage.setText(contents);
            edtReceiver.setText(receivedDate);
        }
    }
}
[ SmsReciever.java ]
package com.study.doit;

import android.content.BroadcastReceiver;
import android.content.Context;
import android.content.Intent;
import android.icu.text.SimpleDateFormat;
import android.icu.text.UFormat;
import android.os.Build;
import android.os.Bundle;
import android.telephony.SmsMessage;
import android.util.Log;

import java.util.Date;

public class SmsReceiver extends BroadcastReceiver {
	...
    public SimpleDateFormat format = new SimpleDateFormat("yyyy-MM-dd HH:mm:ss");

    @Override
    public void onReceive(Context context, Intent intent) {
        ...
            sendToActivity(context, sender, contents, receivedDate);

        }
    }

    private SmsMessage[] parseSmsMessage(Bundle bundle) {
  		...
    }

    private void sendToActivity(Context context, String sender, String contents, Date receivedDate) {

        Intent myIntent = new Intent(context, SmsActivity.class);
        myIntent.addFlags(Intent.FLAG_ACTIVITY_NEW_TASK | Intent.FLAG_ACTIVITY_SINGLE_TOP | Intent.FLAG_ACTIVITY_CLEAR_TOP);

        myIntent.putExtra("sender", sender);
        myIntent.putExtra("contents", contents);
        myIntent.putExtra("receivedDate", format.format(receivedDate));

        context.startActivity(myIntent);

    }
}
2-4 브로드캐스트 수신자 동작 원리
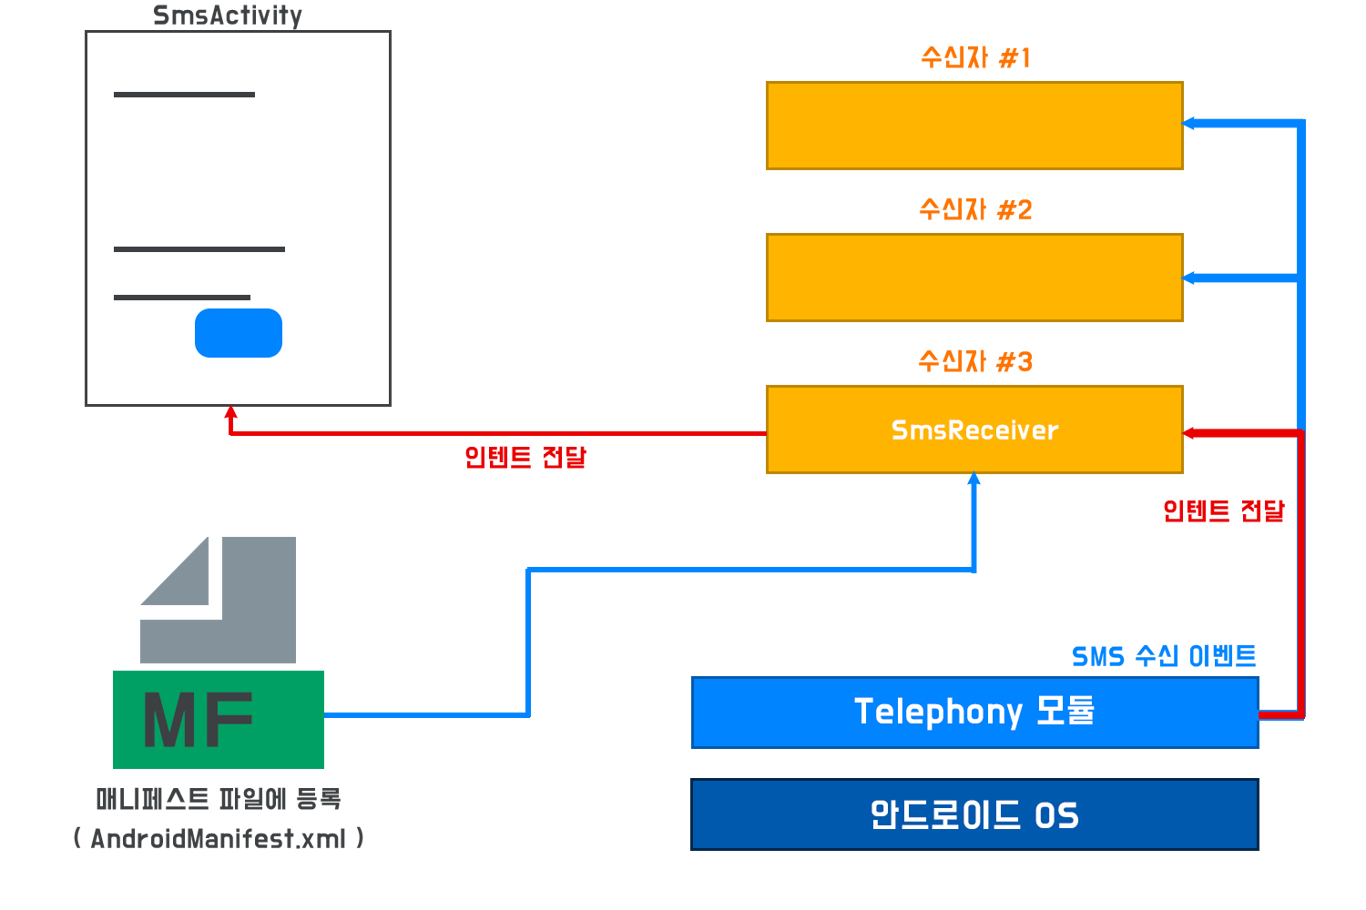
단말에서는 다른 사람으로부터 SMS 문자를 받았을 때 텔레포니(Telephony) 모듈이 처리합니다.
이렇게 처리된 정보는 인텐트에 담겨 브로드캐스팅 방식으로 다른 앱에 전달됩니다.
제가 직접 만든 앱도 그중의 하나가 되어 인텐트를 전달받으며 인텐트를 받았을 때 onReceive() 메서드가 자동 호출됩니다.
제가 만든 브로드캐스트 수신자는 매니페스트 파일에 등록되어 있기 때문에 시스템이 이미 알고 있습니다.
따라서 시스템이 제가 만든 앱으로 인텐트를 전달할 수 있습니다.
브로드캐스트 수신자를 사용하면서 주의할 점은 앱이 실행되어 있지 않아도 원하는 브로드캐스트 메시지가 도착하는 시점에 앱이 실행될 수 있다는 점입니다. 이 때문에 동일한 SMS 수신 앱을 여러 개 수정하여 만들어 설치하면 오류가 발생했을 때 어느 앱에서 생긴 오류인지 찾아내기 힘든 경우가 많습니다.
이 때문에 앱을 한 번 설치한 후 앱의 패키지 이름을 수정하거나 하여 다른 앱으로 만들었을 경우에는 기존에 설치했던 앱을 삭제하는 것이 좋습니다.
앱을 실행하지 않은 상태에서도 인텐트 안에 들어 있는 메시지를 받아볼 수 있다는 점은 브로드캐스트 수신자가 갖는 가장 중요한 특징입니다.
