online study 2주차 과제
이번 2주차는 EKS Cluster의 network 부분을 중점적으로 다루었고, online Study에서 설명 했던 부분에서 이해가 안되었던 부분은 다른 Blog의 글을 통해서 살을 붙이는 걸로 이번 2주차 과제를 진행을 할 예정입니다.
1. 2주차 과제 진행 전 필요한 사전 지식
1.1 IRSA(IAM Role ServiceAccount)
2019년 9월 이전까지 Pod에 권한을 부여하고자 할 경우 Node에 해당 정책을 부여하는 방식으로 해당 Node의 전체 Pod에 동일한 정책을 부여가 되어서, 이를 개선하고자 개별적으로 IAM role을 부여하여 각각의 Pod에 IAM 정책을 부여할 수있는 IRSA가 개발
ServiceAccount는 Pod에 동작하는 Process의 식별자이다. 이 식별자가 API Server로 요청시 API Server는 이 식별자를 통해서 AWS Resource의 접근/사용 여부를 판단을 한다.
그래서 사전에 ServiceAccount와 AWS IAM(Identity and Access Management) 와 Mapping을 한다.
보다 자세한 부분은 URL 참조 : https://docs.aws.amazon.com/eks/latest/userguide/service-accounts.html
1.2 OIDC(open ID connect)
OpenID Connect는 Google 등의 IdP(ID 공급자)에 로그인할 수 있도록 지원하는 표준 인증 프로토콜 입니다. 권한허가 프로토콜인 OAuth 2.0 기술을 이용하여 만들어진 인증 레이어로 JSON 포맷을 이용하여 RESTful API 형식을 사용하여 인증을 하게 됩니다.
OIDC를 사용하면 손쉽게 외부 서비스를 통해 사용자 인증을 구현할 수 있게 됩니다.
즉, Kunernetes의 리소스와 AWS리소스 처럼 서로다른 리소스간의 인증을이 OIDC를 사용하여 손쉽게(?)할 수 있게 됩니다.
위 글은 https://kim-dragon.tistory.com/279에서 그대로 인용을 했습니다.
설명을 잘 해주셔서 그대로 Copy를 했습니다.
1.2 coredns
쿠버네티스 클러스터의 DNS역할을 수행할 수 있는, 확장 가능한 DNS서버
1.3 kube-proxy
Kube-Proxy는 네트워크 동작을 관리하는 컴포넌트이며, 모든 Worker Node에 하나씩 위치하고 있는데, DaemonSet의 형태로 배포
서로 다른 Worker Node의 Pod들 간의 통신이 가능하게 해준다
참고 URL : https://velog.io/@squarebird/Worker-Node-Kube-Proxy
1.4 VPIC CLI Plugin
VPC CNI 장/단점
장점
VPC Traffic을 바로 Pod로 전달하여 overlay network 관련 Overhead가 없음
VPC Flow log와 같은 AWS Network Traffic 감시가 가능
단점
EC2 유형에 따라 Pod에 할당 할 수 있는 IP 수가 결정
이로 인하여 workload에 따라 과도한 자원 낭비가 발생 가능
Kubectl command 참고 URL : https://subicura.com/k8s/guide/kubectl.html
2. Online Study 에서 배포한 Yaml 파일로 Resource 배포
2.1 배포 주요 내용
1주차에서 EKS cluster에 필요한 Resource 를 미리 생성하는 yaml 파일과 EKS Cluster를 생성하는 명령어를 하나의 파일로 통합
2.2 통합에 필요한 Parameter 추가
AWS Configure에 필요한 Access Key ID와 Secret Acesss Key
EKS Cluster Version : 1.24
EKS node Group 생성에 필요한 Parameter : Worknode Instance Type, Worknode 갯수, Work node의 Volume size
AWS에 접속하는 PC의 IP Address
2.3 환경 변수 추가
아래 추가된 부분은 현재 User의 Access Key ID, Secret Access Key, Default Region, Account ID 값을 환경 변수에 추가
# IAM User Credentials
            export AWS_ACCESS_KEY_ID=${MyIamUserAccessKeyID}
            export AWS_SECRET_ACCESS_KEY=${MyIamUserSecretAccessKey}
            export AWS_DEFAULT_REGION=${AWS::Region}
            export ACCOUNT_ID=$(aws sts get-caller-identity --query 'Account' --output text)
            echo "export AWS_ACCESS_KEY_ID=$AWS_ACCESS_KEY_ID" >> /etc/profile
            echo "export AWS_SECRET_ACCESS_KEY=$AWS_SECRET_ACCESS_KEY" >> /etc/profile
            echo "export AWS_DEFAULT_REGION=$AWS_DEFAULT_REGION" >> /etc/profile
            echo "export ACCOUNT_ID=$(aws sts get-caller-identity --query 'Account' --output text)" >> /etc/profile
참고로 aws sts get-caller-identity 명령어는 아래와 같은 형식으로 출력이 된다
$ aws sts get-caller-identity
{
    "UserId": "138996337336",
    "Account": "138996337336",
    "Arn": "arn:aws:iam::138996337336:root"
}
aws sts get-call-identify 명령어 관련 보다 자세한 정보는 https://kimjingo.tistory.com/209 참조
2.4 EKS Cluster에 생성 명령어에 필요한 VPC & SUBNET 관련 환경변수와 Profile에 추가
export VPCID=$(aws ec2 describe-vpcs --filters "Name=tag:Name,Values=$CLUSTER_NAME-VPC" | jq -r .Vpcs[].VpcId)
            echo "export VPCID=$VPCID" >> /etc/profile
            export PubSubnet1=$(aws ec2 describe-subnets --filters Name=tag:Name,Values="$CLUSTER_NAME-PublicSubnet1" --query "Subnets[0].[SubnetId]" --output text)
            export PubSubnet2=$(aws ec2 describe-subnets --filters Name=tag:Name,Values="$CLUSTER_NAME-PublicSubnet2" --query "Subnets[0].[SubnetId]" --output text)
            export PubSubnet3=$(aws ec2 describe-subnets --filters Name=tag:Name,Values="$CLUSTER_NAME-PublicSubnet3" --query "Subnets[0].[SubnetId]" --output text)
            echo "export PubSubnet1=$PubSubnet1" >> /etc/profile
            echo "export PubSubnet2=$PubSubnet2" >> /etc/profile
            echo "export PubSubnet3=$PubSubnet3" >> /etc/profile
            export PrivateSubnet1=$(aws ec2 describe-subnets --filters Name=tag:Name,Values="$CLUSTER_NAME-PrivateSubnet1" --query "Subnets[0].[SubnetId]" --output text)
            export PrivateSubnet2=$(aws ec2 describe-subnets --filters Name=tag:Name,Values="$CLUSTER_NAME-PrivateSubnet2" --query "Subnets[0].[SubnetId]" --output text)
            export PrivateSubnet3=$(aws ec2 describe-subnets --filters Name=tag:Name,Values="$CLUSTER_NAME-PrivateSubnet3" --query "Subnets[0].[SubnetId]" --output text)
            echo "export PrivateSubnet1=$PrivateSubnet1" >> /etc/profile
            echo "export PrivateSubnet2=$PrivateSubnet2" >> /etc/profile
            echo "export PrivateSubnet3=$PrivateSubnet3" >> /etc/profile
2.5 EKS Cluster 생성 명령어 추가
앞서 정의한 환경 변수 값을 참고하여 eksctl 명령으로 Cluster를 생성
1주차 ecksctl과 약간 상이한 점은 addon이 추가가 되었고, 실행시 backgroud daemon process Type으로 실행하기 위해 nohup 과 & 그리고 표준 입출력 Redirection 명령어를 사용했다.
addon으로 VPC CNI, CoreDNS, kube-proxy 가 설치가 되며, 자세한 설명은 사전 지식 부분에 추가를 했다.
# Create EKS Cluster & Nodegroup
            #eksctl create cluster --name $CLUSTER_NAME --region=$AWS_DEFAULT_REGION --nodegroup-name=ng1 --node-type=${WorkerNodeInstanceType} --nodes ${WorkerNodeCount} --node-volume-size=${WorkerNodeVolumesize} --vpc-public-subnets "$PubSubnet1","$PubSubnet2","$PubSubnet3" --version ${KubernetesVersion} --ssh-access --ssh-public-key ${KeyName} --with-oidc --external-dns-access --full-ecr-access --dry-run > myeks.yaml
            eksctl create cluster --name $CLUSTER_NAME --region=$AWS_DEFAULT_REGION --nodegroup-name=ng1 --node-type=${WorkerNodeInstanceType} --nodes ${WorkerNodeCount} --node-volume-size=${WorkerNodeVolumesize} --vpc-public-subnets "$PubSubnet1","$PubSubnet2","$PubSubnet3" --version ${KubernetesVersion} --ssh-access --ssh-public-key /root/.ssh/id_rsa.pub --with-oidc --external-dns-access --full-ecr-access --dry-run > myeks.yaml
            sed -i 's/certManager: false/certManager: true/g' myeks.yaml
            sed -i 's/ebs: false/ebs: true/g' myeks.yaml
            cat <<EOT >> myeks.yaml
            addons:
            - name: vpc-cni # no version is specified so it deploys the default version
              version: v1.12.6-eksbuild.1
              attachPolicyARNs:
                - arn:aws:iam::aws:policy/AmazonEKS_CNI_Policy
            - name: kube-proxy
              version: latest # auto discovers the latest available
            - name: coredns
              version: latest # v1.9.3-eksbuild.2
            EOT
            **nohup eksctl create cluster -f myeks.yaml --verbose 4 --kubeconfig "/root/.kube/config" 1> /root/create-eks.log 2>&1 &**
            echo 'cloudinit End!'
3 배포 후 설정
AWS WEB Console 확인_CLI에서 확인 하는 부분에 해당하는 부분을 WEB Console에서 확인 가능 여부 확인
3.1 default Namespace 적용
$> kubectl ns default
3.2 노드 정보 확인
3개의 work node 생성 확인
$> kubectl get node --label-columns=node.kubernetes.io/instance-type,eks.amazonaws.com/capacityType,topology.kubernetes.io/zone
Cluster에 접근하기 위한 IAM Role과 User 정보를 관리하는 Config Map의 identity mappings 정보를 확인(?) -> Config Map에 대해서는 다시 확인이 필요
$> eksctl get iamidentitymapping --cluster myeks
3.3 Work 노드 IP 확인 및 PrivateIP 환경 변수 지정
$> N1=$(kubectl get node --label-columns=topology.kubernetes.io/zone --selector=topology.kubernetes.io/zone=ap-northeast-2a -o jsonpath={.items[0].status.addresses[0].address})

$> N2=$(kubectl get node --label-columns=topology.kubernetes.io/zone --selector=topology.kubernetes.io/zone=ap-northeast-2b -o jsonpath={.items[0].status.addresses[0].address})

$>N3=$(kubectl get node --label-columns=topology.kubernetes.io/zone --selector=topology.kubernetes.io/zone=ap-northeast-2c -o jsonpath={.items[0].status.addresses[0].address})

$>echo "export N1=$N1" >> /etc/profile
$>echo "export N2=$N2" >> /etc/profile
$>echo "export N3=$N3" >> /etc/profile

$>echo $N1, $N2, $N3
3.4 노드 보안그룹 ID 확인 및 Bastion Host Private IP 정보 추가
$> NGSGID=$(aws ec2 describe-security-groups --filters Name=group-name,Values=*ng1* --query "SecurityGroups[*].[GroupId]" --output text)

$>aws ec2 authorize-security-group-ingress --group-id $NGSGID --protocol '-1' --cidr 192.168.1.100/32
3.5 워커 노드 SSH 접속 확인
$>ssh ec2-user@$N1 hostname
$>ssh ec2-user@$N2 hostname
$>ssh ec2-user@$N3 hostname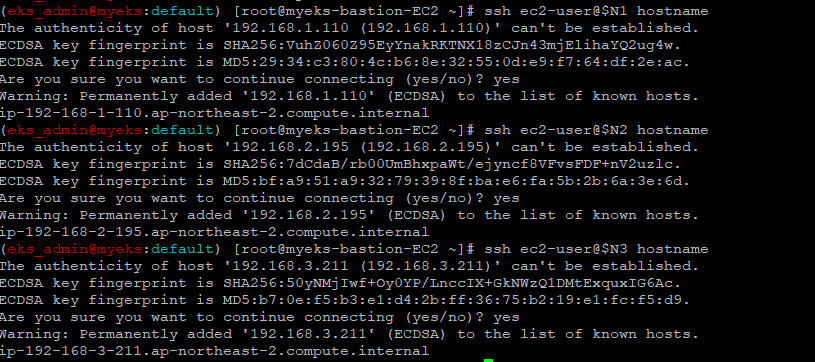
3.6 노드에 tcpdump 툴 설치
$>ssh ec2-user@$N1 sudo yum install links tree jq tcpdump -y
$>ssh ec2-user@$N2 sudo yum install links tree jq tcpdump -y
$>ssh ec2-user@$N3 sudo yum install links tree jq tcpdump -y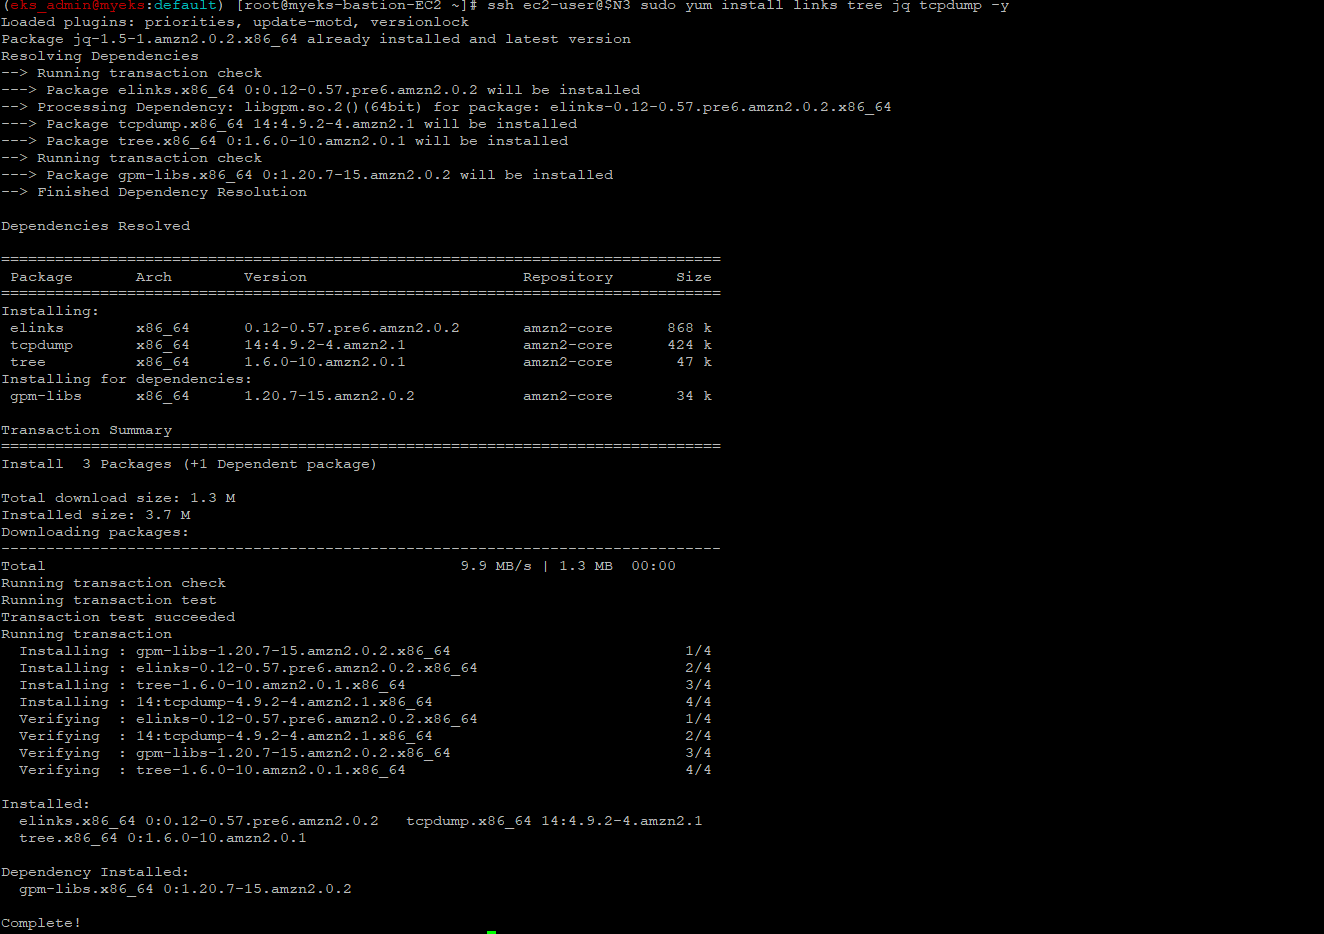
4. 배포 후 확인
4.1 kubectl 명령으로 addon pod 이미지 정보 확인
$> kubectl get pods --all-namespaces -o jsonpath="{.items[*].spec.containers[*].image}" | tr -s '[[:space:]]' '\n' | sort | uniq -c
4.2 eksctl명령으로 addon 설치 확인
$> eksctl get addon --cluster $CLUSTER_NAME
4.3 네트워크 기본 정보 확인
4.3.1 CNI 정보 확인
$>kubectl describe daemonset aws-node --namespace kube-system | grep Image | cut -d "/" -f 2
$>ssh ec2-user@$N1 tree /var/log/aws-routed-eni
$>ssh ec2-user@$N1 cat /var/log/aws-routed-eni/plugin.log | jq
$>ssh ec2-user@$N1 cat /var/log/aws-routed-eni/ipamd.log | jq
$>ssh ec2-user@$N1 cat /var/log/aws-routed-eni/egress-v4-plugin.log | jq

4.3.2 노드 IP 확인(worknode와 Bastion Host)
$>aws ec2 describe-instances --query "Reservations[*].Instances[*].{PublicIPAdd:PublicIpAddress,PrivateIPAdd:PrivateIpAddress,InstanceName:Tags[?Key=='Name']|[0].Value,Status:State.Name}" --filters Name=instance-state-name,Values=running --output table
4.3.3 파드 IP 확인
$>kubectl get pod -n kube-system -o=custom-columns=NAME:.metadata.name,IP:.status.podIP,STATUS:.status.phase4.3.4 파드 이름 확인
$>kubectl get pod -A -o name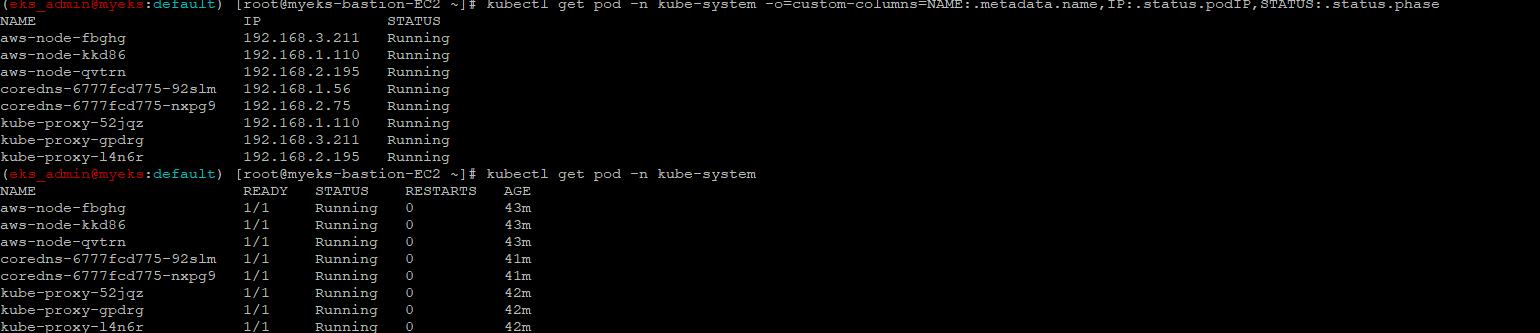
4.3.5 파드 갯수 확인
$>kubectl get pod -A -o name | wc -l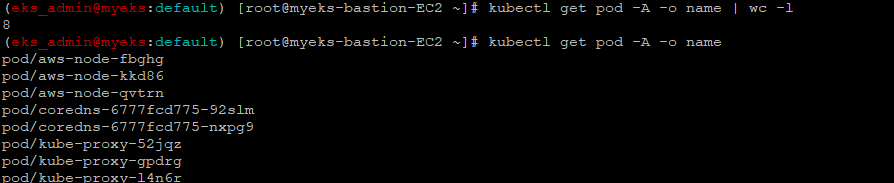
4.3.6 네트워크 정보 확인 : eniY는 pod network 네임스페이스와 veth pair
$>ssh ec2-user@$N1 sudo ip -br -c addr
$>ssh ec2-user@$N1 sudo ip -c addr
$>ssh ec2-user@$N1 sudo ip -c route
$>ssh ec2-user@$N1 sudo iptables -t nat -S
$>ssh ec2-user@$N1 sudo iptables -t nat -L -n -v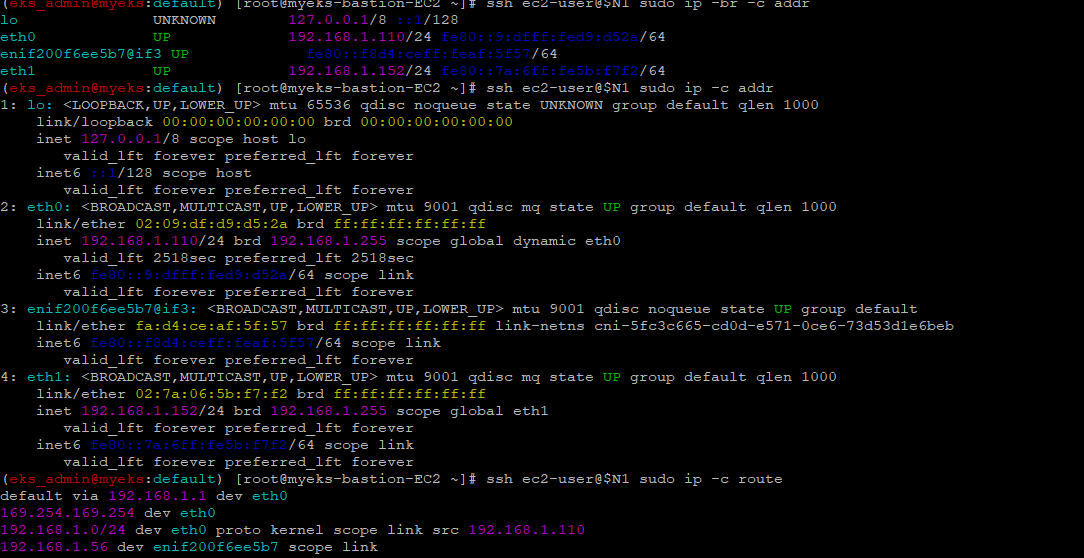
보조 IPv4 주소를 파드 사용 여부 확인
4.3.7 coredns 파드 IP 정보 확인
$>kubectl get pod -n kube-system -l k8s-app=kube-dns -owidecore-dns ip 정보는 보조 Private IPv4주소에서 가져옴
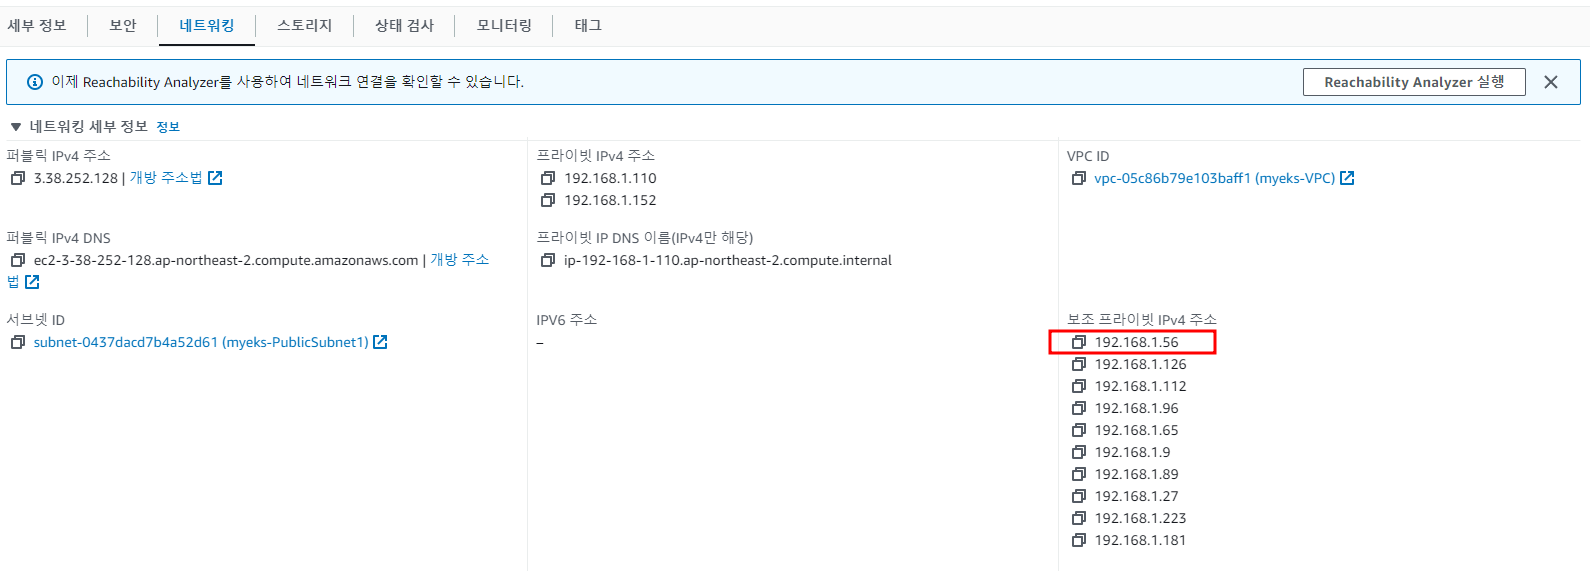


4.3.8 노드의 라우팅 정보 확인
EC2 네트워크 정보의 '보조 프라이빗 IPv4 주소'와 비교
$>ssh ec2-user@$N1 sudo ip -c route
$>ssh ec2-user@$N2 sudo ip -c route
$>ssh ec2-user@$N3 sudo ip -c route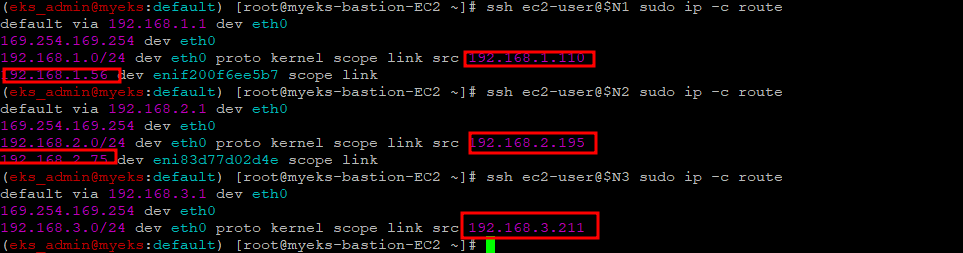
5. 테스트용 파드를 생성하여 Pod의 변화 확인
5.1 테스트용 파드 생성 전 파드 확인
$> kubectl get pod -o wide
$> kubectl get pod -o=custom-columns=NAME:.metadata.name,IP:.status.podIP
5.2 테스트 파드 3개 생성
$> cat <<EOF | kubectl create -f -
apiVersion: apps/v1
kind: Deployment
metadata:
  name: netshoot-pod
spec:
  replicas: 3
  selector:
    matchLabels:
      app: netshoot-pod
  template:
    metadata:
      labels:
        app: netshoot-pod
    spec:
      containers:
      - name: netshoot-pod
        image: nicolaka/netshoot
        command: ["tail"]
        args: ["-f", "/dev/null"]
      terminationGracePeriodSeconds: 0
EOF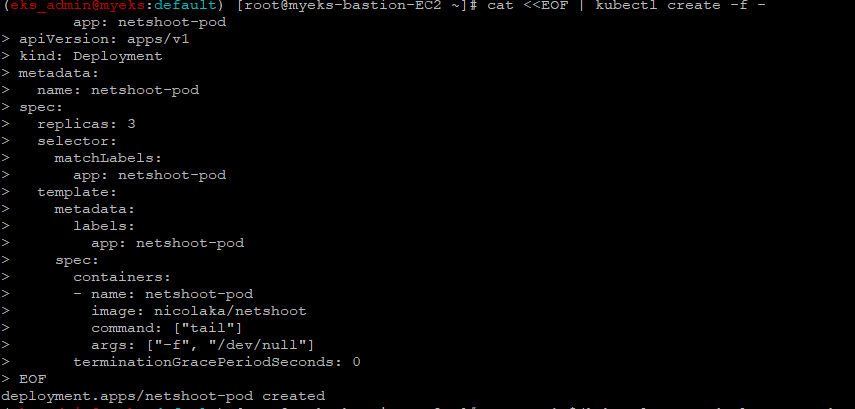
5.3 생성 후 파드 확인
$> kubectl get pod -o wide
$> kubectl get pod -o=custom-columns=NAME:.metadata.name,IP:.status.podIP
파드 생성 후에 워커 노드에 eniY@ifN 추가되고 라우팅 테이블에도 정보가 추가
노드3에서 네트워크 인터페이스 정보 확인
노드3에서 네트워크 인터페이스 정보 확인
$>ssh ec2-user@$N3
----------------
$>ip -br -c addr show
$>ip -c link
$>ip -c addr
$>ip route # 혹은 route -n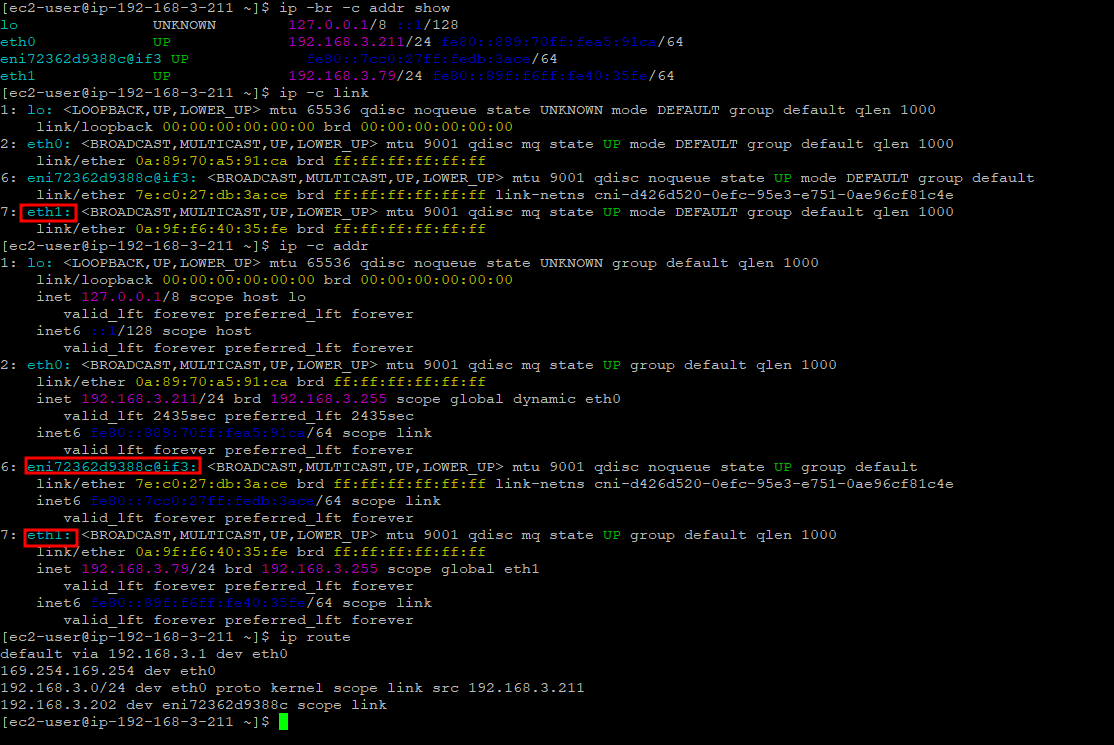
5.4 pod에 접속
$> kubectl exec -it $PODNAME1 -- zsh$> ip -c addr
$> ip -c route
$> route -n
$> ping -c 1 <pod-2 IP>
$> ps
$> cat /etc/resolv.conf
$> exit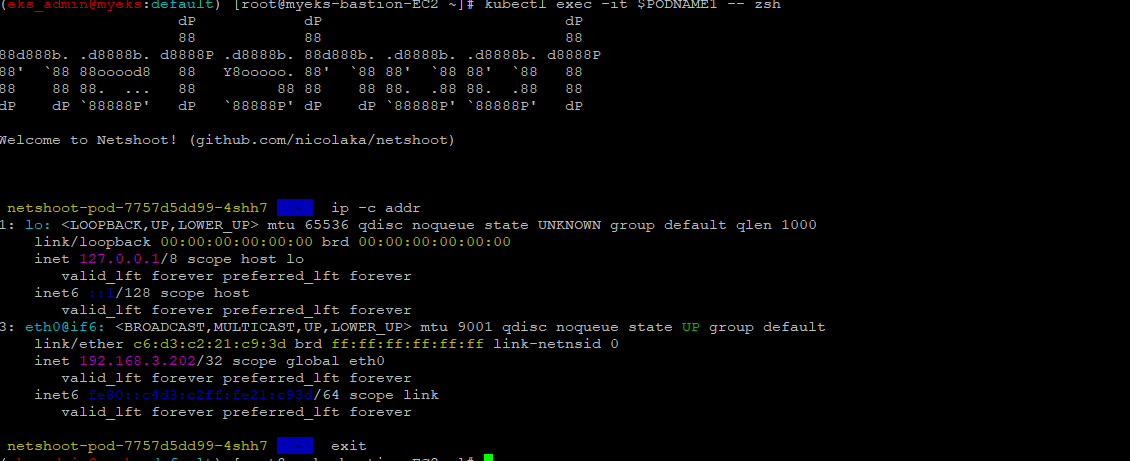
6. 파드간 통신 시험
6.1 파드 이름 변수 지정
$> PODNAME1=$(kubectl get pod -l app=netshoot-pod -o jsonpath={.items[0].metadata.name})

$> PODNAME2=$(kubectl get pod -l app=netshoot-pod -o jsonpath={.items[1].metadata.name})

$> PODNAME3=$(kubectl get pod -l app=netshoot-pod -o jsonpath={.items[2].metadata.name})
6.2 파드 IP 변수 지정
$> PODIP1=$(kubectl get pod -l app=netshoot-pod -o jsonpath={.items[0].status.podIP})

$> PODIP2=$(kubectl get pod -l app=netshoot-pod -o jsonpath={.items[1].status.podIP})

$> PODIP3=$(kubectl get pod -l app=netshoot-pod -o jsonpath={.items[2].status.podIP})
6.3 pod1에서 pod2로 ping 메시지 전송 : tcpdump로 ping 메시지 확인
6.3.1 pod2가 있는 Node에서 Tcpdump 실행
$>sudo tcpdump -i any -nn icmp6.3.2 파드1이 있는 Node에서 파드2로 ping 테스트
$>kubectl exec -it $PODNAME1 -- ping -c 2 $PODIP2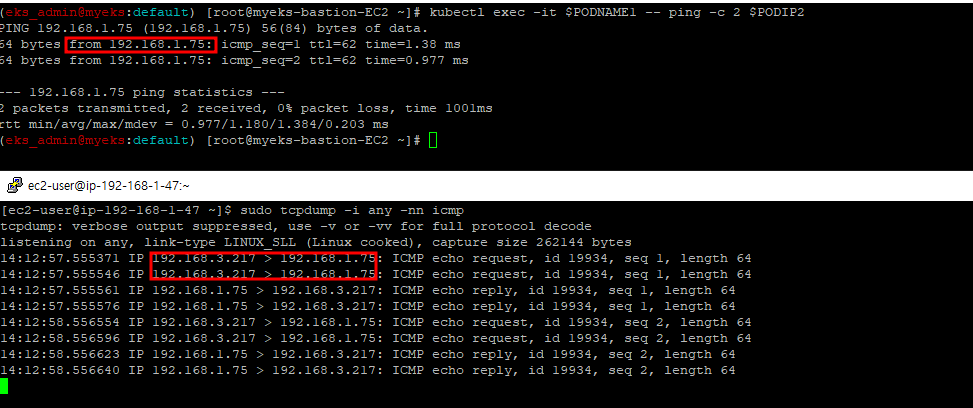
6.3.3 파드에서 외부 통신
파드에서 외부 통신 흐름 : iptable 에 SNAT 을 통하여 노드의 eth0 IP로 변경되어서 외부와 통신됨
6.3.4 워커 노드1 EC2 : 퍼블릭IP 확인
$>curl -s ipinfo.io/ip ; echo6.3.5 워커 노드1 EC2 : TCPDUMP 확인
$> sudo tcpdump -i any -nn icmp6.3.6 Bastion Host을 통하여 pod-1 Shell에서 ping 실행
$>kubectl exec -it $PODNAME1 -- ping -c 1 www.google.com
$>kubectl exec -it $PODNAME1 -- ping -i 0.1 www.google.com
Pod IP -> node IP로 변환

아래는 Pod IP와 Node IP 정보

6.3.7 테스트용 파드 삭제
$> kubectl delete deploy netshoot-pod7 Work node의 IP 수 최대 방안
Secondary IPv4 Address : EC2 Type에 따른 ENI와 보조 IP Address를 최대한 할당
IPv4 Prefix Delegation : Secondary IPv4 Address 방안 개선안으로 ENI 최대 갯수는 변함이 없으나 ENI별 IP Address를 할당하는 것이 아닌 28Bit Prefix 대역(ENI당 16개 주소)을 할당하여 최대 IP Address를 할당
즉 (EC2 Type 별 최대 ENI 갯수) (ENI 당 지원하는 IPv4 갯수 -1) 16개 IP Address = 최대 IP 갯수이며 최대 Pod 갯수로 결정
이론적으로는 위와 같으나 EC2 Type 별 최대 IPv4 갯수 설정 값이 있어 EC2 Type 별 확인이 필요,
그리고 Prefix Delegation 기능은 Nitro hypervisor에만 가능
참고 URL : https://trans.yonghochoi.com/translations/aws_vpc_cni_increase_pods_per_node_limits.ko
7.1 워커노드의 최대 Pod 갯수 확인_t3.medium
7.1.1 t3 타입의 정보(필터) 확인
$> aws ec2 describe-instance-types --filters Name=instance-type,Values=t3.* \
 --query "InstanceTypes[].{Type: InstanceType, MaxENI: NetworkInfo.MaximumNetworkInterfaces, IPv4addr: NetworkInfo.Ipv4AddressesPerInterface}" \
 --output table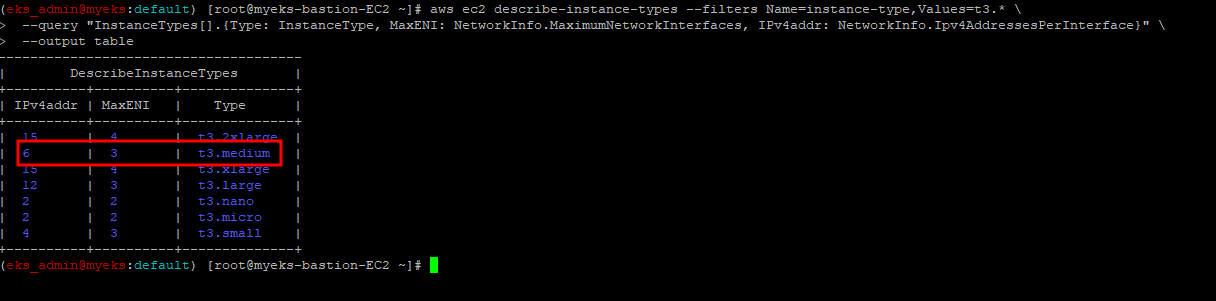
7.1.2 파드 수 계산 공식 : ((MaxENI * (IPv4addr-1)) + 2)
- aws-node 와 kube-proxy 파드는 host-networking 사용으로 IP 2개 남음
- t3.medium 경우 : ((3 * (6 - 1) + 2 ) = 17개 >> aws-node 와 kube-proxy 2개 제외하면 15개
7.1.3 워커노드 상세 정보 확인 : 노드 상세 정보의 Allocatable 에 pods 에 17개 정보 확인
$> kubectl describe node | grep Allocatable: -A7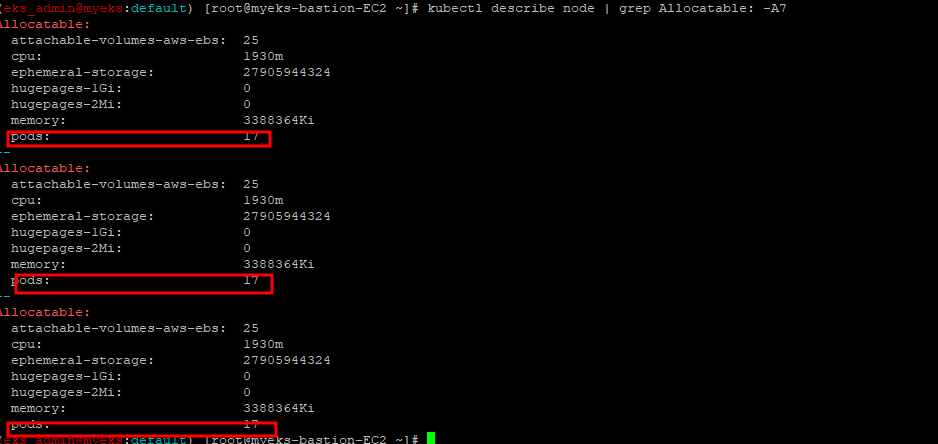
7.2 최대 Pod 가능 수 확인
7.2.1 Bastion Host에서 Pod 수 지속적으로 확인
$> watch -d 'kubectl get pods -o wide'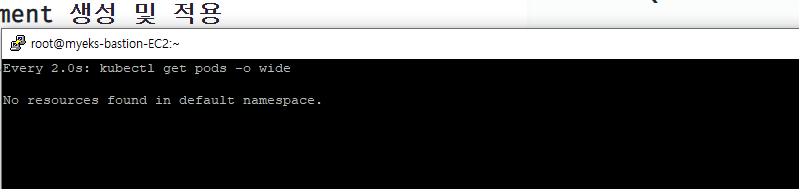
7.2.2 Bastion Host에서 Deployment 생성 및 적용
$> curl -s -O https://raw.githubusercontent.com/gasida/PKOS/main/2/nginx-dp.yaml
$> kubectl apply -f nginx-dp.yaml
7.2.3 파드 생성 여부 확인
$> kubectl get pod -o=custom-columns=NAME:.metadata.name,IP:.status.podIP
7.2.4 파드 증가 테스트
7.2.4.1 8개 파드 정상 생성 확인, 워커 노드에서 eth, eni 갯수 확인
$> kubectl scale deployment nginx-deployment --replicas=8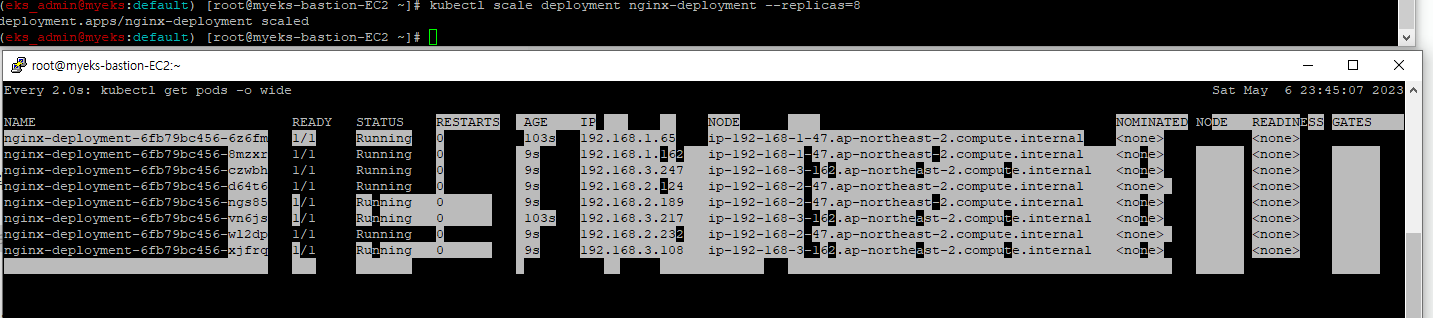
7.2.4.2 15개 파드 정상 생성 확인, 워커 노드에서 eth, eni 갯수 확인
$> kubectl scale deployment nginx-deployment --replicas=15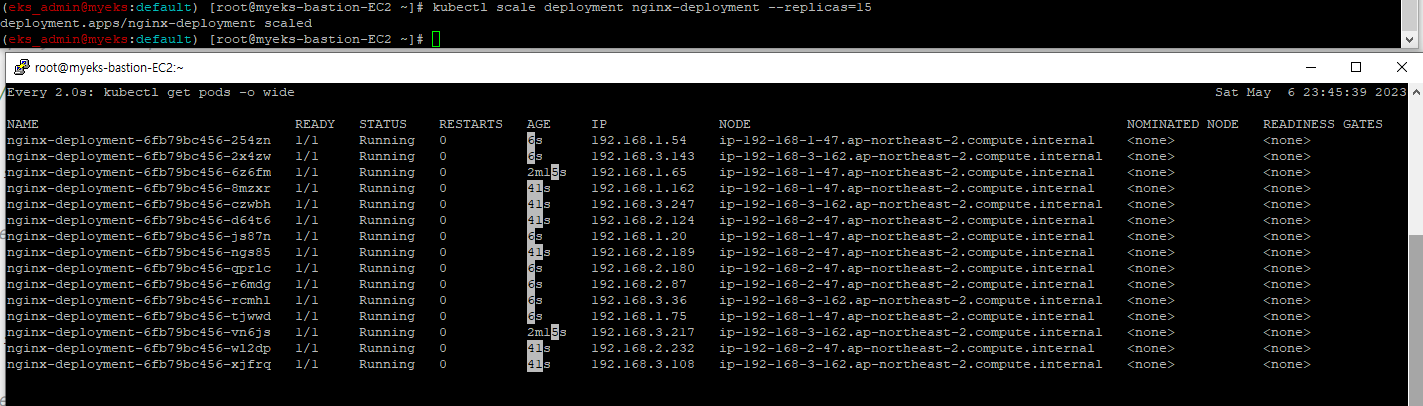
7.2.4.3 50개 파드 정상 생성 확인, 워커 노드에서 eth, eni 갯수 확인
$> kubectl scale deployment nginx-deployment --replicas=50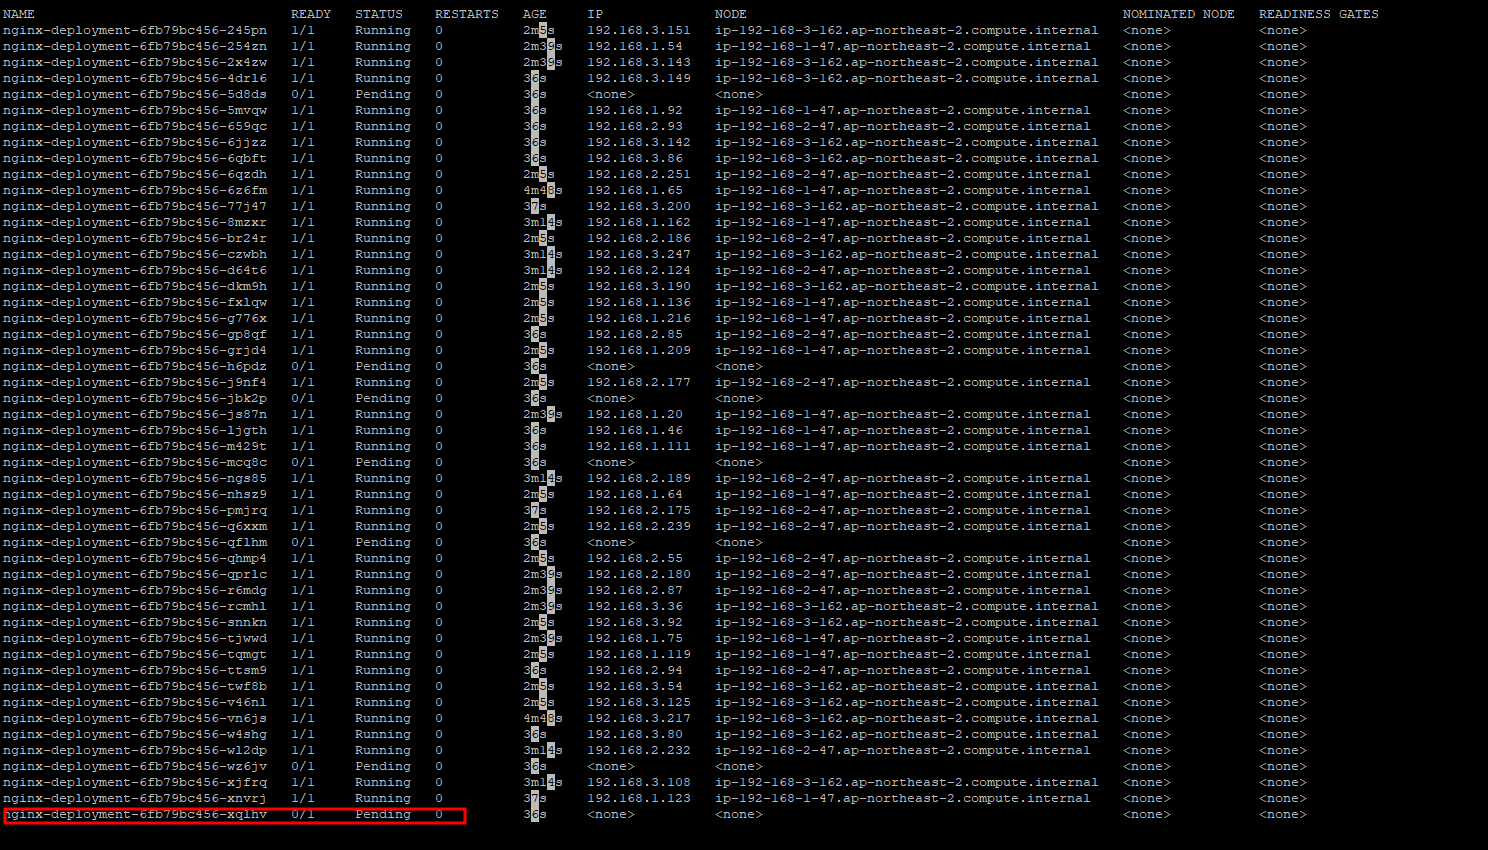
7.2.5 지연된 Pod 여부 확인
$> kubectl get pods | grep Pending
7.2.6 지연된 Pod의 상세 Reason 확인
$> kubectl describe pod <Pending 파드> | grep Events: -A5
7.3 Deployment 삭제
$> kubectl delete deploy nginx-deployment8 Application Load Balancer Controler 배포
EKS Cluster 외부의 Load Balancer 자원에 접근하기 위해 Cluster work-node에 설치가 되는 Application load Balancer Controler Pod에게 IAM Role이 필요
이 IAM Role은 AWS의 사용자 계정과 유사한 EKS Cluster의 Service Account와 연계를 하거나 Work node(EC2)에 IAM Role을 할당하는 방법이 있으나 여기에서는 Service Account와 IAM Role을 연결
그래서 아래와 같은 과정으로 거치면 최종적으로 EKS Cluster Work-node에서 외부 Load Balancer 제어가 가능한 권한으로 접근이 가능
- 외부 Load Balancer Controler 접근 정책 생성
- EKS Cluster의 Service Account 생성
- Cluster 에 Controler 배포
- 배표 확인
Online Study에서 설명하는 부분은 아무래도 Kebenetis에 익숙한 참여자를 대상으로 하여 초보자에게는 일정 부분이 이해가 불가한 부분이 있어, 아래 URL을 참조
Application Load balancer controler 관련 참조 URL : https://catalog.us-east-1.prod.workshops.aws/workshops/9c0aa9ab-90a9-44a6-abe1-8dff360ae428/ko-KR/60-ingress-controller/100-launch-alb#
8.1 AWS LoadBalancer Controller 배포 with IRSA
8.1.1 OIDC 확인
$> aws eks describe-cluster --name $CLUSTER_NAME --query "cluster.identity.oidc.issuer" --output text$> aws iam list-open-id-connect-providers | jq
8.1.2 IAM Policy 생성 JSON 파일 다운로드(AWSLoadBalancerControllerIAMPolicy)
$> curl -o iam_policy.json https://raw.githubusercontent.com/kubernetes-sigs/aws-load-balancer-controller/v2.4.7/docs/install/iam_policy.json
8.1.3 IAM Policy 생성
$> aws iam create-policy --policy-name AWSLoadBalancerControllerIAMPolicy --policy-document file://iam_policy.json
8.1.4 생성된 IAM Policy Arn 확인
$> aws iam get-policy --policy-arn arn:aws:iam::$ACCOUNT_ID:policy/AWSLoadBalancerControllerIAMPolicy --query 'Policy.Arn'
8.1.5 AWS Load Balancer Controller를 위한 ServiceAccount를 생성
자동으로 매칭되는 IAM Role 을 CloudFormation 으로 생성됨!
IAM 역할 생성. AWS Load Balancer Controller의 kube-system 네임스페이스에 aws-load-balancer-controller라는 Kubernetes 서비스 계정을 생성하고 IAM 역할의 이름으로 Kubernetes 서비스 계정에 주석을 답니다(?)_
$> eksctl create iamserviceaccount --cluster=$CLUSTER_NAME --namespace=kube-system --name=aws-load-balancer-controller \
--attach-policy-arn=arn:aws:iam::$ACCOUNT_ID:policy/AWSLoadBalancerControllerIAMPolicy --override-existing-serviceaccounts --approve
8.1.6 IRSA 정보 확인
$> eksctl get iamserviceaccount --cluster $CLUSTER_NAME
8.1.7 서비스 어카운트 확인
$> kubectl get serviceaccounts -n kube-system aws-load-balancer-controller -o yaml | yh
8.1.8 Helm Chart 설치를 통한 AWS loadbalancer Controler 배포
$> helm repo add eks https://aws.github.io/eks-charts

$> helm repo update

$>helm install aws-load-balancer-controller eks/aws-load-balancer-controller -n kube-system --set clusterName=$CLUSTER_NAME \
  --set serviceAccount.create=false --set serviceAccount.name=aws-load-balancer-controller
8.1.9 설치 확인
$> kubectl get crd
$> kubectl get deployment -n kube-system aws-load-balancer-controller

$>kubectl describe deploy -n kube-system aws-load-balancer-controller
$> kubectl describe deploy -n kube-system aws-load-balancer-controller | grep 'Service Account'
8.1.10 클러스터롤, 롤 확인
$> kubectl describe clusterrolebindings.rbac.authorization.k8s.io aws-load-balancer-controller-rolebinding

$> kubectl describe clusterroles.rbac.authorization.k8s.io aws-load-balancer-controller-role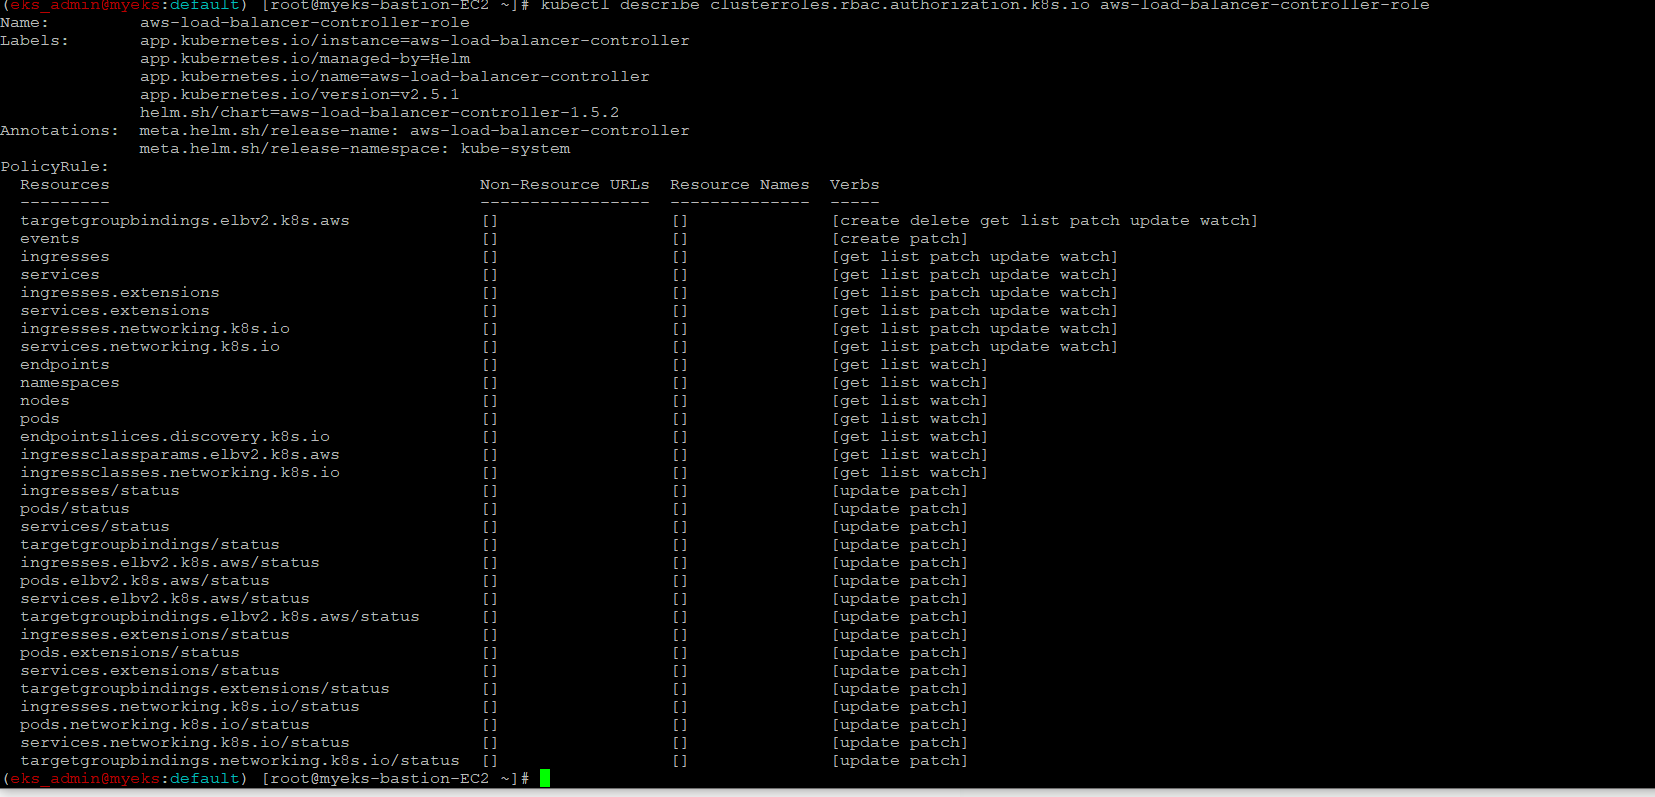
9 AWS Load Balancer Controler + Ingress(ALB)
Ingress 자원 생성 시 자동으로 ALB를 생성
아래 파일은 Namespace + Service + Deployment + Ingress 를 생성하는 Yaml 파일
apiVersion: v1
kind: Namespace
metadata:
  name: game-2048
---
apiVersion: apps/v1
kind: Deployment
metadata:
  namespace: game-2048
  name: deployment-2048
spec:
  selector:
    matchLabels:
      app.kubernetes.io/name: app-2048
  replicas: 2
  template:
    metadata:
      labels:
        app.kubernetes.io/name: app-2048
    spec:
      containers:
      - image: public.ecr.aws/l6m2t8p7/docker-2048:latest
        imagePullPolicy: Always
        name: app-2048
        ports:
        - containerPort: 80
---
apiVersion: v1
kind: Service
metadata:
  namespace: game-2048
  name: service-2048
spec:
  ports:
    - port: 80
      targetPort: 80
      protocol: TCP
  type: NodePort
  selector:
    app.kubernetes.io/name: app-2048
---
apiVersion: networking.k8s.io/v1
kind: Ingress
metadata:
  namespace: game-2048
  name: ingress-2048
  annotations:
    alb.ingress.kubernetes.io/scheme: internet-facing
    alb.ingress.kubernetes.io/target-type: ip
spec:
  ingressClassName: alb
  rules:
    - http:
        paths:
        - path: /
          pathType: Prefix
          backend:
            service:
              name: service-2048
              port:
                number: 80
간략한 설명으로 80 번 Port로 접속 요청하는 HTTP Traffic을 service-2048로 전달, Service-2048 Service는 NodePort Service 구성으로 80 번 Port Traffic을 다시 work node에 80 Port를 Listening 하는 Container로 Traffic을 전달
9.1 게임 파드와 Service, Ingress 배포
$> curl -s -O https://raw.githubusercontent.com/gasida/PKOS/main/3/ingress1.yaml

$> kubectl apply -f ingress1.yaml
9.2 모니터링
$> watch -d kubectl get pod,ingress,svc,ep -n game-20489.2.1 자원 생성 전

9.2.2 자원 생성 후

9.3 생성 확인
$>kubectl get-all -n game-2048

$>kubectl get ingress,svc,ep,pod -n game-2048

$>kubectl get targetgroupbindings -n game-2048
9.4 Ingress 확인
$> kubectl describe ingress -n game-2048 ingress-2048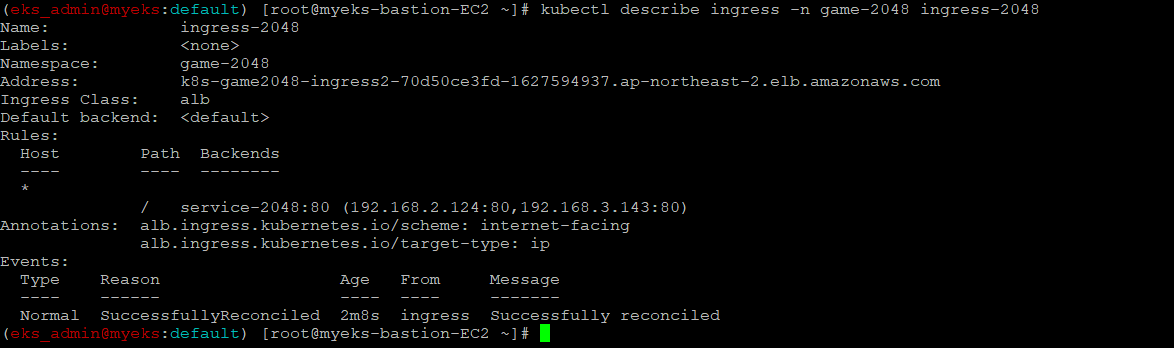
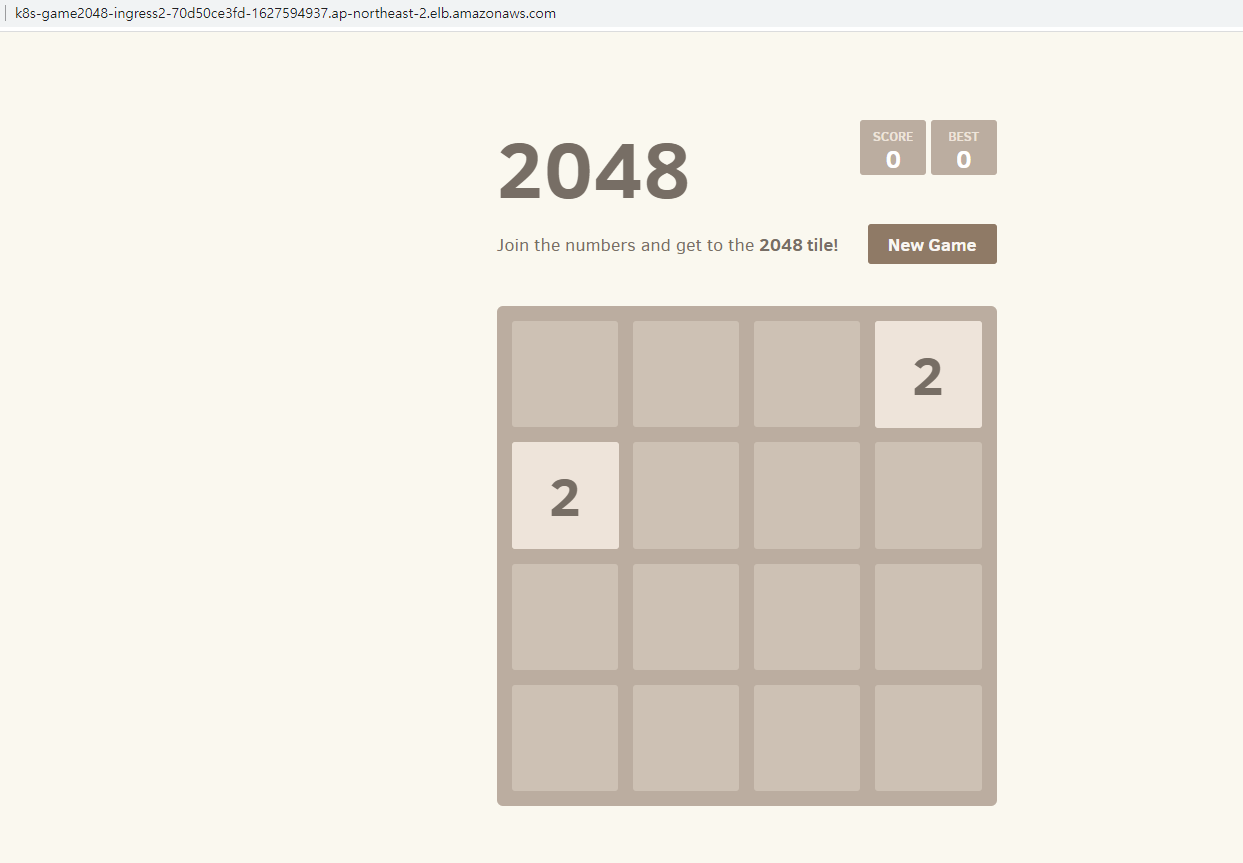
9.5 게임 접속 : ALB 주소로 웹 접속
$> kubectl get ingress -n game-2048 ingress-2048 -o jsonpath={.status.loadBalancer.ingress[0].hostname} | awk '{ print "Game URL = http://"$1 }'
9.6 출력된 URL로 접속
9.7 파드 IP 확인
$> $> kubectl get pod -n game-2048 -owide
9.8 테스트 파드 삭제
9.8.1 Ingress 삭제
$> kubectl delete ingress ingress-2048 -n game-2048
9.8.2 service와 deployment 삭제
$> kubectl delete svc service-2048 -n game-2048 && kubectl delete deploy deployment-2048 -n game-2048 && kubectl delete ns game-2048
10 External DNS
서비스/인그레스 생성 시 도메인을 설정하면, AWS(Route 53), Azure(DNS), GCP(Cloud DNS) 에 A 레코드(TXT 레코드)로 자동 생성/삭제
10.1 AWS Rooute53 정보 확인 및 기타 변수 설정
10.1.1 자신의 도메인 변수 지정 : 소유하고 있는 자신의 도메인을 입력
$> MyDomain=<자신의 도메인>
10.1.2 자신의 Route 53 도메인 ID 조회 및 변수 지정
$>aws route53 list-hosted-zones-by-name --dns-name "${MyDomain}." --query "HostedZones[0].Id" --output text

$> MyDnzHostedZoneId=`aws route53 list-hosted-zones-by-name --dns-name "${MyDomain}." --query "HostedZones[0].Id" --output text`
10.2 External DNS 배포
10.2.1 설정한 변수 확인
$> echo $MyDomain, $MyDnzHostedZoneId
10.2.2 ExternalDNS 배포
$> curl -s -O https://raw.githubusercontent.com/gasida/PKOS/main/aews/externaldns.yaml

$> MyDomain=$MyDomain MyDnzHostedZoneId=$MyDnzHostedZoneId envsubst < externaldns.yaml | kubectl apply -f -
10.2.3 배포 확인
$> kubectl get pod -l app.kubernetes.io/name=external-dns -n kube-system
10.2.4 로그 모니터링
$> kubectl logs deploy/external-dns -n kube-system -f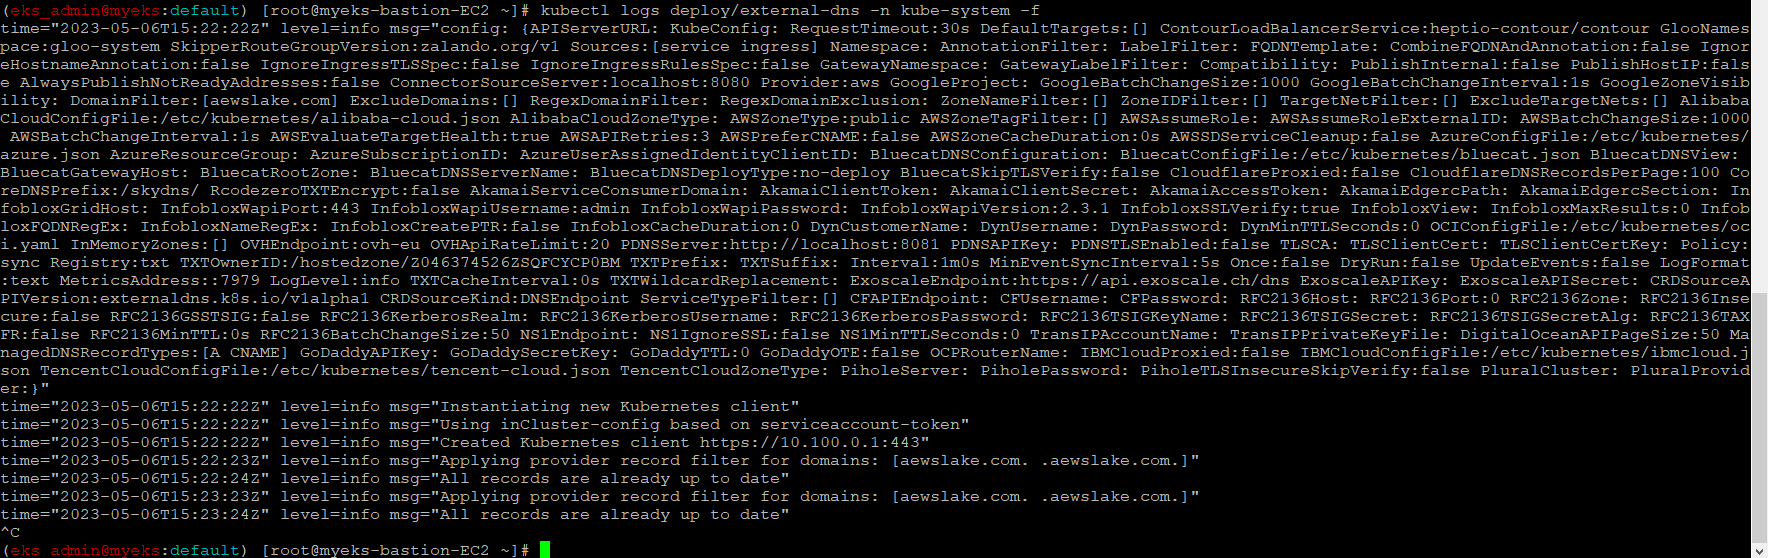
11 Service와 Domain 연동을 통한 외부에서 EKS Service 접속
기 등록한 domain과 연동하여 등록한 Domain을 통해서 서비스 접속
11.1 Service(NLB) + 도메인 연동(ExternalDNS)
11.1.1 테트리스 디플로이먼트 배포
$> cat <<EOF | kubectl create -f -
apiVersion: apps/v1
kind: Deployment
metadata:
  name: tetris
  labels:
    app: tetris
spec:
  replicas: 1
  selector:
    matchLabels:
      app: tetris
  template:
    metadata:
      labels:
        app: tetris
    spec:
      containers:
      - name: tetris
        image: bsord/tetris
---
apiVersion: v1
kind: Service
metadata:
  name: tetris
  annotations:
    service.beta.kubernetes.io/aws-load-balancer-nlb-target-type: ip
    service.beta.kubernetes.io/aws-load-balancer-scheme: internet-facing
    service.beta.kubernetes.io/aws-load-balancer-cross-zone-load-balancing-enabled: "true"
    service.beta.kubernetes.io/aws-load-balancer-backend-protocol: "http"
    #service.beta.kubernetes.io/aws-load-balancer-healthcheck-port: "80"
spec:
  selector:
    app: tetris
  ports:
  - port: 80
    protocol: TCP
    targetPort: 80
  type: LoadBalancer
  loadBalancerClass: service.k8s.aws/nlb
EOF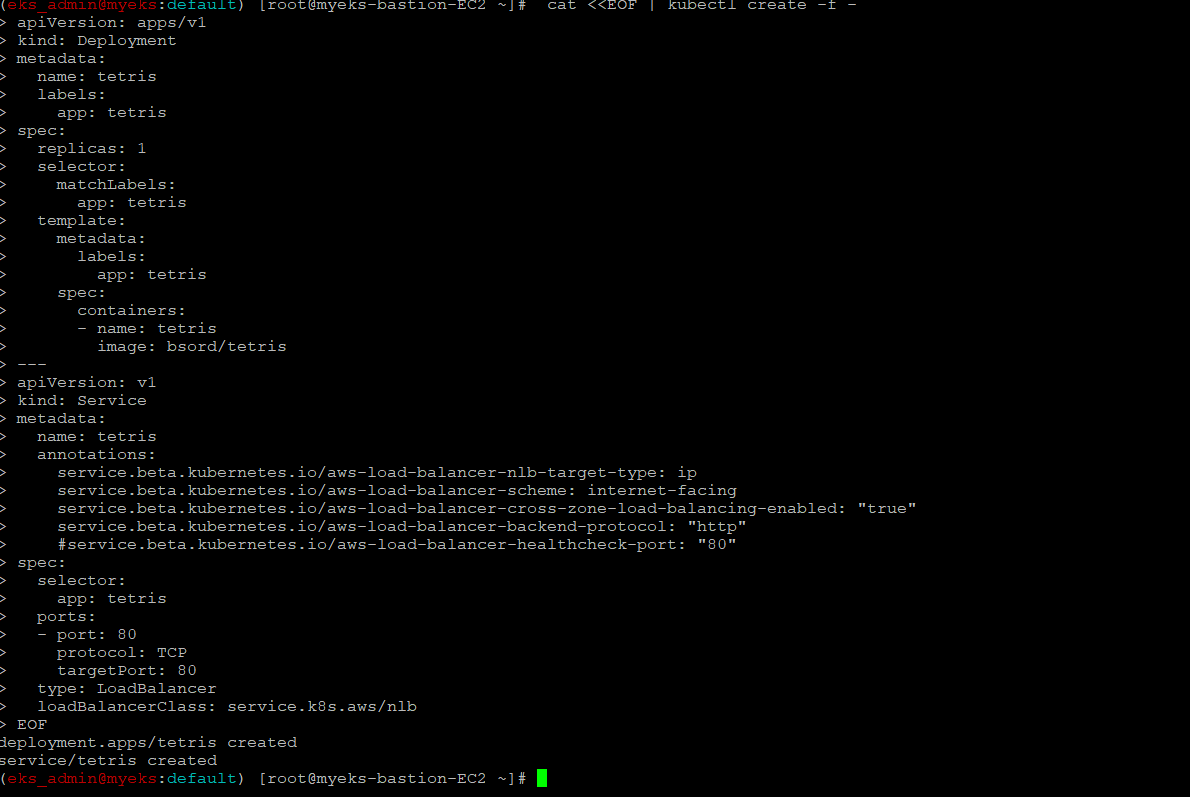
11.1.2 배포 확인 : CLB 배포 확인
$> kubectl get deploy,svc,ep tetris
11.1.3 NLB에 ExternanDNS 로 도메인 연결
$> kubectl annotate service tetris "external-dns.alpha.kubernetes.io/hostname=tetris.$MyDomain"
11.1.4 Route53에 A레코드 확인: External DNS에 자동으로 추가
$> aws route53 list-resource-record-sets --hosted-zone-id "${MyDnzHostedZoneId}" --query "ResourceRecordSets[?Type == 'A']" | jq

$>  aws route53 list-resource-record-sets --hosted-zone-id "${MyDnzHostedZoneId}" --query "ResourceRecordSets[?Type == 'A'].Name" | jq .[]
11.1.5 확인
$> dig +short tetris.$MyDomain @8.8.8.8
$> dig +short tetris.$MyDomain
11.1.6 도메인 체크
$> echo -e "My Domain Checker = https://www.whatsmydns.net/#A/tetris.$MyDomain"11.1.7 웹 접속 주소 확인 및 접속
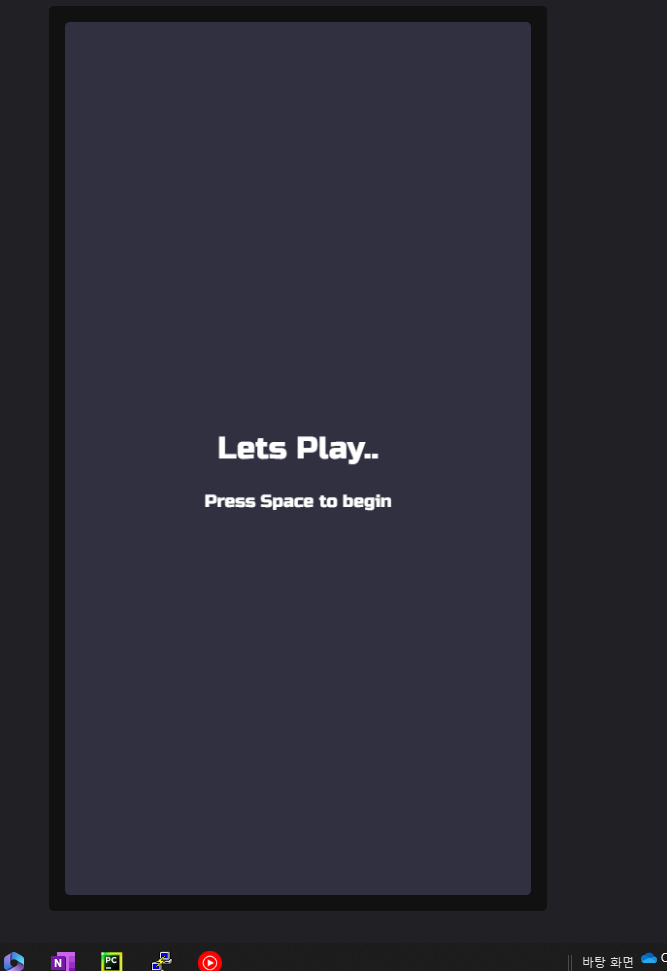
$> echo -e "Tetris Game URL = http://tetris.$MyDomain"
11.1.8 리소스 삭제
$>kubectl delete deploy,svc tetris
12 최종 자원 삭제
$> eksctl delete cluster --name $CLUSTER_NAME && aws cloudformation delete-stack --stack-name $CLUSTER_NAME