7-1. 문서 객체 조작하기
- 요소 : html, head, body, title, hl, div, span 등
- 문서 객체 : 자바스크립트에서는 요소를 문서 객체라고 함
- 문서 객체 모델 : 문서 객체를 조합해 만든 전체적인 형태
1. DOMContentLoaded 이벤트
해당 이벤트는 웹 브라우저가 문서 객체를 모두 읽고 나서 실행하는 이벤트
2. 문서 객체 가져오기
- document.body 코드 사용 시 문서의 body 요소를 읽을 수 있음
document.head
document.body
document.title
document.querySelector(선택자)
document.querySelectorAll(선택자)- querySelector() 메소드 : 요소 하나만 추출
- querySelectorAll() 메소드 : 문서 객체 여러 개 추출
3. 글자 조작하기
- 문서 객체.textContent : 입력된 문자열을 그대로 넣음
- 문서 객체.innerHTML : 입력된 문자열을 html 형식으로 넣음
4. 속성 조작하기
- 문서 객체.setAttribute(속성 이름, 값) : 특성 속성에 값 지정
- 문서 객체.getAttritubte(속성 이름) : 특정 속성 추출
5. 스타일 조작하기
- 문서 객체의 스타일 조작할 때 style 속성 사용
- style 속성은 객체
- 두 단어 이상의 속성은 캐멀 케이스로 표현
h1.style.backgroundColor // 해당 방법을 많이 사용
h1.style['backgroundColor']
h1.style['background-color']
6. 문서 객체 생성하기
- document.createElement() 메소드로 문서 객체 생성
document.createElement(문서 객체 이름)- 문서 객체에는 appendChild()메소드가 있어, 이를 활용하면 어떤 부모 객체 아래 자식 객체 추가 가능
부모 객체.appendChild(자식 객체)7. 문서 객체 이동하기
- appendChild() 메소드 사용해 문서 객체 이동
<!DOCTYPE html>
<html lang="ko">
<head>
  <meta charset="UTF-8">
  <meta name="viewport" content="width=device-width, initial-scale=1.0">
  <title>외부 스타일 시트</title>
</head>
<body>
  <script>
    document.addEventListener('DOMContentLoaded', () => {
      const divA = document.querySelector('#first')
      const divB = document.querySelector('#second')
      const h1 = document.createElement('h1')
      h1.textContent = '이동하는 h1 태그'

      const toFirst = () => {
        divA.appendChild(h1)
        setTimeout(toSecond, 1000)
      }

      const toSecond = () => {
        divB.appendChild(h1)
        setTimeout(toFirst, 10000)
      }

      toFirst()
    })
  </script>
  <body>
    <div id="first">
      <h1>첫 번째 div 태그 내부</h1>
    </div>
    <hr>
    <div id = "second">
      <h1>두 번째 h1 태그 내부</h1>
    </div>
  </body>
</body>
</html>
8. 문서 객체 제거하기
- removeChild() 메소드 사용
부모 객체.removeChild(자식 객체)문서 객체.parentNode.removeChild(문서 객체)9. 이벤트 설정하기
- 모든 문서 객체는 생성, 클릭, 마우스 위에 올릴 때 이벤트 발생
- 이벤트 발생할 때 실행할 함수는 addEventListener() 메소드 사용
문서 객체.addEventListener(이벤트 이름, 콜백 함수)- 이벤트 발생할 때 실행할 함수를 이벤트 리스너, 이벤트 핸들러라 명칭
<!DOCTYPE html>
<html lang="ko">
<head>
  <meta charset="UTF-8">
  <meta name="viewport" content="width=device-width, initial-scale=1.0">
  <title>외부 스타일 시트</title>
</head>
<body>
  <script>
    document.addEventListener('DOMContentLoaded', () => {
      let counter = 0
      const h1 = document.querySelector('h1')

      h1.addEventListener('click', (event) => {
        counter ++
        h1.textContent = `클릭 횟수: ${counter}`
      })
    })
  </script>
  <style>
    h1 {
      user-select : none;
    }
  </style>
  <body>
    <h1> 클릭 횟수 : 0 </h1>
  </body>
</body>
</html>- 이벤트 제거 시에는 removeEventListener() 메소드 사용
문서 객체.removeEventListener(이벤트 이름, 이벤트 리스너)7-2. 이벤트 활용
1. 이벤트 모델
- 이벤트 모델 : 이벤트를 연결하는 방법
- 표준 이벤트 모델 = addEventListenr() 메소드 사용하는 것
- 고전 이벤트 모델 : onOO으로 시작하는 속성에 함수 할당
- 인라인 이벤트 모델 : onOO으로 시작하는 속성을 html 요소에 직접 넣어 이벤트 연결하는 것
2. 키보드 이벤트
- keydown : 키 눌릴 때 실행
- keypress : 키 입력되었을 때 실행
- keyup : 키보드에서 키 떨어질 때 실행
<!DOCTYPE html>
<html lang="ko">
<head>
  <meta charset="UTF-8">
  <meta name="viewport" content="width=device-width, initial-scale=1.0">
  <title>외부 스타일 시트</title>
</head>
<body>
  <script>
    document.addEventListener('DOMContentLoaded', () => {
      const textarea = document.querySelector('textarea')
      const h1 = document.querySelector('h1')

      textarea.addEventListener('keyup', (event) => {
        const length = textarea.value.length
        h1.textContent = `글자 수 : ${length}`
      })
    })
  </script>
  <body>
    <h1></h1>
    <textarea></textarea>
  </body>
</body>
</html>- 키보드 키 코드 사용하기
- code : 입력한 키
- keyCode : 입력한 키를 나타내는 숫자
- altKey : Alt 키를 눌렀는지
- ctrlKey : Ctrl 키를 눌렀는지
- shiftKey : Shift 키를 눌렀는지
3. 글자 입력 양식 이벤트
- 입력 양식 : 사용자로부터 어떠한 입력을 받을 때 사용하는 요소
- input, textarea, button, select 태그 등
<!DOCTYPE html>
<html lang="ko">
<head>
  <meta charset="UTF-8">
  <meta name="viewport" content="width=device-width, initial-scale=1.0">
  <title>외부 스타일 시트</title>
</head>
<body>
  <script>
    document.addEventListener('DOMContentLoaded', () => {
      const input = document.querySelector('input')
      const button = document.querySelector('button')
      const p = document.querySelector('p')

      button.addEventListener('click', () => {
        const inch = Number(input.value)

        if (isNaN(inch)) {
          p.textContent = '숫자를 입력해주세요'
          return // 조기 리턴
        }

        const cm = inch * 2.54
        p.textContent = `${cm} cm`
      })
    })
  </script>
  <body>
    <input type = "text"> inch<br>
    <button>계산</button>
    <p></p>
  </body>
</body>
</html>- 드롭다운 목록 활용하기 : select 태그로 구현
<!DOCTYPE html>
<html lang="ko">
<head>
  <meta charset="UTF-8">
  <meta name="viewport" content="width=device-width, initial-scale=1.0">
  <title>외부 스타일 시트</title>
</head>
<body>
  <script>
    document.addEventListener('DOMContentLoaded', () => {
      const select = document.querySelector('select')
      const p = document.querySelector('p')

      select.addEventListener('chancge', (event) => {
        const options = event.currentTarget.options
        const index = event.currentTarget.options.selectedIndex

        p.textContent = `선택 : ${options[index].textContent}`
      })
    })
  </script>
  <body>
    <select>
      <option>떡볶이</option>
      <option>순대</option>
      <option>오뎅</option>
      <option>튀김</option>
    </select>
    <p>선택 : 떡볶이</p>
  </body>
</body>
</html>- 체크 박스 활용하기 : checked 속성 사용
- 라디오 버튼 활용하기 : checked 속성 사용
4. 기본 이벤트 막기
- 컨텍스트 메뉴 : 이미지에서 우클릭 했을 때 나타나는 메뉴
- 기본 이벤트 : 어떤 이벤트 발생 시 웹 브라우저가 기본적으로 처리해주는 것
- 기본 이벤트 제거는 event 객체의 preventDefault() 메소드 사용
- 불펌 막을 때 주로 사용
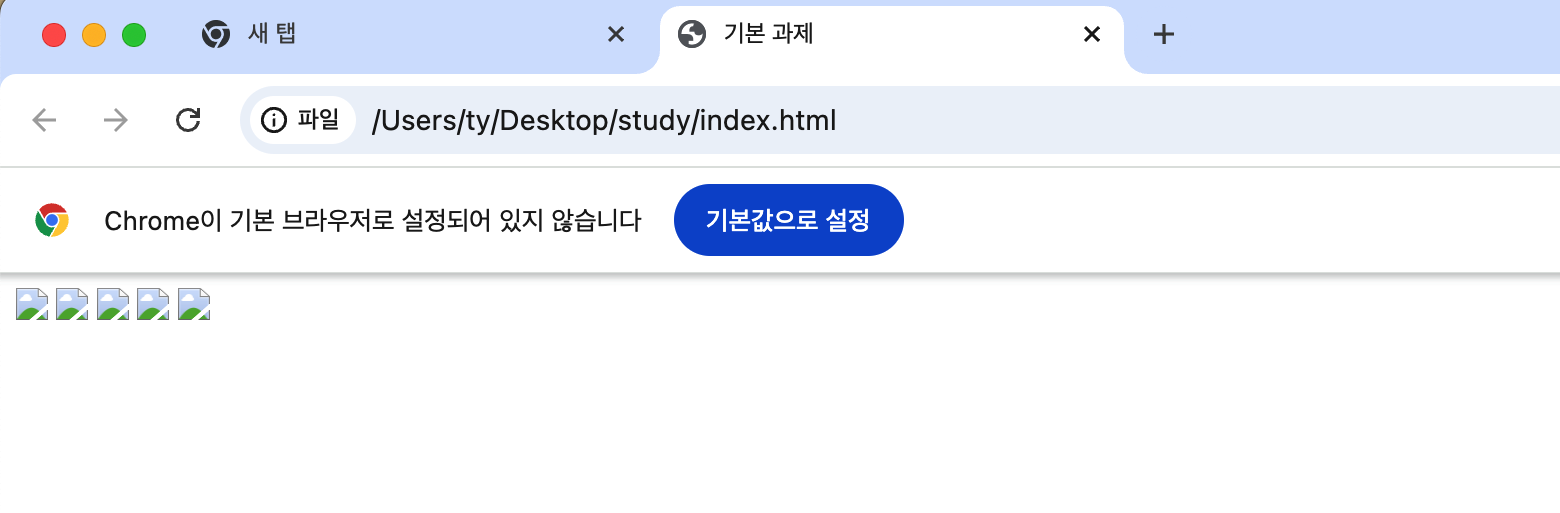
기본 과제
p.315 출력되는 고양이 이미지 캡쳐
[코드]
<!DOCTYPE html>
<html lang="ko">
<head>
  <meta charset="UTF-8">
  <meta name="viewport" content="width=device-width, initial-scale=1.0">
  <title>기본 과제</title>
</head>
<body>
  <script>
    document.addEventListener('DOMContentLoaded', () => {
      const rects = document.querySelectorAll('.rect'); // querySelectorAll로 수정

      rects.forEach((rect, index) => {
        const width = (index + 1) * 100;
        const src = `https://placekitten.com/${width}/250`; // URL 수정 (http → https)
        rect.setAttribute('src', src);
      });
    });
  </script>

  <img class="rect">
  <img class="rect">
  <img class="rect">
  <img class="rect">
  <img class="rect">

</body>
</html>
[결과]
추가 과제
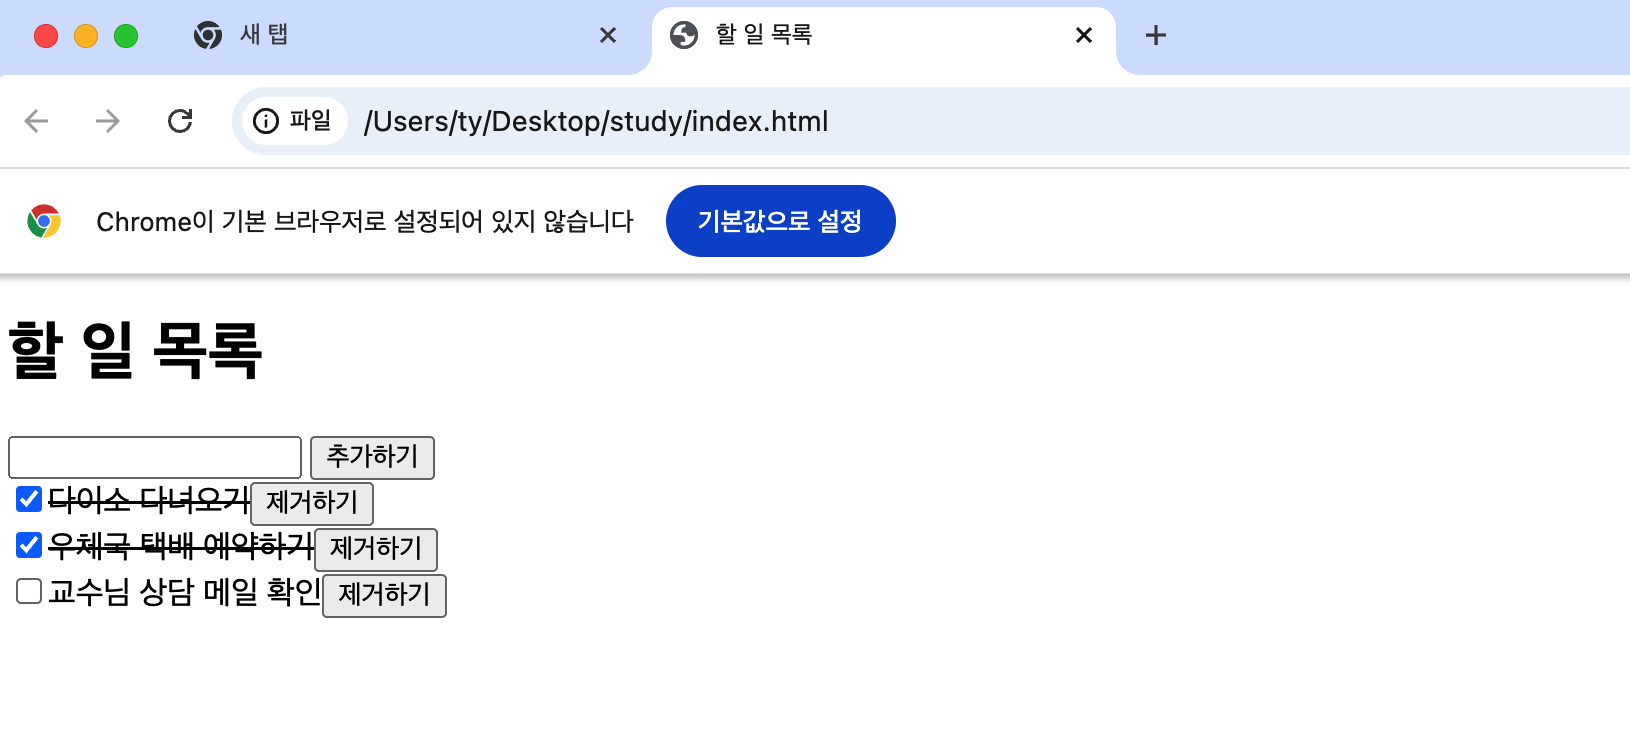
p.352의 할 일 목록 만들기
[코드]
<!DOCTYPE html>
<html lang="ko">
<head>
  <meta charset="UTF-8">
  <meta name="viewport" content="width=device-width, initial-scale=1.0">
  <title>할 일 목록</title>
</head>
<body>
  <h1>할 일 목록</h1>
  <input id="todo">
  <button id="add-button">추가하기</button>
  <div id="todo-list"></div>

  <script>
    document.addEventListener('DOMContentLoaded', () => {
      const input = document.querySelector('#todo');
      const todoList = document.querySelector('#todo-list'); // 수정됨
      const addButton = document.querySelector('#add-button');

      let keyCount = 0;

      const addTodo = () => {
        if (input.value.trim() === '') {
          alert('할 일을 입력해주세요.');
          return;
        }

        const item = document.createElement('div');
        const checkbox = document.createElement('input');
        const text = document.createElement('span');
        const button = document.createElement('button');

        const key = keyCount;
        keyCount += 1;

        item.setAttribute('data-key', key);
        item.appendChild(checkbox);
        item.appendChild(text);
        item.appendChild(button);
        todoList.appendChild(item);

        checkbox.type = 'checkbox';
        checkbox.addEventListener('change', (event) => {
          item.style.textDecoration = event.target.checked ? 'line-through' : '';
        });

        text.textContent = input.value;

        button.textContent = '제거하기';
        button.addEventListener('click', () => { // 수정됨
          removeTodo(key);
        });

        input.value = '';
      };

      const removeTodo = (key) => { // 수정됨
        const item = document.querySelector(`[data-key="${key}"]`); // 수정됨
        if (item) {
          todoList.removeChild(item); // 수정됨
        }
      };

      addButton.addEventListener('click', addTodo);
      input.addEventListener('keyup', (event) => {
        if (event.key === 'Enter') { // 최신 문법으로 수정됨
          addTodo();
        }
      });
    });
  </script>
</body>
</html>
[결과]

소프트웨어학부 3학년 / FE, 정보보안