
애플은 2017년 출시한 아이폰 X 이후 현재까지 노치 디자인을 유지하고 있고, 최근 아이폰 14 프로 에서는 새로운 디자인인 다이나믹 아일랜드까지 추가되었습니다.
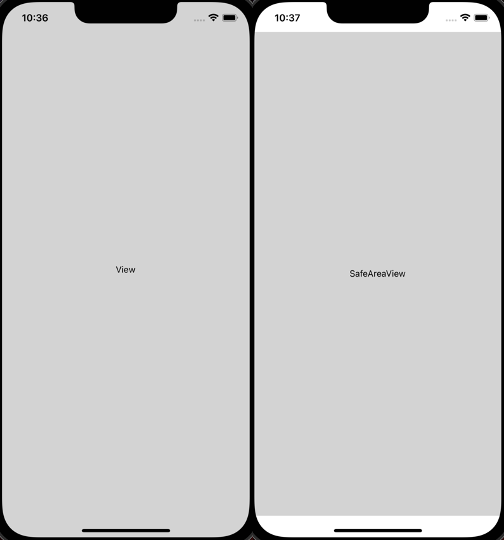
노치와 다이나믹 아일랜드를 지원하는 기종들에서 기존처럼 최상단 컴포넌트를 View 로 구성하게되면 화면 위쪽의 Status Bar 와 화면 아래쪽의 Home Indicator 까지 컴포넌트 영역이 포함됩니다.
View 대신에 SafeAreaView 를 사용하면 Status Bar 와 Home Indicator 영역은 제외하고 화면을 구성할 수 있습니다.
SafeArea 는 무엇일까?
SafeArea 는 처음에 TV에서 도입된 개념이라고 합니다. SafeArea 는 TV의 해상도가 다양해짐에 따라 화면에 보여야하는 필수 요소들(방송사 로고, 프로그램 타이틀, 자막 등등)의 영역을 보장해줍니다.
아이폰의 노치와 다이나믹 아일랜드의 경우에는 컴포넌트가 렌더링 되는 영역에 Status Bar 와 Home Indicator 가 포함됩니다. 따라서 컨텐츠를 온전히 렌더링하기 위해서 SafeAreaView 가 필요합니다.
그런데 개발을 하다보면 SafeAreaView 를 사용한 화면에서 Status Bar 와 Home Indicator 의 색상을 지정해야하는 경우가 있습니다. 해당 기능을 어떻게 구현할 수 있는지 알아보겠습니다.
SafeAreaView 적용하기
SafeAreaView 를 적용하는 것은 간단합니다.
SafeAreaView를 import합니다.
import { SafeAreaView } from 'react-native';View로 구성한 최상단 컴포넌트를SafeAreaView로 변경하거나,SafeAreaView로 래핑합니다.
const App = () => {
  return (
    <SafeAreaView style={{ flex: 1 }}>
      <View style={{ flex: 1, alignItems: 'center', justifyContent: 'center', backgroundColor: 'lightgray' }}>
        <Text style={{ color: 'black' }}>SafeAreaView</Text>
      </View>
    </SafeAreaView>
  );
};
여기까지의 전체 코드는 아래처럼 작성할 수 있습니다.
import React from 'react';
import {
  SafeAreaView,
  StyleSheet,
  Text,
  View,
} from 'react-native';

const App = () => {
  return (
    <SafeAreaView style={styles.container}>
      <View style={styles.body}>
        <Text style={styles.text}>SafeAreaView</Text>
      </View>
    </SafeAreaView>
  );
};

const styles = StyleSheet.create({
  container: {
    flex: 1,
  },
  body: {
    flex: 1,
    alignItems: 'center',
    justifyContent: 'center',
    backgroundColor: 'lightgray',
  },
  text: {
    color: 'black',
  },
});

export default App;
SafeAreaView 배경색 설정하기
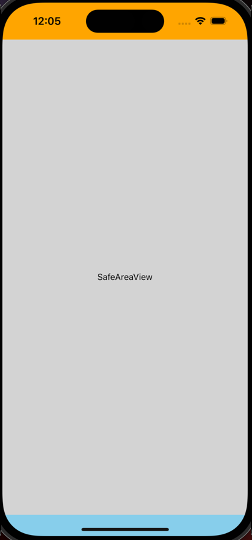
SafeAreaView 의 backgroundColor 스타일 속성에 색상값을 설정해주면 Status Bar 와 Home Indicator 에 설정한 색상이 적용됩니다.
<SafeAreaView style={{ backgroundColor: 'skyblue' }} />
// or
<SafeAreaView style={{ backgroundColor: '#87CEEB' }} />
SafeAreaView 하나 더 추가하기
Status Bar 와 Indicator 의 영역을 분리하기위해 위에서 구성한 SafeAreaView 와 같은 레벨에 SafeAreaView 를 하나 더 추가합니다.
그냥 추가하게되면 JSX Element를 두 개 리턴하게되어 에러가 발생하기 때문에, React의 Fragment 컴포넌트로 래핑해줍니다. Fragment 는 <Fragment></Fragment> 로 사용할 수도 있지만 간단하게 <></> 로도 사용할 수 있습니다.
SafeAreaView를 추가합니다.
const App = () => {
  return (
    <SafeAreaView style={{ backgroundColor: 'orange' }} />
    <SafeAreaView style={{ flex: 1, backgroundColor: 'skyblue' }}>
      <View style={{ flex: 1, alignItems: 'center', justifyContent: 'center', backgroundColor: 'lightgray' }}>
        <Text style={{ color: 'black' }}>SafeAreaView</Text>
      </View>
    </SafeAreaView>
  );
};Fragment컴포넌트로 래핑합니다.<></>대신<Fragment></Fragment>를 사용하고싶으시면React의Fragment를 import 해줘야합니다.
const App = () => {
  return (
    <>
      <SafeAreaView style={{ backgroundColor: 'orange' }} />
      <SafeAreaView style={{ flex: 1, backgroundColor: 'skyblue' }}>
        <View style={{ flex: 1, alignItems: 'center', justifyContent: 'center', backgroundColor: 'lightgray' }}>
          <Text style={{ color: 'black' }}>SafeAreaView</Text>
        </View>
      </SafeAreaView>
    </>
  );
};
여기까지의 전체 코드는 아래처럼 작성할 수 있습니다.
import React, { Fragment } from 'react';
import {
  SafeAreaView,
  StyleSheet,
  Text,
  View,
} from 'react-native';

const App = () => {
  return (
    <Fragment>
      <SafeAreaView style={styles.statusBar} />
      <SafeAreaView style={styles.container}>
        <View style={styles.body}>
          <Text style={styles.text}>SafeAreaView</Text>
        </View>
      </SafeAreaView>
    </Fragment>
  );
};

const styles = StyleSheet.create({
  statusBar: {
    backgroundColor: 'orange',
  },
  container: {
    flex: 1,
    backgroundColor: 'skyblue',
  },
  body: {
    flex: 1,
    alignItems: 'center',
    justifyContent: 'center',
    backgroundColor: 'lightgray',
  },
  text: {
    color: 'black',
  },
});
다이나믹 아일랜드가 적용된 아이폰 14 프로 에서도 잘 동작합니다.
마치며
노치의 경우, Status Bar 의 높이는 47pt, Home Indicator 의 높이는 34pt 입니다.
다이나믹 아일랜드의 경우, Status Bar 의 높이는 59pt, Home Indicator 의 높이는 34pt 입니다.
Status Bar 색상에 따라 내부에 있는 컴포넌트들(시계, 배터리, 와이파이 등등)의 스타일을 바꿔야 할 수 있습니다. 이 부분은 다음 포스트에서 알아보겠습니다.