Problem
Javascript로 Queue자료형을 통해 BFS관련 로직을 짜려고 하였다. 하지만 기존에 사용하던 python과는 다르게 javascript는 별도의 queue나 deque형 라이브러리를 제공해주지 않는다ㅜㅜ
대신 javascript에는 배열의 첫번째 요소를 뽑아먹을 수 있는 shift()라는 메서드가 존재하지만 shift()메서드의 경우 제일 첫번째 요소를 꺼내면서 배열의 주솟값 변동으로 인해서 시간복잡도가 O(n)이 소요된다.
Q. 그렇다면 어떤 식으로 deque를 구현해야 어디서 배열의 요소를 뽑아먹어도 O(1)의 시간복잡도가 실행될까???
A. 첫번째 요소(head)와 마지막 요소(tail)를 가리키고 있는 이중연결리스트 자료구조를 통해서 deque를 직접 구현해보려고 한다.
Solution
이중연결리스트 자료구조를 이해하고 deque를 직접 구현해보자.
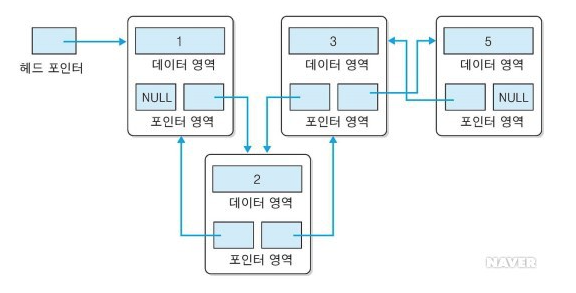
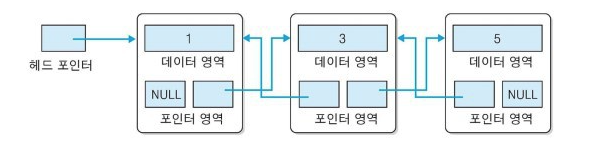
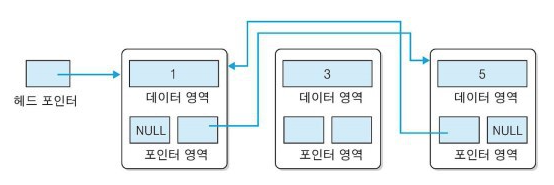
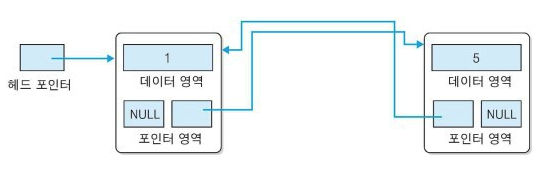
1. 이중연결리스트 정의
각 노드가 선행 노드와 후속 노드에 대한 링크를 가지는 리스트입니다.
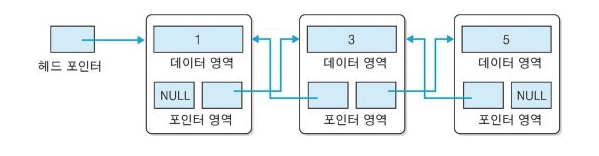
이중 연결 리스트의 노드는 데이터와 다음 노드를 가리키는 포인터, 이전 노드를 가리키는 포인터 이렇게 3개를 갖고 있어야 합니다. 그리고 그림에서는 보여지지 않았지만 양 끝 노드를 각각 헤드포인터, tail 포인터로 두어 단순 연결리스트에 비해 접근성을 더 용이하게 해주었습니다.
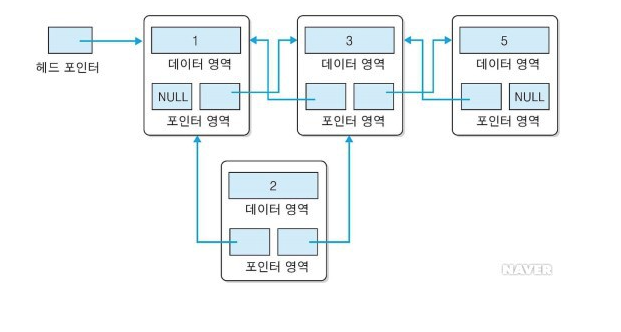
2. 이중연결리스트의 데이터 삽입
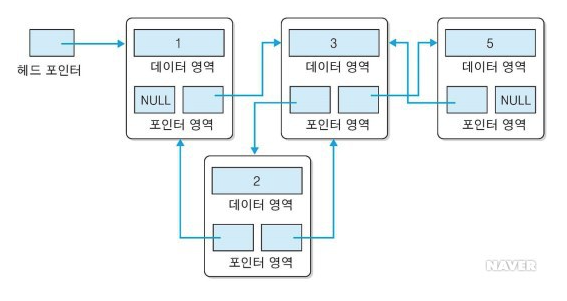
3. 이중연결리스트의 데이터 삭제
아래 deque자료구조를 구현한 코드는 다음과 같다.
function Node(data) {
  this.data = data;
  this.next = null;
  this.prev = null;
}

function Deque() {
  this.head = null;
  this.tail = null;
  this.length = 0;
}

Deque.prototype.size = function () {
  return this.length;
};

Deque.prototype.isEmpty = function () {
  return this.length === 0;
};

// 연결리스트 노드출력함수
Deque.prototype.printNode = function () {
  process.stdout.write("head -> ");
  for (let node = this.head; node != null; node = node.next) {
    process.stdout.write(`${node.data} -> `);
  }
  console.log("null");
};

// 연결리스트 역노드출력함수
Deque.prototype.printNodeInverse = function () {
  let temp = [];
  process.stdout.write("null <- ");

  for (let node = this.tail; node != null; node = node.prev) {
    temp.push(node.data);
  }
  for (let node = temp.length - 1; i > -1; i--) {
    process.stdout.write(`${temp[i]} <- `);
  }
  console.log("null");
};

// javascript unshift 연산
Deque.prototype.pushFront = function (value) {
  let node = new Node(value);

  if (this.head === null) {
    this.head = node;
    this.tail = node;
  } else {
    this.head.prev = node;
    node.next = this.head;
    this.head = node;
  }
};

// javascript shift 연산
Deque.prototype.popFront = function () {
  if (this.head === null) {
    return false;
  }

  const data = this.head.data;

  this.head.prev = null;
  this.head = this.head.next;
  this.length--;

  return data;
};

// javascript push 연산
Deque.prototype.push = function (value) {
  let node = new Node(value);

  if (this.head === null) {
    this.head = node;
    this.tail = node;
  } else {
    this.tail.next = node;
    node.prev = this.tail;
    this.tail = node;
  }
};

// javascript pop 연산
Deque.prototype.pop = function () {
  if (this.head === null) {
    return false;
  }

  const data = this.tail;
  let current = this.tail;

  current.prev.next = null;
  this.tail = current.prev;

  this.length--;

  return data;
};

const deque = new Deque();

// test code
deque.push(1);
deque.printNode();

deque.push(2);
deque.printNode();

deque.push(3);
deque.printNode();

deque.pop();
deque.printNode();

deque.pushFront(4);
deque.printNode();

deque.popFront();
deque.printNode();
코드 설명
pushFront 함수
// javascript unshift 연산
Deque.prototype.pushFront = function (value) {
  let node = new Node(value);
  if (this.head === null) {
    this.head = node;
    this.tail = node;
  } else {
    this.head.prev = node;
    node.next = this.head;
    this.head = node;
  }
};
-
만약 deque에 아무 노드가 없다면
새로 삽입한 노드를 head 포인터와 tail포인터로 설정해줍니다. -
만약 deque에 노드가 존재하고 head포인터가 이미 존재한다면
1) head.prev에다가 새로 삽입한 노드를 넣고 새로 삽입한 노드의 다음 번째는 기존의 head 노드를 넣는다.
2) 그리고 마지막으로 this.head 노드를 새로 삽입한 노드로 변경한다.
popFront 함수
// javascript shift 연산
Deque.prototype.popFront = function () {
  if (this.head === null) {
    return false;
  }
  const data = this.head.data;
  this.head.prev = null;
  this.head = this.head.next;
  this.length--;
  return data;
};
-
데이터 뽑아오기
기존의 head 포인터에 있는 데이터를 리턴하여 pop()연산을 한 데이터를 출력한다. -
데이터 삭제하기
이때 this.head의 이전 값(this.head.prev)의 값을 null로 만들고 this.head의 다음노드(this.head.next)를 헤드포인터로 설정하여 이전노드를 삭제한다.
pop, push
- 앞서 설명한
pushFront,popFront연산에서 this.head 포인터가 아닌 this.tail 포인터로 연산을 동일하게 수행합니다.
출처
https://dororongju.tistory.com/108 [웹 개발 메모장]