안녕하세요.
지금까지 계속 저만의 기술 블로그를 만들어야지, 만들거야
마음으로만 다짐하다가 인제야 시작하게 되었습니다.
비록 시작은 코딩일기지만, 그 끝은 창대하게
어엿한 개발자 블로그로 성장할 수 있도록 노력하겠습니다.
4주차 과제 : 제어문
해당 게시글은 백기선님의 Java live-study 의 과제 내용을 정리한 글입니다.
선택문
-
프로그래밍 언어에서 선택문은 조건에 맞는 것을 선택하여 실행할 수 있게 해주는 구문이며 조건문 이라고도 한다.
선택문에는 다음과 같이 3가지 종류가 있다.-
if문 -
if - else문 -
switch문
-
-
if문
if 는 만약 ~ 라면 이라는 뜻에 직관적으로 특정 조건이 만족할 때 행동을 수행하도록 하는것이다. 코드로 보면 다음과 같다.
if(condition == true)
{
    doSomething();
}
이처럼 condition 이 true 라면 블록 안에 있는 doSomething() 메소드를 실행한다. 만약 condition 이 false 라면 블록전체를 스킵한다.
if - else문
우리는 if 문을 이용해서 조건문을 작성할 수 있게 되었다. 하지만 if 문 만으로는 조건을 설정하는데에 한계가 있다.
다음과 같은 상황을 생각해보자.
if(시험점수 > 80)
{
    새컴퓨터();
}
이런 상황에서 우리는 시험점수가 80점을 넘기면 새로운 컴퓨터를 얻을 수 있다. 하지만 그 조건을 만족하지 못하는 경우, 즉 시험점수가 80점을 넘기지 못했을 때 어떤 일이 일어나는지 알지 못한다. 그렇기에 우리는 이런 조건을 만족하지 못했을 때를 위한 else 구문이 필요하다. else 를 사용하여 위 상황을 다시 정리해보자.
if(시험점수 > 80)
{
    새컴퓨터();
}
else
{
    혼난다();
}
이렇게 상황을 잡는다면 우린 시험점수가 80점을 넘기지 못했을 때
어떤 일이 일어나는지 알 수 있다.
더나아가 이 if - else 문을 이어 붙여 다음과 같이 다채로운 조건을 걸 수 있다.
if(시험점수 > 80)
{
    새컴퓨터();
}
else if(70 < 시험 점수 && 시험 점수 <= 80)
{
    격려();
}
else
{
    혼난다();
}
이렇게 if - else 를 한 세트로 조건을 이어 붙일 수 있다.
switch문
switch 문은 if - else 보다 가독성이 좋고 더 직관적으로 상황을 나눌 수 있다. 지난 번 과제에서 switch문 을 정리한 내용이 있으니 여기서는 간단히 어떻게 작성하는지 코드를 살펴보자.
switch(test)
{
    case 1:
        result = 1;
        break;
    case 2:
        result = 2;
        break;
    case 3:
        result = 3;
        break;
}
이렇게 test의 값이 1이냐 2이냐 3이냐 에 따라서 result이 값이 정해진다. 이처럼 분기를 나눈데에 최적화가 되어있고 Java 13에 들어서면서 이 switch 문에 많은 기능 보완이 이뤄졌다. 자세한 내용은 switch문 혹은 다른 자료들을 참고하자..
반복문
- 반복문은 특정 조건이 만족한다면 계속 반복하여 수행하도록 하는 구문이다.
반복문에는 다음과 같이 3가지 종류가 있다.
-
for문 -
while문 -
do - while문이 세가지 전부 반복한다는 목적은 같지만 그 용도에 조금씩 차이가 있다.
for문
반복문 중에 가장 많이 사용하는 구문이다. 보통 원하는 만큼 반복하기 위해 사용되고, while 문과 다르게 무한루프에 빠질 위험이 적다.
사용법은 다음 코드와 같다.
for(int i = 0; i < 10; i++)
{
    doSomething();
}
이 상황을 말로 표현하자면,
"지금 i가 0인데 i가 10보다 작은 동안에는 doSomething()을 실행시켜라.
한 번 실행이 끝나면 i를 1 증가시켜라"
라고 할 수 있다.
for문의 구조는 다음과 같다.
for(초기식; 조건식; 증감식)
{
    doSomething();
}
for 문이 시작될때 초기식이 한 번 실행된다. 그 다음 조건식을 수행해 해당 조건식이 참이라면 블록안에 있는 doSomething() 을 수행한다. 블록 안에 있는 코드를 전부 수행하면 증감식을 수행하고 다시 조건식을 수행한다. 이를 조건식의 결과가 거짓이 될때까지 반복한다.
while문
while 문은 조건이 만족한다면 계속해서 반복시키는 명령문이다. 특정 조건이 될때까지 반복시키는 용도로 많이 쓰이며 반복 횟수보다는 조건에 좀더 초점을 두었다는 점이 for 문과의 차이라고 할 수 있다.
사용법은 다음과 같다.
while(condition)
{
    doSomething();
}
해당 코드를 말로 풀어보면,
"condition 이 참이라면 계속하여 doSomething()을 수행해라" 이다.
중요한 것은 doSomething() 을 포함한 블록 내에서 condition 의 참/거짓 여부를 조절하는 부분이 없다면 이 반복문은 무한루프가 되어서 끊나지 않게된다.
혹은, 다음과 같이 condition 에 일부로 true를 집어넣어 무한루프 상태를 만든 다음 블록 내에서 원하는 조건까지 반복시키고 break 를 통해 반복문을 빠져나오는 방법도 있다.
while(true)
{
    doSomething();
    if(condition)
    {
        break;
    }
}
do - while문
while 문과 기본적으로 같다. 차이점이라면 do 인데, 우선 한번 실행하고 그 다음 반복할지 말지 조건을 판별하는 방식이다. 사용법은 다음과 같다.
do
{
    doSomething();
}while(condition)
이처럼 condition 에 참/거짓 과 상관없이 우선 doSomething() 을 수행하고 그다음 condition 을 판별하여 반복할지 말지 결정한다.
과제0
JUnit이란?
JUnit 은 Java에서 단위 테스트를 위한 Unit Testing 도구이다.
물론 Java에만 있는 특별한 도구는 아니다. xUnit으로 언어별로 시리즈가 있다.
예를 들면 C언어에서는 CUnit, C++ 에서는 CppUnit 처럼 말이다.
JUnit은 현재 JUnit5 까지 나왔다.
JUnit의 사용법을 찾아보았는데 사용하기 위해서는 Maven 을 통한 pom.xml에 dependency를 추가하면 된다고 한다. 사실 지금까지 IntelliJ에서 command + shift + T 단축키를 사용하면 알아서 라이브러리가 추가되고 처리 해줬기 때문에 이 부분은 좀 더 찾아봐야겠다. Spring 도 xml 파일을 직접 설정해본 적은 없고, Spring Boot 를 통해서만 접해봤는데 JUnit에 대한 의존성을 알아서 챙겨줬다.
사실 예전부터 Spring Boot 강의를 들으며 TDD 때문에 따라쳐보면서 깊이는 아니지만 어떤 느낌으로 테스트가 진행되는지 맛은 보았다. JUnit
에서 쓰이는 몇가지 Assertions 를 알아보자. (JUnit5 기준)
우선 JUnit5 에서 기본적으로 제공하는 Assertions 메소드는 junit.jupiter.api.Assertions.* 에 있다.
assertEquals(expected, actual)
assertNotEquals(Object unexpected, Object actual)
assertTrue(boolean condition)
assertFalse(boolean condition)
assertNull(Object actual)
assertNotNull(Object actual)
fail()
...
이밖에도 공식문서를 살펴보면 상당히 많은 메소드가 있다.
Assertions 는 단언문이다. 예를 들어 assertEquals(expected, actual) 라면 다음과 같이 코드를 작성 할 수 있다. (예전에 작성했던 코드에서 가져왔다.)
@Test
public void 회원가입() throws Exception
{
    //given
    Member member = new Member();
    member.setName("kim");

    //when
    Long saveId = memberService.join(member);

    //then
    assertEquals(member, memberRepository.findOne(saveId));
}
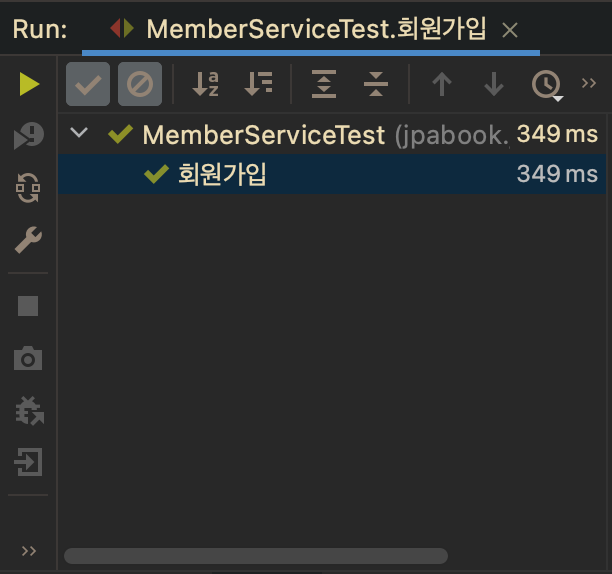
이 상황을 말로 풀어보면 어떤 회원을 생성하고 저장했는데, 이때 memberRepository 에서 그 회원의 id로 조회했을 때 그 둘은 같다고 단정하는 것이다. 이것이 성공하면 다음과 같이 초록불이 뜬다.

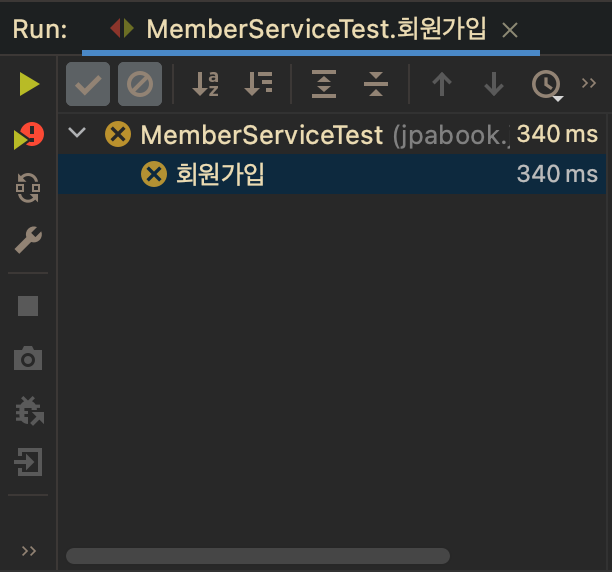
만약 테스트가 실패했다면 다음과 같이 뜨고 반드시 해당 테스트를 통과시키고 다음 단계로 개발을 이어나가야 한다. 
다른 Assertions 메소드도 같은 방식으로 사용되며 필요에 맞게 메소드를 찾아서 사용하면 된다. Assertions
참고로 기본으로 제공되는 Assertions 보다 더 직관적으로 사용할 수 있는 Hamcrest 라이브러리도 있다. Hamcrest 라이브러리를 사용하면 다음과 같이 작성할 수 있다.
assertEquals("SangJin", customer.getName());

assertThat(customer.getName(), is("SangJin"));
사실 라이브러리 별로 호환성이 어떻게 되는지까지는 아직 잘 모른다..
써보고 더 편하고 맞는 라이브러리를 쓰는게 맞지않나 싶다.
과제1 :: live-study 대시 보드를 만드는 코드를 작성하세요. (미완)
git Personal access tokens 연결 부분에서 자꾸 에러가 발생한다.
검색을 해보고 적용해보아도 자꾸 문제가 발생한다. 우선 스킵 ..
과제2 :: LinkedList를 구현하세요.
현재 객체지향을 공부하면서 인터페이스와 구현체를 나누어 개발하는 것을 연습할 겸 분리하여 구현해보았다.
ListNode인터페이스
package LinkedList;

public interface ListNode
{
    ListNodeImpl add(ListNodeImpl head, ListNodeImpl nodeToAdd, int position);

    ListNodeImpl remove(ListNodeImpl head, int positionToRemove);

    boolean contains(ListNodeImpl head, ListNodeImpl nodeTocheck);
}ListNodeImpl구현체
package LinkedList;

public class ListNodeImpl implements ListNode
{
    private Integer data;
    public ListNodeImpl next;

    public ListNodeImpl()
    {
        this.data = null;
        this.next = null;
    }

    public ListNodeImpl(Integer data)
    {
        this.data = data;
        this.next = null;
    }

    public ListNodeImpl(Integer data, ListNodeImpl next)
    {
        this.data = data;
        this.next = next;
    }


    @Override
    public ListNodeImpl add(ListNodeImpl head, ListNodeImpl nodeToAdd, int position)
    {
        ListNodeImpl node = head;
        ListNodeImpl preNode = head;

        for (int i = 0; i < position - 1; i++)
        {
            preNode = node;
            node = node.next; // head를 마지막 노드까지 이동
        }

        nodeToAdd.next = node;
        preNode.next = nodeToAdd;

        return nodeToAdd;
    }

    @Override
    public ListNodeImpl remove(ListNodeImpl head, int positionToRemove)
    {
        ListNodeImpl node = head;
        ListNodeImpl preNode = head;

        for (int i = 0; i < positionToRemove - 1; i++)
        {
            preNode = node;
            node = node.next; // head를 삭제할 위치의 노드까지 이동
        }

        preNode.next = node.next;
        node.next = null;

        return head;
    }

    @Override
    public boolean contains(ListNodeImpl head, ListNodeImpl nodeTocheck)
    {
        ListNodeImpl node = head;

        while (node.next != null) // 끝까지 조회
        {
            if (node.next == nodeTocheck) // nodeTocheck 가 있다면 return true
            {
                return true;
            }
            node = node.next;
        }

        return false;
    }

    public ListNodeImpl getNode(ListNodeImpl head, int index)
    {
        ListNodeImpl node = head;

        while (node.next != null) // 끝까지 조회
        {
            node = node.next;
        }

        return node;
    }

    public Integer getData()
    {
        return data;
    }

    public ListNodeImpl getNext()
    {
        return next;
    }
}ListNodeImplTest테스트 코드.
사실 테스트 코드를 혼자 생각해서 작성해본 것은 처음이라 맞게 테스트 했는지는 모르겠다. 우선 초록불이 뜨도록은 해보았다. 확실히 테스트 쪽은 공부를 해야겠다.
package LinkedList;

import org.junit.jupiter.api.Test;

import static org.junit.jupiter.api.Assertions.*;

class ListNodeImplTest
{
    @Test
    public void add() throws Exception
    {
        //given
        ListNodeImpl linkedList = new ListNodeImpl();
        ListNodeImpl firstNode = new ListNodeImpl(1);
        ListNodeImpl secondNode = new ListNodeImpl(2);
        ListNodeImpl thirdNode = new ListNodeImpl(3);

        //when
        linkedList.add(firstNode, secondNode, 2);
        linkedList.add(firstNode, thirdNode, 3); // 1 -> 2 -> 3

        //then
        assertEquals(3, linkedList.getNode(firstNode, 3).getData());
    }

    @Test
    public void remove() throws Exception
    {
        //given
        ListNodeImpl linkedList = new ListNodeImpl();
        ListNodeImpl firstNode = new ListNodeImpl(1);
        ListNodeImpl secondNode = new ListNodeImpl(2);
        ListNodeImpl thirdNode = new ListNodeImpl(3);

        linkedList.add(firstNode, secondNode, 2);
        linkedList.add(firstNode, thirdNode, 3); // 1 -> 2 -> 3

        //when
        linkedList.remove(firstNode, 2); // 1 -> remove(2) -> 3

        //then
        assertEquals(3, linkedList.getNode(firstNode, 2).getData());

    }

    @Test
    public void contains() throws Exception
    {
        //given
        ListNodeImpl linkedList = new ListNodeImpl();
        ListNodeImpl firstNode = new ListNodeImpl(1);
        ListNodeImpl secondNode = new ListNodeImpl(2);
        ListNodeImpl thirdNode = new ListNodeImpl(3);

        linkedList.add(firstNode, secondNode, 2);
        linkedList.add(firstNode, thirdNode, 3); // 1 -> 2 -> 3

        //when
        boolean flag = linkedList.contains(firstNode, thirdNode);

        //then
        assertTrue(flag);
    }
}
과제3 :: Stack을 구현하세요.
Stack 도 마찬가지로 인터페이스와 구현체를 분리해보았다.
Stack인터페이스
package Stack;

public interface Stack
{
    void push(int data);
    int pop();
}
StackImpl구현체
package Stack;

public class StackImpl implements Stack
{
    public int[] arr = new int[5]; // 예시로 길이가 5인 배열 생성
    public int pos = 0;

    @Override
    public void push(int data)
    {
        arr[pos++] = data;
    }

    @Override
    public int pop()
    {
        if (pos == -1)
        {
            return -1;
        }
        return arr[--pos];
    }
}
StackImplTest테스트 코드
package Stack;

import org.junit.jupiter.api.Test;

import static org.junit.jupiter.api.Assertions.*;

class StackImplTest
{
    @Test
    public void push() throws Exception
    {
        //given
        StackImpl stack = new StackImpl();

        //when
        stack.push(1);
        stack.push(2);
        stack.push(3);
        stack.push(4);
        stack.push(5);

        //then
        for(int i = 0; i < 5; i++)
        {
            assertEquals(i+1, stack.arr[i]);
        }
    }

    @Test
    public void pop() throws Exception
    {
        //given
        StackImpl stack = new StackImpl();
        stack.push(1);
        stack.push(2);
        stack.push(3);
        stack.push(4);
        stack.push(5);

        //when
        int pop = stack.pop();
        int pop2 = stack.pop();
        int pop3 = stack.pop();
        int pop4 = stack.pop();
        int pop5 = stack.pop();

        //then
        assertEquals(5, pop);
        assertEquals(4, pop2);
        assertEquals(3, pop3);
        assertEquals(2, pop4);
        assertEquals(1, pop5);
    }

}
과제4 :: 앞서 만든 ListNode를 사용해서 Stack을 구현하세요.
ListNode 에 있는 add 와 remove 메소드를 활용하고 싶었는데 이 부분이 잘 안되어 그냥 노드를 일일이 생성하고 이어주는 식으로 했다.
인터페이스는 Stack 인터페이스를 바로 구현하였다.
ListNodeStackImpl구현체
package ListNodeStack;

import LinkedList.ListNodeImpl;
import Stack.Stack;

public class ListNodeStackImpl implements Stack
{
    ListNodeImpl posNode;
    ListNodeImpl pushedNode;
    ListNodeImpl poppedNode;

    @Override
    public void push(int data)
    {
        if(posNode == null)
        {
            posNode = new ListNodeImpl(data);
        }else
        {
            ListNodeImpl tmpNode = posNode;
            pushedNode = new ListNodeImpl(data);
            posNode = pushedNode;
            pushedNode.next = tmpNode;
        }
    }

    @Override
    public int pop()
    {
        poppedNode = pushedNode;
        pushedNode = pushedNode.next;

        return poppedNode.getData();
    }
}
ListNodeStackImplTest테스트 코드
package ListNodeStack;

import org.junit.jupiter.api.Test;

import static org.junit.jupiter.api.Assertions.*;

class ListNodeStackImplTest
{
    @Test
    public void push() throws Exception
    {
        //given
        ListNodeStackImpl linkedNodeStack = new ListNodeStackImpl();

        //when
        linkedNodeStack.push(1);
        linkedNodeStack.push(2);
        linkedNodeStack.push(3);

        //then
        assertEquals(3, linkedNodeStack.pushedNode.getData());
        assertEquals(2, linkedNodeStack.pushedNode.getNext().getData());
    }

    @Test
    public void pop() throws Exception
    {
        //given
        ListNodeStackImpl linkedNodeStack = new ListNodeStackImpl();

        linkedNodeStack.push(1);
        linkedNodeStack.push(2);
        linkedNodeStack.push(3);

        //when
        int pop = linkedNodeStack.pop();
        int pop2 = linkedNodeStack.pop();
        int pop3 = linkedNodeStack.pop();
        //then
        assertEquals(3, pop);
        assertEquals(2, pop2);
        assertEquals(1, pop3);


    }

}
과제5 :: Queue를 구현하세요.
배열 활용
배열을 활용하는 구현에는 Stack 과 유사하게 구현하였다.
Queue인터페이스
package Queue;

public interface Queue
{
    void push(int data);
    int pop();
}
QueueImpl구현체
package Queue;

public class QueueImpl implements Queue
{
    public int[] arr = new int[5]; // 예시로 길이가 5인 배열 생성
    public int head, tail = 0;

    @Override
    public void push(int data)
    {
        arr[tail++] = data;
    }

    @Override
    public int pop()
    {
        return arr[head++];
    }
}
QueueImplTest테스트 코드
package Queue;

import org.junit.jupiter.api.Test;

import static org.junit.jupiter.api.Assertions.assertEquals;

class QueueImplTest
{
    @Test
    public void push() throws Exception
    {
        //given
        QueueImpl queue = new QueueImpl();

        //when
        queue.push(1);
        queue.push(2);
        queue.push(3);
        queue.push(4);
        queue.push(5);

        //then
        for(int i = 0; i < 5; i++)
        {
            assertEquals(i+1, queue.arr[i]);
        }
    }

    @Test
    public void pop() throws Exception
    {
        //given
        QueueImpl queue = new QueueImpl();
        queue.push(1);
        queue.push(2);
        queue.push(3);
        queue.push(4);
        queue.push(5);

        //when
        int pop = queue.pop();
        int pop2 = queue.pop();
        int pop3 = queue.pop();
        int pop4 = queue.pop();
        int pop5 = queue.pop();

        //then
        assertEquals(1, pop);
        assertEquals(2, pop2);
        assertEquals(3, pop3);
        assertEquals(4, pop4);
        assertEquals(5, pop5);
    }

}
ListNode 활용 (미완)
이 부분에서 상당히 막혔다. ListNodeStack 과 유사하게 하려했지만 Queue는 FIFO의 데이터 입출 구조를 이루고 있어서 같은 유형을 적용하기 힘들었다. 내 생각에 ListNode 에서 구현한 add와 remove 메소드를 활용해서 구현해야하는 것 같은데 이건 다시 시도 해봐야겠다.
마치며
상당히 많은 것을 배운 시간이었다. 우선 강의를 들을때 따라만 쳐봤던 @Test 를 직접 쳐보고 어떻게 하면 테스트가 잘 진행되는지 미숙하지만 고민을 해보았다는 것이 큰 수확이다. 왜 좋은 테스트 코드를 위해 고심하는지 조금은 알 것 같다.
요즘 원론적인 공부에 비해 실제로 코딩하는 시간이 적었는데 이를 실감하는 시간이기도 했다. 역시 코딩공부는 코딩하면서 해야함을 느끼며 못다한 과제는 반드시 시간을 내어서 마무리 짓겠다.
%20%E1%84%87%E1%85%A9%E1%86%A8%E1%84%89%E1%85%A1%E1%84%87%E1%85%A9%E1%86%AB%205.PNG)