Firestore database 사용하기
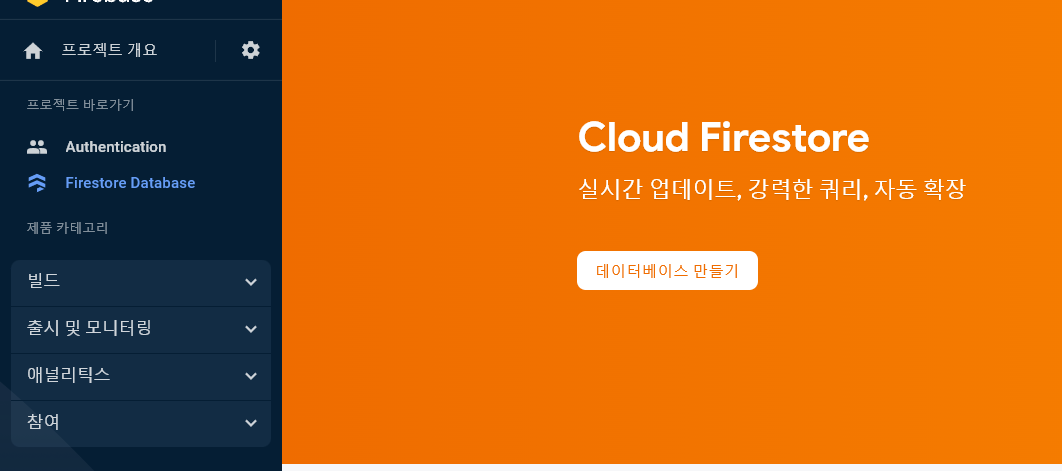
1. Firebase에 본인 Project에 들어가 데이터베이스 만들기를 누른다.
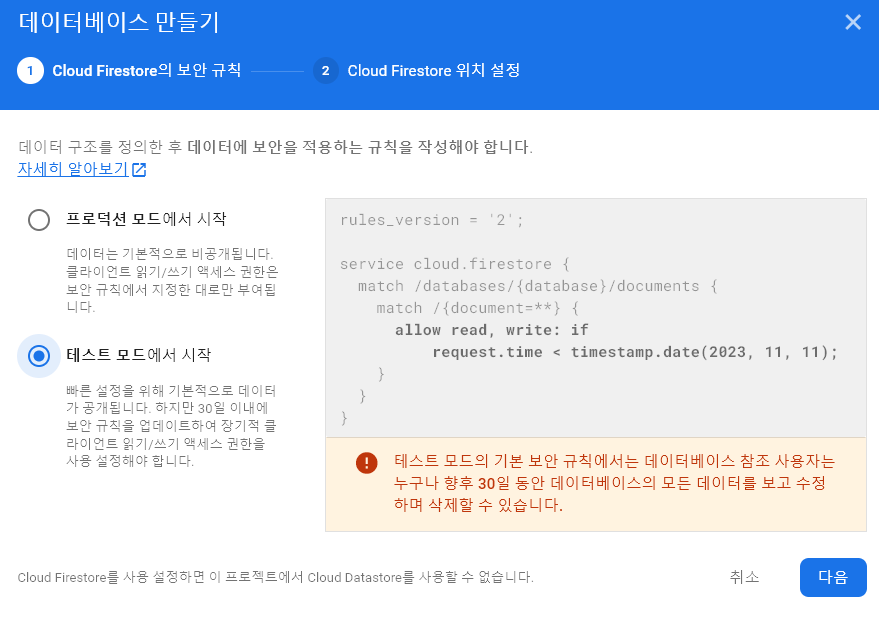
2. 각자 맞는 형식의 데이터베이스를 선택 후 다음을 누른다.
3. 국가 지정을 해준다.
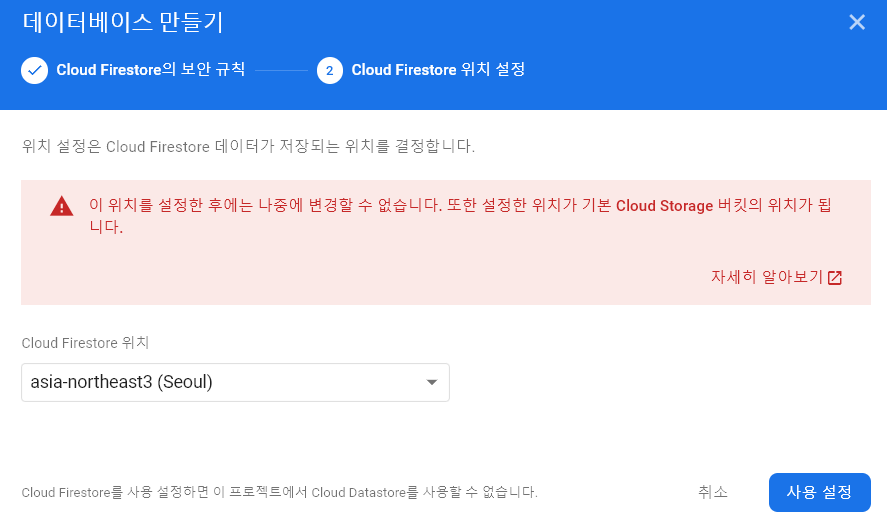
북한은 없다
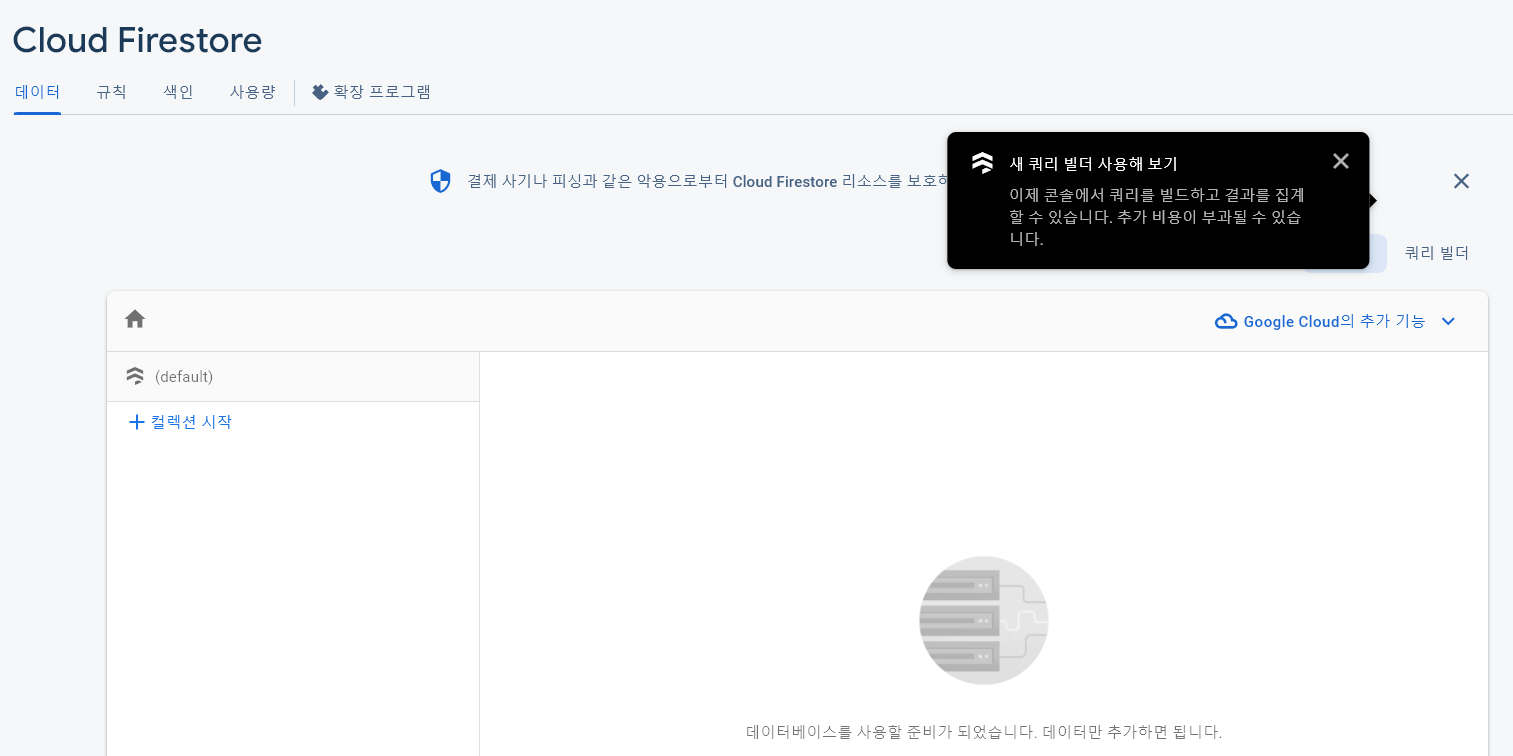
4. 내 데이터베이스가 생겼다!😁
5. 컬렉션을 넣어준다.
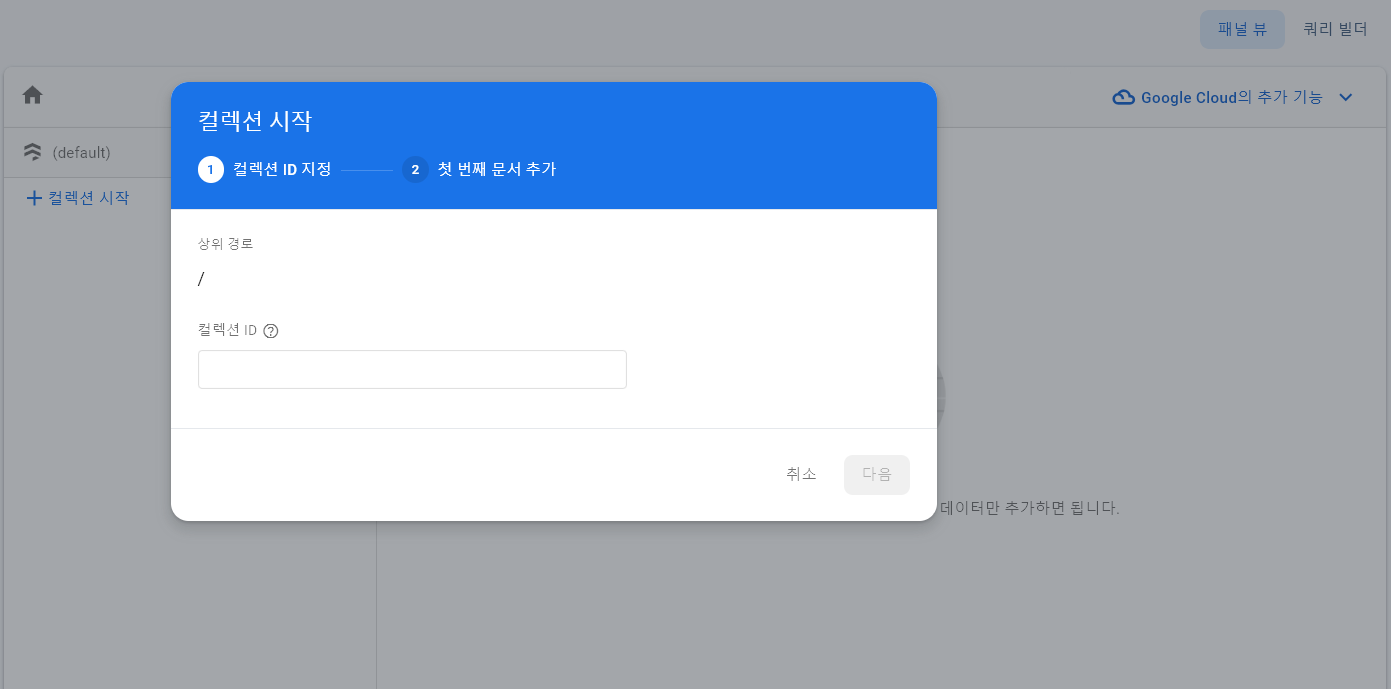
6. 문서 ID를 넣어주고 저장한다.
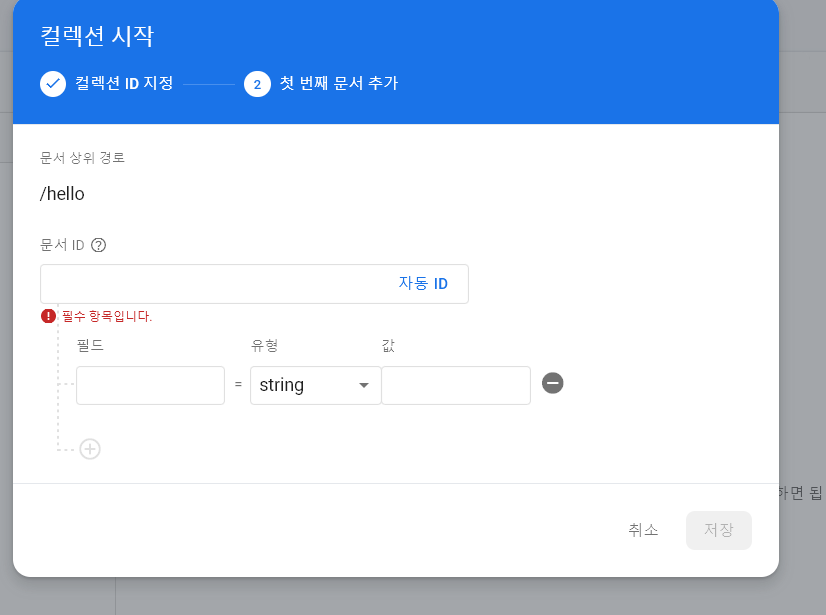
7. 컬렉션에 값을 넣어준다.
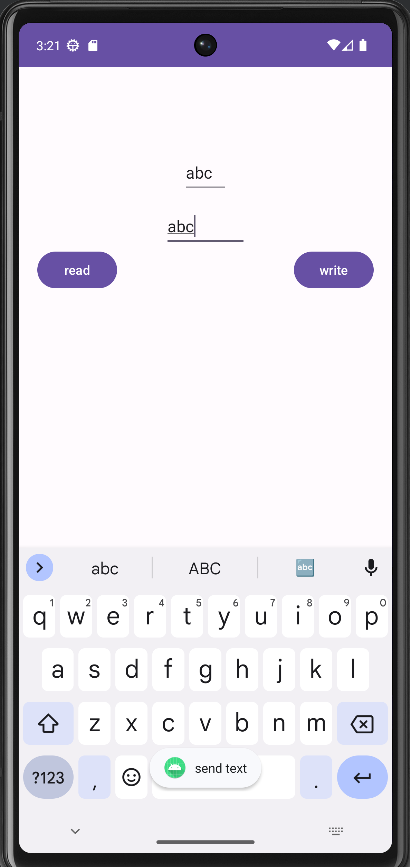
8. 안드로이드스튜디오로 돌아와서 mainActivity xml파일을 먼저 꾸민다.

<?xml version="1.0" encoding="utf-8"?>
<androidx.constraintlayout.widget.ConstraintLayout xmlns:android="http://schemas.android.com/apk/res/android"
    xmlns:app="http://schemas.android.com/apk/res-auto"
    xmlns:tools="http://schemas.android.com/tools"
    android:layout_width="match_parent"
    android:layout_height="match_parent"
    tools:context=".MainActivity">

    <EditText
        android:id="@+id/email"
        android:layout_width="wrap_content"
        android:layout_height="wrap_content"
        android:layout_marginTop="92dp"
        android:hint="email"
        android:minHeight="48dp"
        android:onClick="saveQuote"
        app:layout_constraintEnd_toEndOf="parent"
        app:layout_constraintStart_toStartOf="parent"
        app:layout_constraintTop_toTopOf="parent" />

    <EditText
        android:id="@+id/nickName"
        android:layout_width="wrap_content"
        android:layout_height="wrap_content"
        android:layout_marginTop="11dp"
        android:hint="NickName"
        android:minHeight="48dp"
        app:layout_constraintEnd_toEndOf="parent"
        app:layout_constraintStart_toStartOf="parent"
        app:layout_constraintTop_toBottomOf="@+id/email" />

    <Button
        android:id="@+id/button"
        android:layout_width="wrap_content"
        android:layout_height="wrap_content"
        android:layout_marginLeft="20dp"
        android:text="read"
        app:layout_constraintStart_toStartOf="parent"
        app:layout_constraintTop_toBottomOf="@+id/nickName" />

    <Button
        android:id="@+id/button2"
        android:layout_width="wrap_content"
        android:layout_height="wrap_content"
        android:layout_marginEnd="20dp"
        android:text="write"
        app:layout_constraintEnd_toEndOf="parent"
        app:layout_constraintTop_toBottomOf="@+id/nickName" />


</androidx.constraintlayout.widget.ConstraintLayout>
9.kt파일도 작성해준다. firestore공식문서를 보면 자세히 나와있다.
import android.content.ContentValues.TAG
import androidx.appcompat.app.AppCompatActivity
import android.os.Bundle
import android.util.Log
import android.widget.Toast
import com.dreamteam.firestoreprac.databinding.ActivityMainBinding
import com.google.firebase.FirebaseApp
import com.google.firebase.firestore.ktx.firestore
import com.google.firebase.ktx.Firebase

class MainActivity : AppCompatActivity() {
    override fun onCreate(savedInstanceState: Bundle?) {
        super.onCreate(savedInstanceState)
        val binding = ActivityMainBinding.inflate(layoutInflater)
        setContentView(binding.root)
        FirebaseApp.initializeApp(this)

        val db = Firebase.firestore

        binding.button2.setOnClickListener {

            val eamil = binding.email.text.toString()
            val nickName = binding.nickName.text.toString()
            val user = hashMapOf(
                "email" to eamil,
                "nickName" to nickName
            )
            Toast.makeText(this, "send text", Toast.LENGTH_SHORT).show()

            db.collection("hello")
                .add(user)
                .addOnSuccessListener { documentReference ->
                    Log.d(TAG, "DocumentSnapshot added with ID: ${documentReference.id}")
                }
                .addOnFailureListener { e ->
                    Log.w(TAG, "Error adding document", e)
                }
        }

    }
}
이렇게 데이터를 보내면
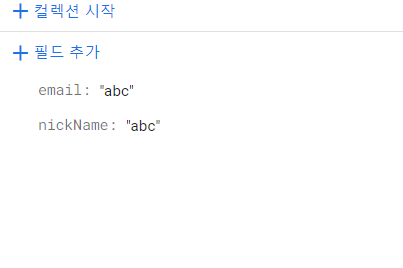
추가되는 모습을 볼 수 있다.
문서를 생성하려면 set()을 사용하고,
val city = hashMapOf(
    "name" to "Los Angeles",
    "state" to "CA",
    "country" to "USA",
)

db.collection("cities").document("LA")
    .set(city)
    .addOnSuccessListener { Log.d(TAG, "DocumentSnapshot successfully written!") }
    .addOnFailureListener { e -> Log.w(TAG, "Error writing document", e) }
문서가 있으면 새로 제공한 데이터로 내용을 덮어쓰지만, 다음과 같이 데이터를 기존 문서와 병합하도록 지정한 경우는 예외.
val data = hashMapOf("capital" to true)

db.collection("cities").document("BJ")
    .set(data, SetOptions.merge())
firestore 데이터 유형
val docData = hashMapOf(
    "stringExample" to "Hello world!",
    "booleanExample" to true,
    "numberExample" to 3.14159265,
    "dateExample" to Timestamp(Date()),
    "listExample" to arrayListOf(1, 2, 3),
    "nullExample" to null,
)

val nestedData = hashMapOf(
    "a" to 5,
    "b" to true,
)

docData["objectExample"] = nestedData

db.collection("data").document("one")
    .set(docData)
    .addOnSuccessListener { Log.d(TAG, "DocumentSnapshot successfully written!") }
    .addOnFailureListener { e -> Log.w(TAG, "Error writing document", e) }
firestore Custom객체
data class City(
    val name: String? = null,
    val state: String? = null,
    val country: String? = null,
    @field:JvmField // use this annotation if your Boolean field is prefixed with 'is'
    val isCapital: Boolean? = null,
    val population: Long? = null,
    val regions: List<String>? = null,
)
val city = City(
    "Los Angeles",
    "CA",
    "USA",
    false,
    5000000L,
    listOf("west_coast", "socal"),
)
db.collection("cities").document("LA").set(city)
set()을 사용하여 문서를 추가할 땐 만들 문서의 ID를 지정해야 함.
db.collection("cities").document("new-city-id").set(data)문서에 유의미한 ID를 두지 않고 Cloud Firestore에서 자동으로 ID를 생성하도록 하려면 언어별 add() 메서드를 호출하면 된다.
// Add a new document with a generated id.
val data = hashMapOf(
    "name" to "Tokyo",
    "country" to "Japan",
)

db.collection("cities")
    .add(data)
    .addOnSuccessListener { documentReference ->
        Log.d(TAG, "DocumentSnapshot written with ID: ${documentReference.id}")
    }
    .addOnFailureListener { e ->
        Log.w(TAG, "Error adding document", e)
    }
실제로 .add(...)와 .doc().set(...)은 완전히 동일하다.
전체 문서를 덮어쓰지 않고 문서의 일부 필드를 업데이트하려면 다음과 같은 언어별 update() 메서드를 사용한다.
val washingtonRef = db.collection("cities").document("DC")

// Set the "isCapital" field of the city 'DC'
washingtonRef
    .update("capital", true)
    .addOnSuccessListener { Log.d(TAG, "DocumentSnapshot successfully updated!") }
    .addOnFailureListener { e -> Log.w(TAG, "Error updating document", e) }
Firebase 실시간 데이터베이스의 '푸시 ID'와 달리, Cloud Firestore에서 자동으로 생성한 ID에서는 자동 정렬을 지원하지 않아, 생성일에 따라 문서를 정렬하려면 타임스탬프를 문서의 필드로 저장해야 한다.
val docRef = db.collection("objects").document("some-id")

val updates = hashMapOf<String, Any>(
    "timestamp" to FieldValue.serverTimestamp(),
)

docRef.update(updates).addOnCompleteListener { }
문서에 중첩된 객체가 있으면 update()를 호출할 때 '점 표기법'을 사용하여 문서 내 중첩 필드를 참조할 수 있다.
// Assume the document contains:
// {
//   name: "Frank",
//   favorites: { food: "Pizza", color: "Blue", subject: "recess" }
//   age: 12
// }
//
// To update age and favorite color:
db.collection("users").document("frank")
    .update(
        mapOf(
            "age" to 13,
            "favorites.color" to "Red",
        ),
    )
점 표기법을 사용하면 다른 중첩 필드를 덮어쓰지 않고 단일 중첩 필드를 업데이트할 수 있다. 점 표기법을 사용하지 않고 중첩 필드를 업데이트하면 전체 맵 필드를 덮어쓴다.
// Create our initial doc
db.collection("users").doc("frank").set({
  name: "Frank",
  favorites: {
    food: "Pizza",
    color: "Blue",
    subject: "Recess"
  },
  age: 12
}).then(function() {
  console.log("Frank created");
});

// Update the doc without using dot notation.
// Notice the map value for favorites.
db.collection("users").doc("frank").update({
  favorites: {
    food: "Ice Cream"
  }
}).then(function() {
  console.log("Frank food updated");
});

/*
Ending State, favorite.color and favorite.subject are no longer present:
/users
    /frank
        {
            name: "Frank",
            favorites: {
                food: "Ice Cream",
            },
            age: 12
        }
 */
문서에 배열 필드가 포함되어 있으면 arrayUnion() 및 arrayRemove()를 사용해 요소를 추가하거나 삭제할 수 있다. arrayUnion()은 배열에 없는 요소만 추가하고, arrayRemove()는 제공된 각 요소의 모든 인스턴스를 삭제한다.
val washingtonRef = db.collection("cities").document("DC")

// Atomically add a new region to the "regions" array field.
washingtonRef.update("regions", FieldValue.arrayUnion("greater_virginia"))

// Atomically remove a region from the "regions" array field.
washingtonRef.update("regions", FieldValue.arrayRemove("east_coast"))
숫자 값 늘리기는 숫자 필드 값을 늘리거나 줄일 수 있다. 증분 작업은 필드의 현재 값을 지정된 값만큼 늘리거나 줄인다.
val washingtonRef = db.collection("cities").document("DC")

// Atomically increment the population of the city by 50.
washingtonRef.update("population", FieldValue.increment(50))
안드로이드 주니어 개발자