data-component
data-component
페이지를 로드 하자마자 데이터를 보여줘야하는 상황이라면
useEffect()에서 호출하고 두 번째 인자로는 빈 배열을 전달한다.
그러면 최초 랜더링 시 데이터를 로드할 수 있다.
어떠한 동작에 의해서 데이터를 보여주고 싶다면 이벤트 핸들러에서 요청한다.
state를 어디에서 관리해야 하는지에 대해서 고려해서 선언한다.
App에서 관리하면 props로 전달할 수 있기는하지만 수정할 경우
App단위 전체로 리랜더링 되므로 비효율적이다.
function ItemList() {

            const [users, setUsers] = useState();

            useEffect(
                () => {
                    fetch('https://jsonplaceholder.typicode.com/users')
                    .then(response => response.json())
                    .then(responseUser => setUsers(responseUser)) // 반환된 객체를 state쪽에 설정해준다.
                    //.then(response => console.log(response));
                    // response.json()에서 반환되는 값이 매개변수(responseUser)가 되는 것
                }
            );

            return (
                <div>
                    { users && users.map(user => <Item user={ user } key={ user.id }/>) }
                    {/* 최초에 로드될 때 useEffect가 마운트 제일 마지막 시점에 user객체를 불러들인다.
                    그보다 먼저 마운트되는 return 구문은 usermap이 없는 상태이기 때문에 오류가 발생한다.
                    그래서 user&& users.map구문이 필요하다. */}
                </div>
            );


        }
weather-promise
날씨 API 사용해서 오늘의 날씨 페이지 만들기 예제
const { useState, useEffect } = React;

        const API_KEY = '94491d2466105d8873d696dd9429a1c1';

        function Weather() {

            const [position, setPosition] = useState({});
            const [cityname, setCityname] = useState('');
            const [weather, setWeather] = useState({});
            const [wind, setWind] = useState({});

            useEffect (
                () => {
                    /* 위치 정보에 대한 조회가 완료된 이후 날씨 정보 api로 요청이 되어야하므로
                    두 가지 비동기 요청에 대한 순서를 반드시 정해서 수행해야만 한다. */

                    new Promise((resolve, reject) => {

                    /* 위도 경도 알아오기 */
                    /* 첫번째 인자: 성공 시 함수 (전달 받는 매개변수는 CurrentPosition이라는 현재 위치 값)
                       두번째 인자: 실패 시 함수 (지금은 사용하지 않음) */
                    navigator.geolocation.getCurrentPosition(currentPosition => {
                        console.log(currentPosition);
                        setPosition({
                            latitude : currentPosition.coords.latitude,
                            longitude : currentPosition.coords.longitude

                        })
                        resolve(currentPosition.coords);
                });

            })
            .then(coords => {

                /* 날씨 API 요청하기 */
                fetch(`https://api.openweathermap.org/data/2.5/weather?lat=${coords.latitude}&lon=${coords.longitude}&appid=${API_KEY}&lang=kr`)
                    .then(response => response.json())
                    .then(json => {
                        console.log(json);
                        setCityname(json.name);
                        setWeather(json.weather[0]);
                        setWind(json.wind);
                    });

            });


                },
                []
            );

            return (
                <>
                    <h1>현재 위치</h1>
                    <h4>{ `위도: ${ position.latitude } 경도: ${ position.latitude }`}</h4>
                    <h4>{ `조회도시: ${ cityname }`}</h4>
                    <h4>{ `날씨: ${ weather.main } 날씨 설명: ${ weather.description }`}</h4>
                    <h4>{ `풍향: ${ wind.deg } 풍속: ${ wind.speed }`}</h4>

                </>
            );
        }
weather-async-await
위에서 작성한 예제를 async-await로 변경해서 작성
위도, 경도 알아오기
function getPosition (){

                return  new Promise((resolve, reject) => {


                    navigator.geolocation.getCurrentPosition(currentPosition => {
                        console.log(currentPosition);
                        setPosition({
                            latitude : currentPosition.coords.latitude,
                            longitude : currentPosition.coords.longitude

                        })
                        resolve(currentPosition.coords);
                    });

                });
            }
날씨 API 요청하기
function getWeather(coords){

                return fetch(`https://api.openweathermap.org/data/2.5/weather?lat=${coords.latitude}&lon=${coords.longitude}&appid=${API_KEY}&lang=kr`)
                    .then(response => response.json())

            }
위치 정보에 대한 조회가 완료된 이후 날씨 정보 api로 요청이 되어야하므로
두 가지 비동기 요청에 대한 순서를 반드시 정해서 수행해야만 한다.
useEffect (
                () => {

                    const loadData = async () => {

                        const coords = await getPosition();
                        const result = await getWeather(coords);
                        setCityname(result.name);
                        setWeather(result.weather[0]);
                        setWind(result.wind);

                    }
                    loadData();


                },
                []
            );
04_pokemon-example
전체 포켓몬 목록에 대한 api 요청
        function PokemonList() {

            const [pokes, setPokes] = useState([]);


            useEffect(

               () => {

                fetch('https://pokeapi.co/api/v2/pokemon')
                .then(response => response.json())
                .then(pokeUser => setPokes(pokeUser.results));
                //.then(pokeUser => console.log(pokeUser));   // 로그를 찍어서 받아올 데이터를 확인한다. results안에 값이 들어 있음 하단 사진 참고


                },
                []

            );


return (
                <>
                    <div>

                        { pokes && pokes.map(poke => <Card poke={ poke } key={ poke.name }/>) }

                    </div>
                </>
); // 키 값 필요 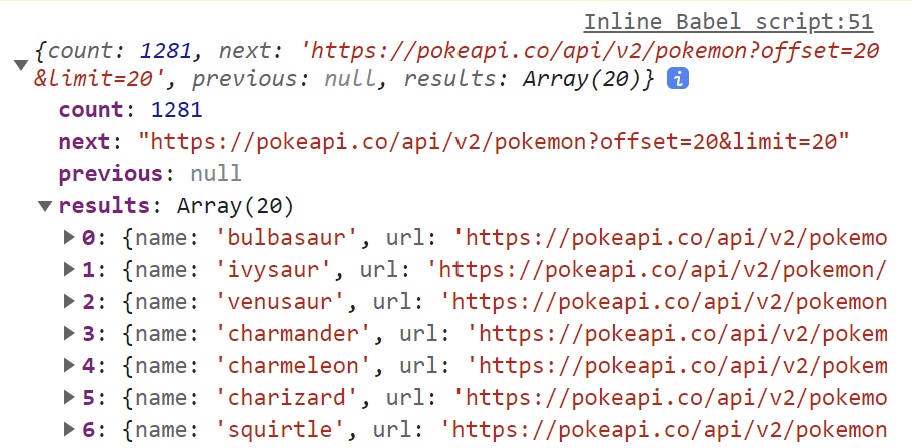
return구문의 키 값 : 반복적으로 처리되는 경우 key 값이 필요한데 results 안에 따로 설정된 고유 값이 없으므로 key 값을 이름으로 설정했다.
key={ poke.name }
- 한 포켓몬의 이미지 주소 요청 => 이전 api 요청의 결과에 url 속성으로 존재
- 요청 결과 sprites.back_default 속성을 이용해 img 설정
이름 속성: name속성으로 바로 꺼내올 수 있다.
No 속성 :
https://pokeapi.co/api/v2/pokemon/1/
정규 표현식을 사용해서 링크의 맨 뒤 숫자를 이용해서 꺼내온다.
/(슬러시) 뒤에 0~9 사이의 숫자가 1글자 이상 오는 패턴을 찾아온다.
const regExp = /\/[0-9]{1,}/;
정규 표현식을 이용해서 값을 꺼내온다.
url 안에 정규 표현식과 매치되는 숫자를
문자열로 슬래시 영역을 삭제하고 숫자를 가져온다.
{ poke.url.match(regExp).toString().replace('/', '') }
function Card( { poke }) {


            const [data, setData] = useState();

            useEffect(
            () => {

                fetch(poke.url)
                .then(response => response.json())
                .then(json => setData(json));
                //.then(json => console.log(json));

            }

            );
            const regExp = /\/[0-9]{1,}/;

            return (
                <div className="card">
                    <h4> { data && <img src={data.sprites.back_default}/> }</h4>
                    <div className="info">
                        <h2>No.{ poke.url.match(regExp).toString().replace('/', '') }</h2>
                        <h3>name : { poke.name } </h3>
                    </div>
                </div>
            );
        }
이미지의 경우 각각의 포켓몬을 다시 한 번 조회를 해야 가져올 수 있다.
useEffect(
            () => {

                fetch(poke.url)
                .then(response => response.json())
                .then(json => setData(json));
                //.then(json => console.log(json));

            }