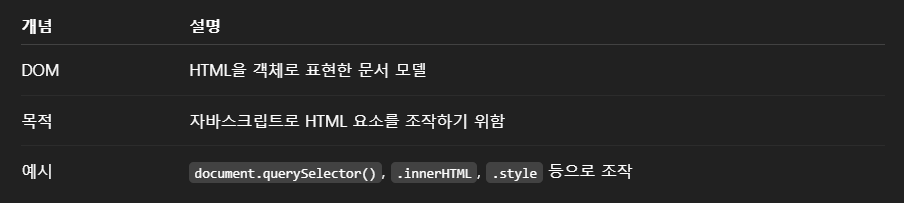
🎄 DOM [Document Object Model]
👉 HTML을 자바스크립트가 이해하고 조작할 수 있게 만든 트리 구조
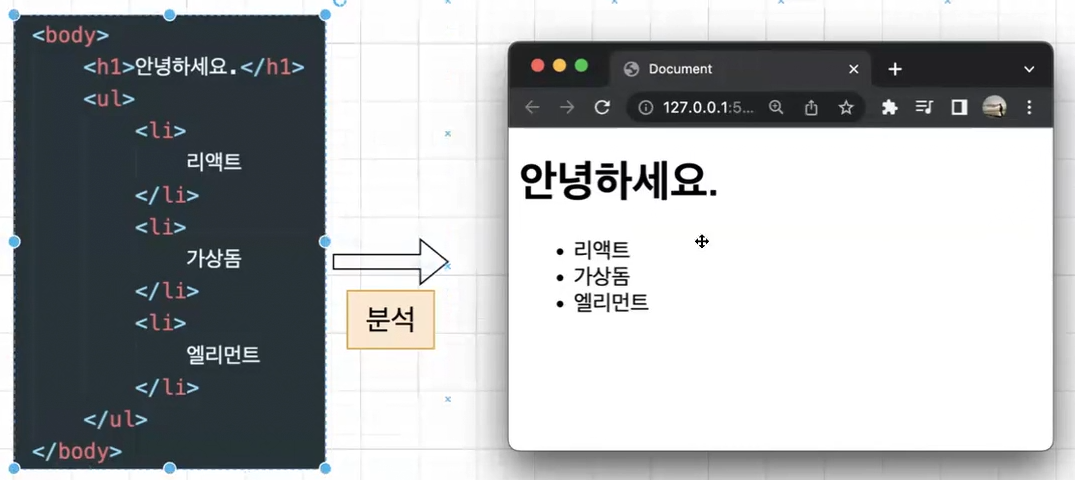
브라우저에서 UI를 볼 수 있는 것➡이 HTML을 분석해서 보여줄 수 있음👀
이 HTML은 요소(Element)들로 구성되어있음✔
<body>
  <h1>Hello</h1>
  <p>Welcome!</p>
</body>
document
└── html
└── body
├── h1
└── p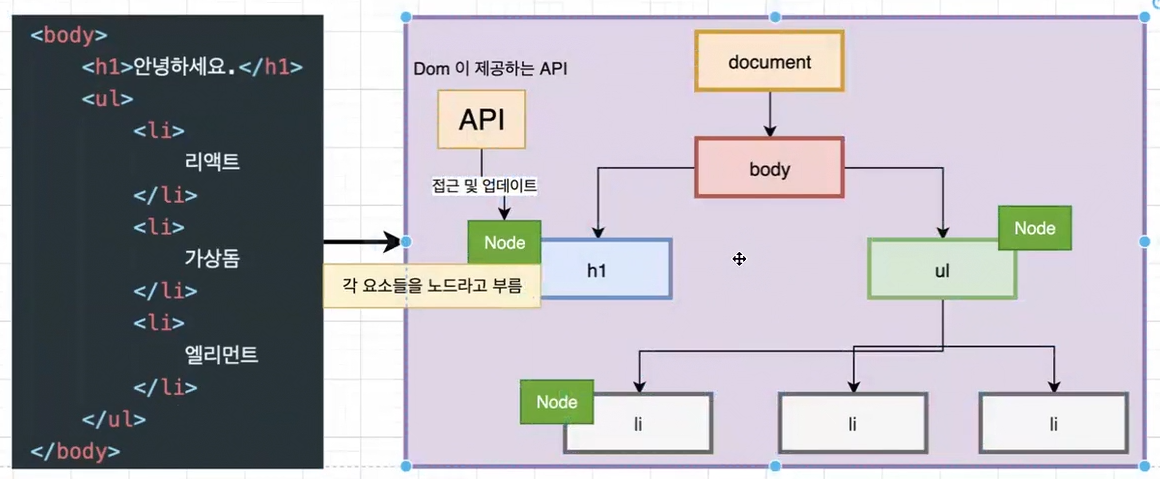
각 태그가 노드(Node)가 되고 document.body 이런 식으로 JS에서 접근 가능⭕
DOM의 각 노드는 고유한 기능을 가지고 있어서
자바스크립트를 이용해 생성·수정·삭제할 수 있음🙆♀️
이런 조작이 가능한 건 DOM이 다양한 API를 제공하기 때문🔥
🙋♀️ 자바스크립트로 DOM 다루기 예시
ex 1 )
const heading = document.querySelector("h1"); // h1 요소 선택
heading.textContent = "안녕!";               // 텍스트 바꾸기
heading.style.color = "blue";               // 스타일 바꾸기
ex 2 )
<button class="button"> Click Me </button>// DOM 안에 클래스가 button 이라는 이름을 가진 요소에 접근
var button = document.querySelector('.button');
// DOM 안에 있는 요소의 스타일을 직접 변경(DOM 조작)
button.onclick = function () {
this.style.backgroundColor = "red";
};
JS 코드 안에 있지만 실제 document.querySelector는 JS 자체 요소는 아님❌
document는 브라우저에서 제공하는 window 객체의 한 부분❗
✍ window.document인데 window는 생략 가능
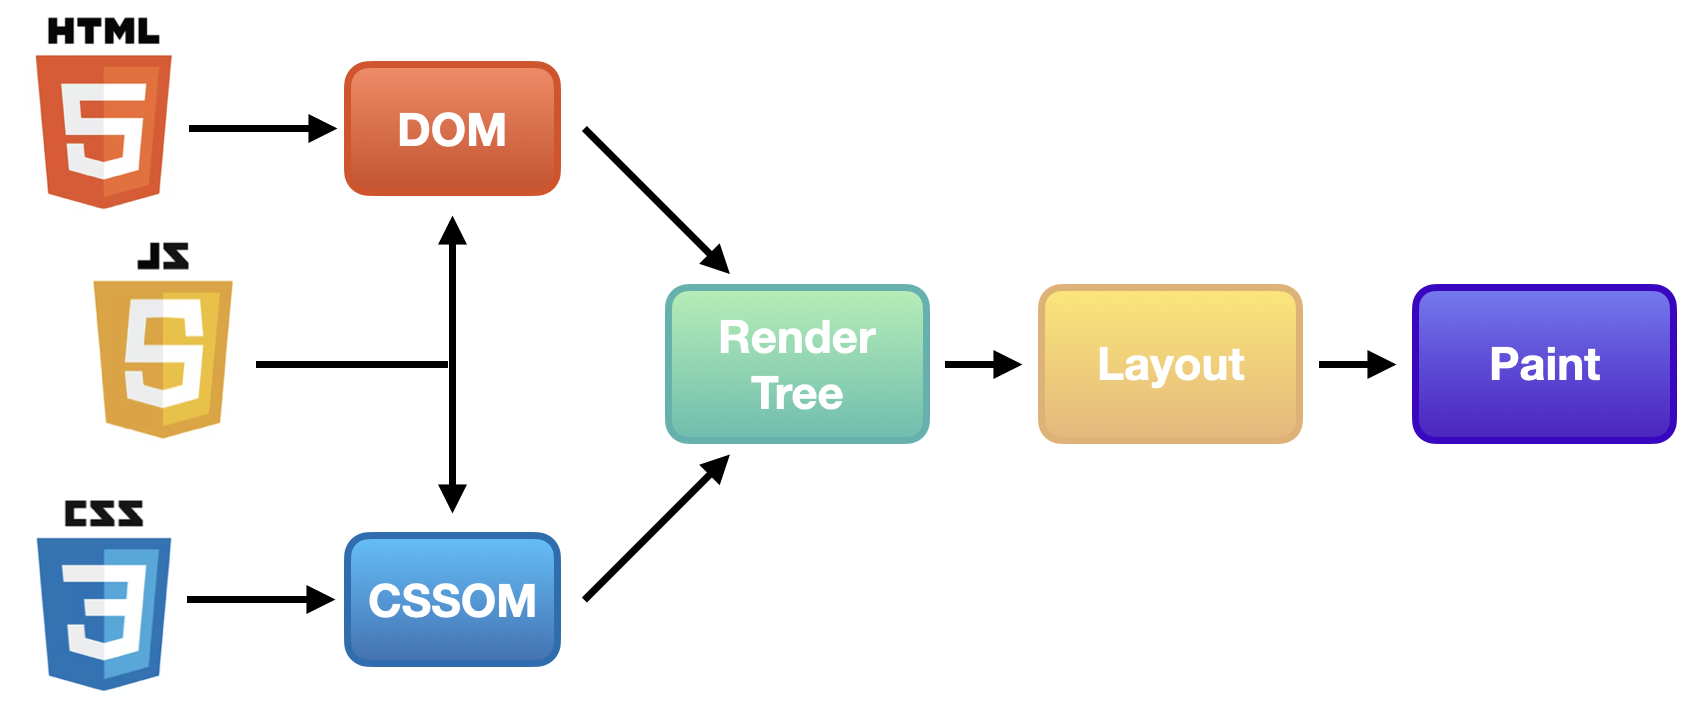
이렇게 DOM 조작해서 화면 변경시켜줄 때
브라우저 내부에선 어떠한 과정을 통해 바뀐 화면을 변경시켜주는지 알아보자🧐
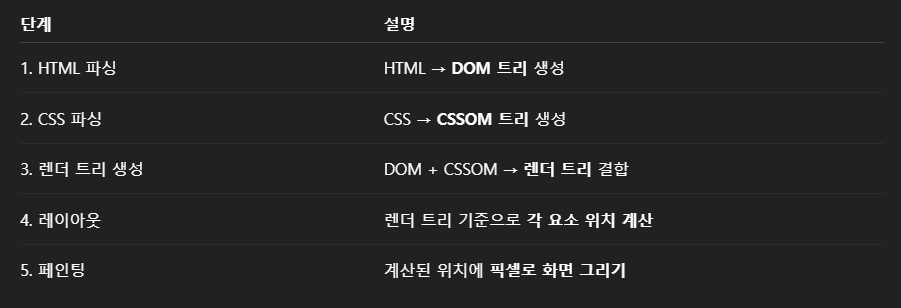
⚡ 웹 페이지 빌드 과정 [Critical Rendering Path, CRP]
브라우저가 서버에서 페이지에 대한 HTML 응답을 받고
화면에 표시하기 전에 여러 단계가 있음🙋♀️
👇 웹 브라우저가 HTML 문서를 읽고 스타일 입히고 뷰포트에 표시하는 과정
🧩 Document Object 사용해보기
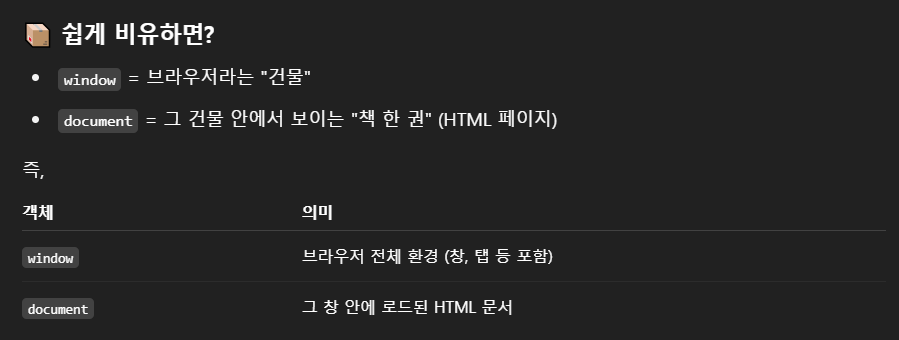
✅ document도 사실 window.document의 축약형
즉, window 안에 document가 들어 있는 구조라고 보면 됨
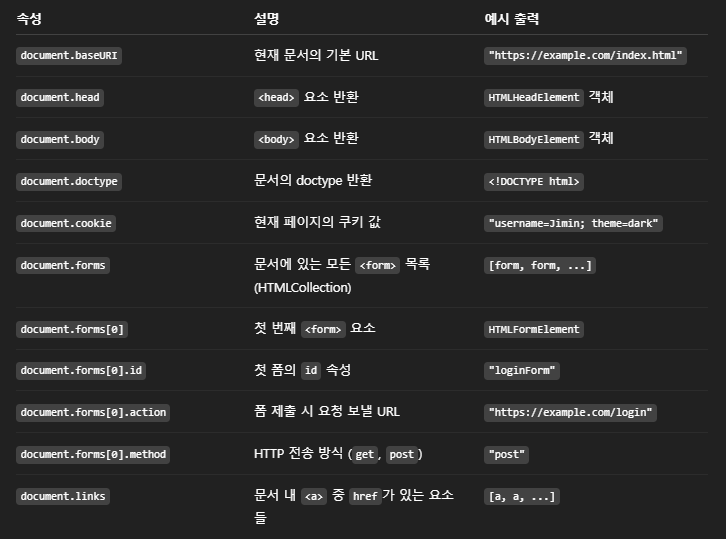
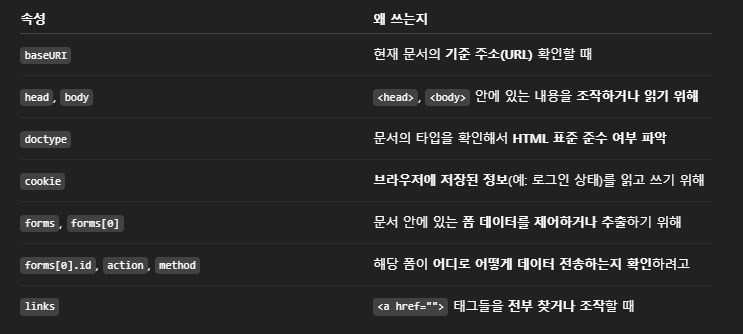
document 주요 속성 예제 + 설명
<!DOCTYPE html>
<html>
  <head><title>테스트</title></head>
  <body>
    <form id="loginForm" action="/login" method="post">
      <input type="text" name="username" />
    </form>

    <a href="https://naver.com">네이버</a>
    <a>텍스트만</a> <!-- href 없으면 links에 포함 안 됨 -->
  </body>
</html>console.log(document.baseURI); // 전체 주소(절대 경로 반환)
console.log(document.head); // <head> 요소
console.log(document.body); // <body> 요소
console.log(document.doctype.name); // "html"
console.log(document.cookie); // 쿠키 값
console.log(document.forms.length); // 1
console.log(document.forms[0].id); // "loginForm"
console.log(document.forms[0].action); // "/login"
console.log(document.forms[0].method); // "post"
console.log(document.links.length); // 1 (href 있는 <a>만 포함)브라우저에서 웹 페이지 조작 || 정보 가져올 때 쓰임
ex ) 로그인 폼이 있다고 하면 document.forms[0].submit( )으로
JS에서 바로 로그인 요청을 보낼 수도 있고
document.cookie로 로그인 상태 유지도 할 수 있음
<!DOCTYPE html>
<html>
  <head>
    <title>폼 submit + 쿠키 예제</title>
  </head>
  <body>
    <form id="loginForm" action="/login" method="POST">
      <input type="text" name="username" placeholder="아이디 입력" />
      <input type="password" name="password" placeholder="비밀번호 입력" />
      <button type="button" onclick="handleLogin()">로그인</button>
    </form>

    <script>
      function handleLogin() {
        // 예: 로그인 전에 쿠키를 하나 저장해보자 (실제로는 로그인 후 저장)
        document.cookie = "loginStatus=tryLogin; path=/";

        // 첫 번째 폼을 submit함 → <form action="/login" method="POST">로 요청 감
        document.forms[0].submit();
      }
    </script>
  </body>
</html>
🗣 fetch로 로그인 요청 보내고, 🍘쿠키 저장까지 처리하는 예제
<!DOCTYPE html>
<html>
  <head>
    <title>fetch 로그인 예시</title>
  </head>
  <body>
    <input type="text" id="username" placeholder="아이디 입력" />
    <input type="password" id="password" placeholder="비밀번호 입력" />
    <button onclick="login()">로그인</button>

    <script>
      async function login() {
        const username = document.getElementById("username").value;
        const password = document.getElementById("password").value;

        try {
          const response = await fetch("/login", {
            method: "POST",
            headers: {
              "Content-Type": "application/json"
            },
            body: JSON.stringify({ username, password })
          });

          if (response.ok) {
            // 로그인 성공 시 쿠키 저장 (예: 로그인 상태 쿠키)
            document.cookie = "loggedIn=true; path=/";

            alert("로그인 성공!");
            // 페이지 이동 등
          } else {
            alert("로그인 실패!");
          }
        } catch (error) {
          console.error("로그인 오류:", error);
        }
      }
    </script>
  </body>
</html>
document method
👉 HTML 요소를 JS에서 선택할 때 사용하는 대표적인 방법
<div id="box">ID로 선택됨</div>
<p class="text">첫 번째 텍스트</p>
<p class="text">두 번째 텍스트</p>
// ✅ getElementById
const box = document.getElementById('box');
console.log(box);
// 리턴: <div id="box">ID로 선택됨</div>
// ✅ querySelector
const firstText = document.querySelector('.text');
console.log(firstText);
// 리턴: <p class="text">첫 번째 텍스트</p>🔍 getElementById & querySelector 차이
| 항목 | getElementId( ) | querySelector( ) |
|---|---|---|
| 인자 | 요소의 id ( 문자열, #️⃣ 안 씀❌ ) | CSS 선택자 ( id = #️⃣id, 클래스 = .class ) |
| 리턴값 | 일치하는 1개의 요소 | CSS 선택자에 맞는 첫 번째 요소 |
| 사용 상황 | 특정 🆔 요소만 선택할 때 | 클래스, 태그, 속성 등 다양한 선택자로 요소를 찾을 때 |
| 예 | getElementById('dox') | querySelector('.text') |
✍언제 쓰면 좋을까❓
- getElementById➡id가 유일할 때 빠르고 명확해서 자주 쓰임
- querySelector➡클래스, 태그, 속성 조합 등 유연한 선택이 필요할 때 좋음
💁♀️document.getElementById('header-heading').className
⚡특정 id를 가진 요소의 클래스 이름( class 속성값 )을 가져오거나 바꿀 때 사용
<h1 id="header-heading" class="title main">
  안녕하세요
</h1>
예제 ① : 클래스 이름 확인
const heading = document.getElementById('header-heading');
console.log(heading.className);
// 출력: "title main" (← class 속성값이 문자열로 나옴)
예제 ② : 클래스 이름 변경
document.getElementById('header-heading').className = 'highlight';
// 결과 : <h1 id="header-heading" class="highlight">안녕하세요</h1>
getElementById로 스타일 & 콘텐츠 변경하기
<h1 id="header-container">
  안녕하세요
</h1>
const headerContainer = document.getElementById('header-container');
// ✅ 스타일 변경
headerContainer.style.fontSize = '10px'; // 폰트 크기 변경
headerContainer.style.display = 'none'; // 화면에서 숨김
// ✅ 콘텐츠 변경
// 텍스트만 삽입 (태그 해석 X)
headerContainer.textContent = 'Text Content';
// 사람이 보는 기준의 텍스트 (보이는 것 기준)
headerContainer.innerText = 'Inner Text';
// HTML 코드로 삽입 (태그 해석 O)
headerContainer.innerHTML = '<span>Inner HTML</span>';🤔textContent && innerText && innerHTML
차이를 비교해볼 수 있는 예제
<div id='my_div'>
  안녕하세요?     만나서 반가워요.
  <span style='display:none'>숨겨진 텍스트</span>
</div>

<input type='button'
       value='innerHTML'
       onclick='getInnerHTML()'/>
<input type='button'
       value='innerText'
       onclick='getInnerText()'/>
<input type='button'
       value='textContent'
       onclick='getTextContent()'/>
function getInnerHTML() {
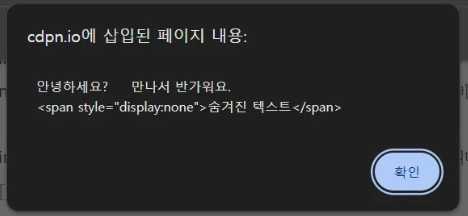
const element = document.getElementById('my_div');
alert(element.innerHTML);
}
function getInnerText() {
const element = document.getElementById('my_div');
alert(element.innerText);
}
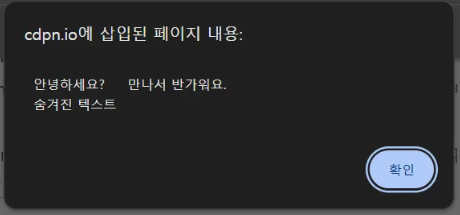
function getTextContent() {
const element = document.getElementById('my_div');
alert(element.textContent);
}✅ innerHTML : HTML까지 같이 보여줌
✅ innerText : 사용자에게 보여지는 텍스트 값을 읽어오며
여러 공백 무시하고 하나의 공백만 처리( 줄 바꿈 처리, 숨겨진 건 제외 )
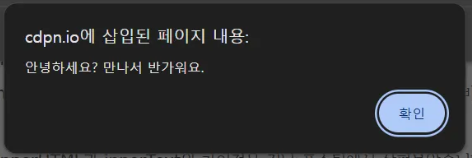
display: none 처리한 부분은 나오지 않음🙅♀️
✅ textContent : 숨겨진 텍스트도 가져오는 노드가 갖고 있는
텍스트 값 그대로 보여줌( 숨겨진 것도 포함, 줄 바꿈 있음 )
| 속성 | 태그 포함 | 숨겨진 텍스트 포함 | 줄바꿈/공백 처리 | 설명 요약 |
|---|---|---|---|---|
| innerHTML | ⭕ | ⭕ ( display:none도 포함 ) | ❌ 무시( HTML로 직접 넣어야 함 ) | HTML 태그까지 문자열로 가져옴( 삽입함 ) |
| innerText | ❌ | ❌ ( 화면에 보이는 것만 표시 ) | 👀 ( 눈에 보이는 줄바꿈 반영 ) | 화면에 표시된 텍스트만 가져옴 |
| textContent | ❌ | ⭕ ( 숨겨진 텍스트도 포함 ) | ❌ ( 줄바꿈은 있음, 브라우저는 안 보임 ) | HTML 무시, 전체 텍스트를 그대로 가져옴 |
📌 요약
- ✅ HTML도 넣고 싶다! → innerHTML
- ✅ 사용자 눈에 보이는 것만! → innerText
- ✅ 태그 말고 텍스트 전부! → textContent
querySelector
👉 아이디, 클래스, 태그를 모두 선택할 수 있는 매우 유용한 메서드
아이디 선택 :
#아이디
클래스 선택 :.클래스
태그 선택 :태그명
<div id="header">헤더</div>
<p class="intro">소개 글</p>

<ul>
  <li>첫 번째 항목</li>
  <li>두 번째 항목</li>
</ul>
// #아이디로 선택
const headerElement = document.querySelector('#header');
console.log(headerElement.textContent); // 출력: 헤더
// .클래스명으로 선택
const introElement = document.querySelector('.intro');
console.log(introElement.textContent); // 출력: 소개 글
// 태그명으로 선택
const firstListItem = document.querySelector('li');
console.log(firstListItem.textContent); // 출력: 첫 번째 항목<div class="container">
<p>첫 번째 문단</p>
<p>두 번째 문단</p>
<p>세 번째 문단</p>
<p>네 번째 문단</p>
<p>다섯 번째 문단</p>
</div>
<script>
// :nth-child(2) - 두 번째 문단 선택
const secondParagraph = document.querySelector('.container p:nth-child(2)');
secondParagraph.style.color = 'red'; // 두 번째 문단을 빨간색으로 설정
// :last-child - 마지막 문단 선택
const lastParagraph = document.querySelector('.container p:last-child');
lastParagraph.style.fontWeight = 'bold'; // 마지막 문단을 굵은 글씨로 설정
// :nth-child(odd) - 홀수 번째 문단들 선택
const oddParagraphs = document.querySelectorAll('.container p:nth-child(odd)');
oddParagraphs.forEach(paragraph => {
paragraph.style.backgroundColor = 'lightblue'; // 홀수 문단의 배경을 하늘색으로 설정
});
// :nth-child(even) - 짝수 번째 문단들 선택
const evenParagraphs = document.querySelectorAll('.container p:nth-child(even)');
evenParagraphs.forEach(paragraph => {
paragraph.style.backgroundColor = 'lightgreen'; // 짝수 문단의 배경을 초록색으로 설정
});
</script>여러개 - getElementsByClassName && querySelectorAll
const items = document.getElementsByClassName('list-group-item');
console.log(items);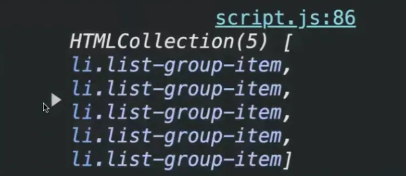
console.log(items[0]);
items[0].style.color = 'blue';  // 첫번째 요소만 폰트가 파란색으로 변경됨
items[3].textContent = 'Hi';  // 세번째 요소의 텍스트가 Hi로 변경됨
getElementsByTagName
// (태그의 이름을 작성하면 됨)
let list = document.getElementsByTagName('li');
// 이것도 위와 같이 첫번째 요소의 텍스트 색상이 빨간색으로 변경됨
list[0].style.color = 'red';
list = Array.from(list);
console.log(list);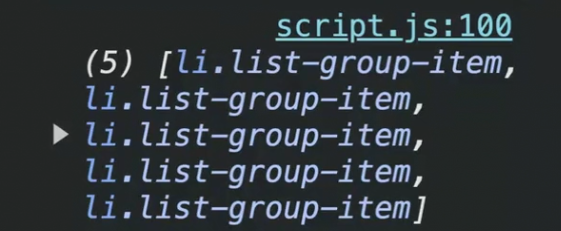
Array.from을 해야 배열로 됨⭕
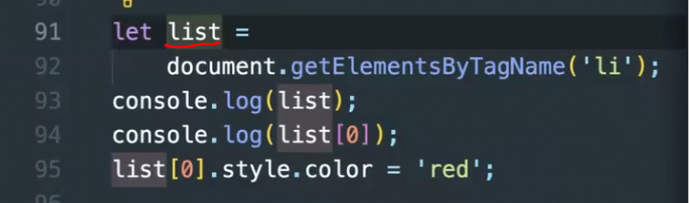
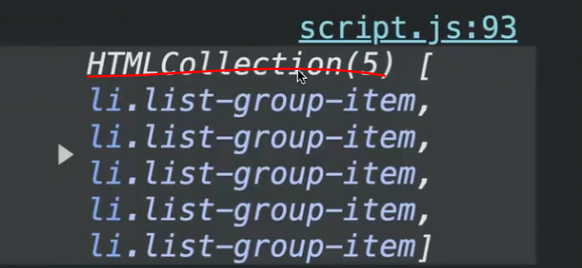
컬렉션 이건 배열이 아님❌
const items = document.querySelectorAll('ul.list-group li.list-group-item');
console.log(items);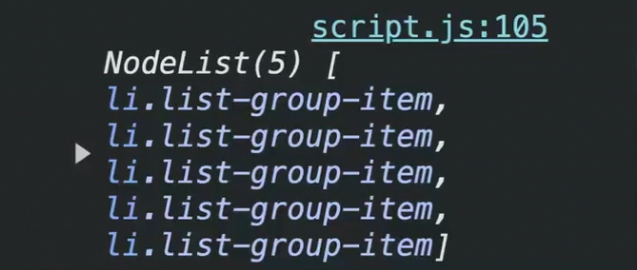
✔이것들을 하나씩 순회하려면 forEach 사용하면됨
items.forEach(function (item, index) {
item.textContent = `${index}. List`
})
/* 출력
0. List
1. List
2. List
3. List
4. List
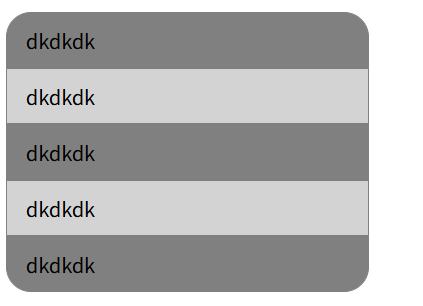
*/const liOdd = document.querySelectorAll('li:nth-child(odd)');
liOdd.forEach(function (li, index) {
li.style.background = 'gray';
})
const liEven = document.querySelectorAll('li:nth-child(even)');
for (let i = 0; i < liEven.length; i++) {
liEven[i].style.background = 'lightgray'
}

안녕하세요! 퍼블리싱 & 프론트엔드 개발 공부 블로그 입니다!