목차
1. Docker 설치
2. Jenkins 컨테이너 생성
3. Jenkins 접근
4. Docker in Docker
5. Dockerfile, Jenkinsfile 작성 및 깃허브 푸쉬
6. Github access token 발급 및 Webhook 설정
7. Jenkins Pipeline 설정
1. Docker 설치
ssh root@공인IP 명령어로 접속

업데이트 확인 =>
apt-get update

curl 설치되어있음 => 도커 설치로 이동
curl 설치되어있지않음 => apt-get install curl

도커 설치 =>
curl https://get.docker.com %3E docker-install.sh

root@ncp:~# ls 명령어로 설치 확인 가능
docker-install.sh

chmod 755 docker-install.sh (실행 권한 부여)

./docker-install.sh (도커 설치파일 실행)

docker -v (도커 버전 확인, 버전이 확인되면 설치된 것)
2. Jenkins 컨테이너 생성
/var/jenkins_home 디렉토리의 소유자와 그룹을 jenkins 컨테이너 내부의 사용자(UID10900)에게 할당
sudo chown -R 1000:1000 /var/jenkins_home
젠킨스 컨테이너 생성
docker run -d --name jenkins -p 8085:8080 -p 50000:50000 -u root -v /var/run/docker.sock:/var/run/docker.sock -v /jenkins_home:/var/jenkins_home jenkins/jenkins:lts
nodejs 설치
docker exec -it -u root jenkins bash
apt-get update
apt-get install -y curl
curl -sL https://deb.nodesource.com/setup_21.x | bash -
apt-get install -y nodejs
설치 확인
node -v
npm -v
도커 설치(Docker in Docker)
apt-get install -y docker.io
도커 설치 확인
docker -v
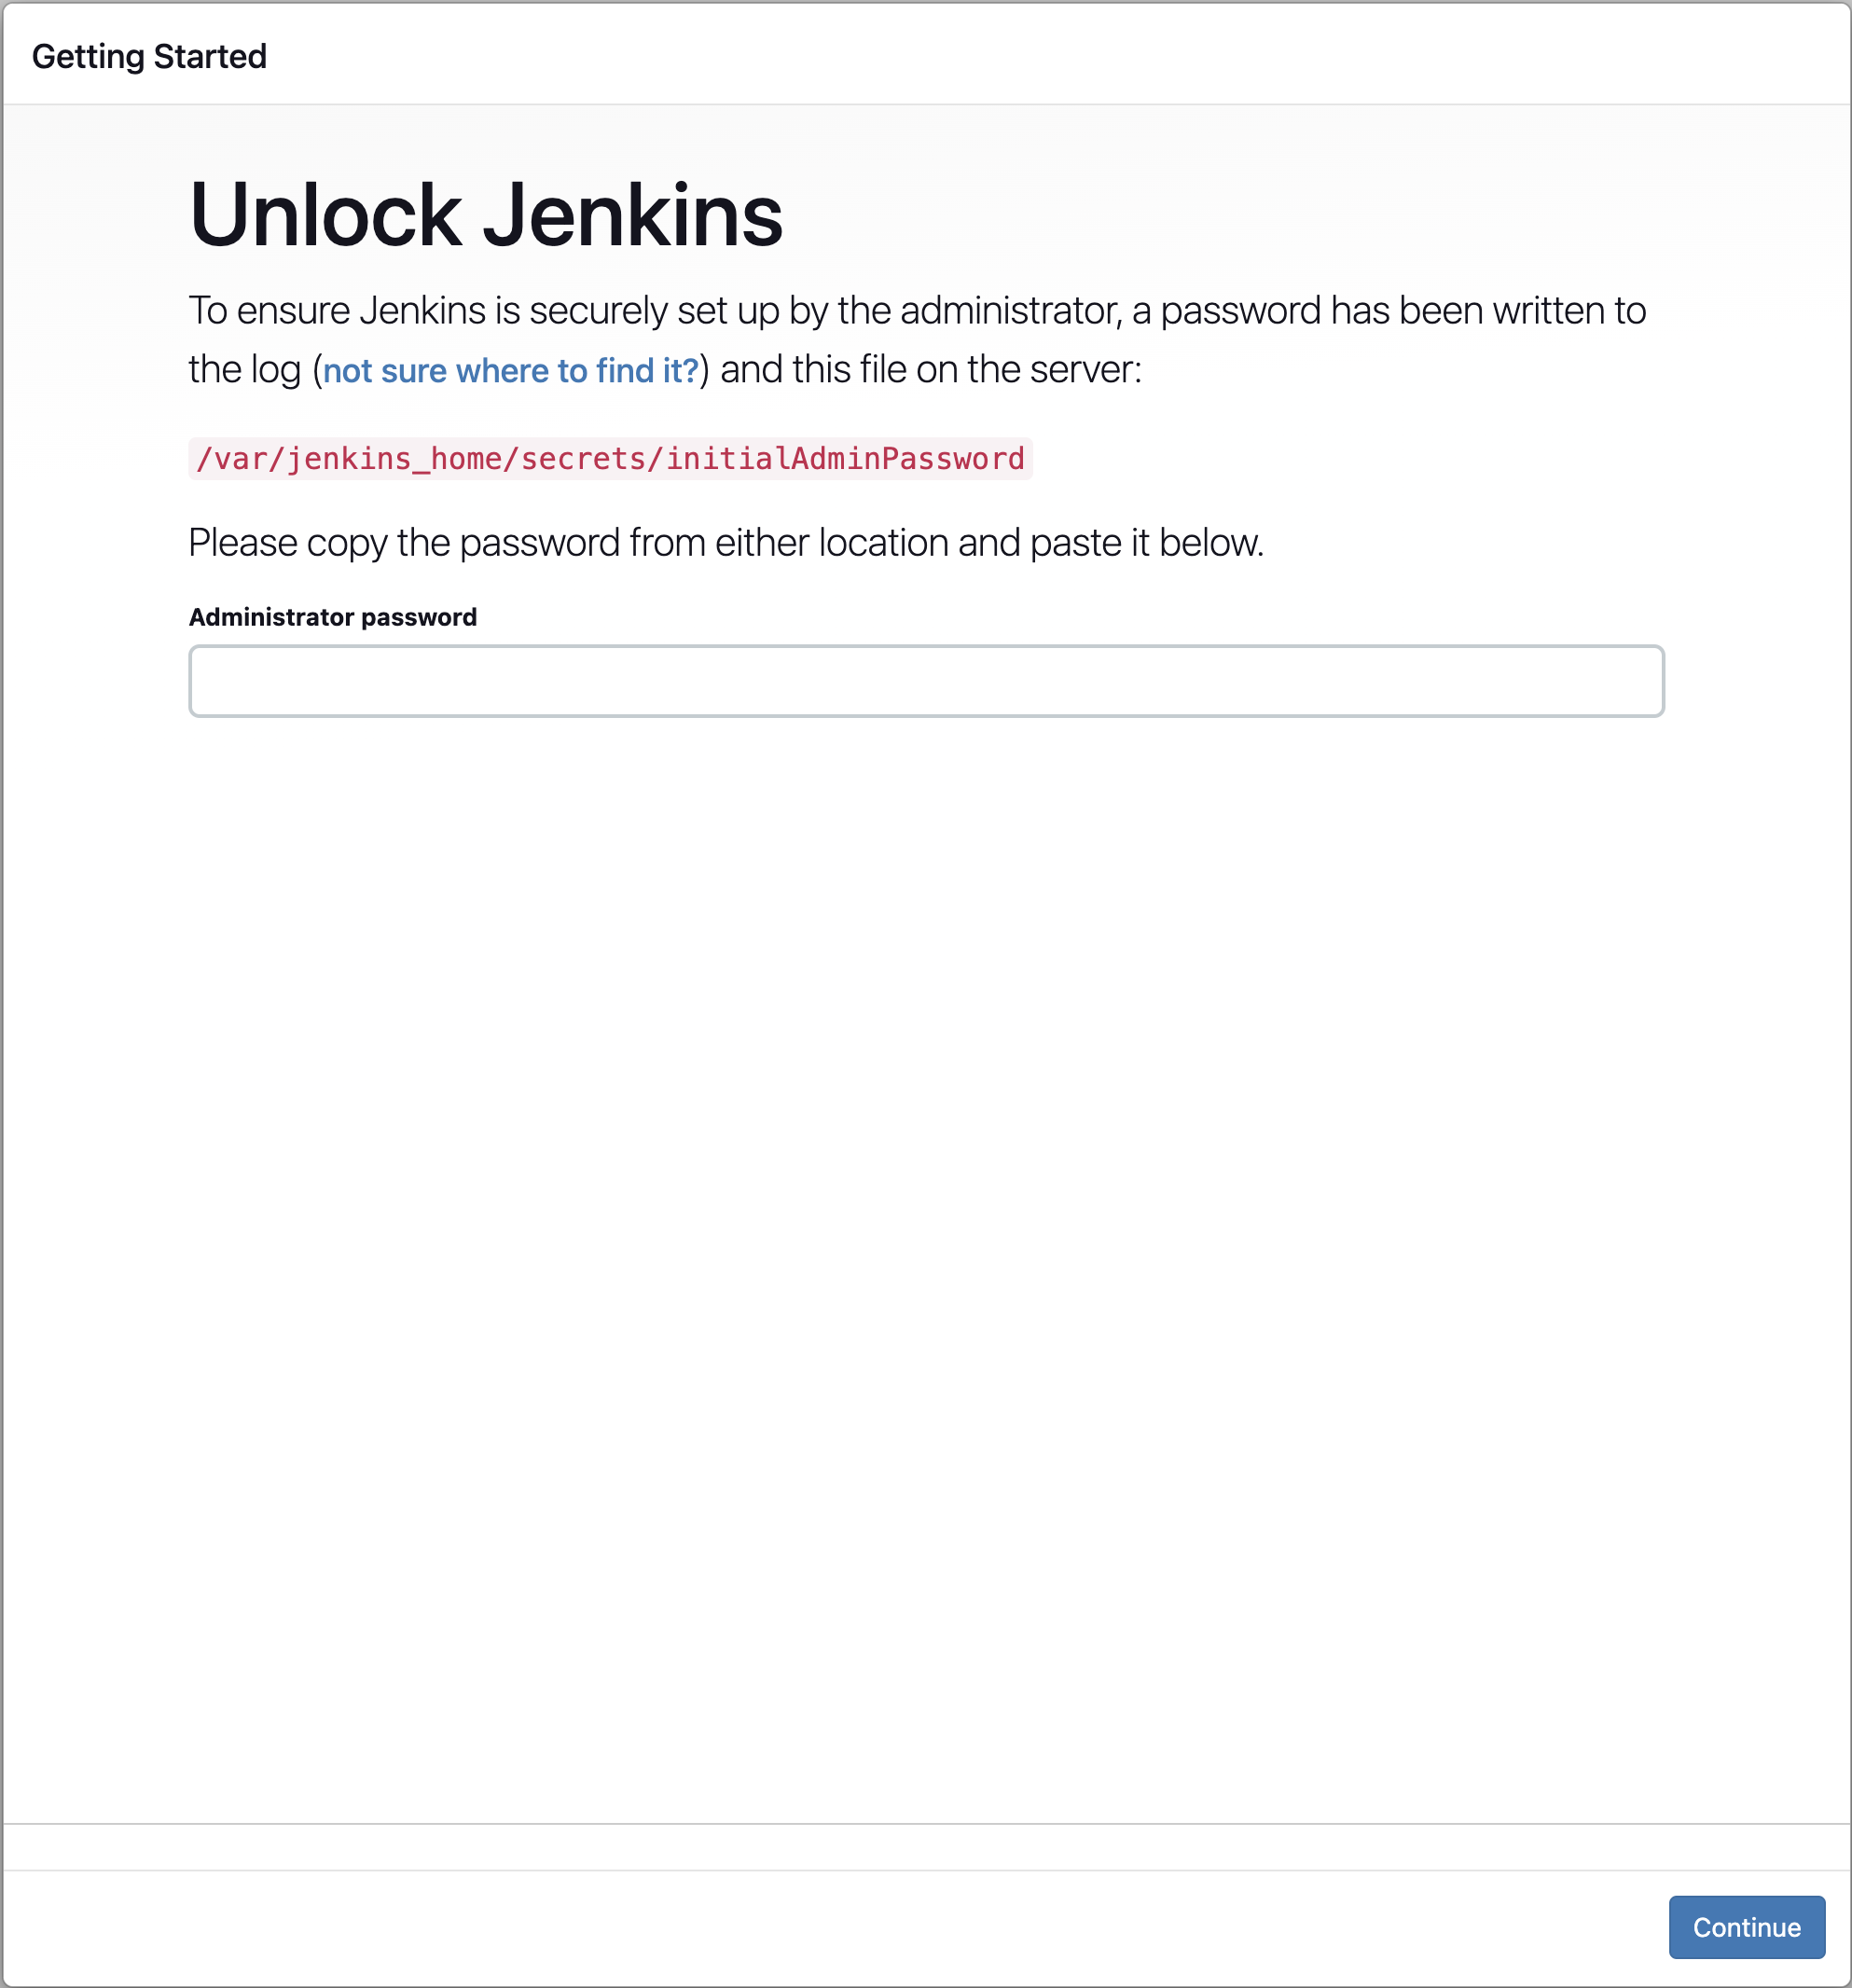
젠킨스 진입용 비밀번호 확인
docker logs jenkins3. Jenkins 접근
- 위의
docker logs jenkins명령어로 확인한 비밀번호를 복사하여 웹 브라우저에서발급받은 공인IP:8085로 접근한다
입력창에 복사한 비밀번호를 입력하고 우측 하단의Continue클릭
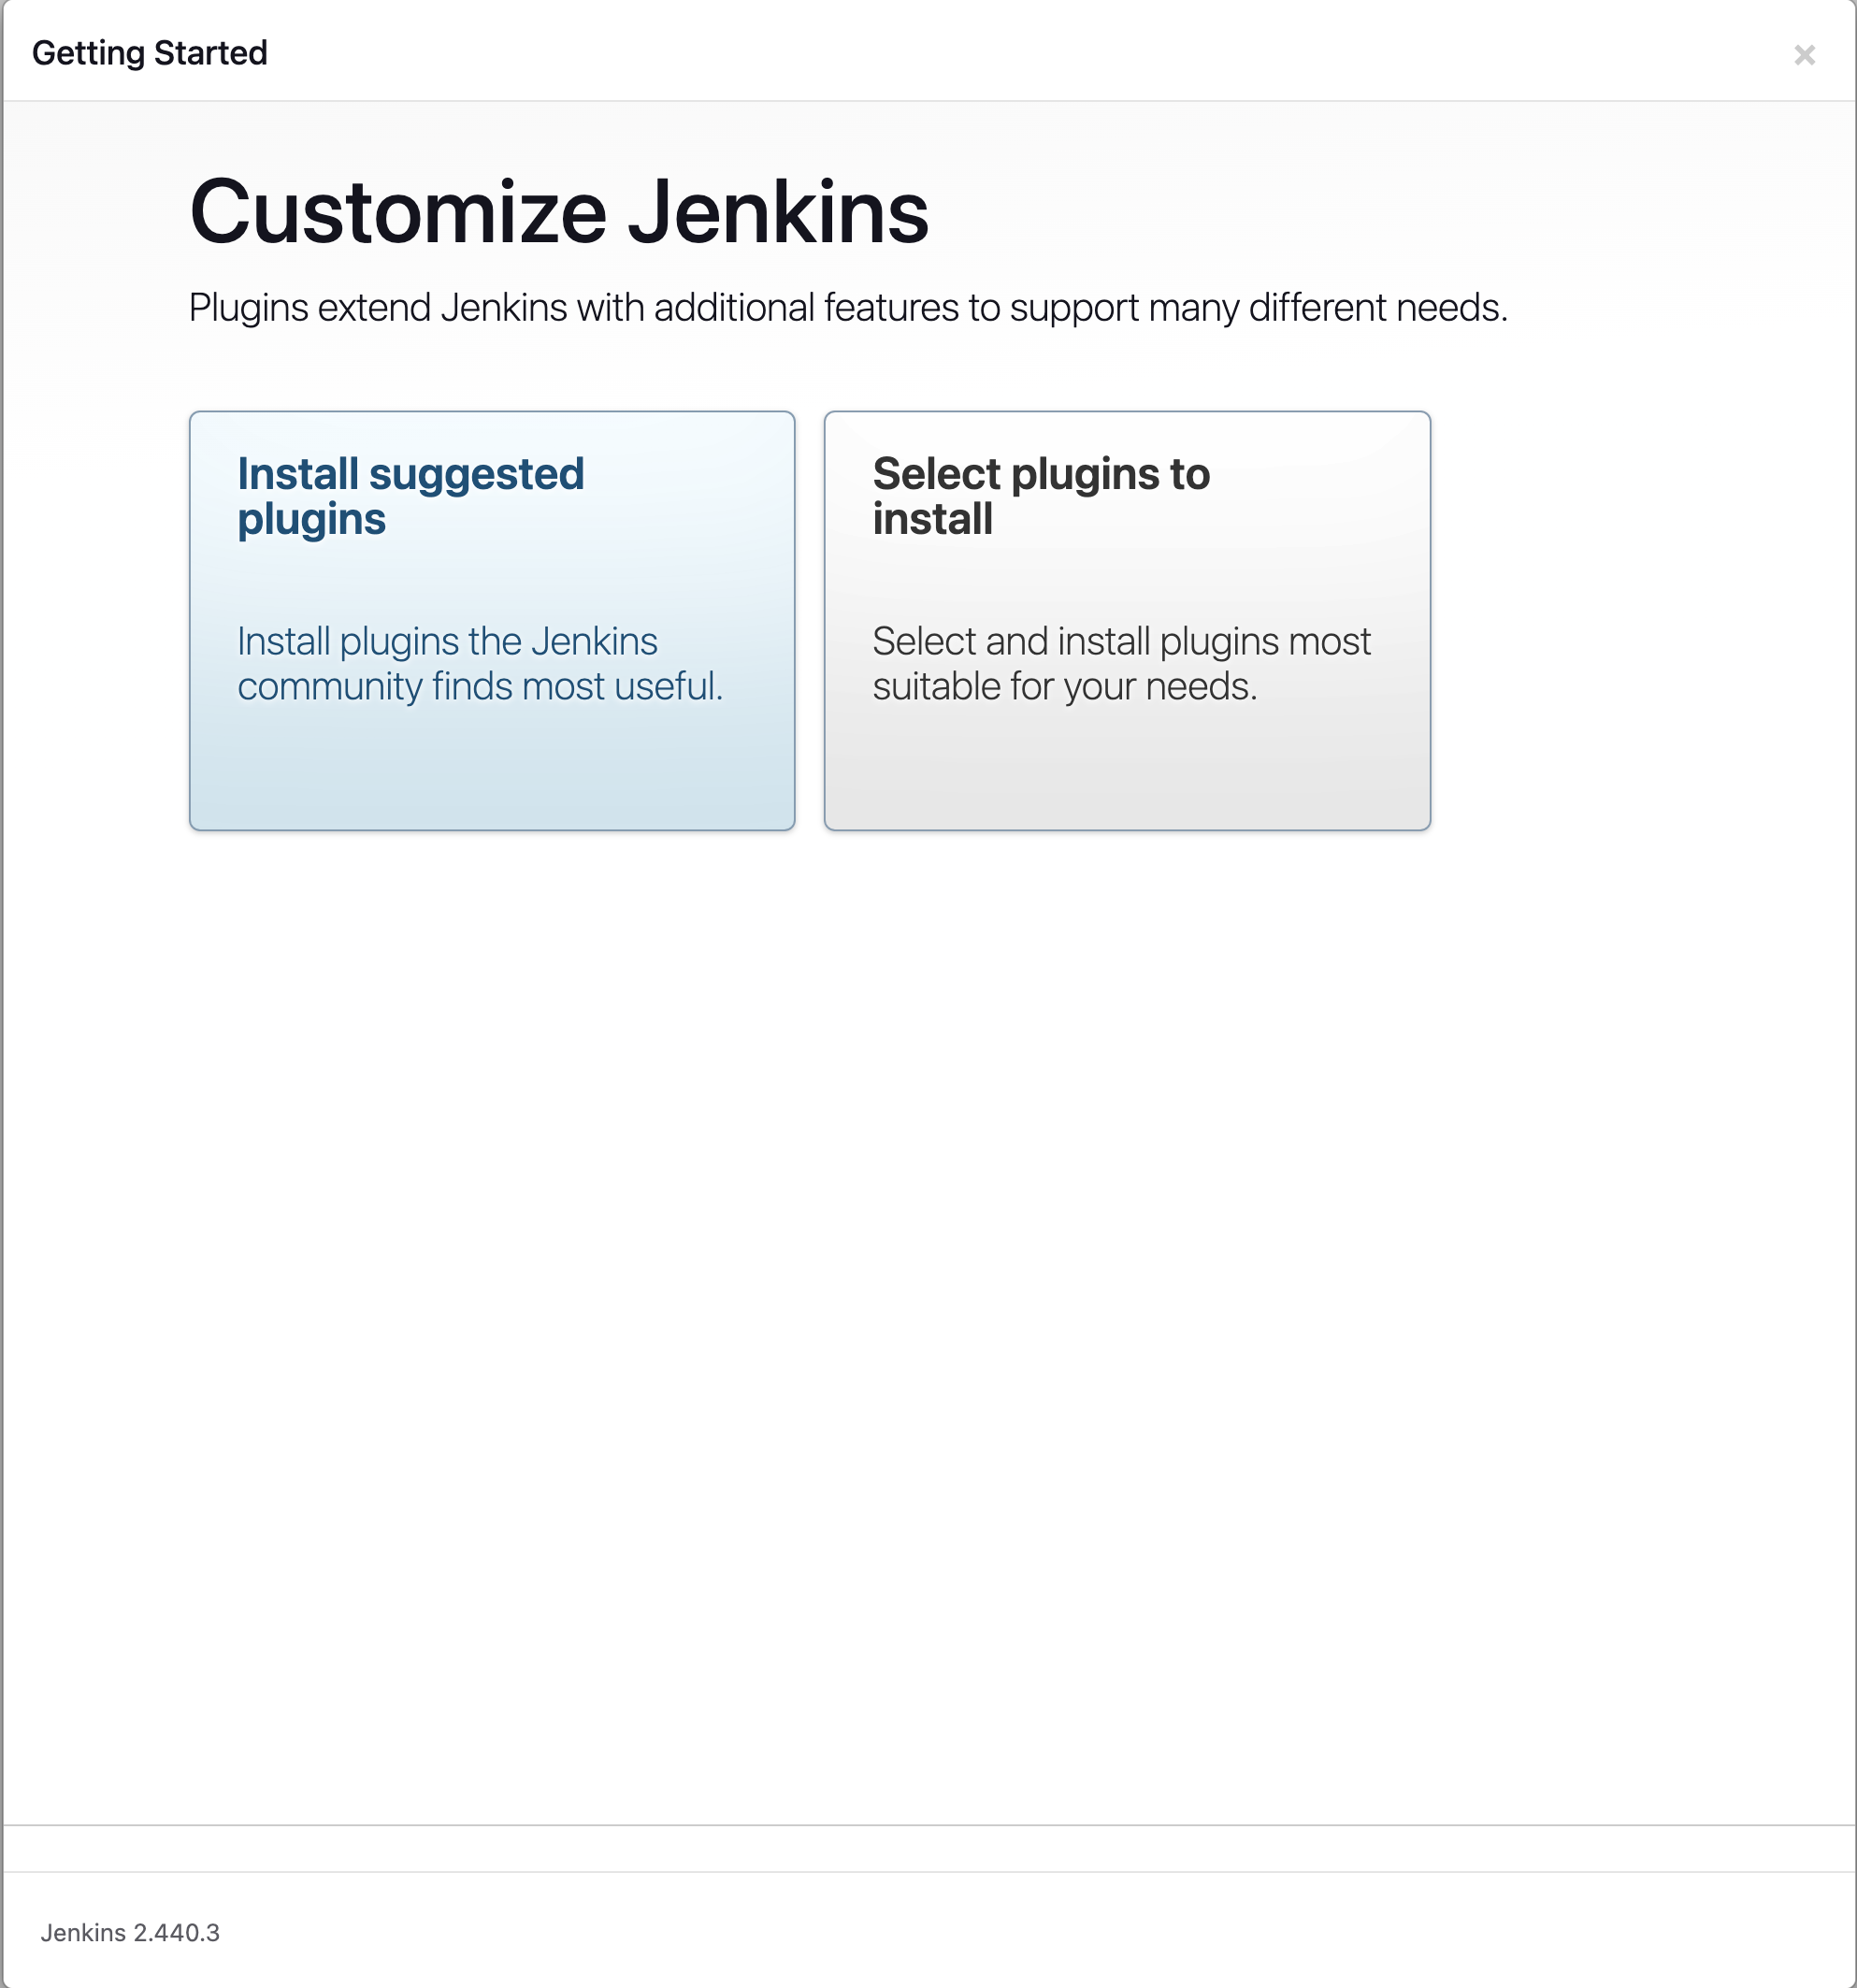
- Install suggested plugins 클릭, 다운로드를 기다리자
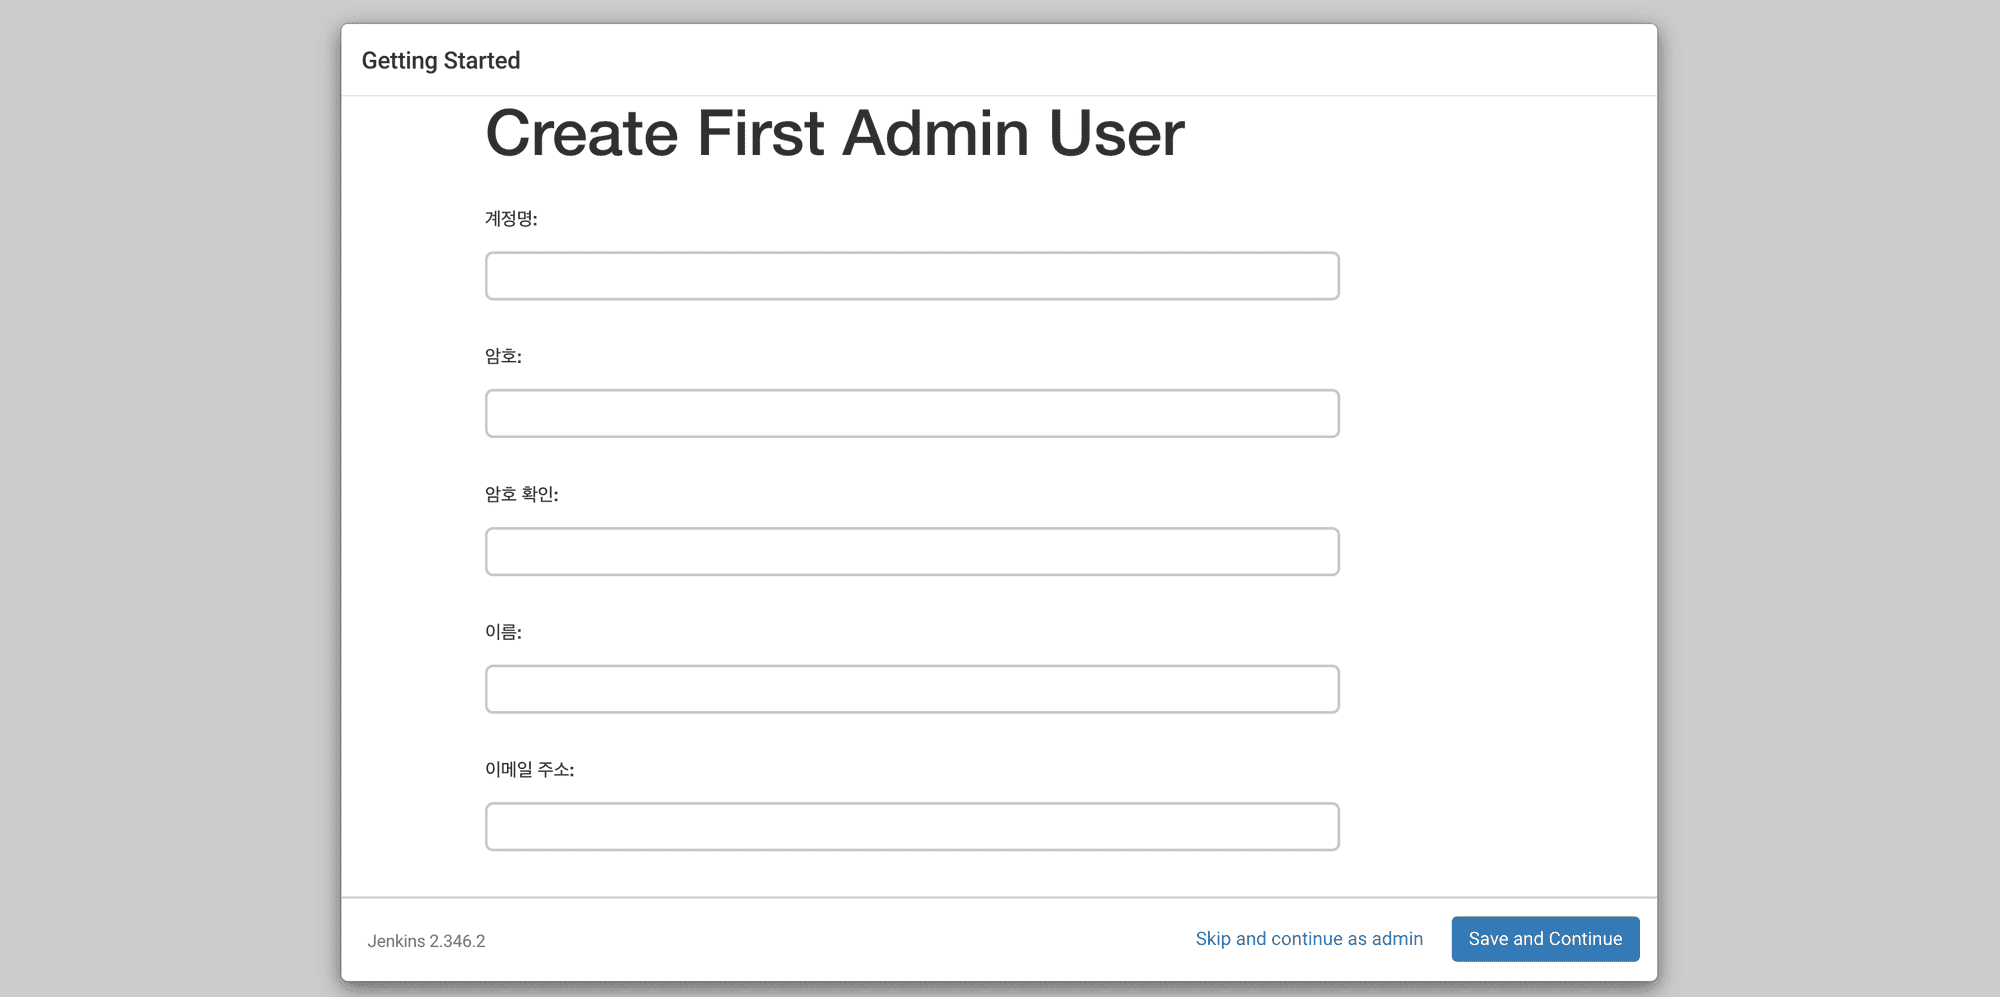
- 다운로드가 끝나면 다음과 같은 창이 뜰 것이다
계정명: admin
암호: 111
암호 확인: 111
이름: admin
이메일 주소: admin@admin.com
입력 후Save and Continue클릭
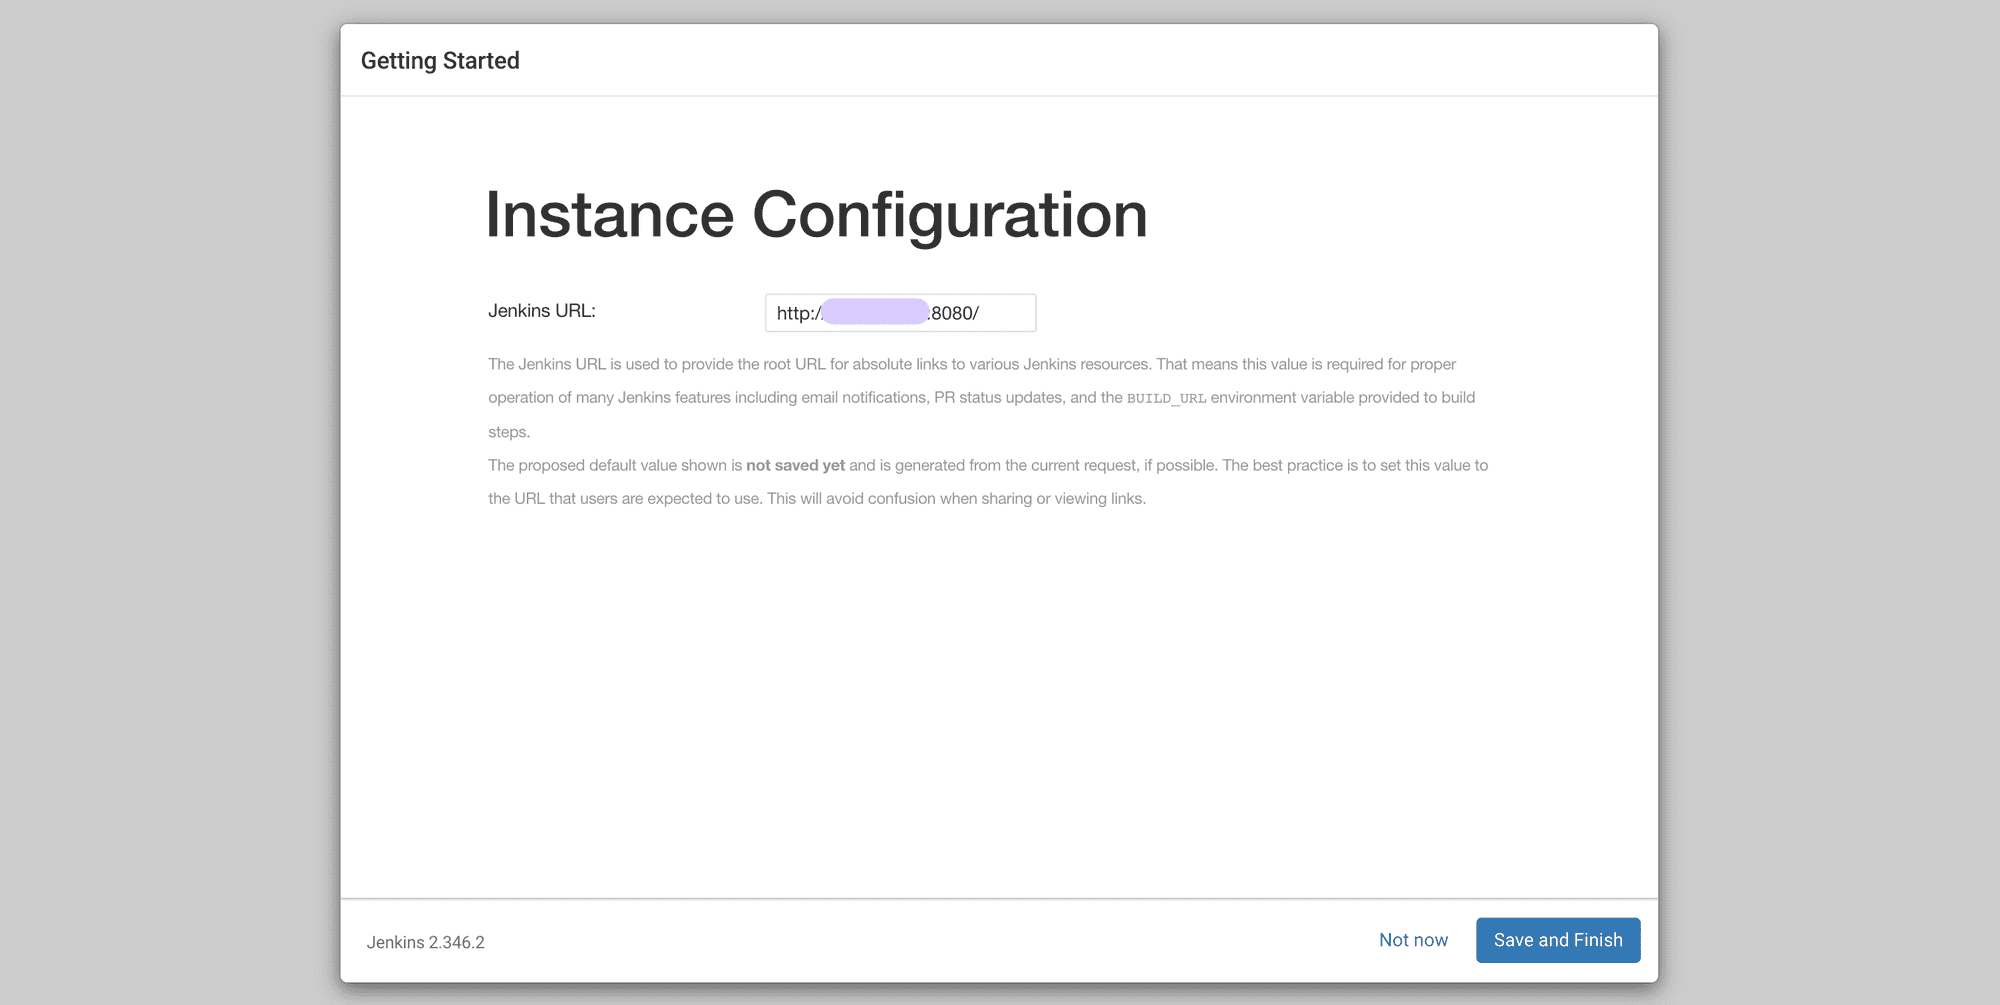
- 다음 창에서 Jenkins URL을 확인해주자.
내 글을 토대로 작성했다면 공인IP:8085로 설정되어 있을 것이다.
URL 확인 후Save and Finish클릭
- 모든 과정이 끝나면 아래 화면으로 진입할 수 있다.
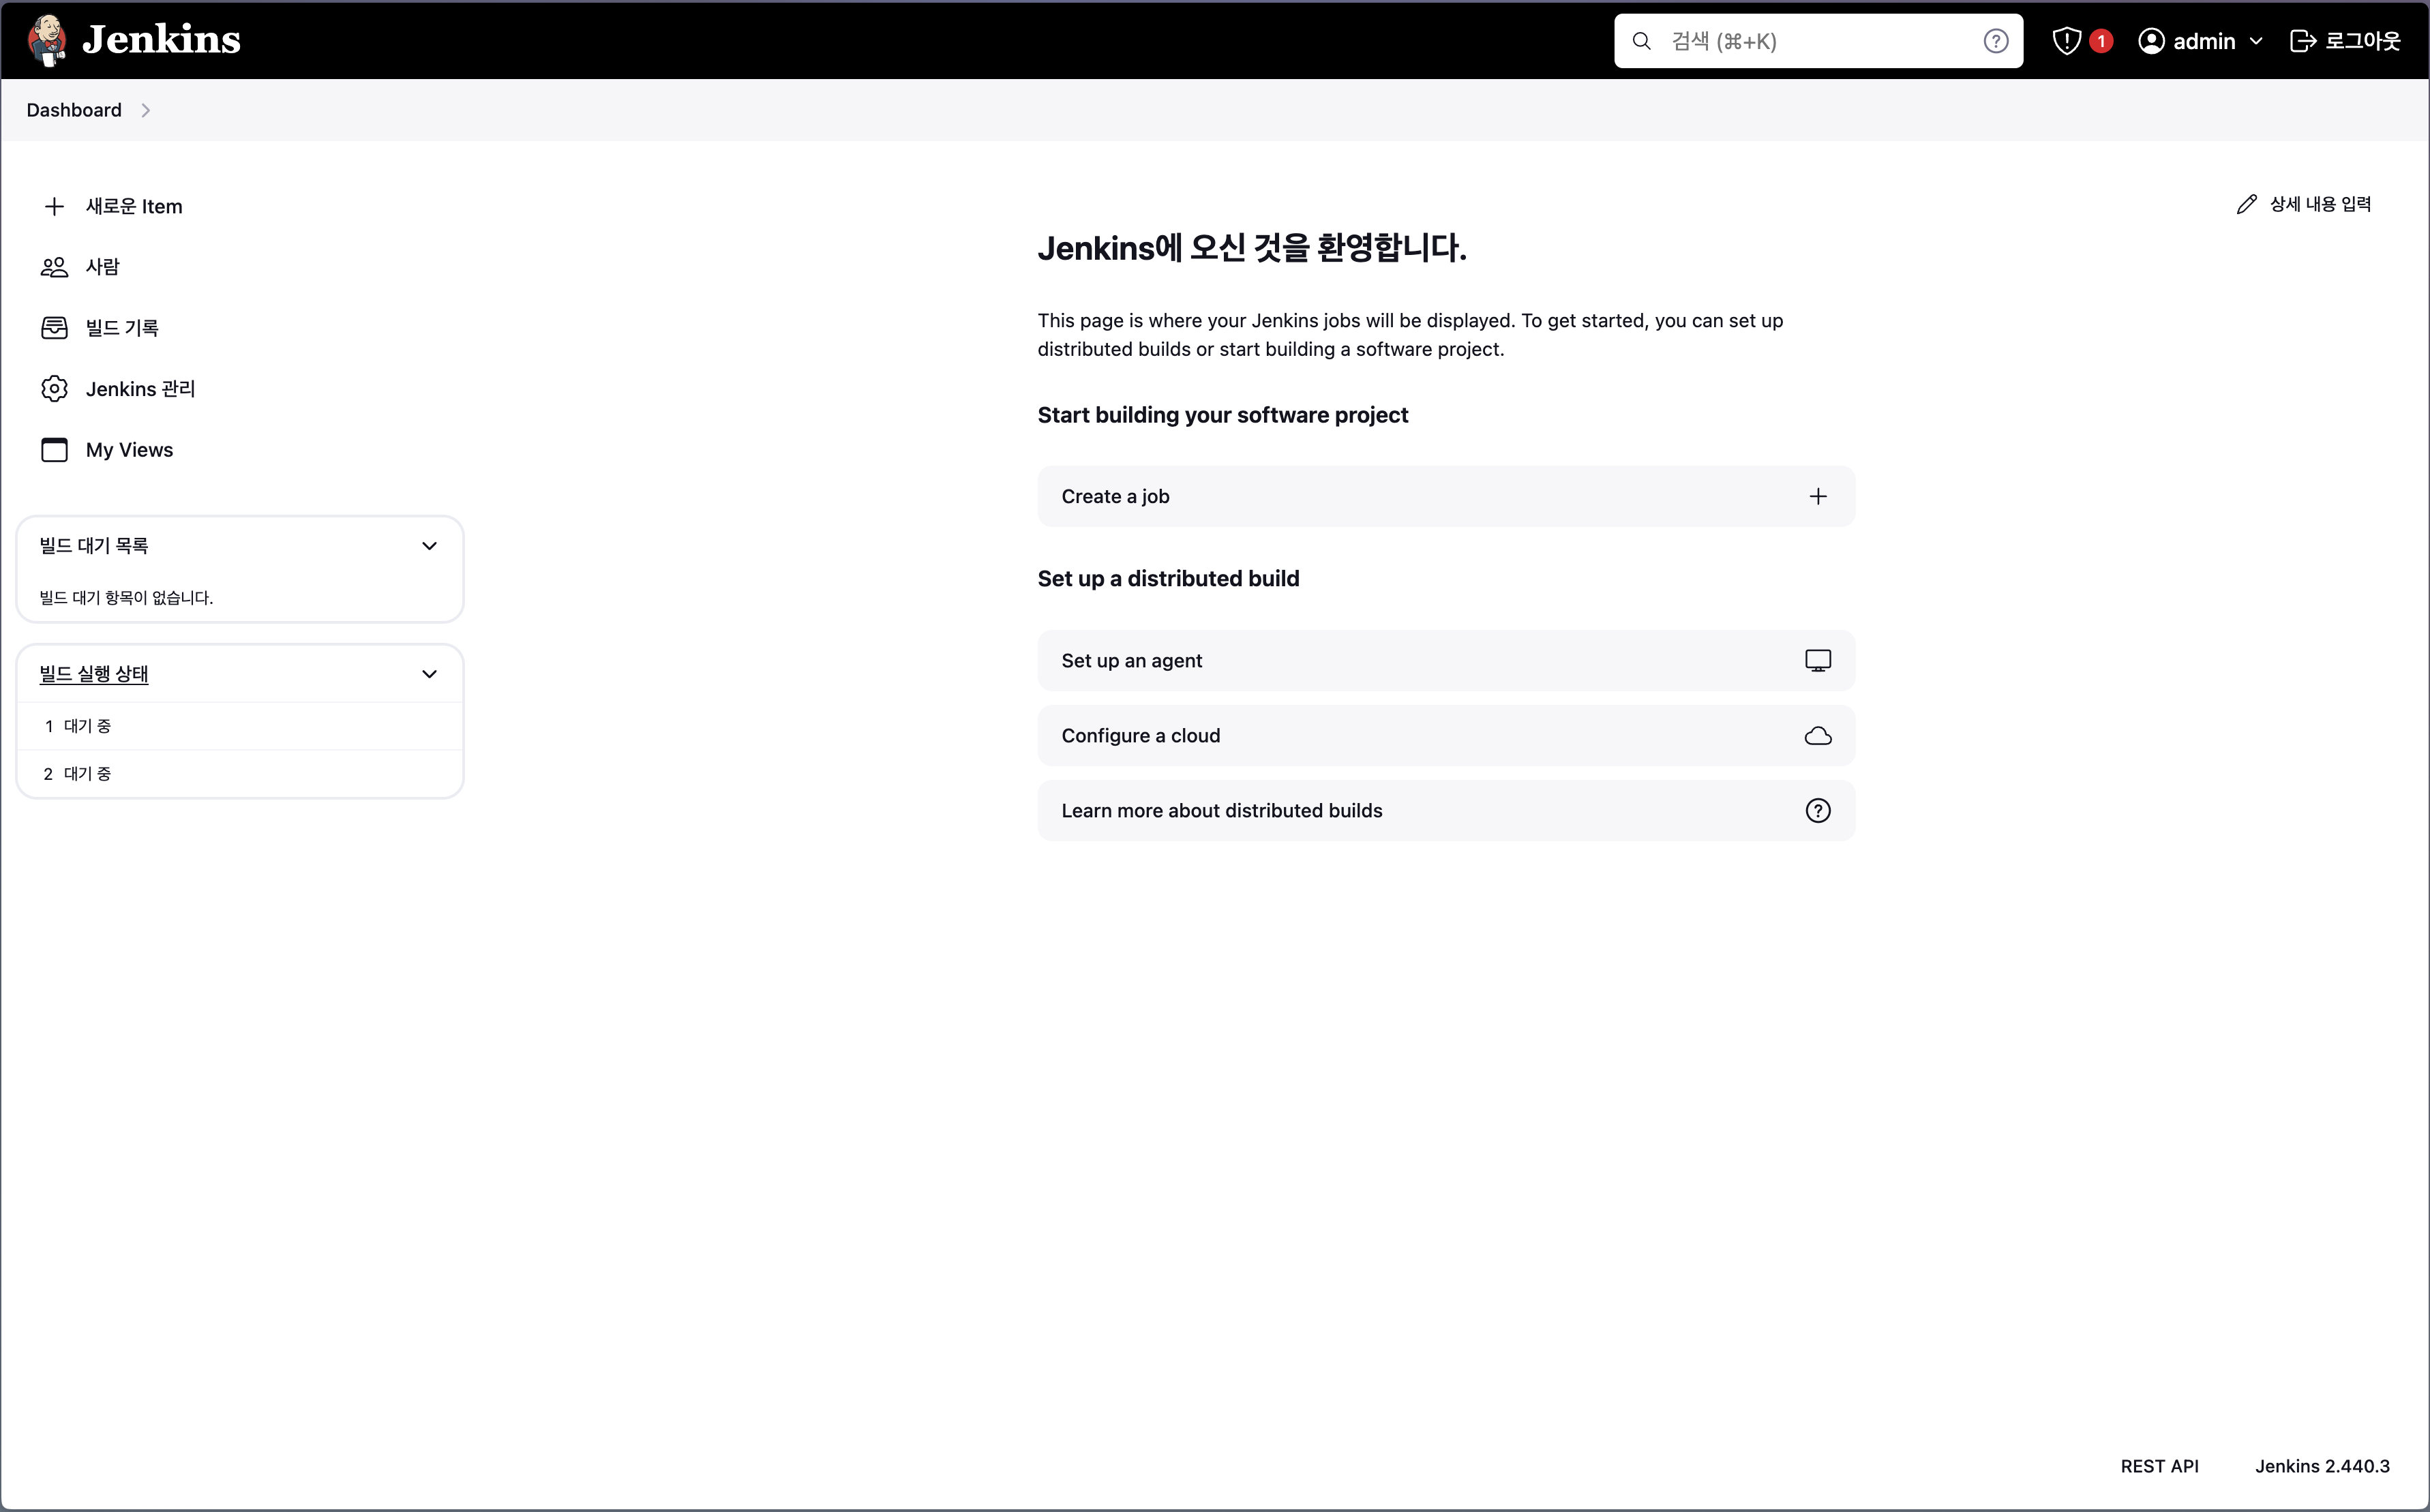
cf) 빌드를 위해 node, docker, github 관련된 플러그인들을 다운로드 받아놓자( 이미 설치되어있다면 PASS )
4. Docker in Docker
- 리액트와 스프링부트 프로젝트 루트 디렉토리에 Dockerfile을 생성하여 Jenkinsfile을 통해 Docker build를 실행할 예정
이를 위해 젠킨스 컨테이너 내에서 도커에 대한 권한이 필요하기 때문에 도커를 설치해보자
root 권한으로 젠킨스 컨테이너 진입
docker exec -u 0 -it jenkins bin/bash

업데이트
apt-get update

젠킨스 컨테이너 안에 도커 설치 (Docker in Docker)
apt-get install -y docker.io

docker 명령어 반응 확인 후 exit
5. Dockerfile, Jenkinsfile 작성 및 깃허브 푸쉬
Dockerfile, Jenkinsfile 생성(+nginx.conf)
리액트 / 스프링부트 프로젝트 각각의 루트 디렉토리에 Dockerfile과 Jenkinsfile을 생성한다.
80 포트로 클라이언트에 보일 예정으로 프론트 부분은 80포트로 내보낼 것임 ( 추후 SSL 인증을 받는다면 443 포트 포함 )
{ 깃허브 레포지토리 명 } 표시되어 있는 부분들은 수정하여 작성하기 바람 ex) test, testapiserver 등으로, 중괄호는 지우고 쓰기
cf) React 프로젝트는 nginx로 구동 예정, nginx.conf 파일 또한 루트 디렉토리에 생성하여 작성해준다
- nginx.conf
user  nginx;
worker_processes  auto;

error_log  /var/log/nginx/error.log notice;
pid        /var/run/nginx.pid;

events {
    worker_connections  1024;
}

http {
    include       /etc/nginx/mime.types;
    default_type  application/octet-stream;

    log_format  main  '$remote_addr - $remote_user [$time_local] "$request" '
                      '$status $body_bytes_sent "$http_referer" '
                      '"$http_user_agent" "$http_x_forwarded_for"';

    access_log  /var/log/nginx/access.log  main;

    sendfile        on;
    #tcp_nopush     on;

    keepalive_timeout  65;

    #gzip  on;

    server {
        listen 80;
        server_name localhost;

        location / {
            root /usr/share/nginx/html;
            try_files $uri $uri/ /index.html;
        }
    }

    include /etc/nginx/conf.d/*.conf;
}- React Dockerfile ( 파일명 : Dockerfile )
FROM node:lts-alpine as build
WORKDIR /app
COPY package.json package-lock.json ./
RUN npm ci
COPY . .
RUN npm run build

FROM nginx:stable-alpine
COPY --from=build /app/build /usr/share/nginx/html
COPY nginx.conf /etc/nginx/nginx.conf
EXPOSE 80
CMD ["nginx", "-g", "daemon off;"]- React Jenkinsfile ( 파일명 : Jenkinsfile )
pipeline {
    agent any
    stages {
        stage('Build') {
            steps {
                sh 'npm install'
                sh 'CI=false npm run build'
            }
        }
        stage('Docker Build') {
            steps {
                sh 'docker build -t {깃허브 레포지토리 명} .'
            }
        }
        stage('Deploy') {
            steps {
                sh 'docker stop {깃허브 레포지토리 명} || true'
                sh 'docker rm {깃허브 레포지토리 명} || true'
                sh 'docker run -d -p 80:80 -p 443:443 --name {깃허브 레포지토리 명} {깃허브 레포지토리 명}'
            }
        }
    }
}- Springboot Dockerfile ( 파일명 : Dockerfile )
FROM openjdk:17-jdk-slim
LABEL maintainer="test@test.com"
VOLUME /tmp
EXPOSE 8080
ARG JAR_FILE=./build/libs/testapiserver-0.0.1-SNAPSHOT.jar
COPY ${JAR_FILE} {스프링부트 프로젝트 명}.jar
ENTRYPOINT ["java","-jar","/{스프링부트 프로젝트 명}.jar"]
Springboot Jenkinsfile ( 파일명 : Jenkinsfile )
pipeline {
    agent any
    stages {
        stage('Build') {
            steps {
                sh './gradlew build'
            }
        }
        stage('Docker Build') {
            steps {
                sh 'docker build -t {깃허브 레포지토리 명} .'
            }
        }
        stage('Deploy') {
            steps {
                sh 'docker stop {깃허브 레포지토리 명} || true'
                sh 'docker rm {깃허브 레포지토리 명} || true'
                sh 'docker run -d -p 8080:8080 --name {깃허브 레포지토리 명} {깃허브 레포지토리 명}'
            }
        }
    }
}
깃허브 레포지토리 생성
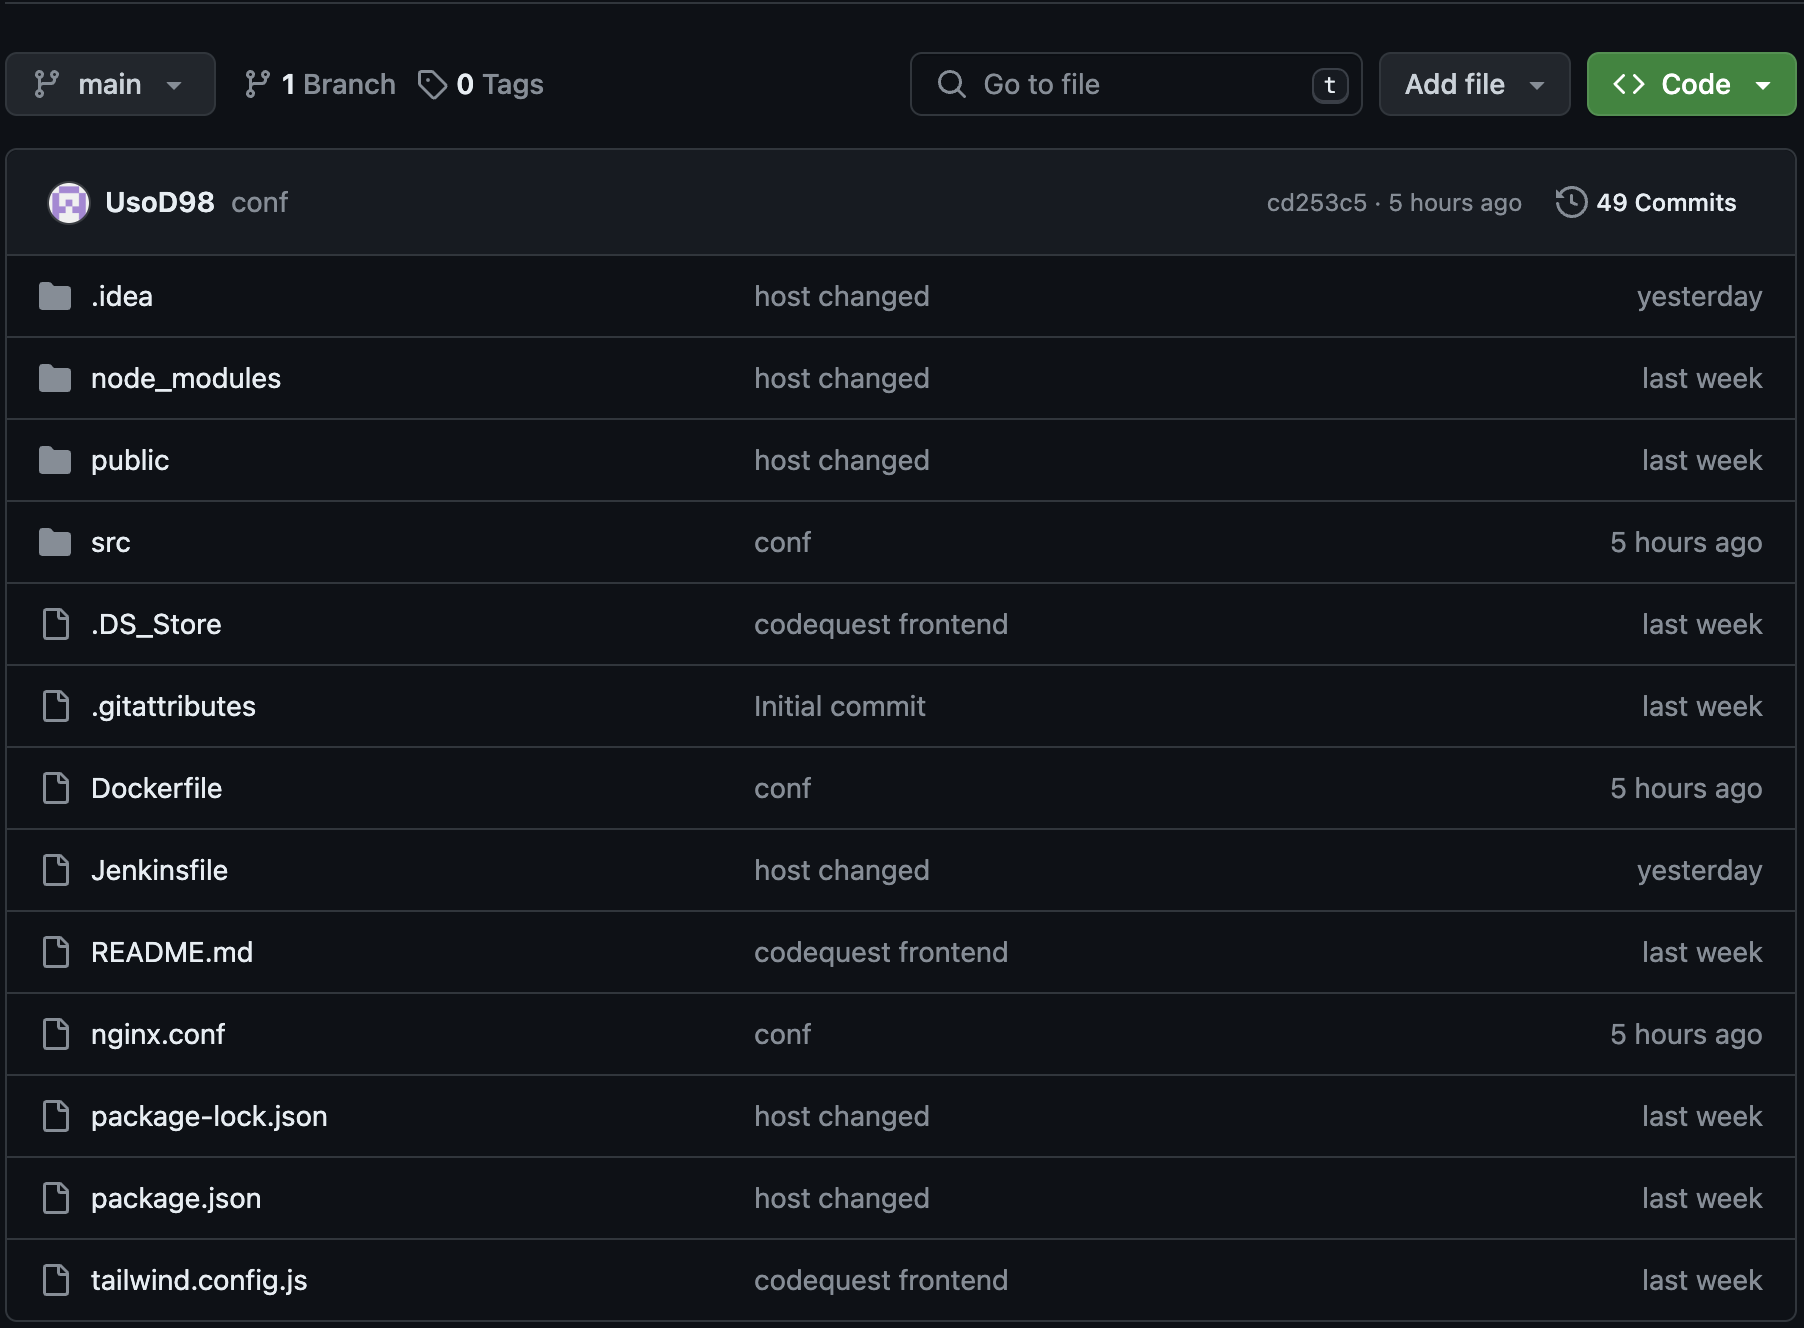
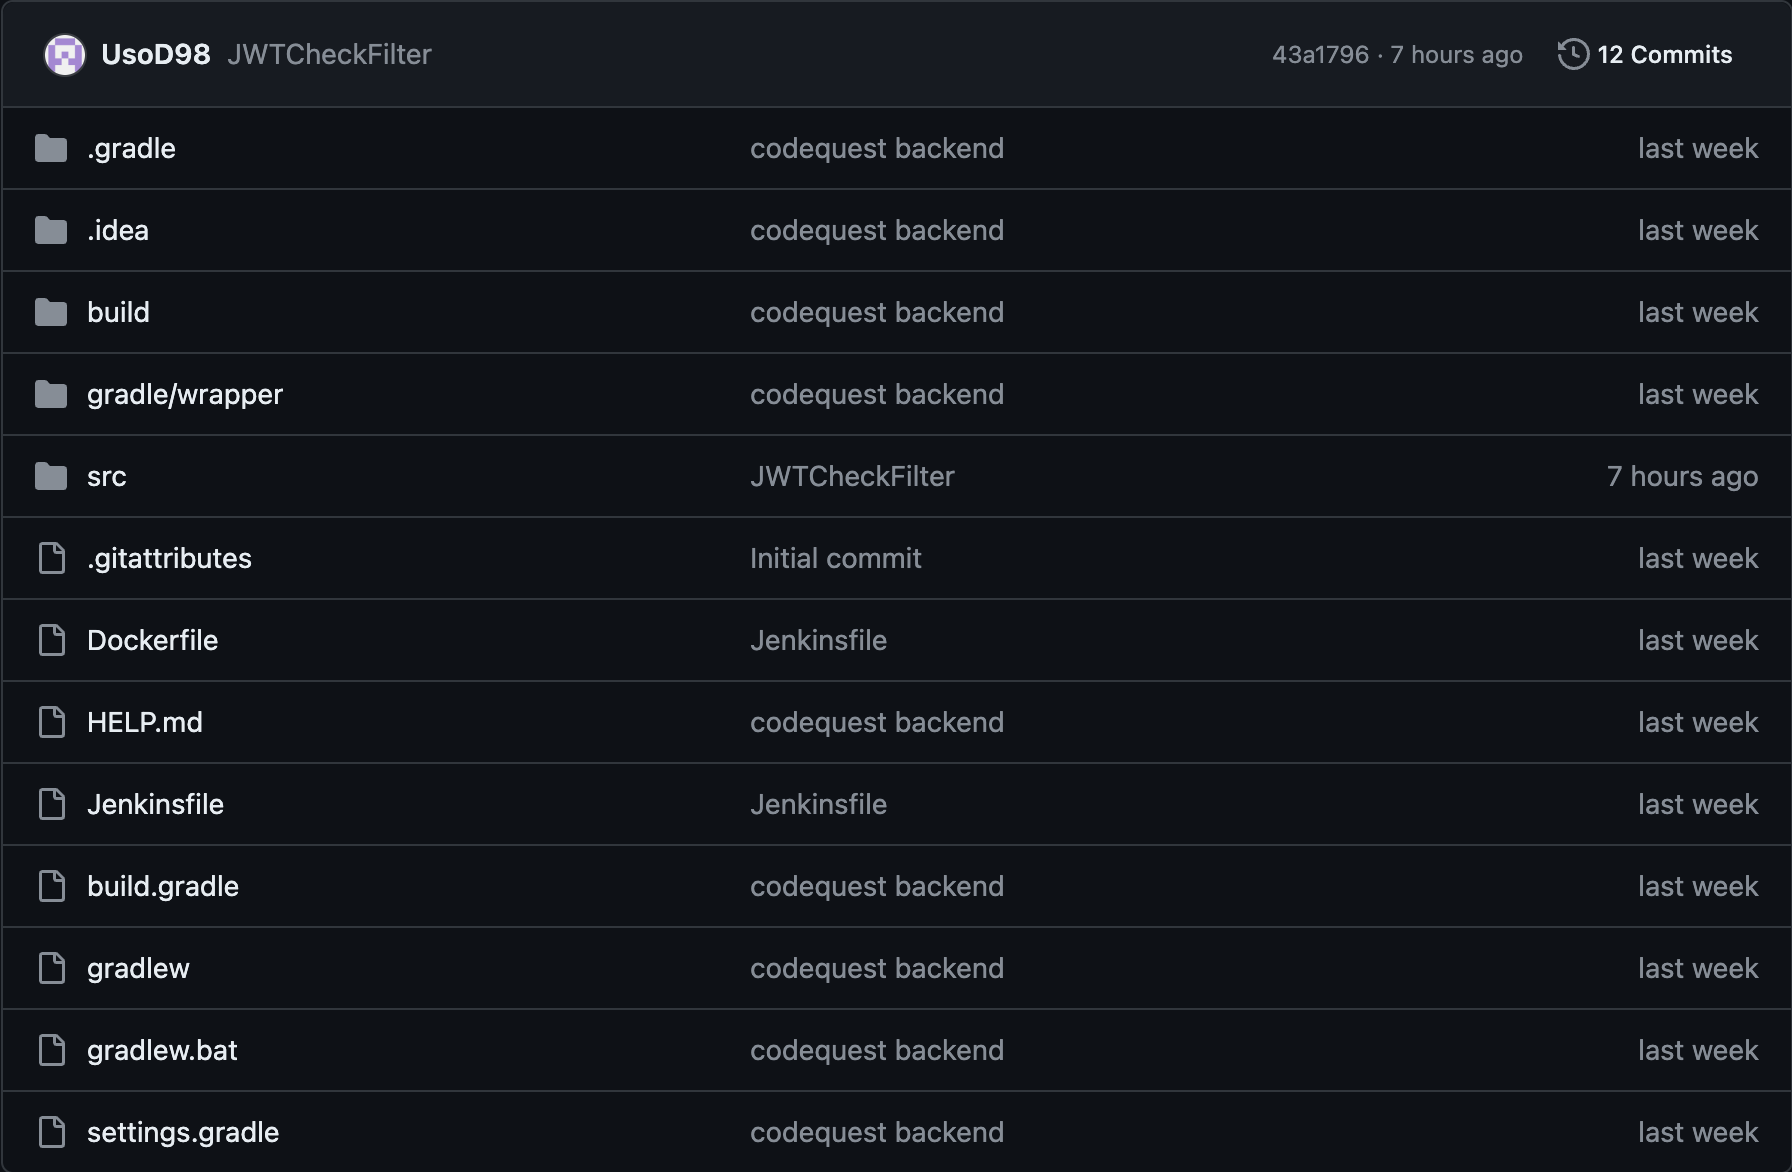
각 프로젝트 명과 동일하게 깃허브 레포지토리 네임을 설정하여 생성하였다.
깃 사용법은 생략하고, 다음과 같이 레포지토리가 생성된 것을 확인하자
- FE 레포지토리
- BE 레포지토리
6. Github access token 발급 및 Webhook 설정
6-1 Github Access Token 발급
- 이제 CI/CD 자동화, 웹훅 설정을 위해 깃허브 토큰을 발급받고 이를 젠킨스에 적용해보자
깃허브 우측 상단 마이페이지 ->Settings-> 좌측 사이드바 최하단Developer settings

- 좌측 사이드바
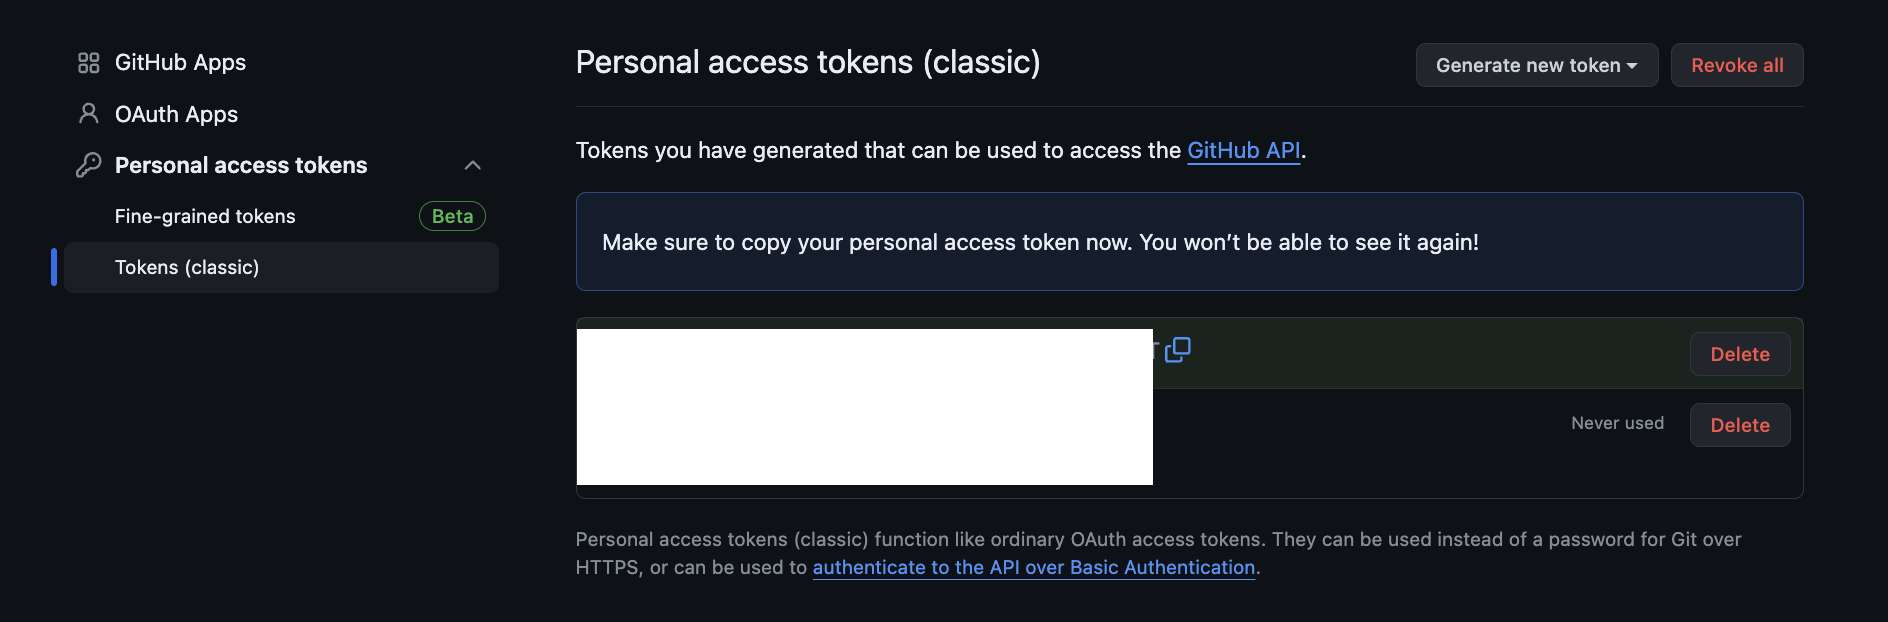
Personal access tokens->Tokens (classic)-> 중단의Generate new token->Generate new token (classic)

- passkey 혹은 password를 통해 인증

Note: 마음대로 작성 ( 본인은 jenkins 라고 설정 )
Expioration: 마음대로 설정 (만기일 없도록 설정했음)
Select scopes: 자기가 필요한 것들 ( 사진에 보이는 것들로만 체크하면 추가 사항은 없을 것 )
체크 후Generate
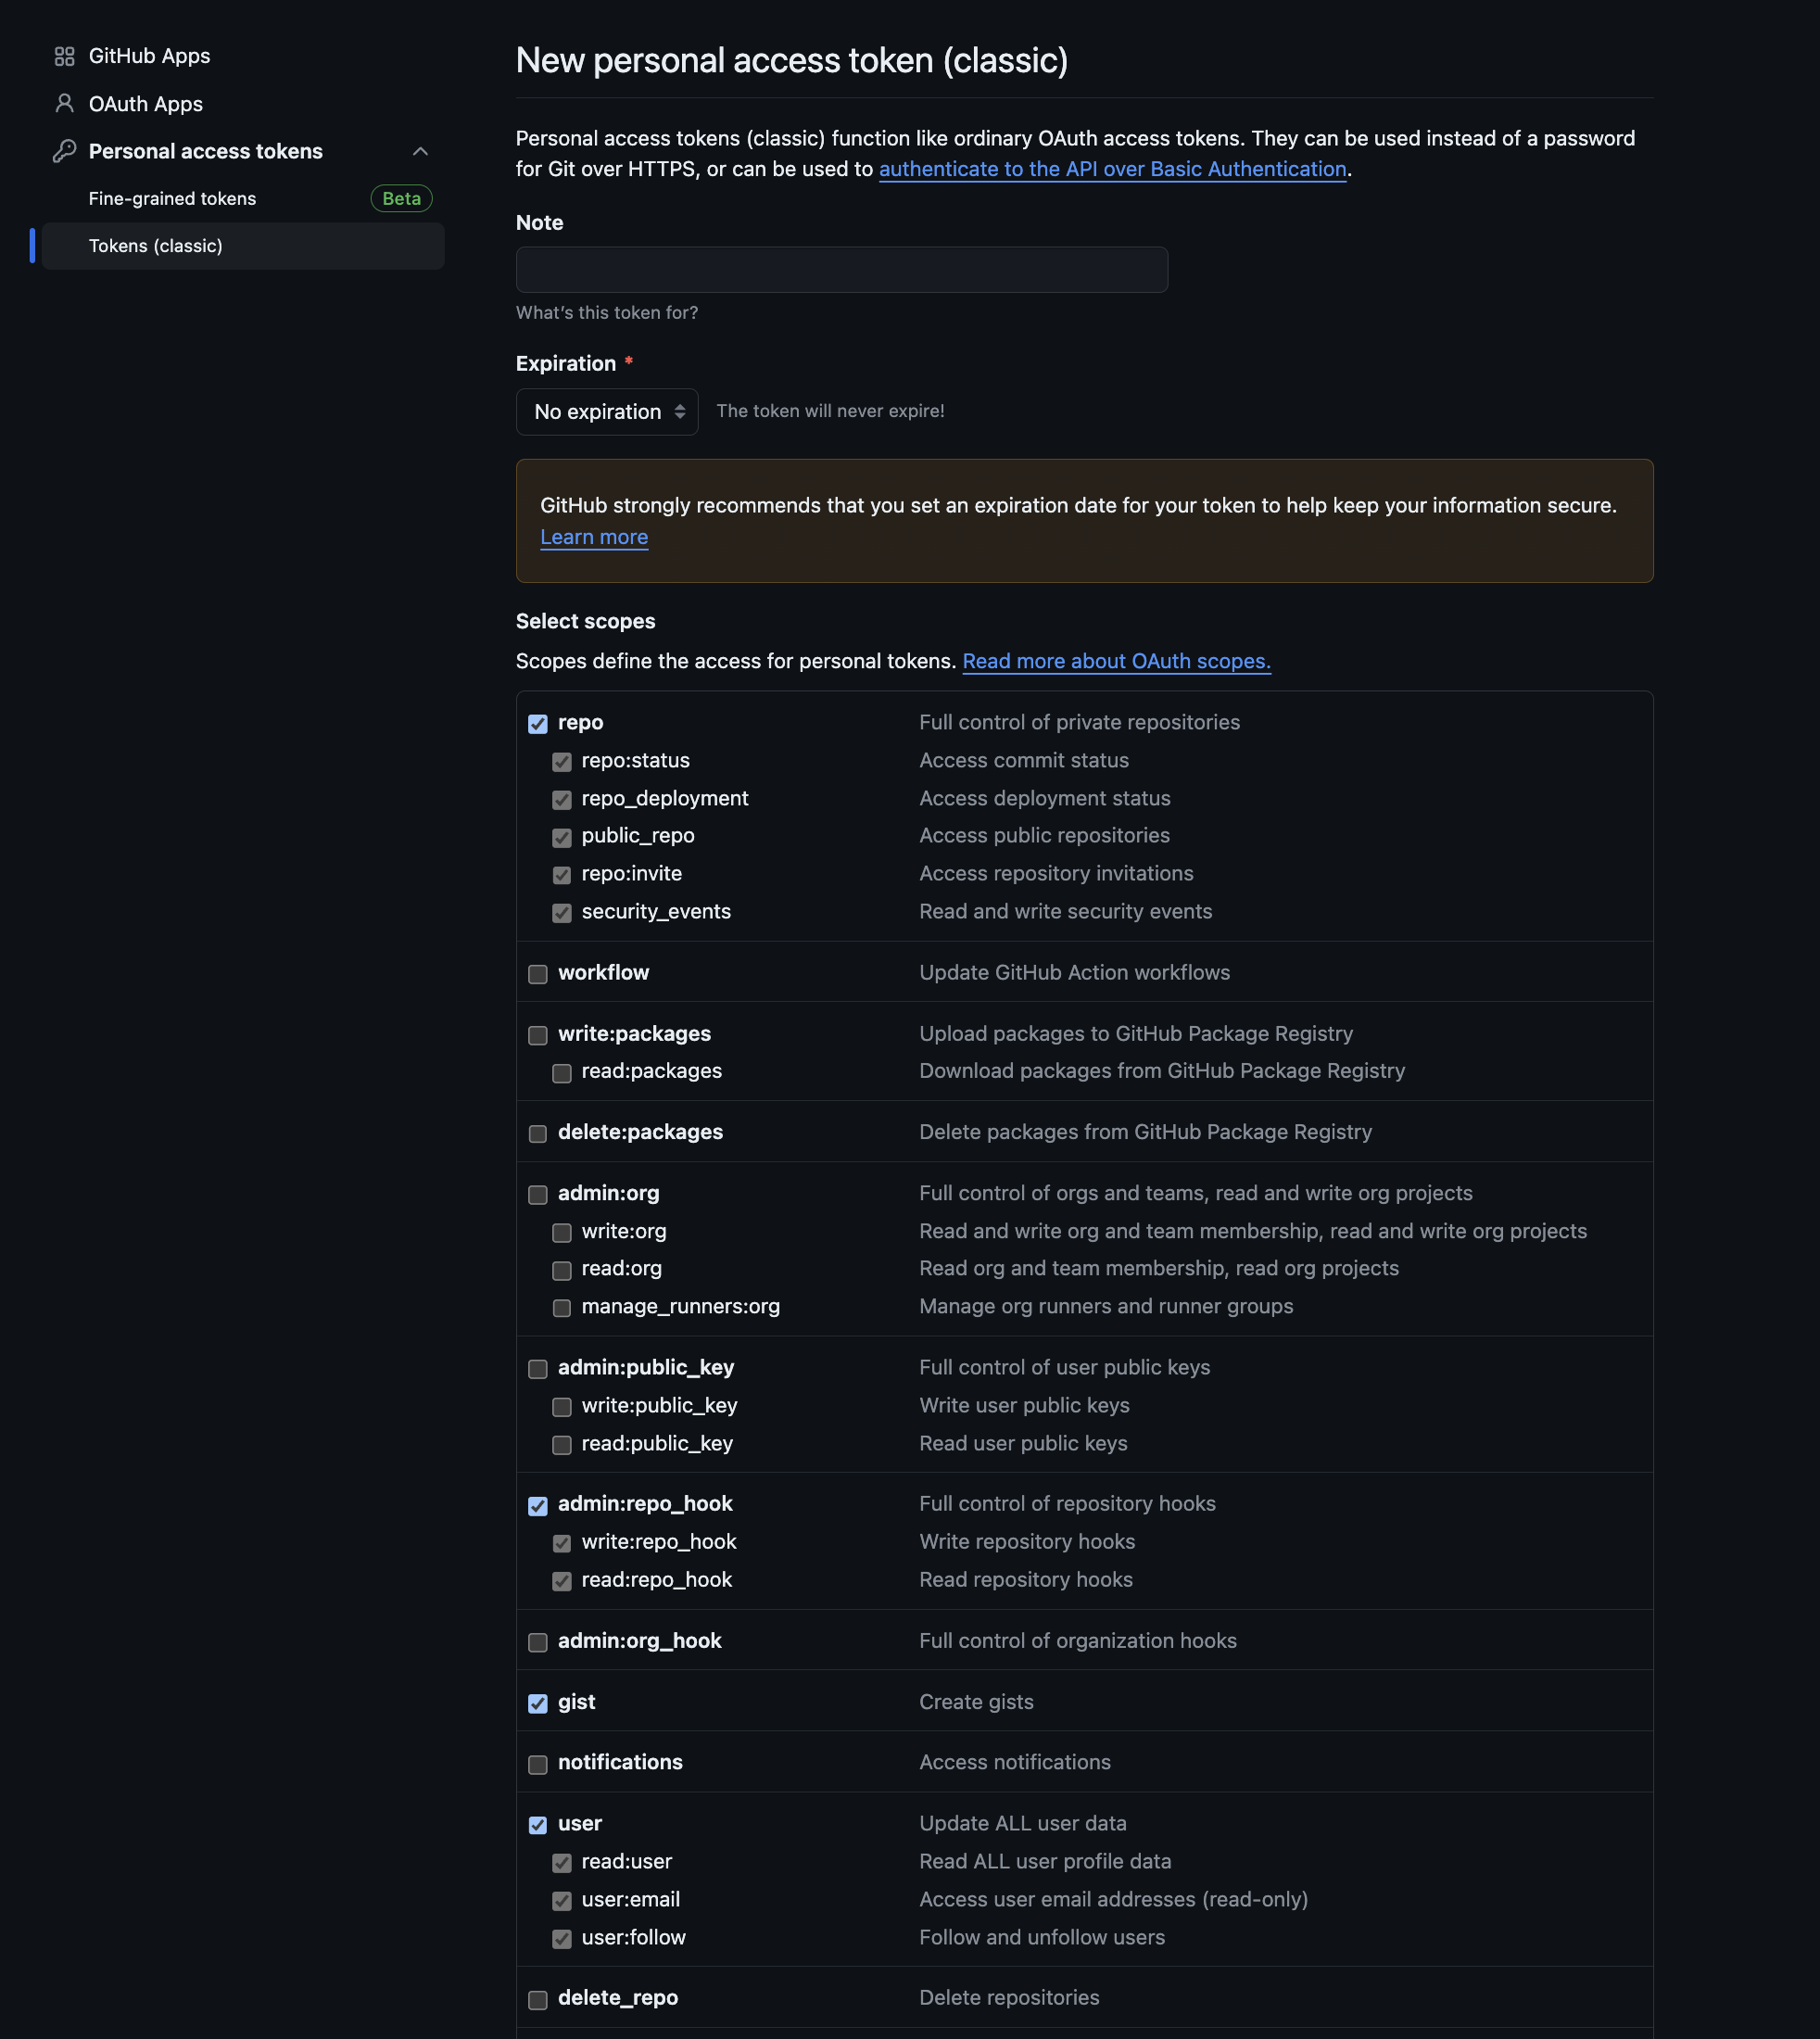
- 흰색 체크박스에 있는 코드를 복사하고 잊어버리지 않도록 하자
6-2. 깃허브 Webhook
- FE / BE 레포지토리에서
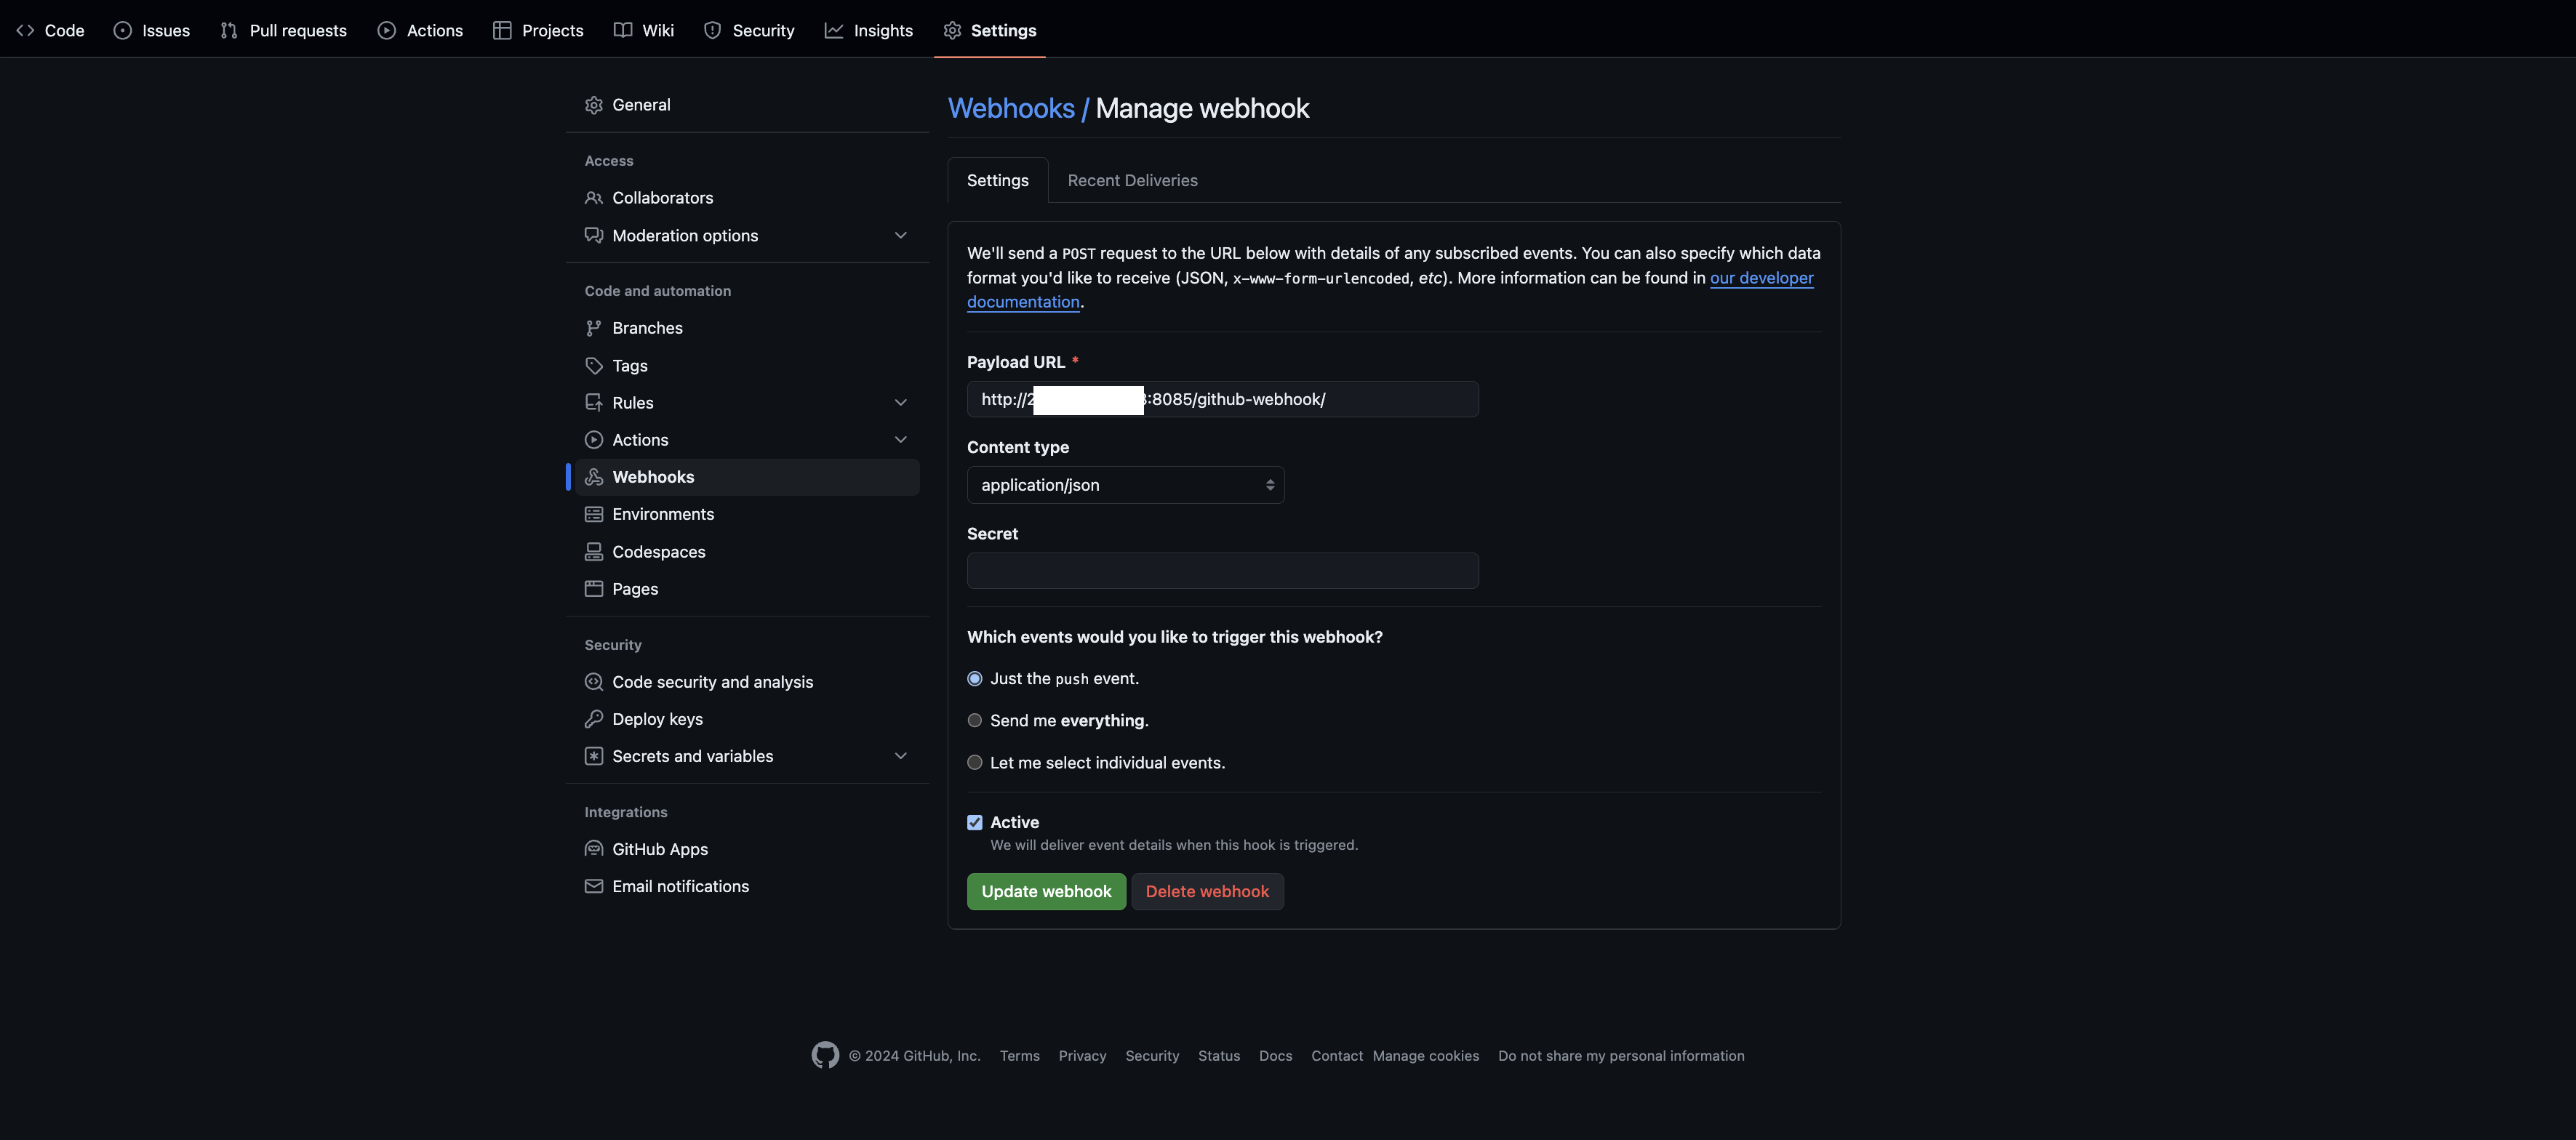
Settings-> 좌측 사이드바Webhooks
Payload URL: https://공인IP:8085/github-webhook/
Content type: application/json
Just the push event.
Active
설정 후Add webhook클릭
7. Jenkins Pipeline 설정
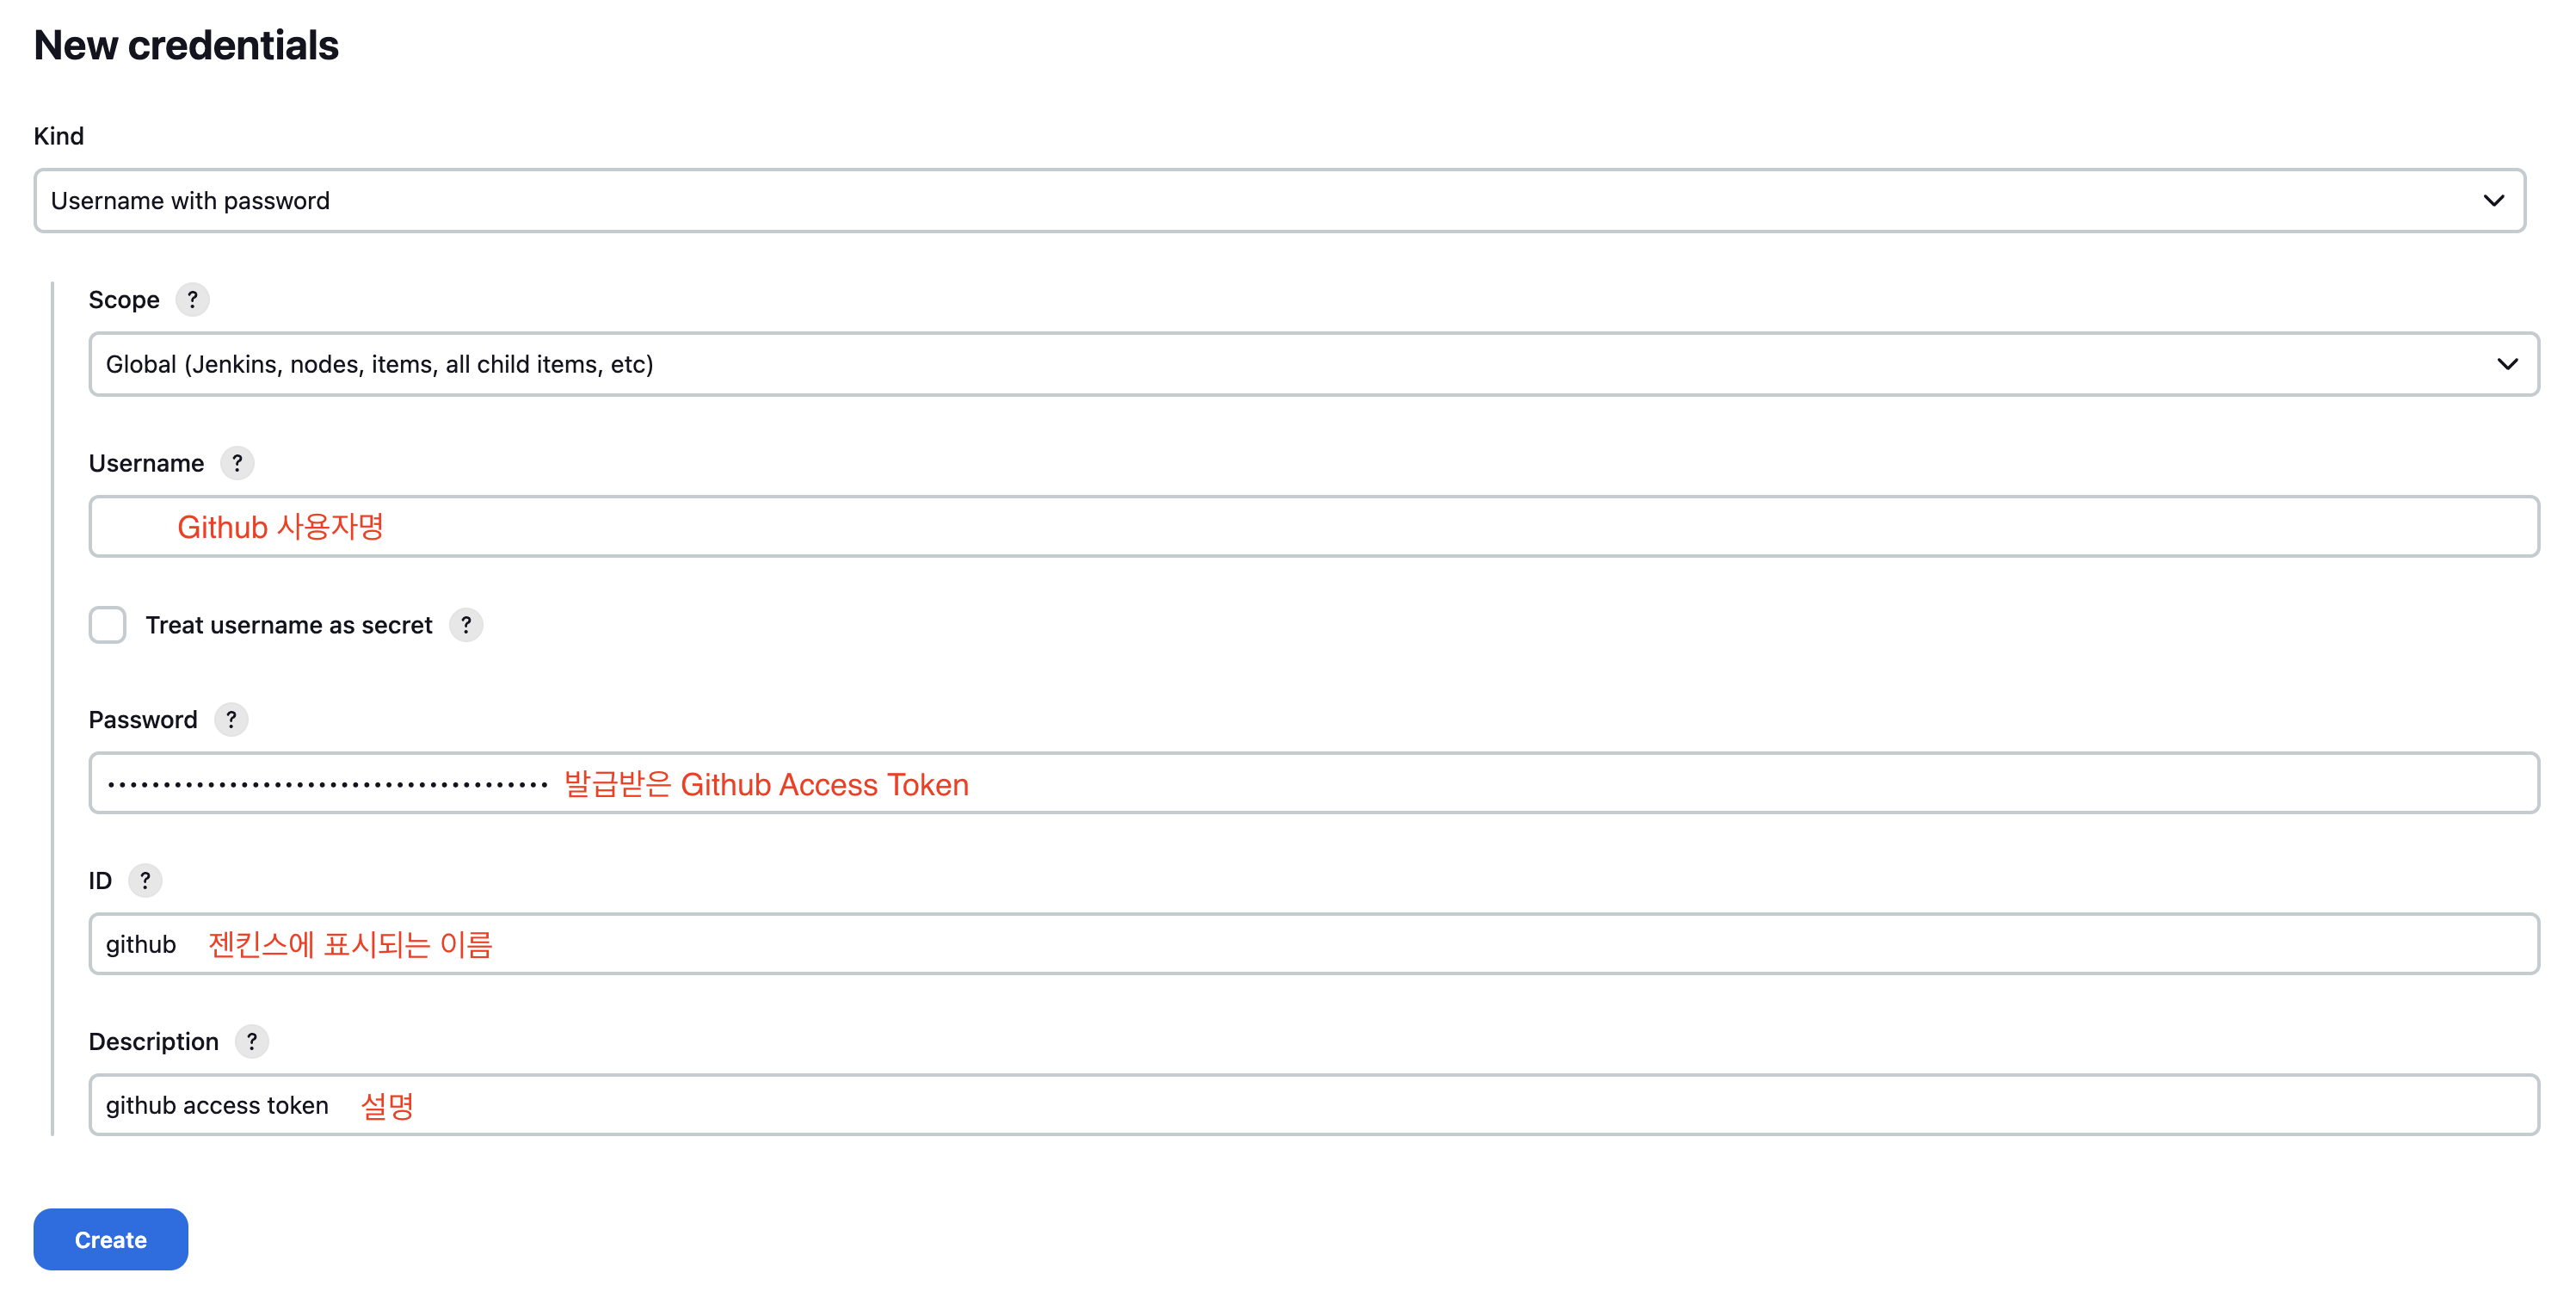
7-1. Jenkins Credential 설정
- 발급받은 Github Access Token을 젠킨스에 적용하자
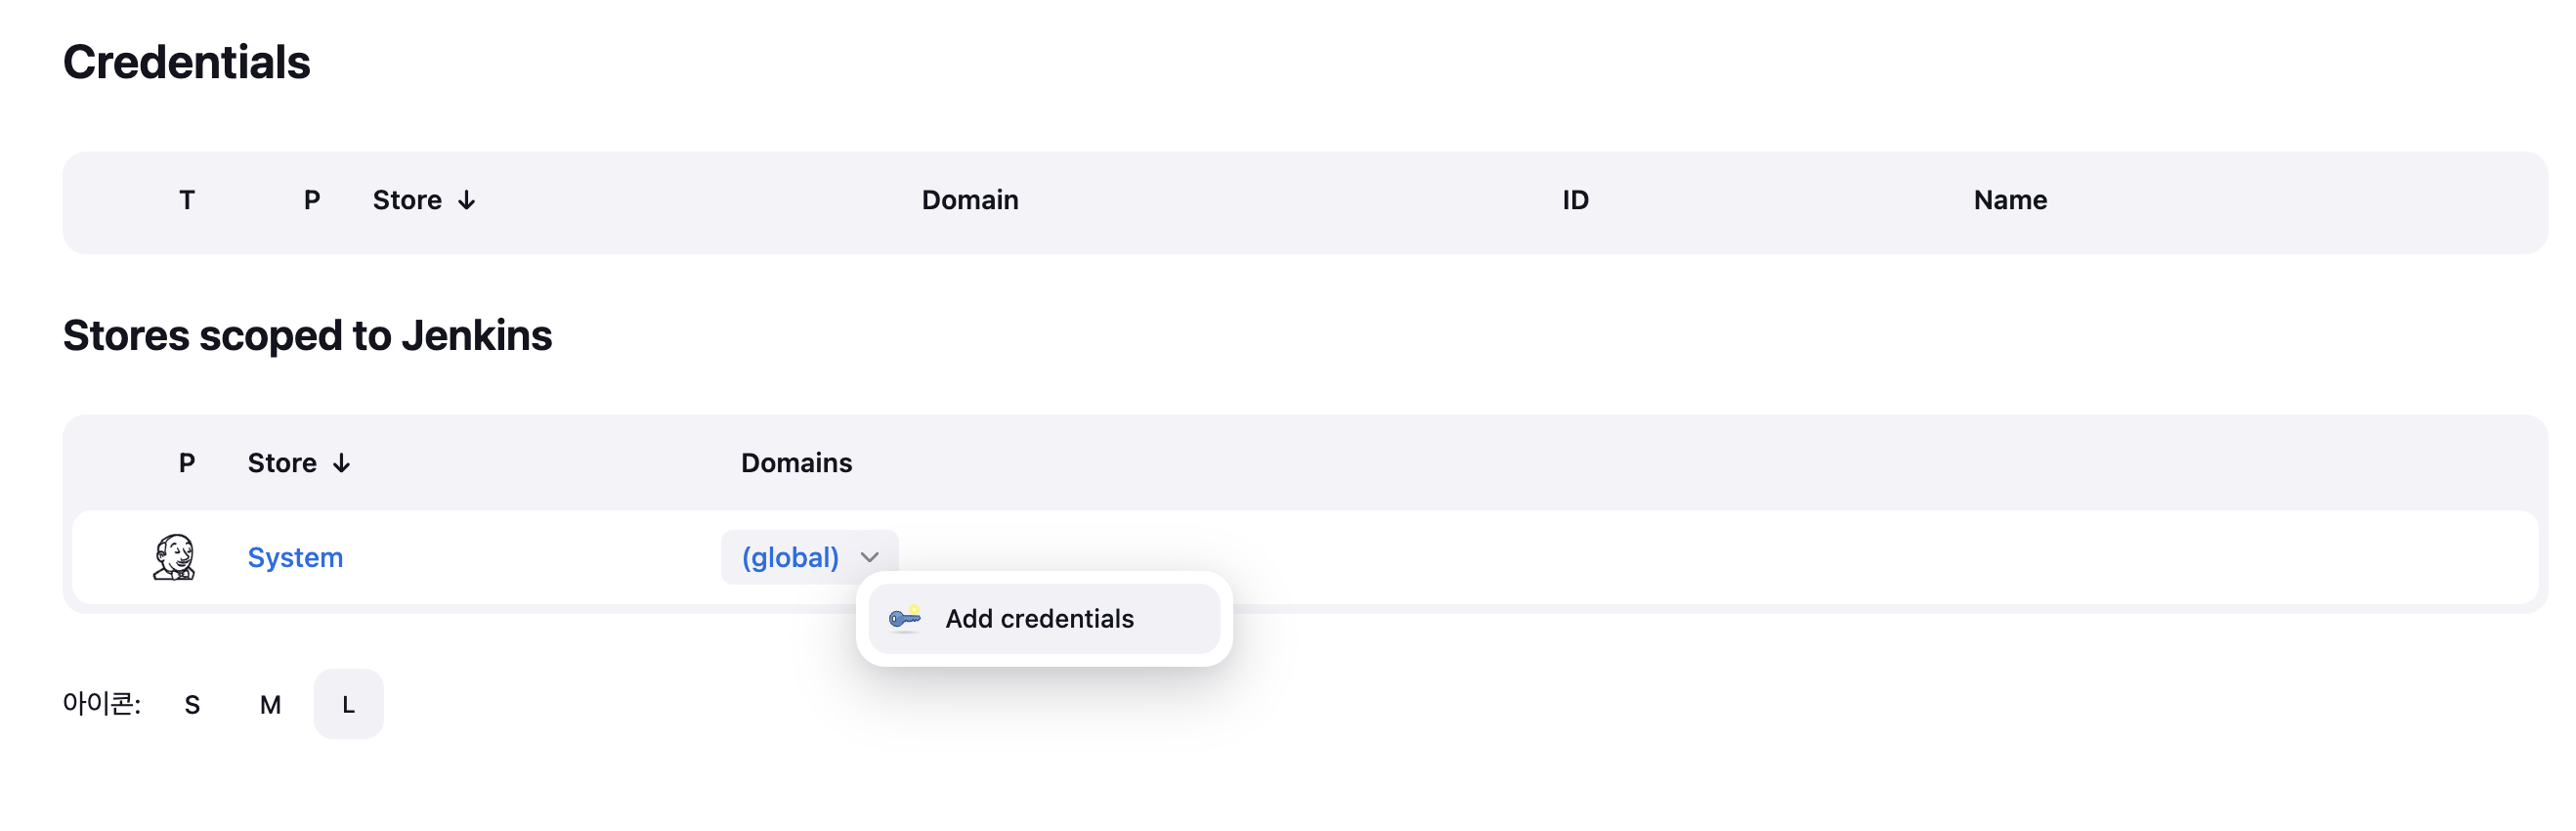
Jenkins 좌측 사이드바Jenkins 관리->Security->Credentials
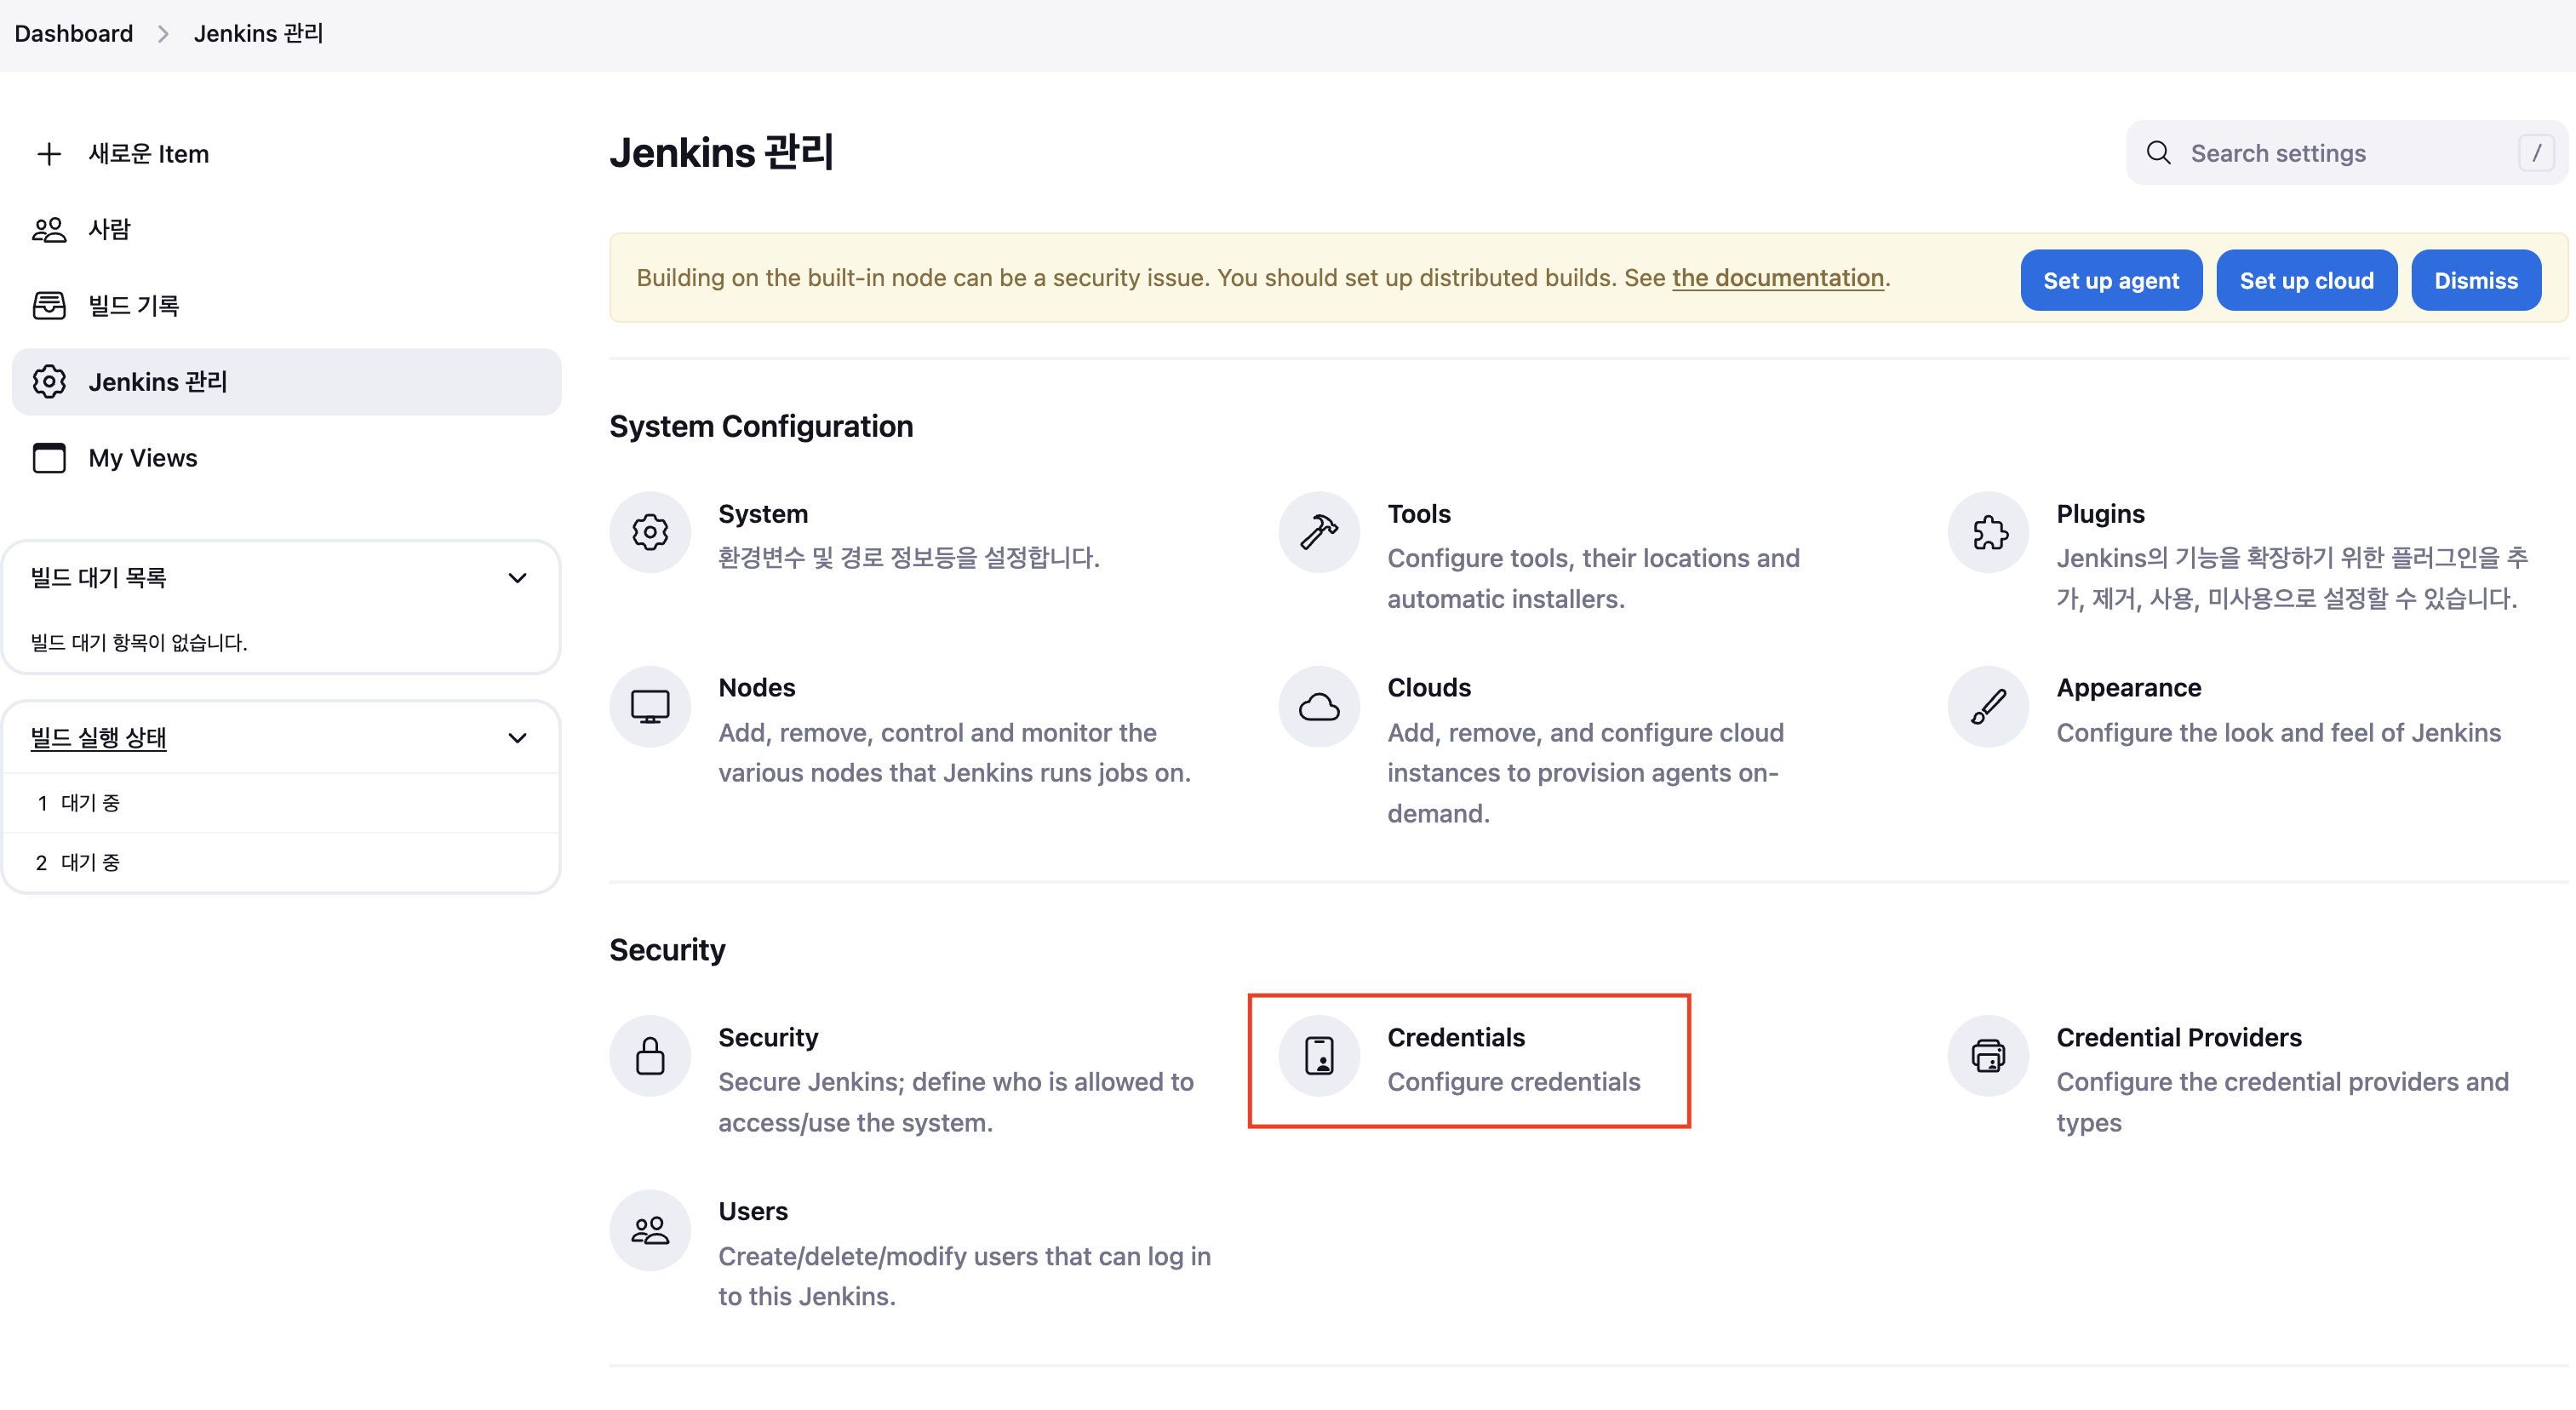
(global)hover -> 화살표 클릭 ->Add credentials
- 다음과 같이 입력 후
Create
7-2. Jenkins Pipeline 설정
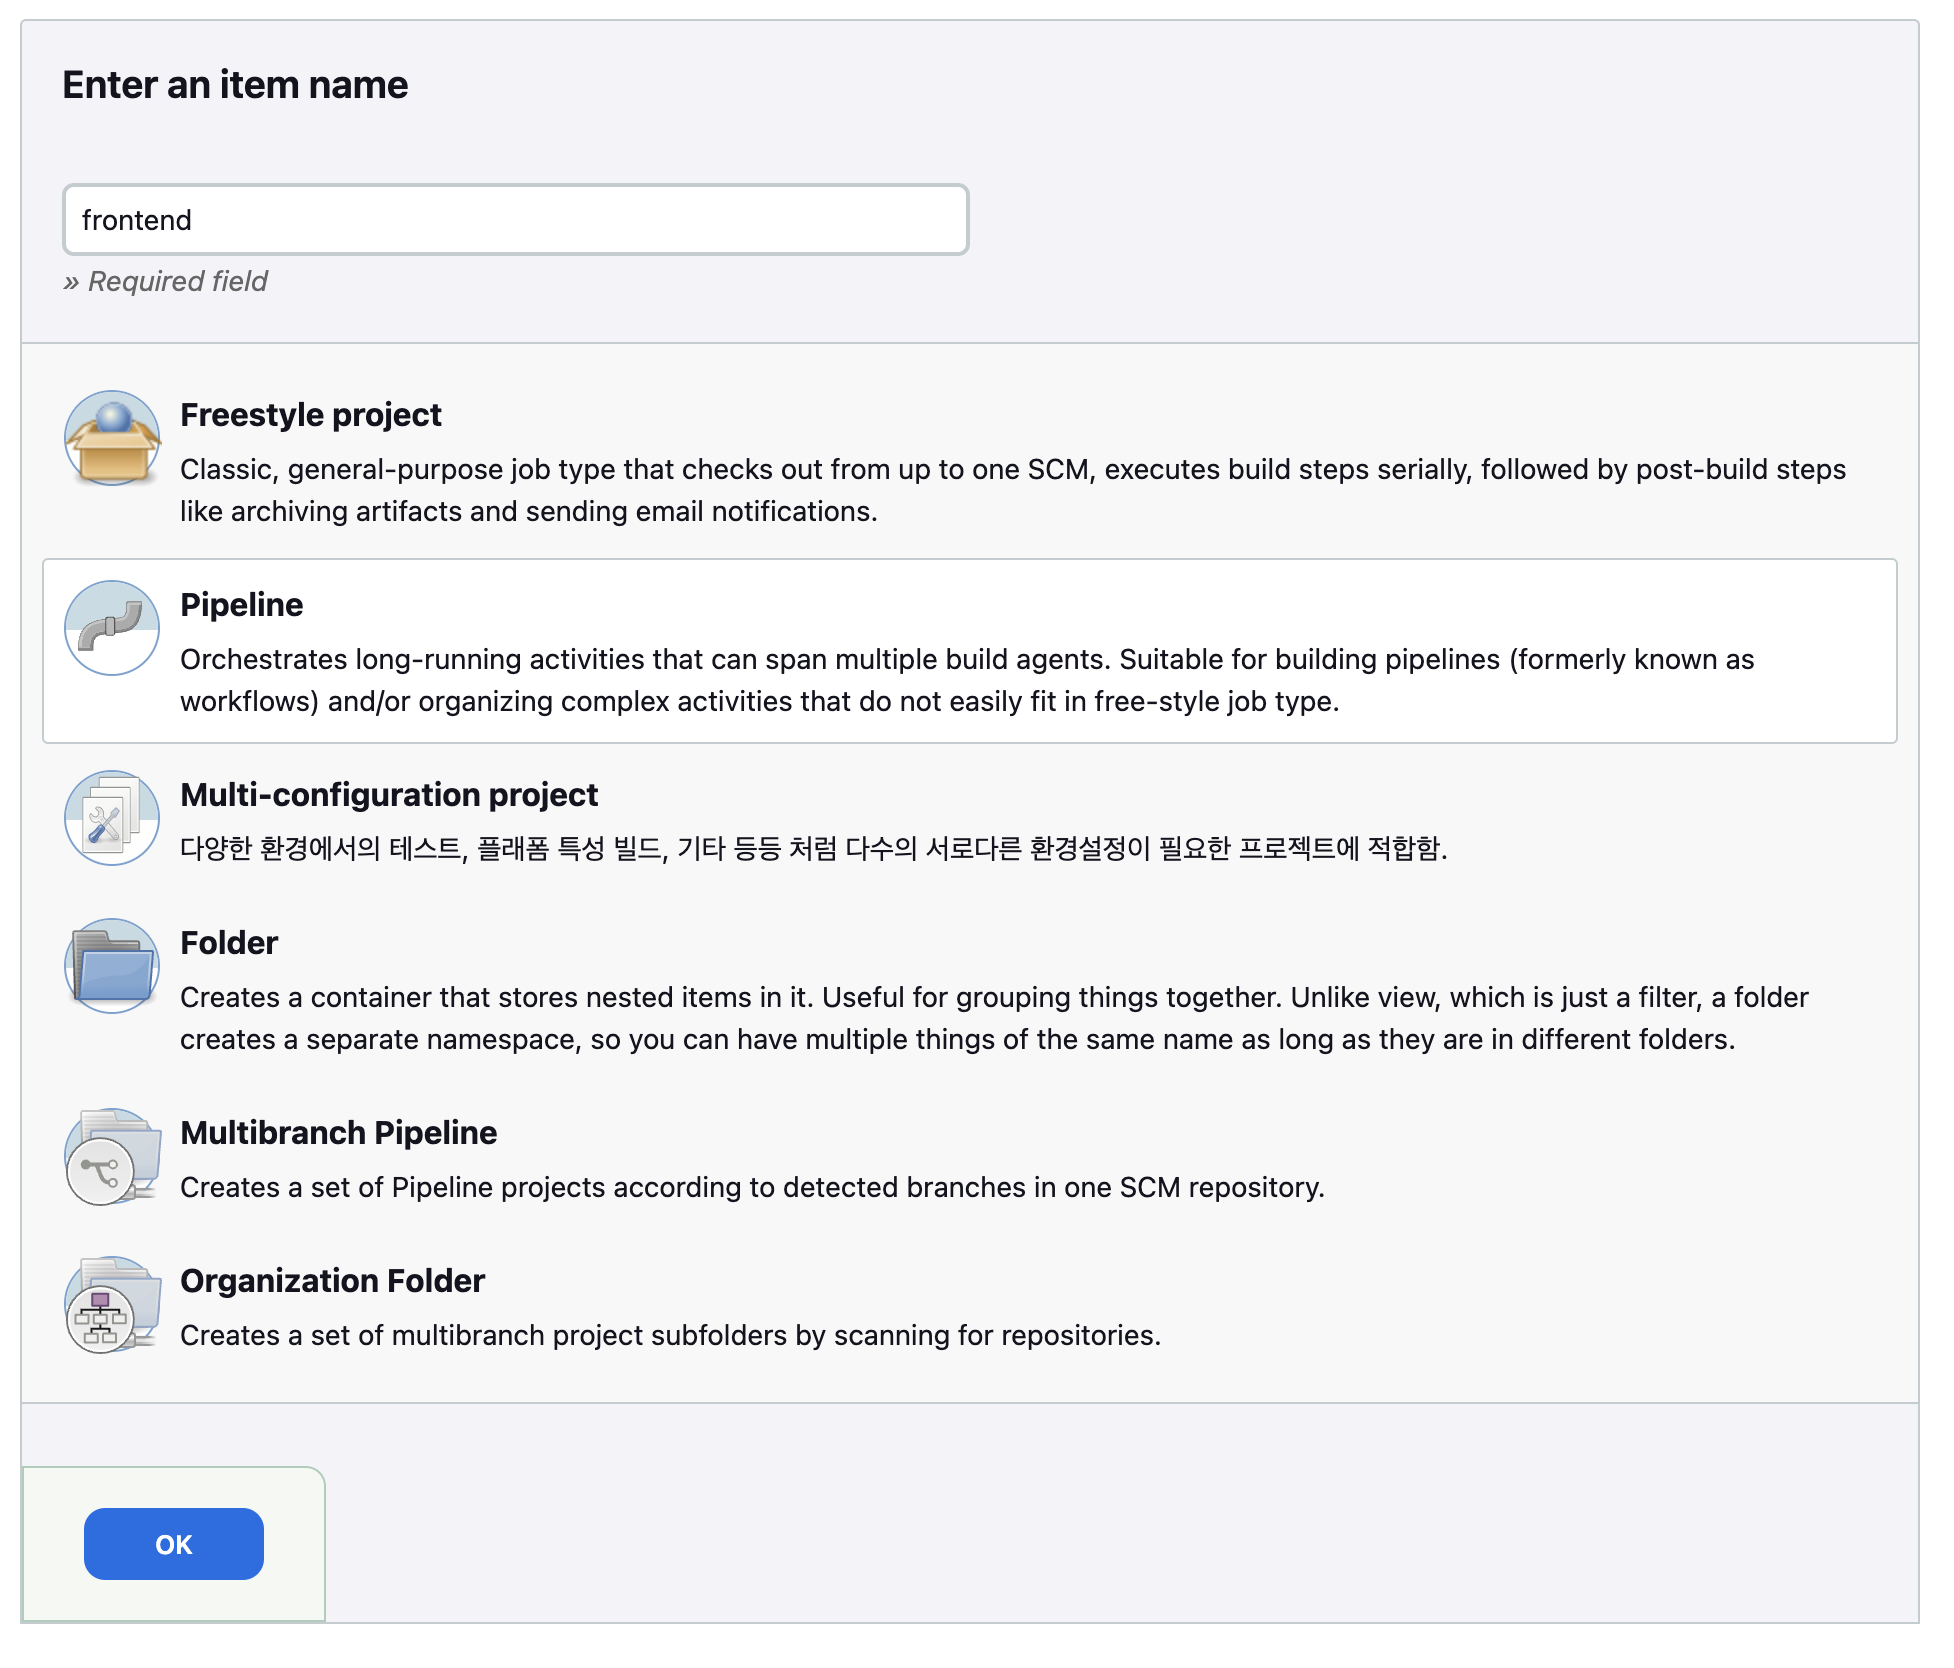
- Jenkins Dashboard ->
새로운 Item
이름 지정(본인은 레포지토리 명으로 만듦) 후Pipeline으로 설정하고OK
FE / BE 각각 하나씩 만들어 줄 예정
FE Pipeline
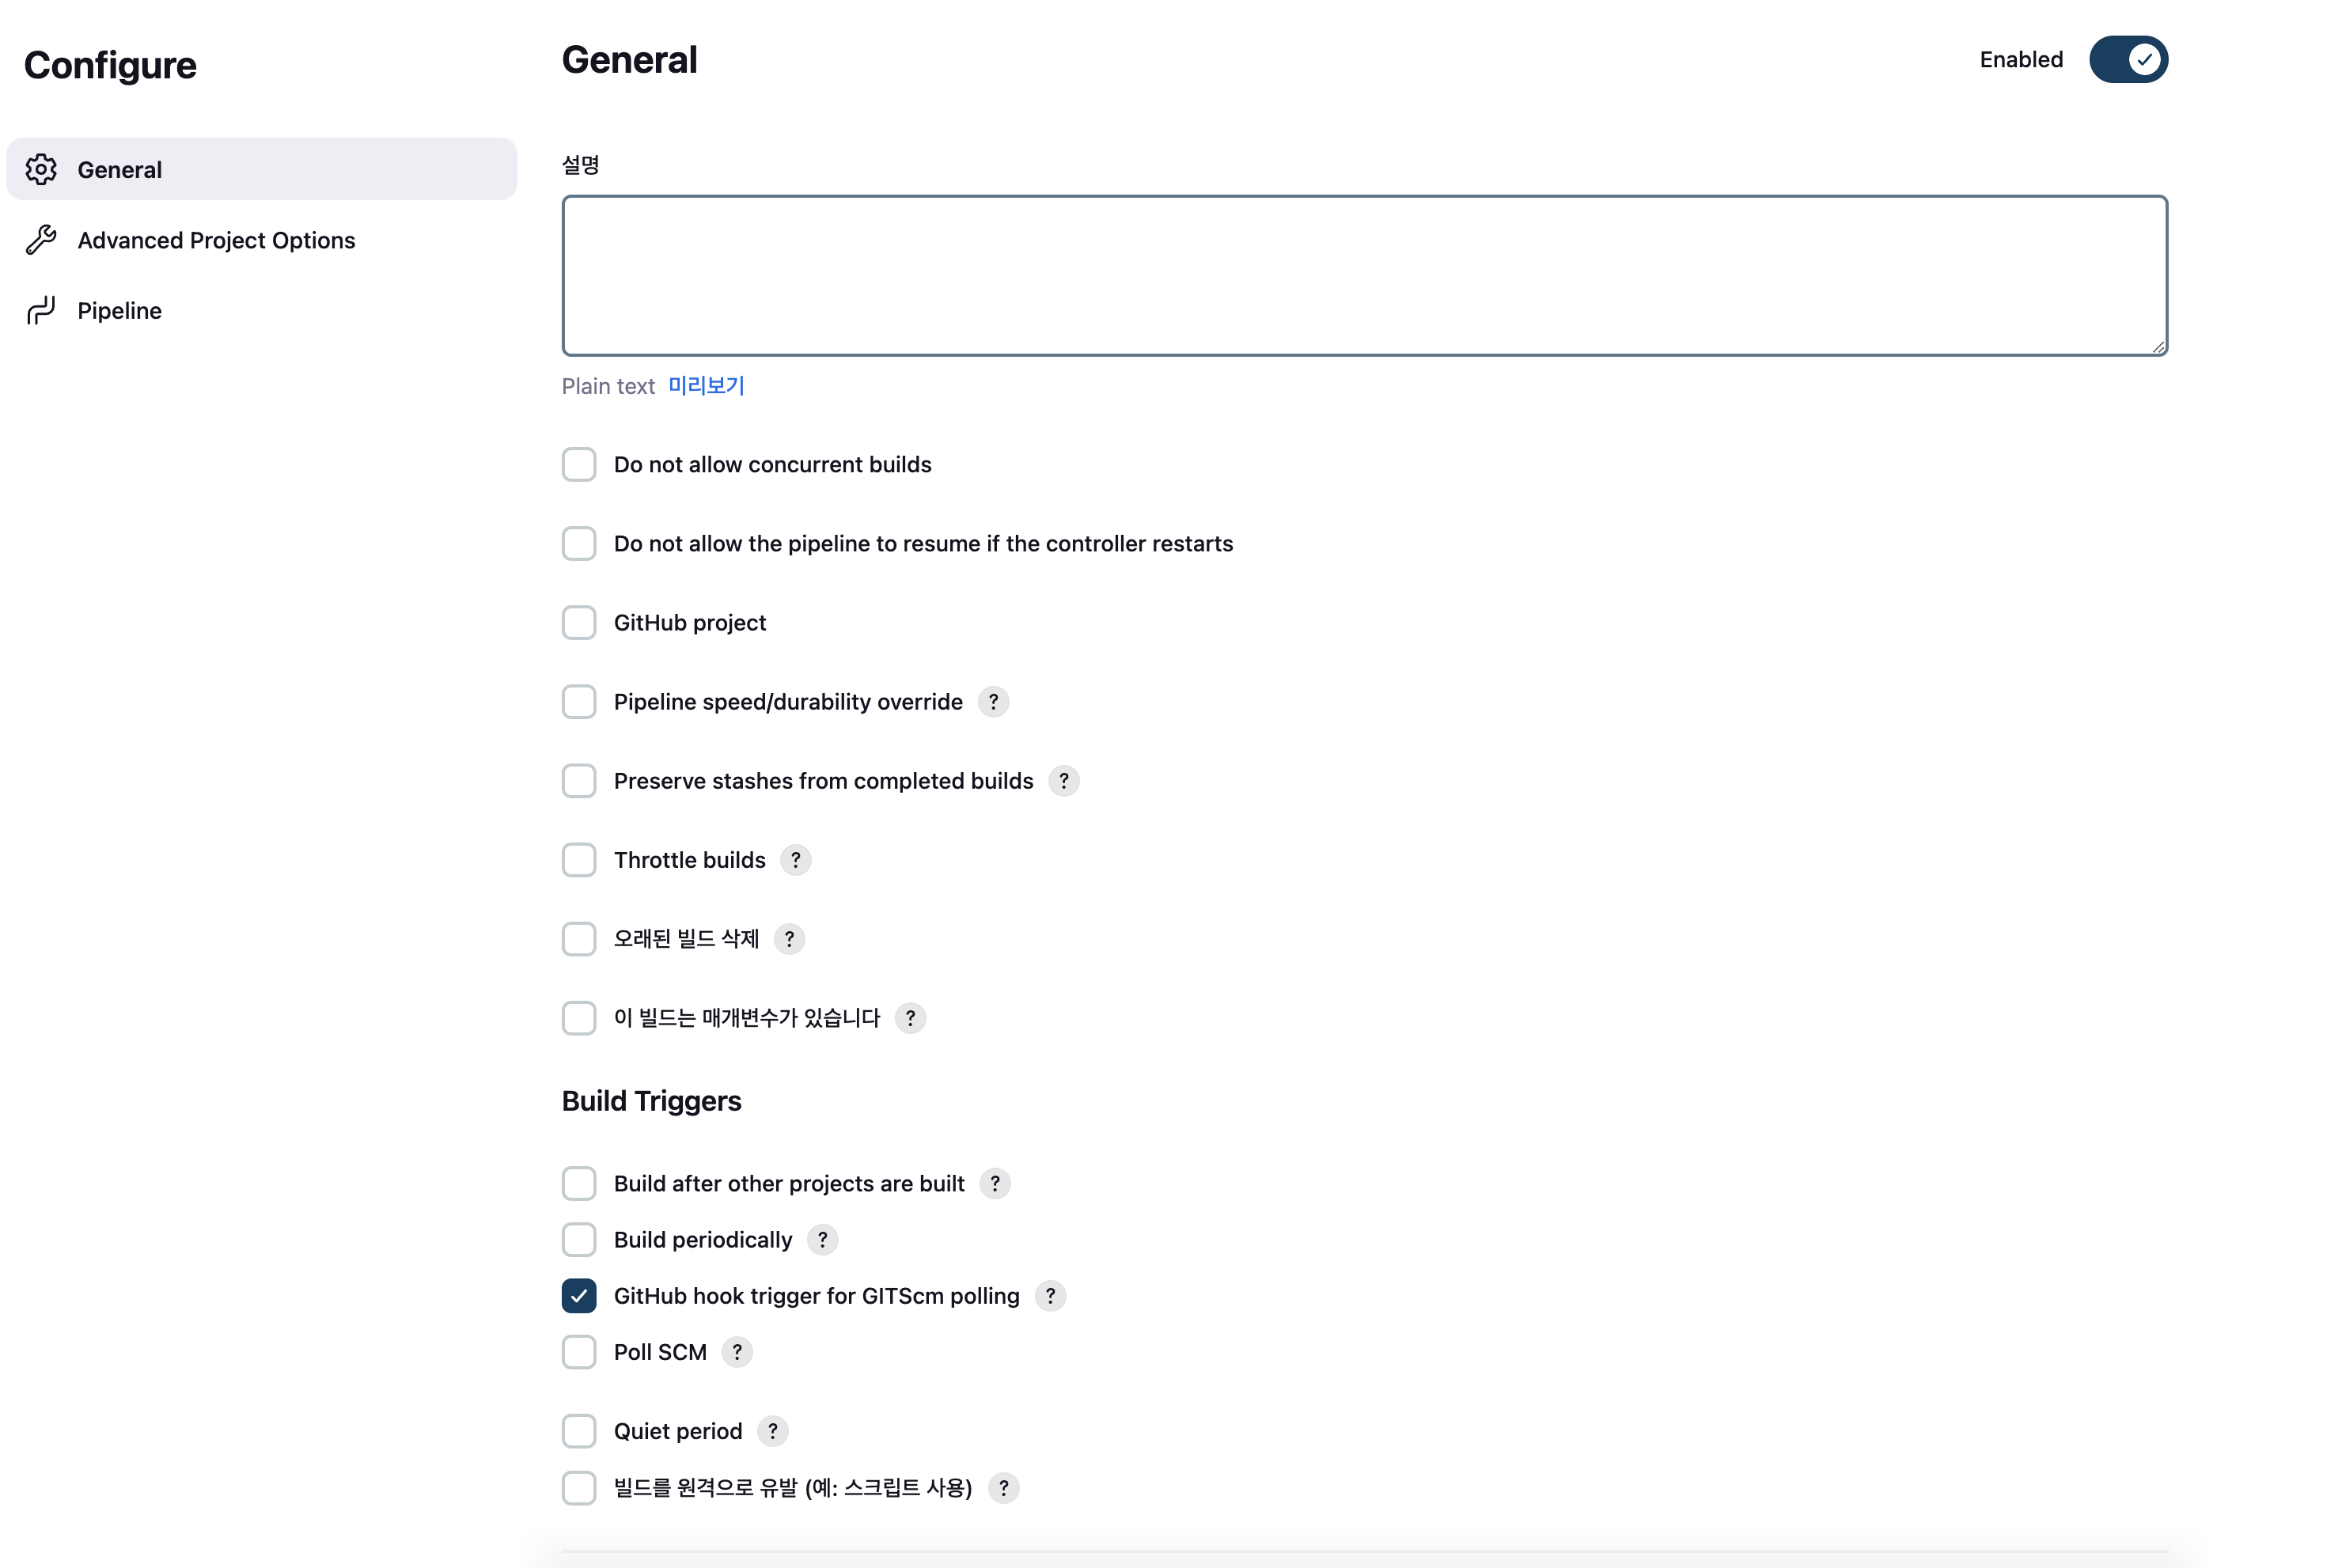
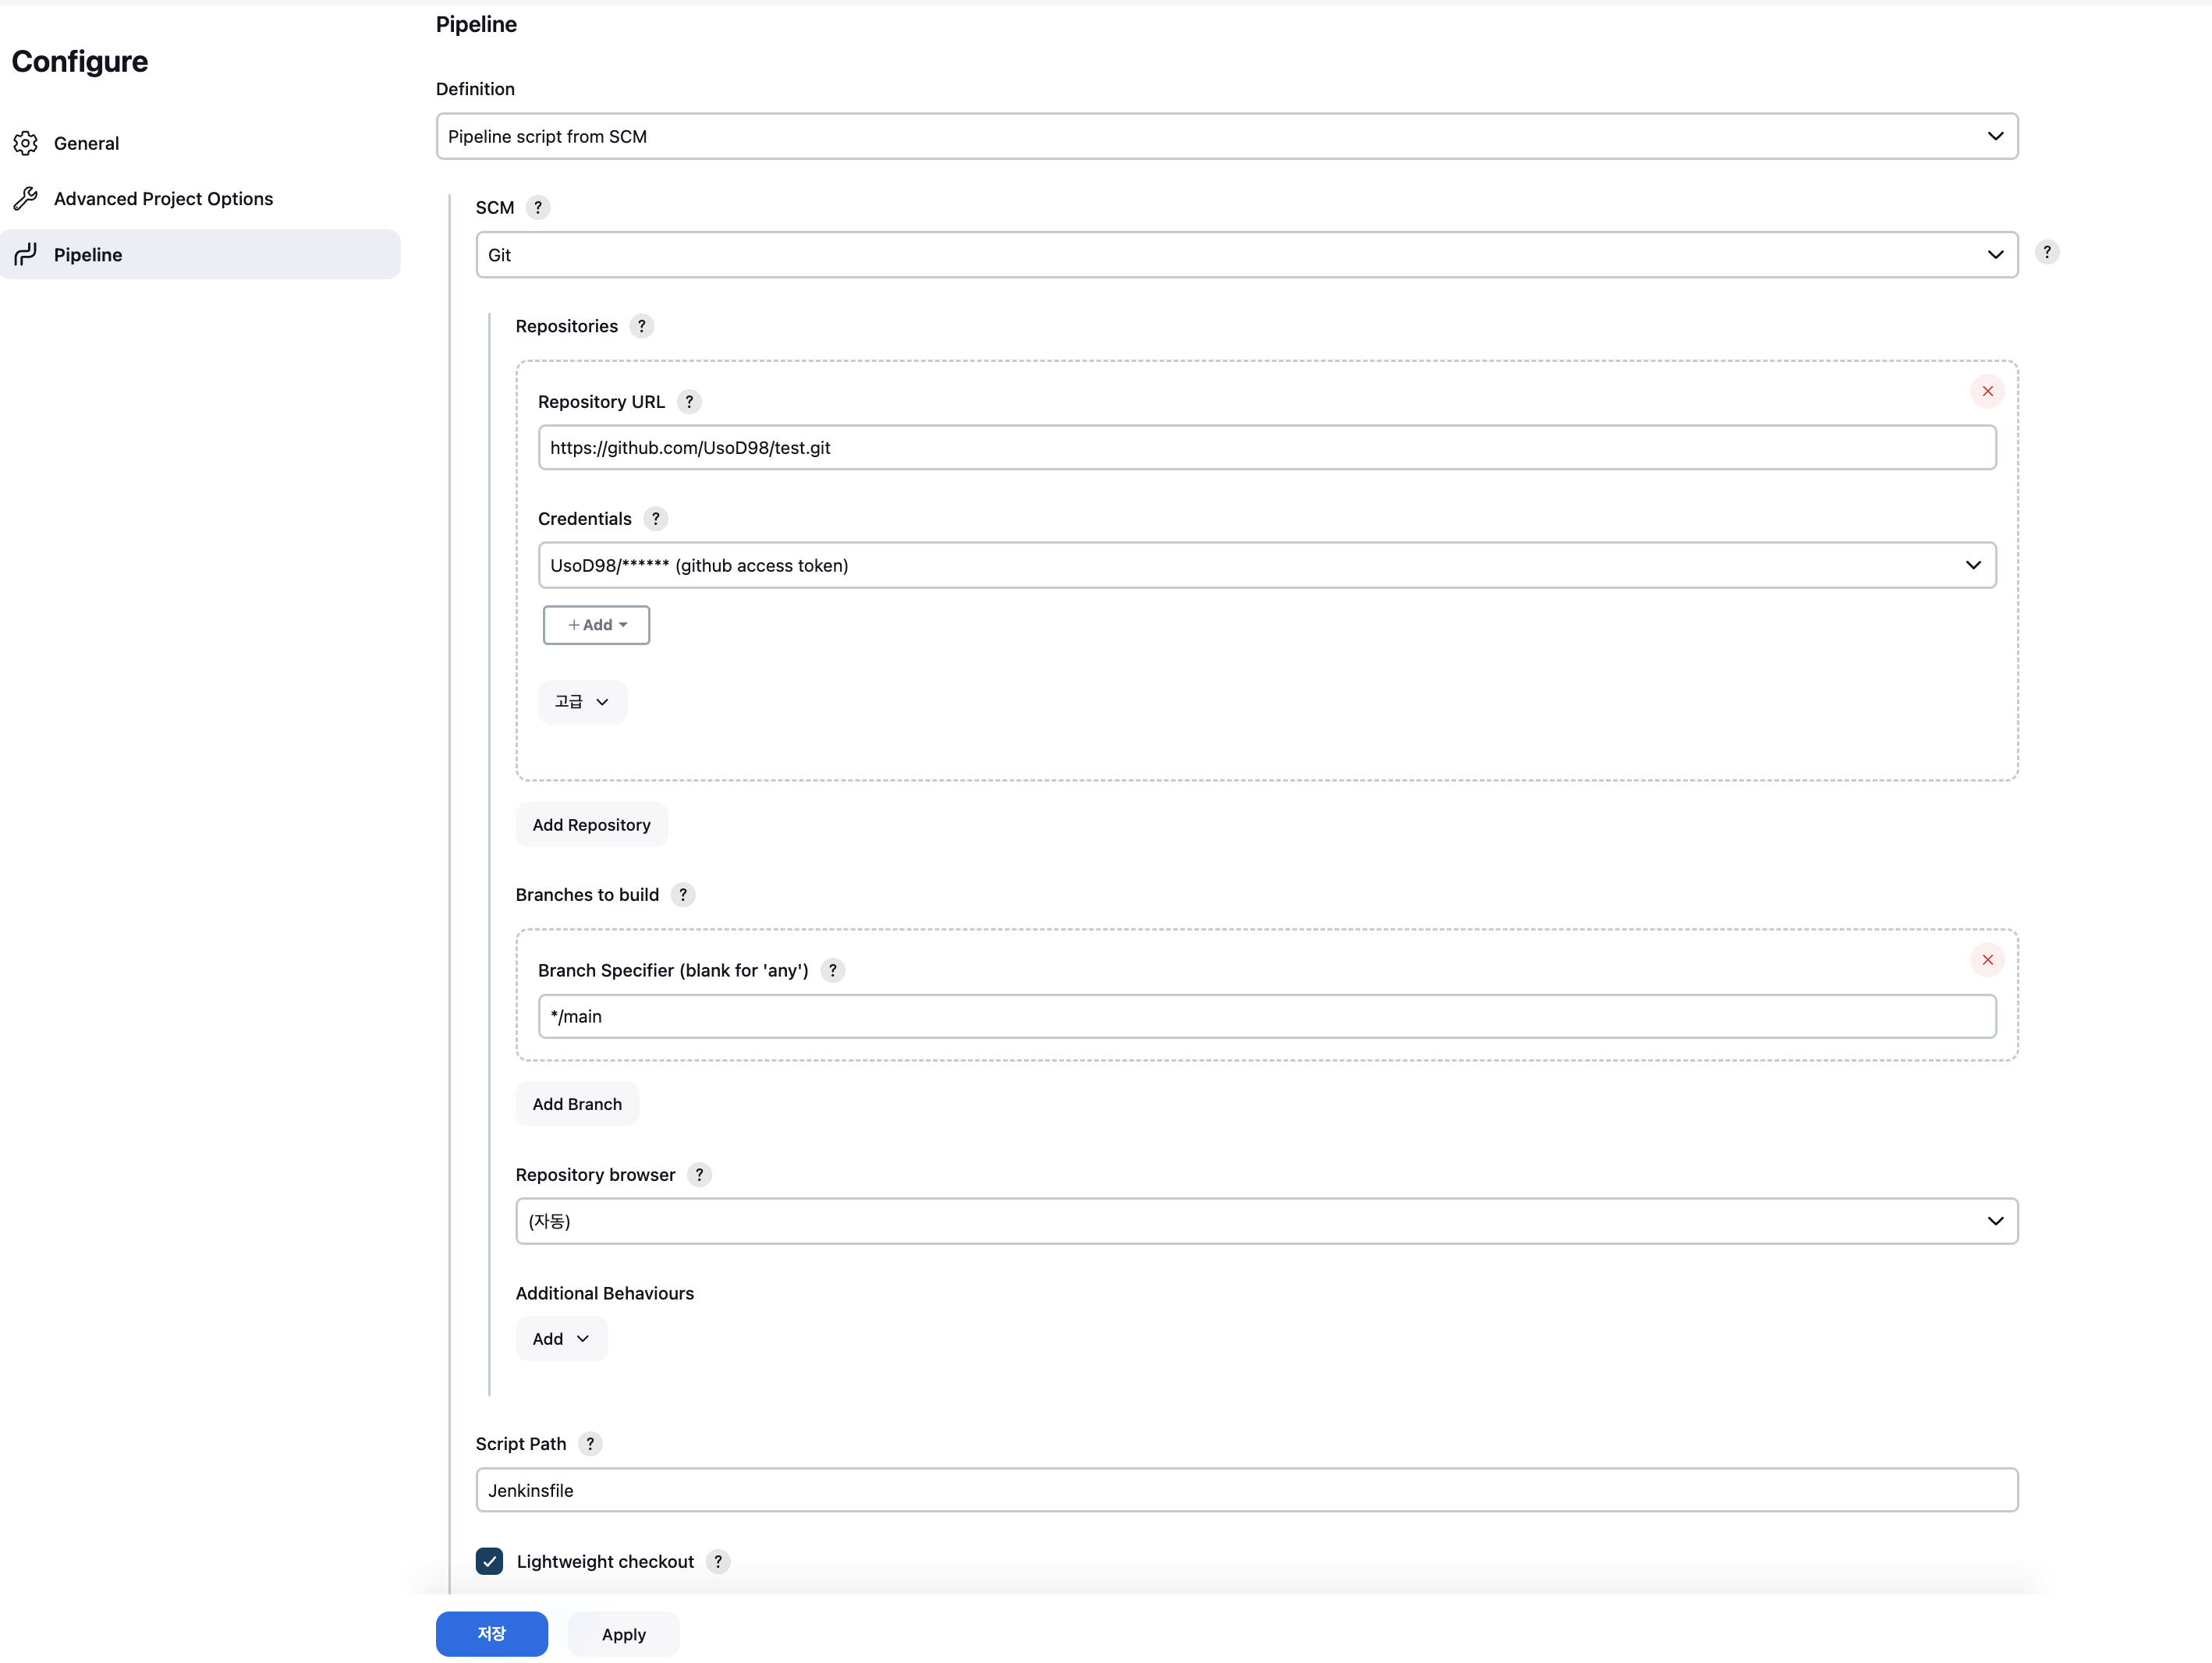
- name 입력 후
Pipeline체크 ->OK
- 다음과 같이 설정 후
저장
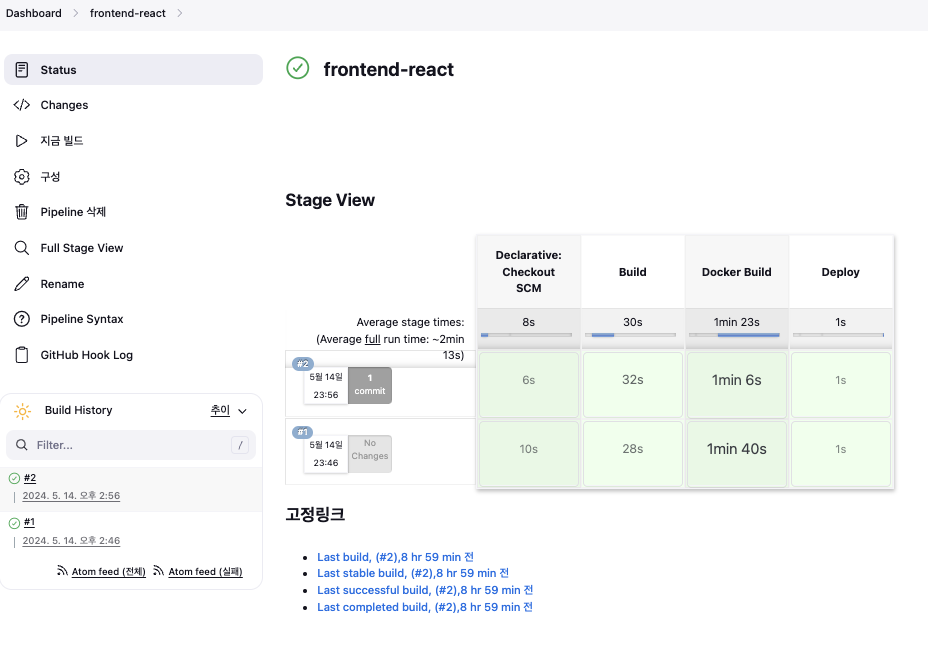
- 지금 빌드 후 결과 확인
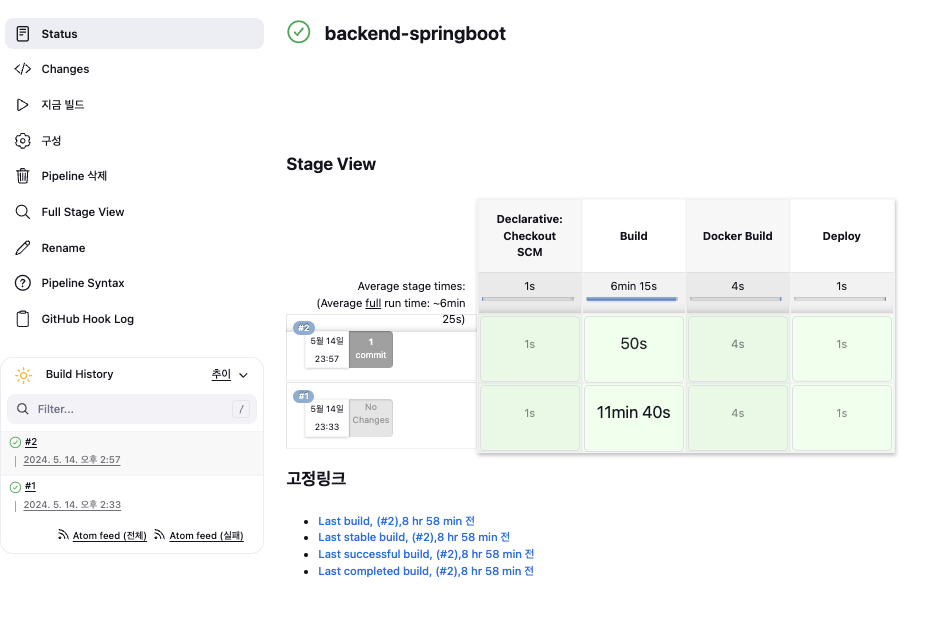
BE Pipeline 또한 같은 방식으로 생성
Github 웹훅 확인
이제 깃허브에 작업 내용을 push하고 젠킨스 화면에서 빌드가 자동으로 이루어지는지 확인하자
문제가 없다면 CI/CD 자동화 끝!

안녕하세요