✍ Nest
- Nest.js 공식문서와 인프런 Nest 강의를 기반으로 작성하였습니다.
- 원문 그 자체로 이해가 더 잘되는 경우는 번역하지 않고 그대로 가져왔습니다.
Nest(NestJS)는 효율적이고 확장 가능한 Node.js 서버측 애플리케이션을 구축하기 위한 프레임워크라고 한다. 어떻게 효율적인지, 확장이 가능한지 알아보자. 또, 순수 JS로도 코딩이 가능하지만 TypeScript를 빌드하고 완벽하게 지원하며 OOP, FP, FRP 요소를 결합한다.
Express와 같은 HTTP 서버 프레임워크를 사용하며 선택적으로 Fastify(express 이후 세대 프레임워크로 express 보다 더 잘 설계되어 있지만, express+Nest를 쓰면 Fastify를 쓰는 장점을 커버할 수 있기 때문에 굳이 사용하지 않는다고 한다.)를 사용할 수 있다. 이렇듯 공통 Node.js 프레임워크(Express/Fastify) 위에 추상화 수준을 제공하지만 API를 개발자에게 직접 노출하여 기본 플랫폼에서 사용할 수 있는 수많은 타사 모듈을 자유롭게 사용할 수 있다.
특징
- Nest는 모듈별로 import & export하기 때문에 서버 구조 파악에 용이하다.
- express 같은 경우는 app.js에
app.use/get를 이용하여 route 위주로 설계했지만, Nest는 하나의 app.js 파일에 다 넣는 게 아니고 유저 관련된 서비스면 사용자 모듈을 만들고, dm용, 워크스페이스용 모듈 등 서비스에 관련된 모듈을 각각 따로 만들어 그에 관련된 것들만 연결해준다. 그럼 Nest가 모듈간 연결된 걸 파악하여 한번에 실행해준다.
- express 같은 경우는 app.js에
- 기능들이 세분화되어있다.
- 하나의 개념이 한 가지 역할만 해서 명확하다.
- API 문서를 직접 수동으로 작성하지 않아도 코드를 통해 자동으로 정리해준다.
- 프로젝트를 하면서 notion에 수 십개의 API를 하나 하나 정리해서 쓰고 있던 내가 생각나는 날이다..
src 파악하기
express에서 MVC에 따라 폴더를 분리하였듯 Nest는 모듈, 서비스, 컨트롤러, main.ts로 분리한다. 견고한 Node 서버를 제작하기 위함이다.
코드의 흐름은 service(or other provider) + controller => module => main.ts의 순이다.
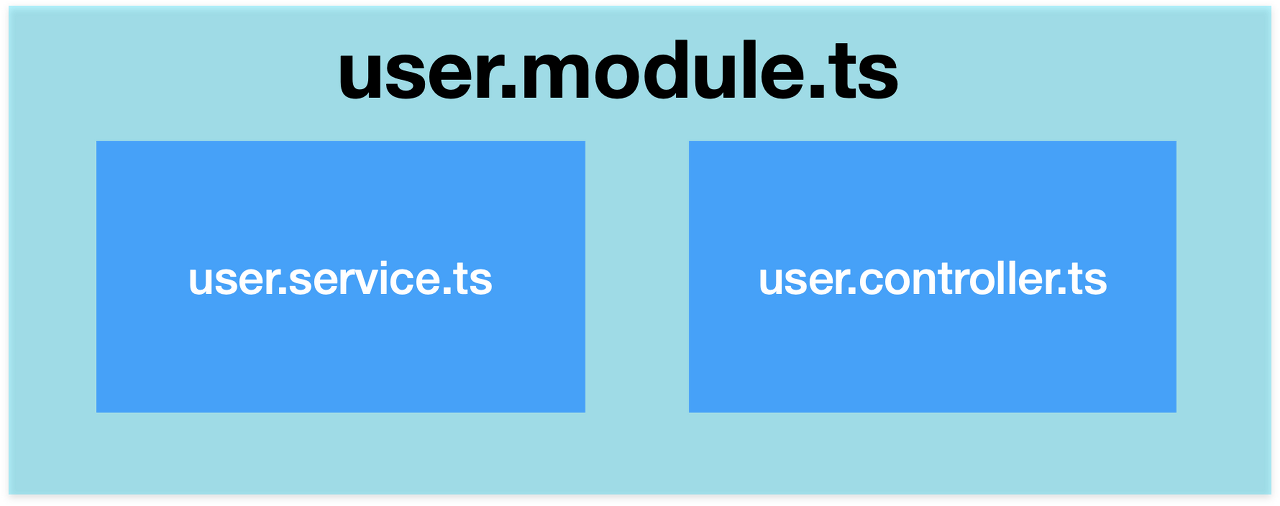
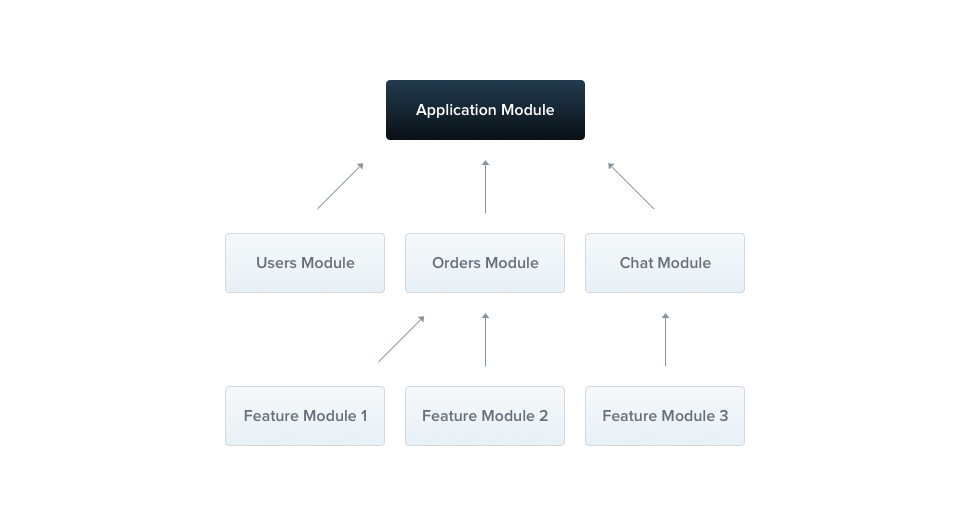
아키텍쳐적으로 보자면 controller와 service를 module로 묶어 한 덩어리로 관리하고 여러 module이 모여 하나의 프로젝트를 구성한다고 보면 되겠다.
- Module : 모듈은 비슷한 기능을 하는 코드들의 모음이다. service와 controller를 한 모듈로 묶어 하나의 덩어리를 형성한다. 기능별로 Module을 분리한다. 또한 모듈은 다른 모듈과 소통하는 등 자유롭게 사용할 수 있다.

*AppModule : 세부적인 다른 모듈을 모아 총괄하는 App Module이 있다. -> main.ts에서 app을 구성하는데 사용되고, listen으로 실행된다.

- controller : url을 받고 함수를 실행한다. 즉, routing 기능을 한다. Nest는 서비스 로직을 controller로부터 분리하여 실질적으로 함수(비즈니스 로직)은 Service에서 담당한다.
- Service : 비즈니스 로직을 작성한다. 그래서 유저에게 제공하는 'Service'라고 이름 붙여졌다. nest는 url을 처리하는 controller와 비즈니스 로직을 작성하는 부분을 분리하도록 설계됐다.
1. Modules
import { Module } from '@nestjs/common';
import { AppController } from './app.controller';
import { AppService } from './app.service';

@Module({
  imports: [],
  controllers: [AppController], // route
  providers: [AppService],
})
export class AppModule {}
service와 controller를 한 모듈로 묶는다고 했듯, 실제 코드를 살펴보면 데코레이터를 통해 controller와 provider(옵션)를 부착하는 모습을 볼 수 있다.
2. Controllers (routing)
Decorator
decorator, which is required to define a basic controller.
데코레이터가 붙은 클래스, 메소드(함수) 및 변수 등에 데코레이터에서 정의된 기능이 동작하는 것을 의미한다. 앞에 @를 붙여 사용하고, 함수에 기능을 추가해준다.
e.g. we'll use the @Controller() decorator, which is required to define a basic controller.
handling incoming requests and returning responses to the client.
컨트롤러의 목적은 애플리케이션에 대한 특정 요청을 수신하고 클라이언트에게 응답을 보내는 것이다. 특정 url에 반응하여 어떠한 로직을 수행하는 부분이다. 정확하게는, 특정 메서드로 특정 url에 접근하면 무슨 로직을 처리해야할지 연결하는 부분이다. 비즈니스 로직 자체는 Service로 분리한다.
2-1. Controllers와 Service의 관계
컨트롤러에서 사용자 정보를 가져오라는 요청을 받으면 비지니스 로직인 서비스로 가서, 서비스에서 실제로 DB 요청을 한다. 라우터가 해야되는 동작은 서비스고, 컨트롤러는 서비스를 실행한 다음 결과값을 받아서 리턴해준다.
서비스 단위에서는 요청과 응답에 대해서는 모르지만 컨트롤러는 req, res에 대해 알아야 한다. 요청을 조작해서 서비스로 넘긴다.
app.controller.ts
@Controller('abc')
export class AppController {
  constructor(private readonly appService: AppService) {}
  // class의 constructor 부분에 appService를 부여

  @Get('hello') // GET/abc/hello : HTTP메소드/공통주소/세부주소
  getHello(): string {
    return this.appService.getHello();
  }

  @Post('hi') // POST/abc/hi : HTTP메소드/공통주소/세부주소
  postHello(): string {
    return this.appService.postHello();
  }
}
app.service.ts
import { Injectable } from '@nestjs/common';

@Injectable()
export class AppService {
  getHello(): string {
    return 'Hello World!';
  }

  postHello(): string {
    return 'Hello World!';
  }
}
2-2. Controllers Routing
@Controller() decorator allows us to easily group a set of related routes, and minimize repetitive code. For example, we may choose to group a set of routes that manage interactions with a customer entity under the route /customers. In that case, we could specify the path prefix customers in the @Controller() decorator so that we don't have to repeat that portion of the path for each route in the file.
prefix 알아보기
@Controller('abc') // 함수들의 공통적인 라우트 (optional route path prefix of `abc`)
export class AppController {
  constructor(private readonly appService: AppService) {}

  // 괄호 안에 들어가는 게 세부 주소
  @Get('hello') // GET/abc/hello : HTTP메소드/공통주소/세부주소
  getHello(): string {
    return this.appService.getHello();
  }

  @Post('hi') // POST/abc/hi : HTTP메소드/공통주소/세부주소
  postHello(): string {
    return this.appService.postHello();
  }
}

// Get('hello')를 Controller('abc')에 연결하는 코드를 작성하지 않았는데
// 어떻게 자동으로 연결되는 걸까?
// Nest 데코레이터(에노테이션)가 자동으로 해준다.
다른 예시로 route path 더 자세하게 알아보기
import { Controller, Get } from '@nestjs/common';

@Controller('cats') // we've declared a prefix for every route ( cats),
export class CatsController {
  @Get() // and haven't added any path information in the decorator
  findAll(): string {
    return 'This action returns all cats';
  }
}
For example, a path prefix of customers combined with the decorator @Get('profile') would produce a route mapping for requests like GET /customers/profile.
every route인 데코레이터 Controller에 cats를 설정하였고, 추가적으로 다른 path는 설정하지 않았다. 따라서 route는 GET /cats가 된다. @Get('profile)로 작성한다면 route는 GET/cats/profile가 된다. 또한 위의 예에서 이 엔드포인트에 GET 요청이 발생하면 Nest는 요청을 사용자 정의 findAll()메서드 로 라우팅한다. 이 메서드는 200 상태 코드와 관련 응답(문자열)을 반환한다.
3. Service는 왜 필요한가요?
독립적이고 req/res를 모르기 때문에 중복적으로(ex:유저 한 명 정보 받아오기) 발생하는 요청에 대해서 재사용성이 높다. 또한 Req, res를 쓸 필요가 없어서 나중에 테스트할 때 편리해진다. 인자가 있으면 테스트 할 때 항상 Mocking을 해야되기 때문이다. 이런 구조의 강제성 때문에 협업자들과의 코드 구조 통일성이 어느 정도 지켜진다.
파이널 프로젝트를 하면서 express를 이용하여 Nest의 서비스와 같이 함수를 따로 분리하여 재사용성을 높였었는데, 같이 백엔드로 작업했던 팀원 분은 이것에 익숙하지 않아서 통일성이 지켜지지 않았었다. Nest는 서비스라는 모델을 도입하면서 구조의 강제성을 가지기 때문에 express에서는 지켜지지 않는, (왜냐면 express는 정해진 틀이 없어 자유롭기 때문에 사람마다 구조가 다양하다. 정답은 없다.) 협업자들과의 약속이 지켜진다.
Providers
공급자는 Nest의 중요한 개념이다. 기본 Nest 클래스의 대부분은(서비스, 리포지토리, 팩토리, 도우미 등) 공급자로 취급될 수 있다. provider는 의존성 주입될 수 있다. 의존성으로 주입된다는 게 뭘까?
controller는 HTTP 요청을 다뤄야 하고, 더욱 복잡한 작업을 provider에게 위임할 수 있다. provider는 plain JS classes며 모듈에서 proviers와 같이 선언된 것이다.
@Module({
  imports: [],
  controllers: [AppController],
  providers: [AppService], <---
})
밑은 간단한 CatsService로서 데이터 저장 및 검색을 담당하며 @injectable로 인해 controller에서 사용하도록 설계되었으므로 CatsController 공급자로 정의하기에 좋은 후보다.
cats.service.ts
import { Injectable } from '@nestjs/common';
import { Cat } from './interfaces/cat.interface';

@Injectable() // @Injectable() 데코레이터를 사용한다.
export class CatsService {
  private readonly cats: Cat[] = [];

  create(cat: Cat) {
    this.cats.push(cat);
  }

  findAll(): Cat[] {
    return this.cats;
  }
}
cats.controller.ts
import { Controller, Get, Post, Body } from '@nestjs/common';
import { CreateCatDto } from './dto/create-cat.dto';
import { CatsService } from './cats.service';
import { Cat } from './interfaces/cat.interface';

@Controller('cats')
export class CatsController {
  constructor(private catsService: CatsService) {}
// The CatsService is injected through the class constructor
  @Post()
  async create(@Body() createCatDto: CreateCatDto) {
    this.catsService.create(createCatDto);
  }

  @Get()
  async findAll(): Promise<Cat[]> {
    return this.catsService.findAll();
  }
}CatService가 class constructor로 주입됐다. private syntax allows us to both declare and initialize the catsService member immediately in the same location.
실습해보기
Unable to create a new project with the Nest CLI : nest new project-name가 안 될 때 참고한 자료
*npx는 pakage.json이 생성된 이후에 사용한다고 한다.
Hot Reload
서버 코드를 변경 할 때마다, 서버를 껐다가 재시작하는 건 귀찮은 일이다. 이를 자동으로 해주기 위해서 node.js에서 nodemon을 썼었다. 그 역할을 Nest에서는 Hot Reload가 해준다.
1. Installation
$ npm i --save-dev webpack-node-externals run-script-webpack-plugin webpack
2. Configuration
Once the installation is complete, create a webpack-hmr.config.js file in the root directory of your application.
const nodeExternals = require('webpack-node-externals');
const { RunScriptWebpackPlugin } = require('run-script-webpack-plugin');

module.exports = function (options, webpack) {
  return {
    ...options,
    entry: ['webpack/hot/poll?100', options.entry],
    externals: [
      nodeExternals({
        allowlist: ['webpack/hot/poll?100'],
      }),
    ],
    plugins: [
      ...options.plugins,
      new webpack.HotModuleReplacementPlugin(),
      new webpack.WatchIgnorePlugin({
        paths: [/\.js$/, /\.d\.ts$/],
      }),
      new RunScriptWebpackPlugin({ name: options.output.filename }),
    ],
  };
};
3. Hot-Module Replacement
To enable HMR, open the application entry file (main.ts) and add the following webpack-related instructions:
declare const module: any; // 추가

async function bootstrap() {
  const app = await NestFactory.create(AppModule);
  await app.listen(3000);

  // 추가
  if (module.hot) {
    module.hot.accept();
    module.hot.dispose(() => app.close());
  }
}
bootstrap();
4. To simplify the execution process
add a script to your package.json file.
"start:dev": "nest build --webpack --webpackPath webpack-hmr.config.js --watch"
Now simply open your command line and run the following command:
$ npm run start:dev
Nest가 응답하는 두 가지 옵션
-
Standard(recommended)
request handler가 객체나 배열을 반환할 때 자동으로 JSON으로 serialized 된다. 다만, 원시 타입(e.g., string, number, boolean...)을 return 한다면 직렬화없이 값만 send할 것이다.
Furthermore, the response's status code is always 200 by default, except for POST requests which use 201. We can easily change this behavior by adding the@HttpCode(...)decorator at a handler-level (see Status codes). -
Library-specific
데코레이터를 사용하여 주입할 수 있는 라이브러리별 응답 객체를 사용할 수 있다. Express를 사용하면 다음과 같은 코드를 사용하여 응답을 구성할 수 있다.@Res()findAll(@Res() response)response.status(200).send()
주의 ⚠️
Nest는, 핸들러가 @Res()또는 @Next()를 만나면 라이브러리별 옵션을 선택했다는 걸 감지한다. 한번에 하나의 접근 방식 옵션만 사용할 수 있다. 두 접근 방식을 동시에 사용하려면(예: 쿠키/헤더만 설정하고 나머지는 프레임워크에 남겨두도록 응답 개체를 주입하여) 데코레이터 에서 passthrough옵션을 true로 설정해야 한다.
@Res({ passthrough: true }).
express 미들웨어 옮기기
dotenv
외부에서 정의된 환경 변수는 process.env전역을 통해 Node.js 내부에서 볼 수 있다. 각각의 환경에서 환경변수를 별도로 설정하여 다중 환경의 문제를 해결할 수 있다.
$ npm i --save @nestjs/config
내일 또 계속 . . .

